Lamb’s Tongue Twister:
The lamb’s tongue chamfer on my oak Moxon vice
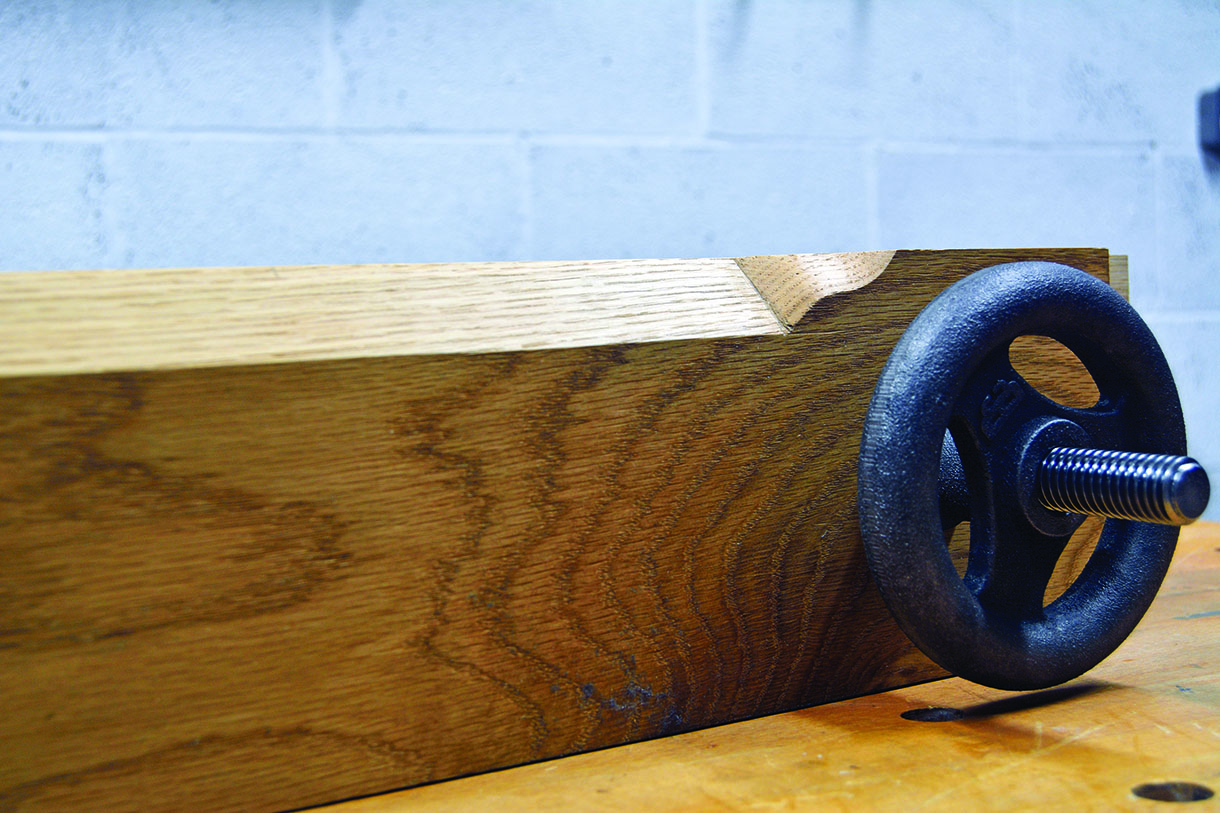
The lamb’s tongue chamfer on my oak Moxon vice
Stopped chamfers are a recurring form in both architecture and furniture, and are used to add decoration as well as reducing the visual weight of a component. There are a number of ways to terminate a stopped chamfer but one of the most elegant, to my eye at least, is the use of a lamb’s tongue carving – effectively an ogee-shaped transition from a sharp corner to the flat of the chamfer. I recently built an oak ‘Moxon’ style twin screw vice, and decided that a lamb’s tongue chamfer would not only add to the functionality of the vice but also add a touch of visual interest. Here is how I went about it.
Layout
The first step is to lay out the chamfer on the workpiece. Because the oak jaws of my vice were quite thick I went for a wide chamfer of 20mm from the corner of the workpiece. It is important to mark out the edges of the chamfer using pencil rather than a cutting gauge, as the layout marks from a cutter will cut below the final surface of the chamfer and remain visible on the finished work. Next, strike safety lines 2mm inside each edge of the chamfer – these can be marked out with a bladed marking tool rather than a pencil.

Laying out the chamfer is best done with a pencil rather than a cutting gauge
It is now time to lay out the lamb’s tongue. For repeatable curved parts I prefer to make templates out of 2mm thick plywood. For the lamb’s tongue, I made a half template showing the curves as they would be laid out on one side of the work – the template can then be flipped over to lay out the other side of the lamb’s tongue. For the template mark out a rectangle the length of the lamb’s tongue, and as wide as the distance of the chamfer from the arris of the workpiece (in my case 20mm). Now divide the template in two by striking a line across the width to identify where the ogee will transition from a concave to convex curve. My template was 45mm long by 20mm wide, and the transition point was 22mm from the tip of the lamb’s tongue. I used French curves to draw in the curves of the lamb’s tongue, but you can also use a compass, or even draw in freehand, if you prefer. Once you are happy with the curves cut the template to shape – several light passes with a knife or scalpel will make cutting smooth curves easier than a single heavy cut, and the final shape can be fared up with some 220 grit sandpaper. Use the template to transfer the curves to both sides of the workpiece, at each end of the chamfer.
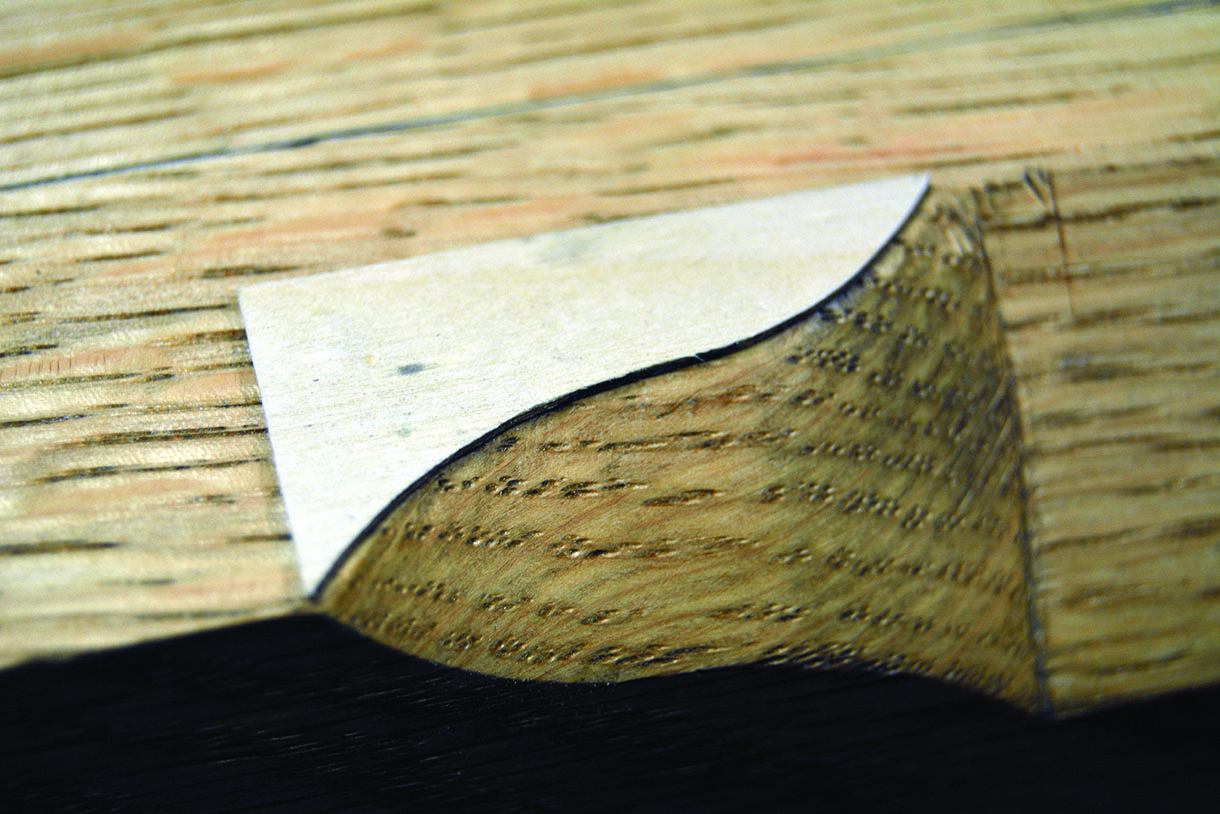
Using a template makes repeating the curves on each face of the work easy

The relief cuts don’t have to be pretty, but they must not cross the safety lines
In the rough
Most of the material for the chamfer can be removed quickly and easily, allowing you to spend more time working on the detail of the lamb’s tongue. Using a fine carcass saw first make a cut to define where the chamfer will transition into the lamb’s tongue, but be careful not to cross the safety lines. Then, cut a series of relief cuts along the chamfer between the two lamb’s tongues – my relief cuts were roughly 10mm apart. Again, make sure that the relief cuts touch the safety lines but do not cross them. The relief cuts allow most of the waste to be knocked out easily using a chisel and mallet. Because you are working on two faces of the work, it is easier to hog off the waste from one side while the workpiece is in the vice, and then to clamp the work to the bench to remove the waste from the other face.
Once you have removed the waste down to the safety lines, swap the chisel and mallet for something a little more refined. I used a spokeshave to work the chamfer down to final depth, but a Stanley No. 65 chamfer plane (or modern equivalent) would be perfect for this job. The lamb’s tongue will block the sole of the spokeshave from reaching the very ends of the chamfer, so pare the ends of the chamfer level with a broad chisel, riding the back of the chisel on the finished part of the chamfer. I find levelling the ends of the chamfer to be easier once the lamb’s tongue has been carved, and it gives me a final opportunity to adjust the transition from the tongue to the chamfer.
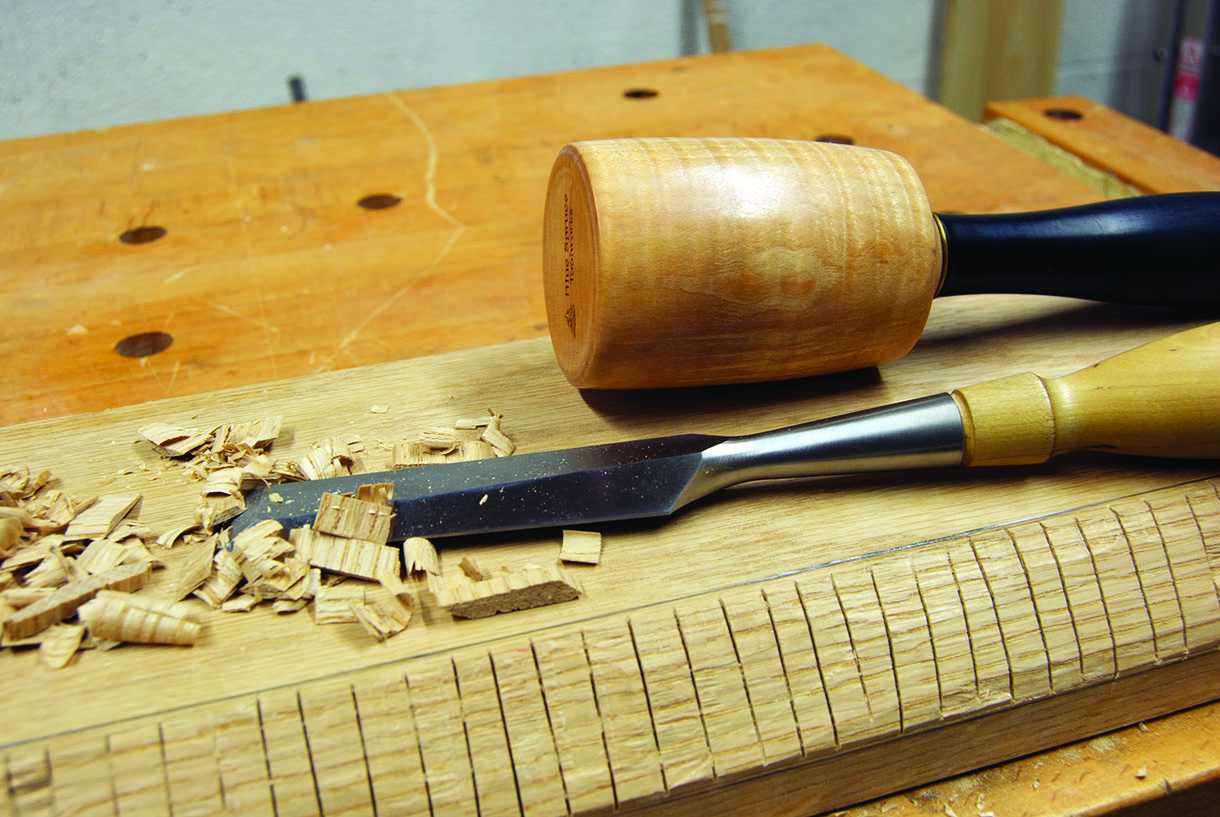
For quick removal of stock, knock out the waste with a chisel and mallet
Carving the lamb’s tongue
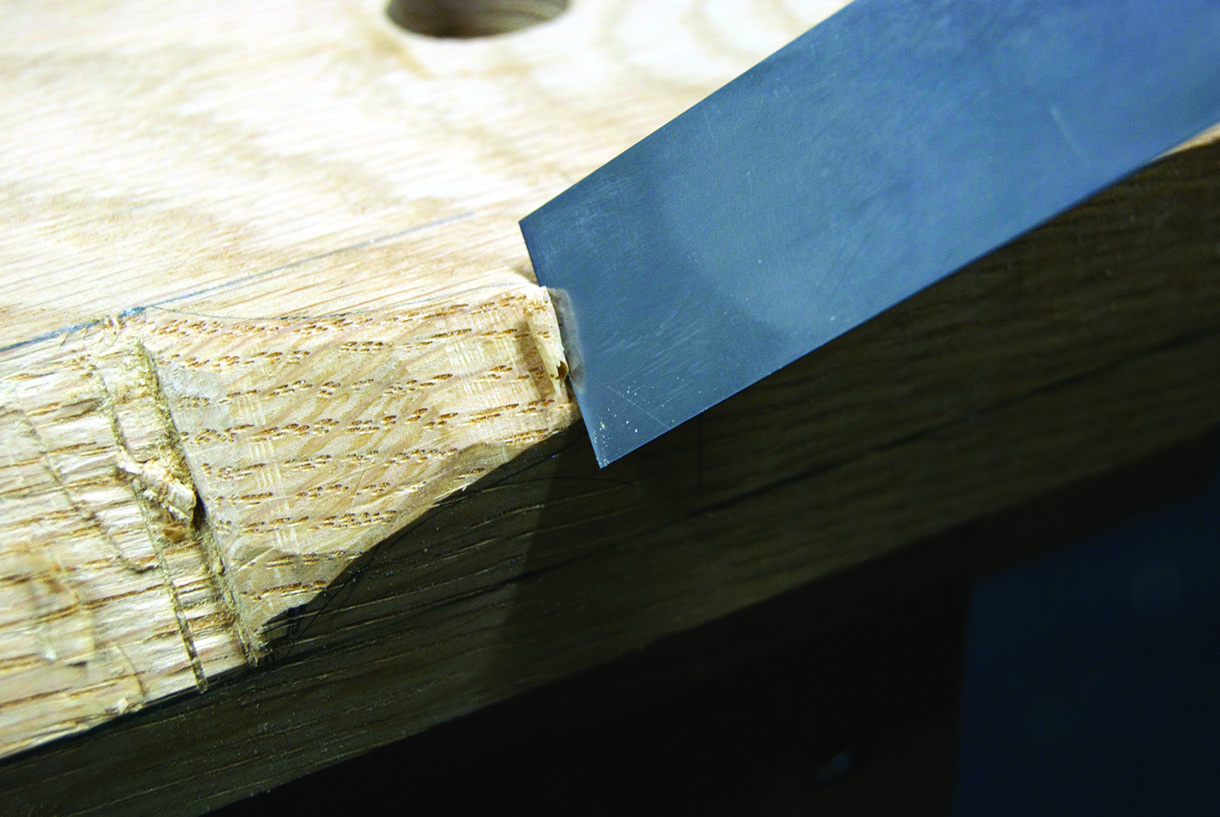
If you are carving lamb’s tongues at both ends of the chamfer then one will be carved with the grain while the other is carved against the grain. To make life easier, start by carving the tongue that follows the grain, and then move onto the opposite end. To carve the lamb’s tongue, start at the chamfer end and pare
the waste away with a broad chisel held bevel down. Once the majority of the waste has been removed you can carve the tongue. I find it easiest to start at the tip of the tongue. With the chisel still held bevel down, gently scoop out the waste down to the pencil lines, taking care not to bruise the convex portion of the tongue with the corner of the chisel’s primary bevel. On narrow sections of the lamb’s tongue you can carve the full width of the tongue in one go, checking to make sure that the chisel is hitting the lines on both faces of the work. If the widest sections of the tongue are wider than your chisel, work each edge of the tongue down to the line, and then remove the material in the middle until a consistent flat connects both faces of the work. Any tool marks can be removed with fine rasps – I use a 13 grain, 7in modeller’s rasp – and 220 grit paper wrapped around a piece of dowel. If you have not yet levelled off the ends of the chamfer, now is the time to do so.
The spokeshave won’t be able to reach the very end of the chamfer, so clean it up with a broad chisel
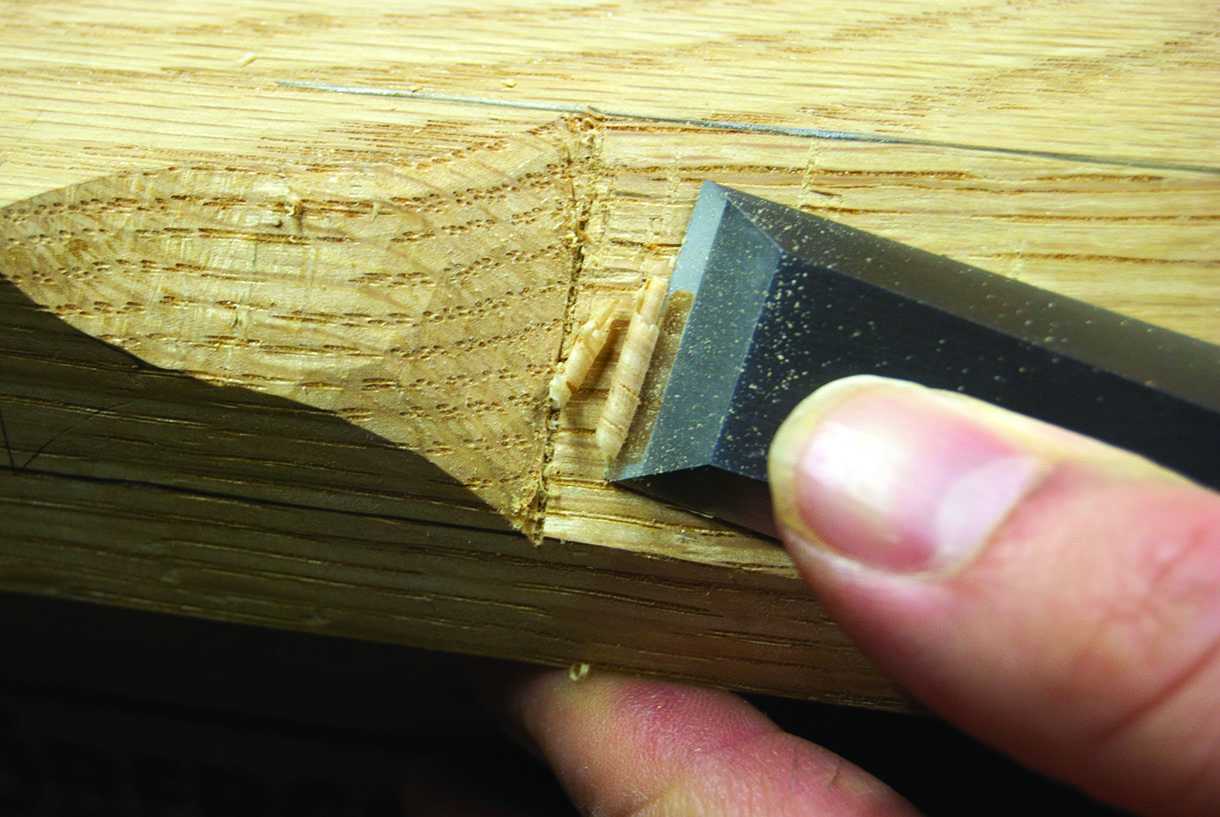
Once most of the waste has been removed start paring to the lines with a broad chisel, starting at the tip of the tongue
No tongue twister
Lamb’s tongues add a lovely detail to stopped chamfers, and as this article has hopefully demonstrated, are surprisingly easy to carve.


1 Comment
Thank you!
After many years I finally decided to stop my every day woodworking and build a classic Shaker Style work bench.
To inhance the interest I included a knee vise. Well it’s what I call it. As well as an end vise. Build all from scratch. After that theirs not much more one can do
to embellish basically a simple Shaker Work bench.
That is except for adding some lambs tongues to the legs. The only thing I needed was a simple
drawing so as to make a template which makes the job actually quite simple.
I’m still hinting for just thst but writing to thank you for this website one I hadn’t heard of before. Thus why I started this email with thank you. Thank you for a very detailed article on the making of a lambs tongue.
While thumbing through the internet all I seemed to get was everything you wanted to know about a REAL lambs tongue lol!
So thanks once again for the demo and for showing me all the magazines associate with Ll types of Woodworking.
Neal in Morganton NC.