Segmented Turning:
Richard Findley makes a bowl with a segmented ring, for the first time
Richard Findley makes a bowl with a segmented ring, for the first time
In the past I have dismissed segmented turning as being rather fiddly, having to stick little bits of wood together to make a bowl. I’m not entirely sure that going though the process will completely convert me, but I must admit, I will enjoy the challenge.
As with all of the articles in this series, it is the first time I have done any segmenting, so I decide to start with as simple a project as I can think of: a bowl from solid timber, with a segmented ring fitted for decorative interest. Many segmented bowls are completely segmented, from base to rim, but I figure
that a couple of rings shouldn’t be too difficult and would give me a taste of segmenting.
Theory
I have many books that show how to form a segmented ring. It should simply be a case of working out how many sections I would like, working out the angle needed, cutting it accurately and gluing the sections together. The ring, once dry, can then be sandwiched into a block of timber and turned, almost as a normal bowl. I’m sure this is over-simplifying things however; we shall see!
Research
My first port of call is to do a little research on the subject of segmenting. I know there are a number of different ways of cutting the segments, so I need to decide on which will be best for me. I have seen people use a mitre saw (sometimes known by the catchy name of a ‘sliding compound mitre saw’ or SCMS for short); some use a disc sander; while others use a saw bench (or table saw as they are becoming better known).
My workshop is set up so that I can do all kinds of woodwork. I own all three of these machines, but my SCMS was quite inexpensive, bought with the intention of easily cross-cutting lengths of timber and isn’t terribly accurate. From my experience in joinery workshops, it seems that you need to spend some serious money to get an SCMS that would be consistently accurate enough for this kind of work. My disc sander is, to be honest, a little unloved and abused. It isn’t used a great deal, so the sanding disc is rather past its best and I have not yet managed to buy replacements; which immediately rules this out for the job in hand. My table saw on the other hand is used almost daily. It is accurate and has sharp blades, so is the obvious choice. My feeling is that a jig may be in order to give me the best results.
My search for a suitable jig begins on YouTube. I am a little cautious about researching on YouTube as there are some ‘so called’ experts out there who know less than they should, mixed in with the genuinely skilled turners simply trying to pass on their knowledge. The trick is to find the good ones! Sometimes I’ll watch a video and think ‘that seems unnecessarily complicated’. However, I have found one promising video that shows a jig that makes sense to me, would be easy to construct and seems to fit the bill.
Back to school!
It is clear to me that I need to do some maths to work out some of the details. Maths was never really a strong point for me at school. While I had a grasp of the basics and enough to see me through, the subject never really held me. I think this was mostly because it seemed so irrelevant to real life. Once I left school to work for my Dad, I learned maths in a more practical way. We used to make fittings for bay windows, so I became quite familiar with working with angles and how to manipulate them to my advantage. I am certain this will be a useful skill here.
My main problem is that I can’t quite remember some of the intricacies of the maths required for this job. Thankfully we now have Google to hand at the touch of a phone screen, so the equations are easy to find. My first decision is how many segments I should use to form the ring. I could literally use any number here, but to help me visualise it, I decide to go with 12, so it is divided up the same as a clock face. I find being able to visualise things very important, so using this familiar pattern seems to make sense. Based on the ring being 12 segments I can work out the angles:
A circle has 360°
360 ÷ 12 = 30°
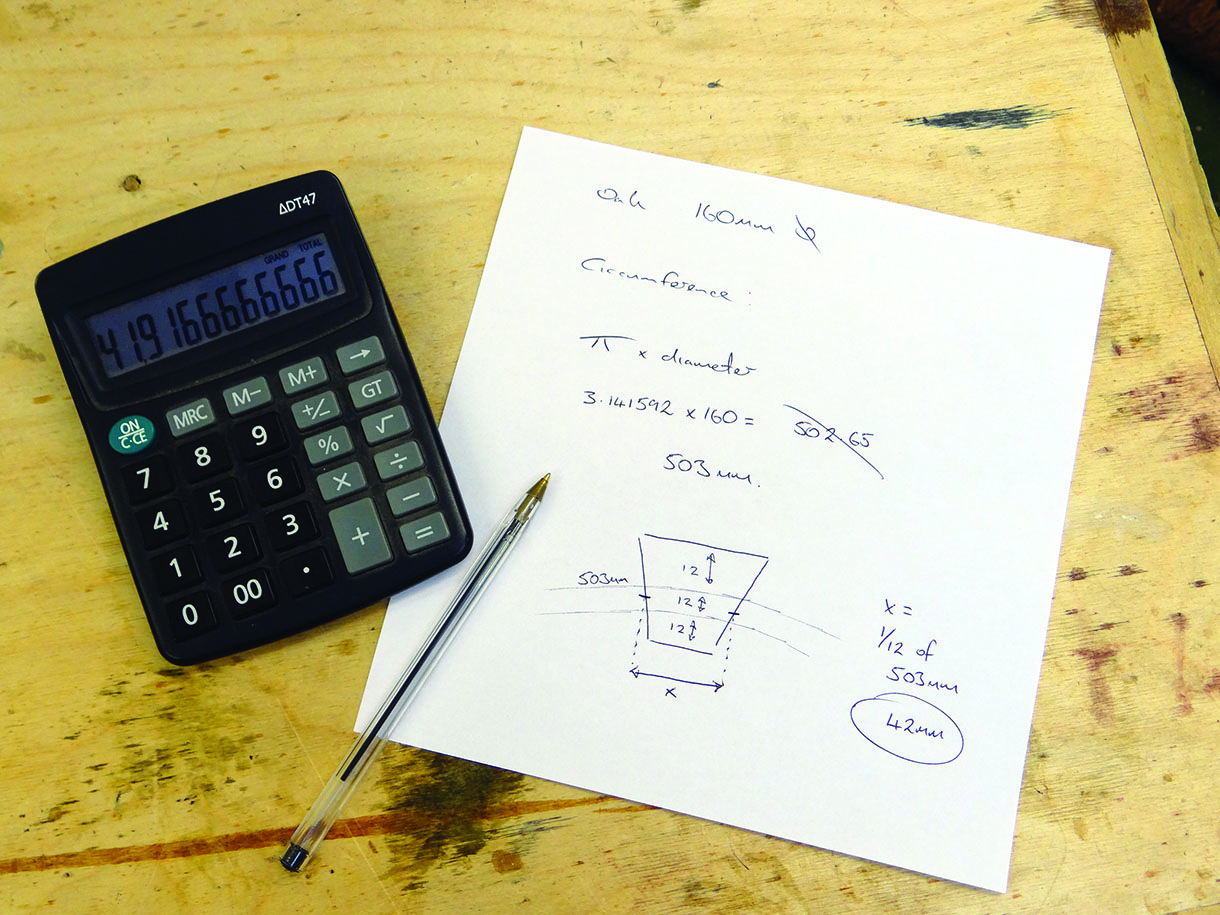
However, when cutting a mitre joint, as I will be when segmenting, each sideof the mitre is half of this angle, so each segment needs an angle of 15° on each side. The next bit of maths I need is to calculate the circumference of my bowl blank, so I know how big to make my ring.
The diameter of the blank is 160mm.
Circumference = π x diameter
π (Pi) = 3.141592
Diameter = 160mm
Circumference = 3.141592 x 160 = 502.65mm
502.65mm is the measurement all the way around the edge, or the circumference. 503mm is good enough for the purposes of this project. At this stage, it seems like a good idea to make the disc larger than the diameter of the bowl blank, so my plan is to make the segments around three times wider than my intended bowl thickness. This should give me plenty of leeway when gluing up. I think 12mm will be more than thick enough for the wall thickness of the bowl – I will most likely make it thinner but I am erring on the cautious side at this early stage – so 36mm wide segments will allow 12mm either side of the bowl thickness. A simple sketch shows me the size I need for my segments.
My rough workings

The segment I am using for this bowl
Mistake number one
I have had this project in mind for a while before actually making a start on it. The most common way to glue up the rings seems to be to use a large Jubilee clip to pull the mitres together. A few days before I start work on the bowl, I order a couple from eBay, basing their size on the diameter of the bowl blank. However, due to my calculations and decision to make the ring larger than the diameter of the blank, when they arrive I realise they are too small, so I need to use a different method.
Making the jig
The jig shown on YouTube is fully adjustable, but as I only intend to make this particular bowl with 15° mitres, I see no need to go to the extra effort of doing the same with my jig. If I do get hooked on segmenting, I can always spend more time on making an all-singing, all-dancing version; for now, simplicity is king. The design of the jig is simple enough. I start by cutting a strip of beech to run in the channel on the bed of the saw and fit this to a piece of 18mm MDF, using glue and screws. I position the MDF so that it is oversized and, once fitted with the strip of beech, I can push it past the saw to give an accurate edge parallel to the saw blade. I can then use this edge to set my angles.
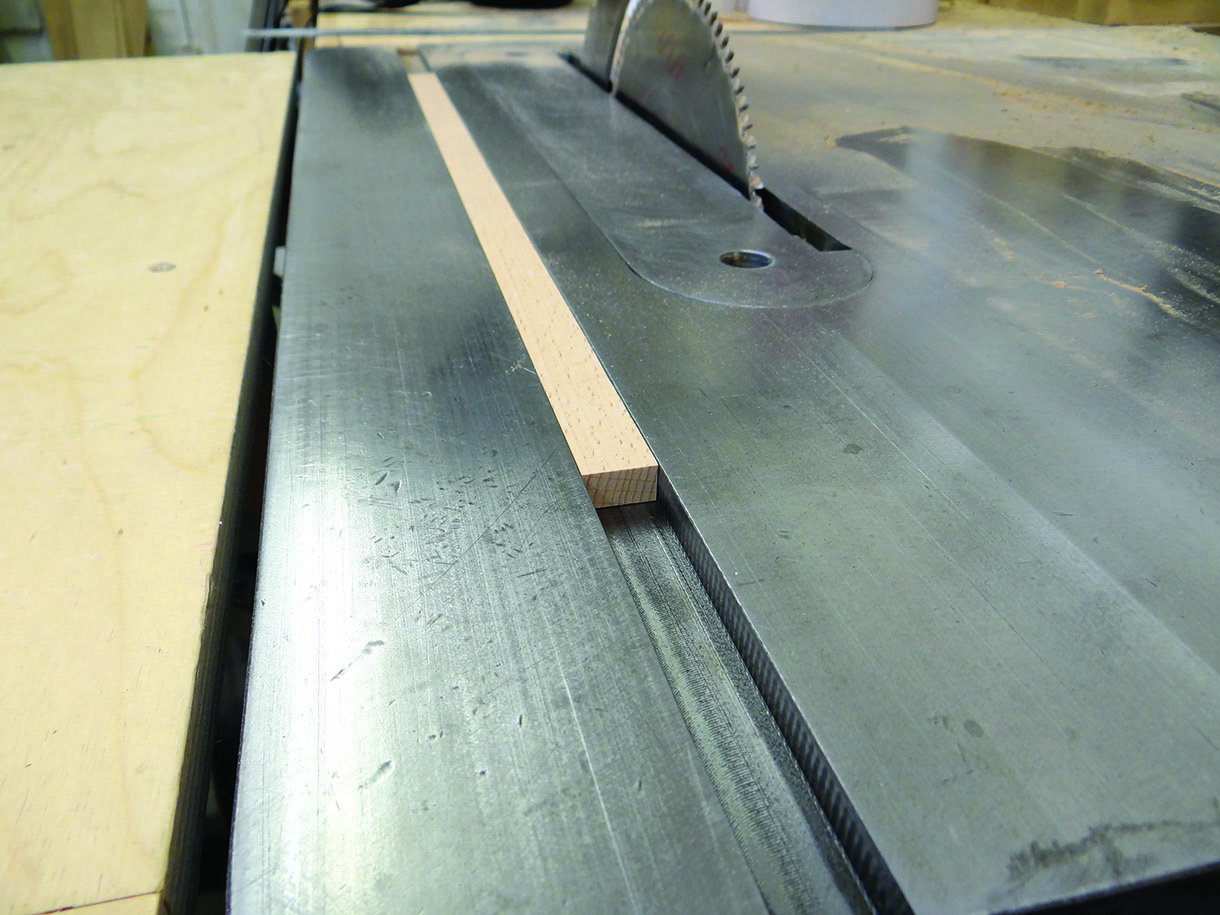
The first step for most jigs like this is to insert the beech strip in the slot on the saw bed
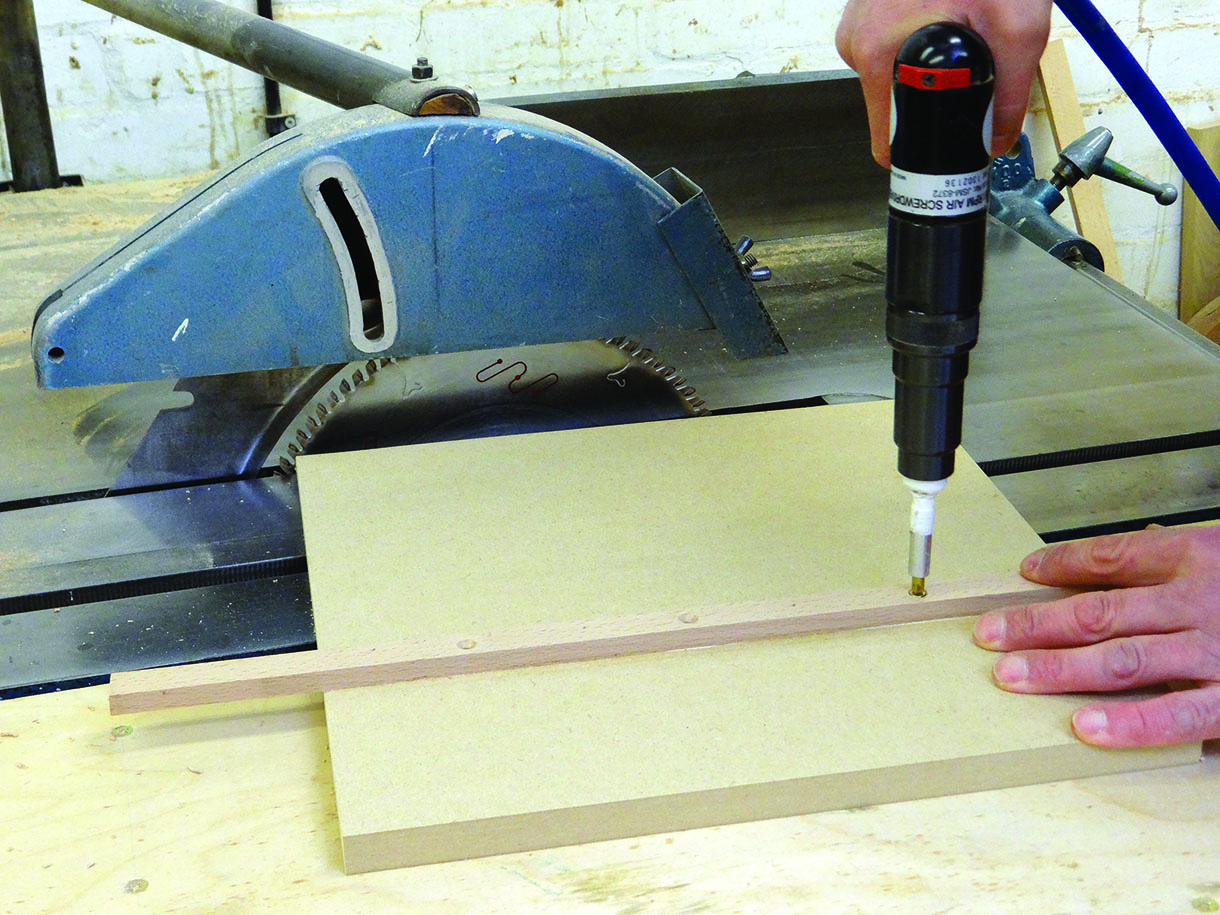
Fixing the battens in place with glue and screws
Trimming a parallel edge to the base board
Top tip
When fitting wooden battens to an MDF base board, a combination of glue and screws will give the strongest and longest-lasting combination of fixings. Often however, as you drive in the screws, they can pull the batten away from the desired position. To avoid this, I glue the batten and use a nail gun to grip the batten firmly in place, while I pilot drill and drive in the screws.
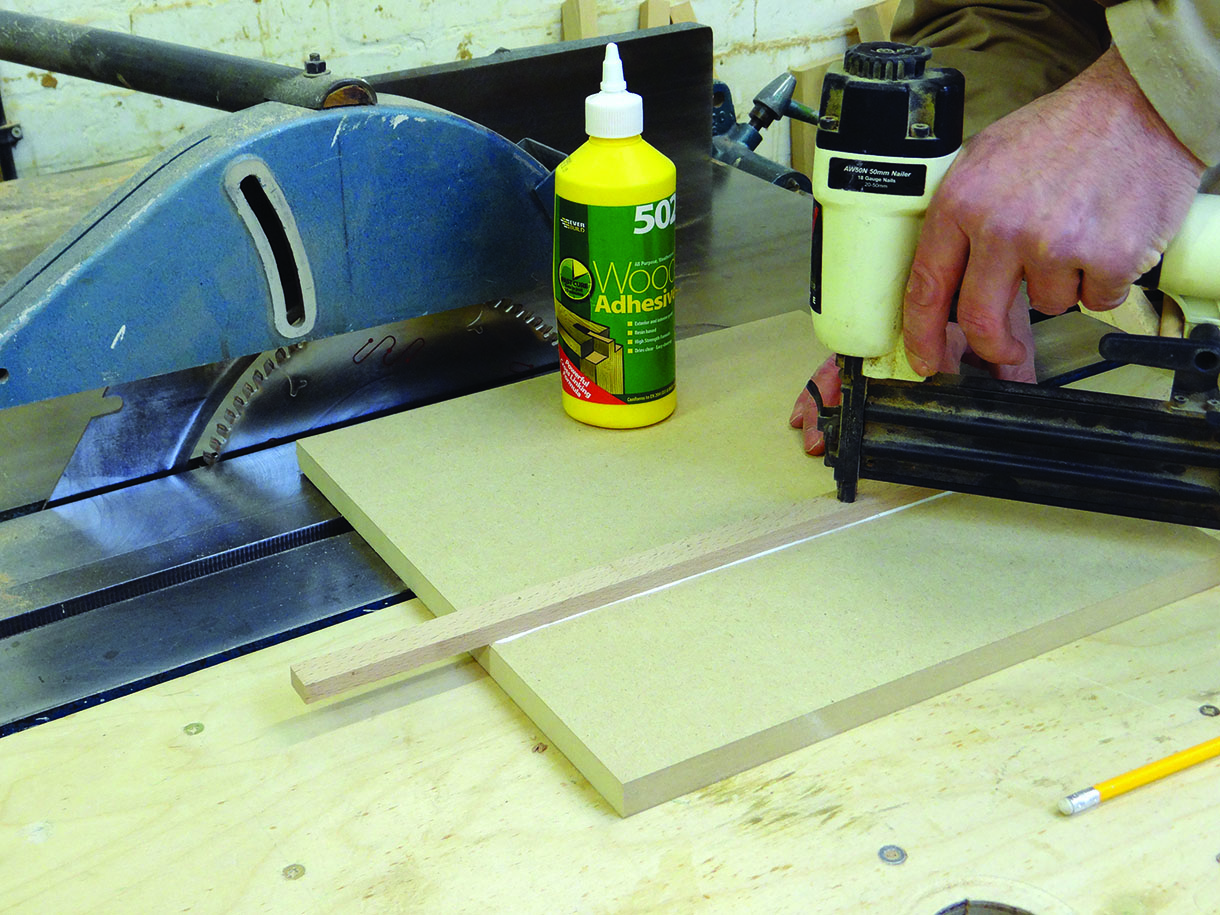
Using my pin gun to hold the batten in place before permanent fixing
Setting up the jig
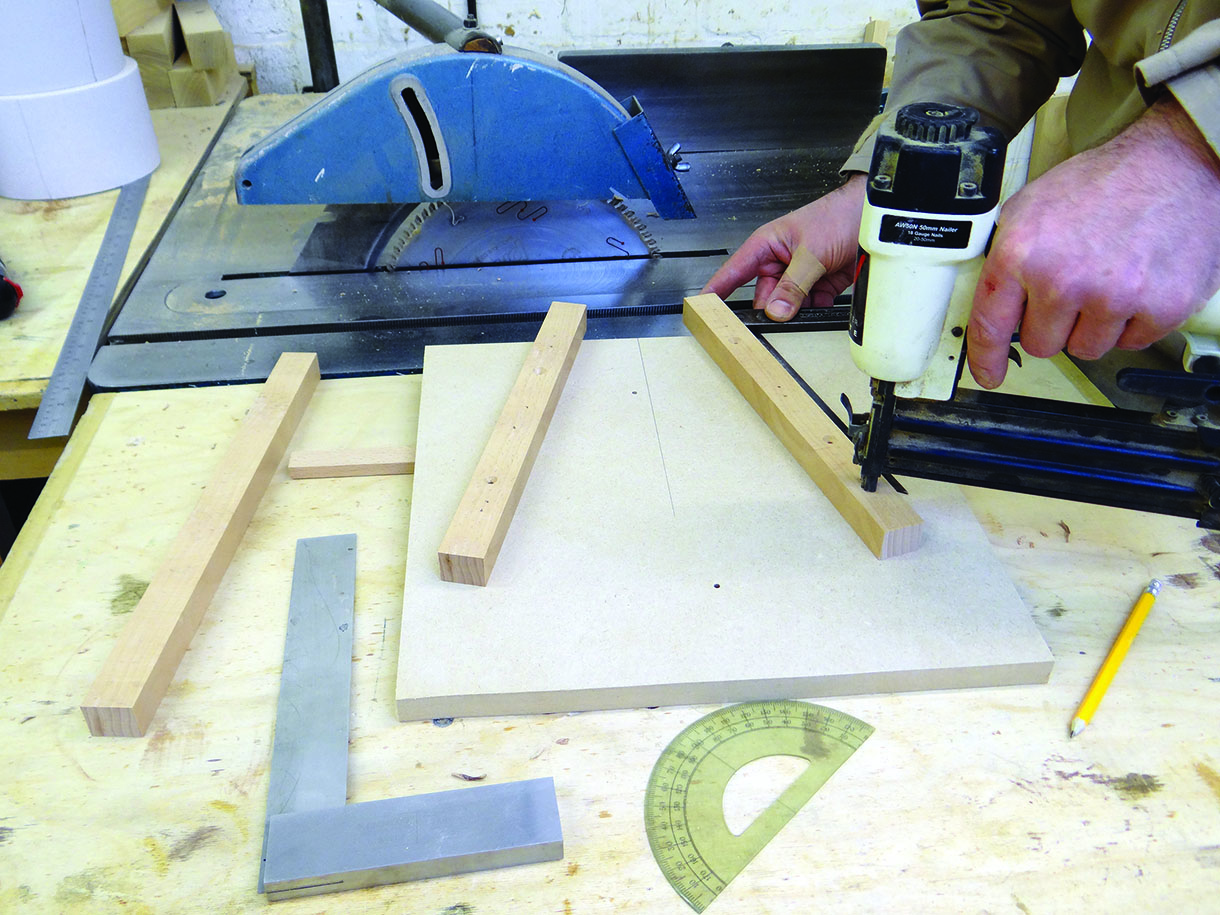
I carefully set my sliding bevel to 15° and, using the cut edge of the MDF base board, I position the battens and fix them down. In the YouTube video, the guy uses a setting out triangle, which has 30°, 60° and 90° corners, to check the battens are set correctly. I do the same and I am pleased that my original setting out is good.
You will notice that there are two battens fixed to the base board. The YouTube presenter doesn’t fully understand why it works best like this, only that it does seem to work. I believe it is to minimise – or hopefully eradicate – problems with the angles. I try using the standard mitre fence for my saw and simply turning the piece of wood over to alternate the angle on each block, but find it quite inaccurate. The problem is that the angle is repeated so many times around the ring, that even by being 1° out, by the time you get all the way round, you will be 24° out; the fault is multiplied at every angle. By using this jig, with two battens that are a known 30° – thanks to the plastic triangle – the angles become far more accurate. Using some off cuts, I form a ring using my mitre fence and one using the jig and the results speak for themselves. There is a tiny discrepancy, but I feel I can deal with this. At this point I realise that, had I made the jig adjustable, I would have been able to adjust the fault away. This experience can go in my ever-growing ‘lessons learned’ file!
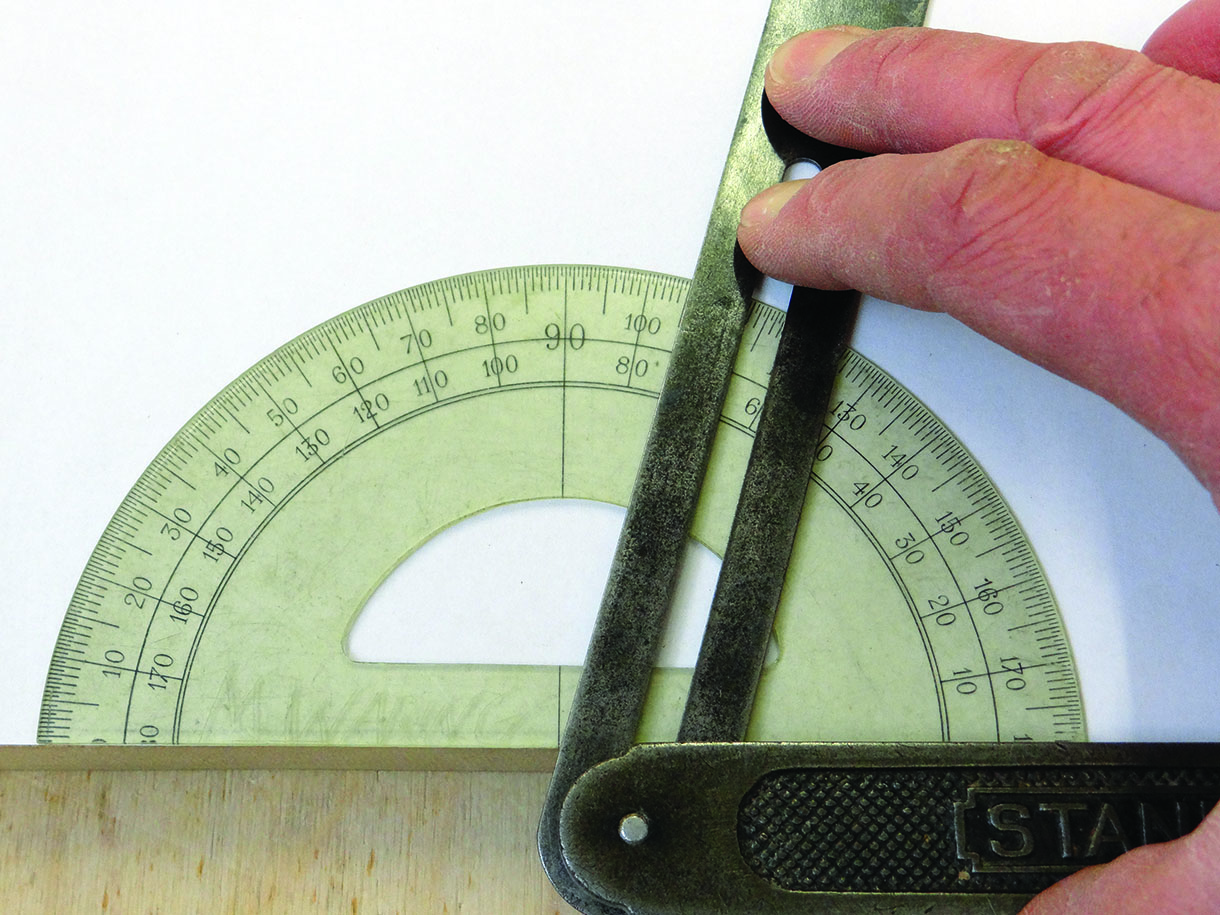
Setting my sliding bevel to a protractor
Fixing the battens to the base board using the sliding bevel as a guide
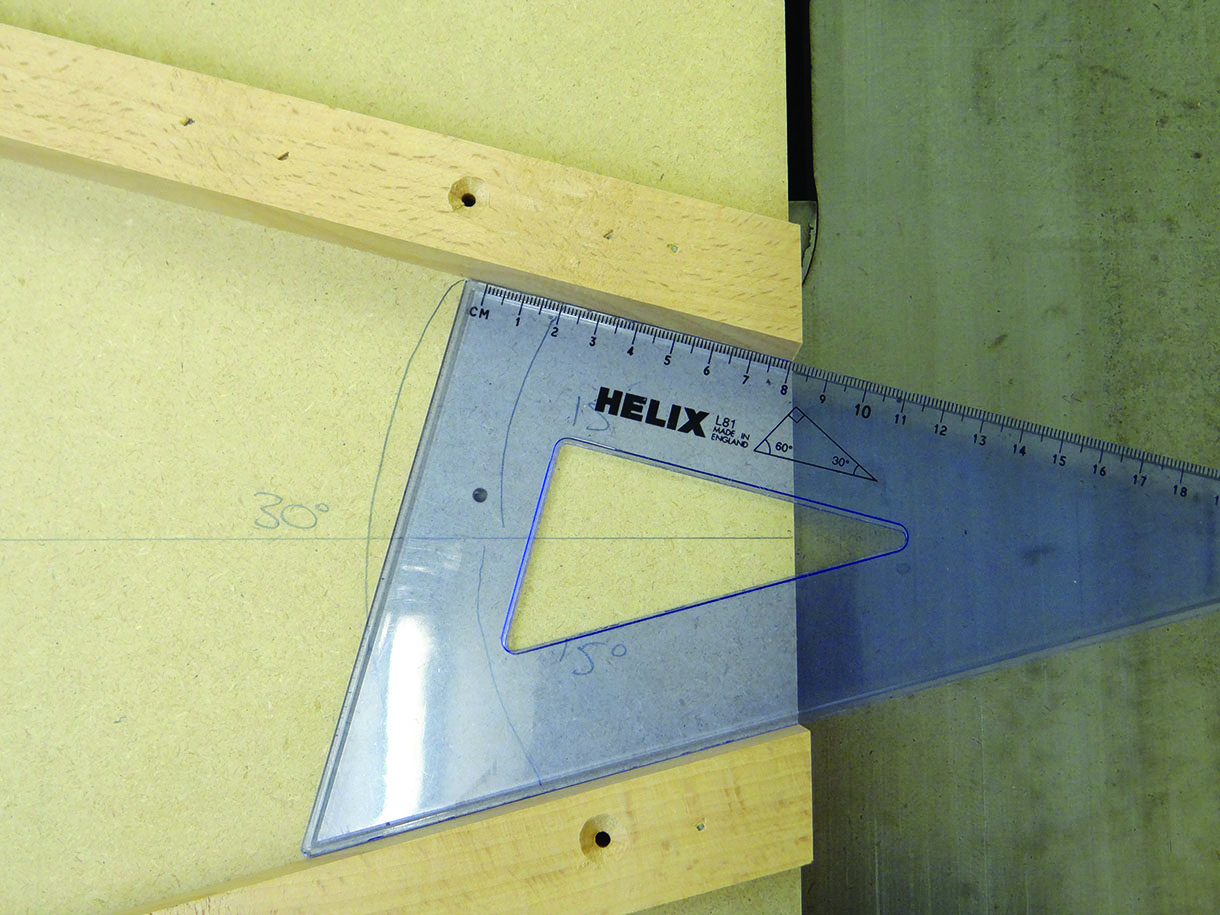
Checking the angles with a setting out triangle
My test cut is promising
Experimenting with glue ups
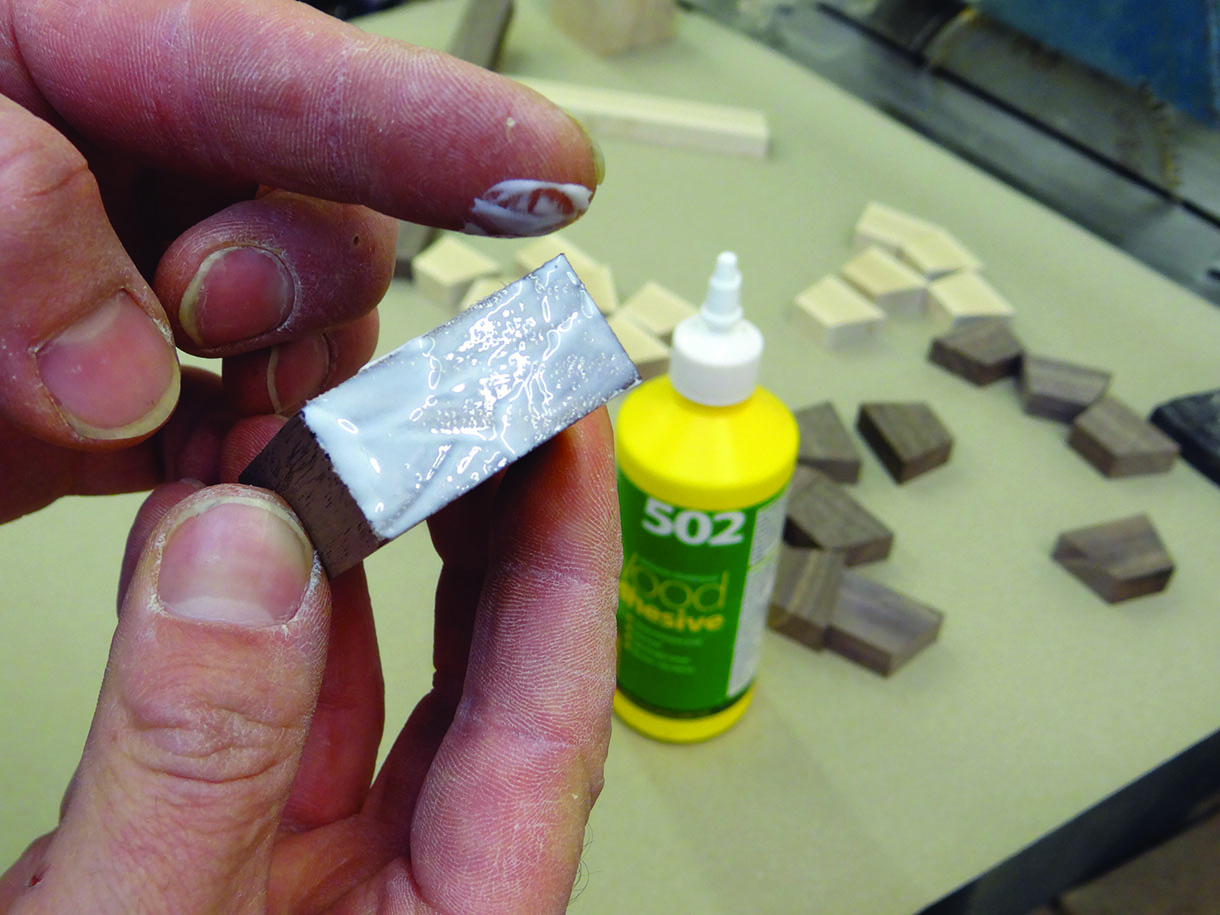
Now able to form the ring with some accuracy, I need a different way to glue the blocks together, as my Jubilee clips aren’t large enough. A method I know of from my joinery experience is a rub joint. By applying an even coat of glue to a surface, then rubbing two pieces of properly prepared timber together, air is squeezed out forming a kind of vacuum, which forms enough pressure to hold the two pieces of wood together while the glue dries. This is something that I know the principle of, but again, have never used in angles, so I experiment on some of my trial cuts. I am amazed at the strength of the joint, especially as end grain to end grain joints are notoriously weak. Satisfied that this method would work, I set about cutting
my segments and getting ready for the first glue up.
Run out on the first semicircle
My second trial is much more promising using my jig
Gluing the segments
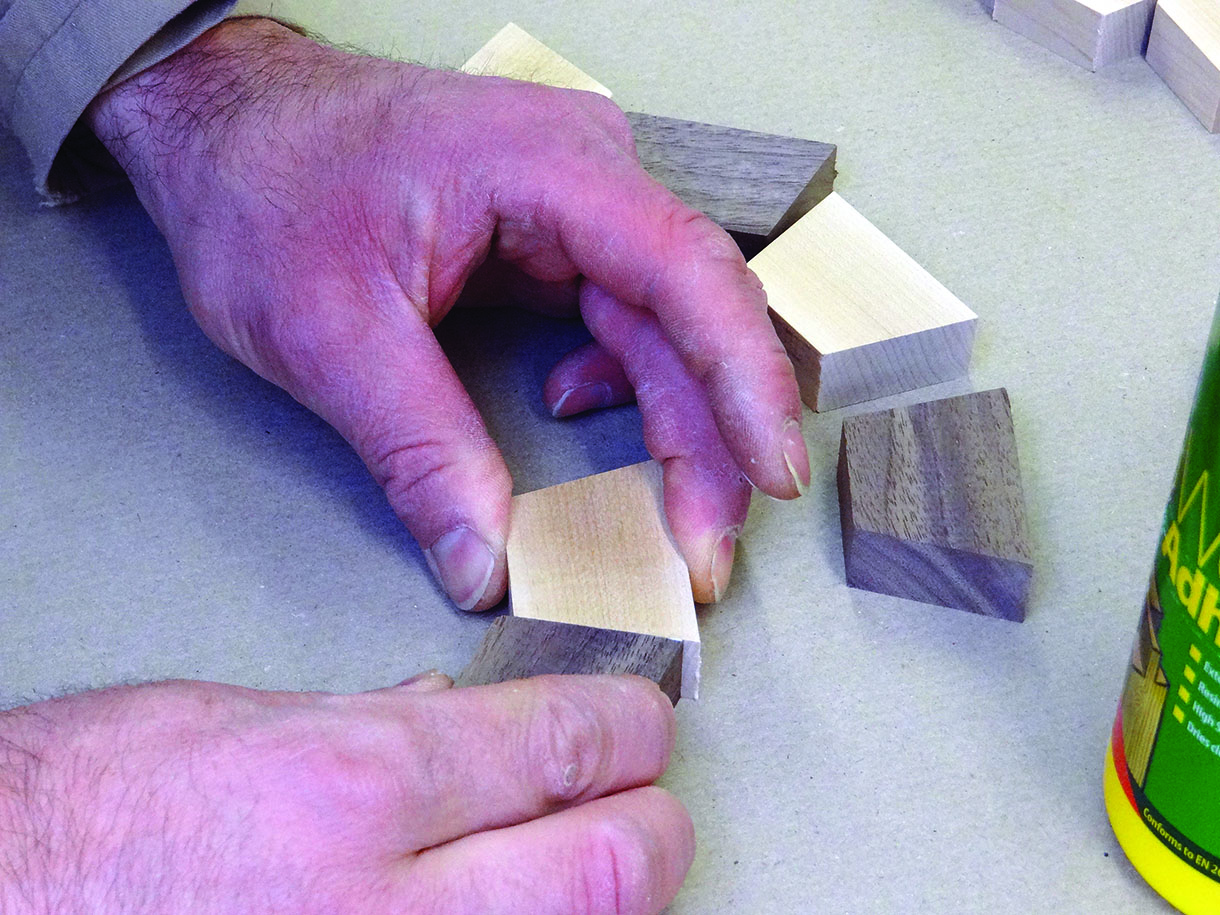
I prepare pieces of American black walnut (Juglans nigra) and maple (Acer saccharum) using my planer-thicknesser to smooth and square up strips of material before cutting them into segments with the jig
on the saw. I use a sharp 96-tooth saw blade which cuts very cleanly and remove any wispy bits by rubbing them away with my fingernail. I lay out a sheet of brown craft paper on a flat area of my bench and gather the segments together. I alternate the walnut and maple to form a chequering pattern.
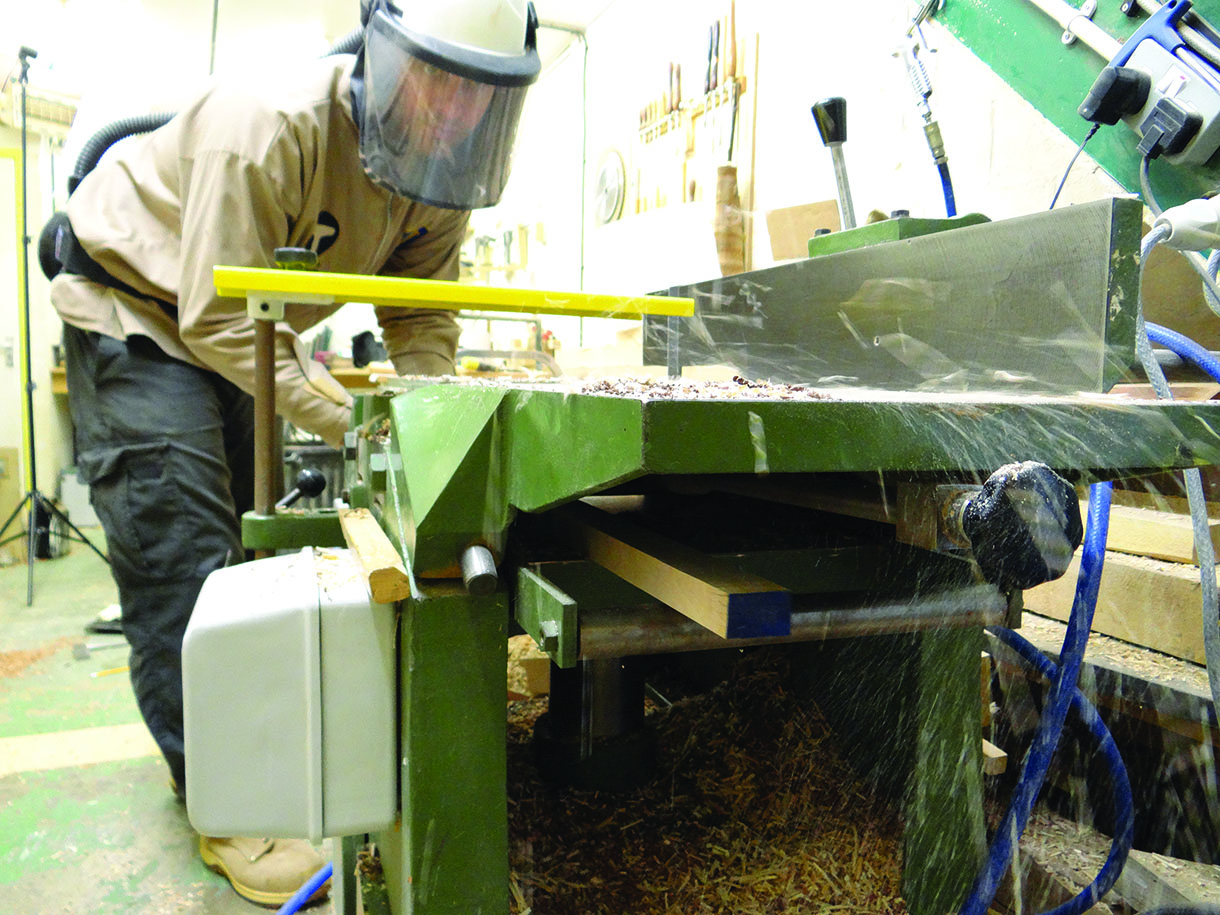
Preparing the timber with my planer-thicknesser
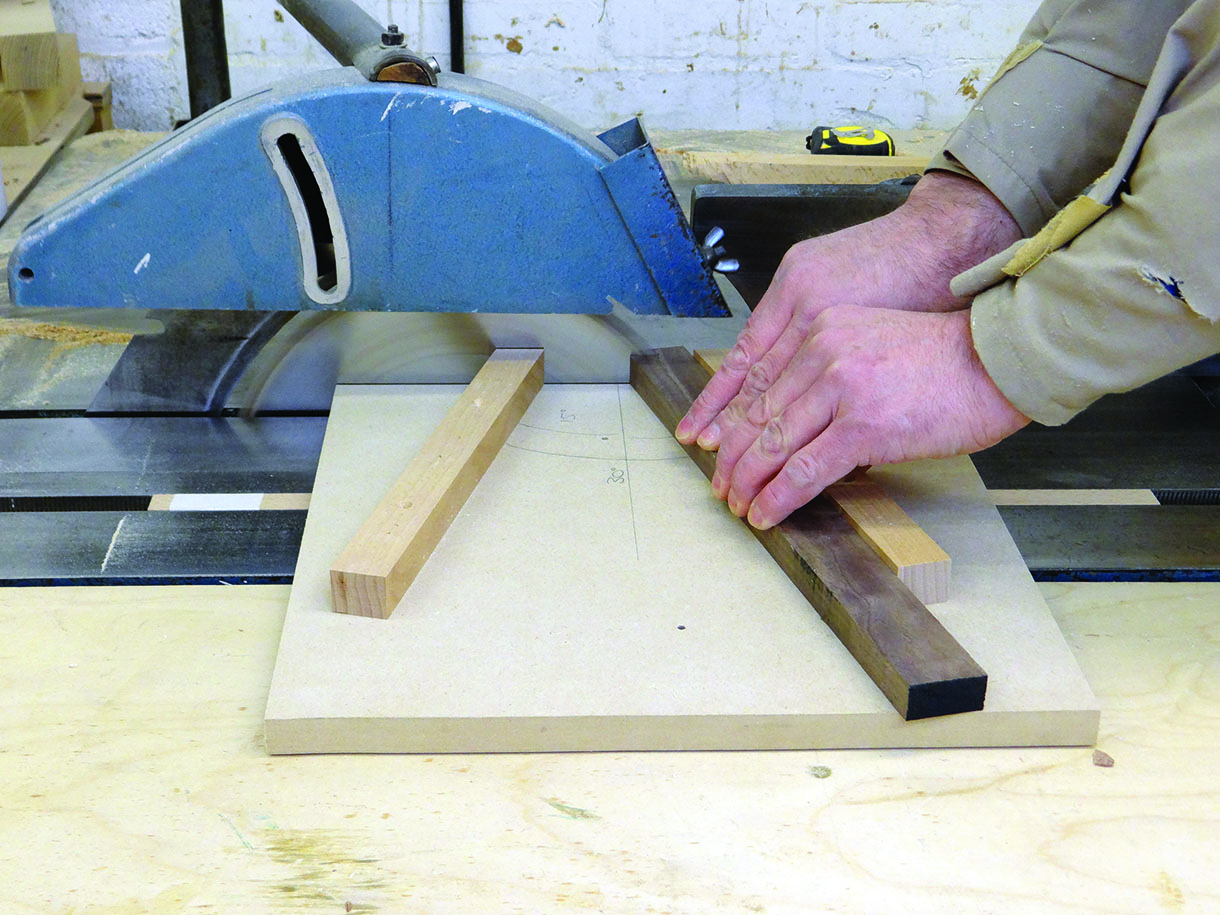
Using the jig…
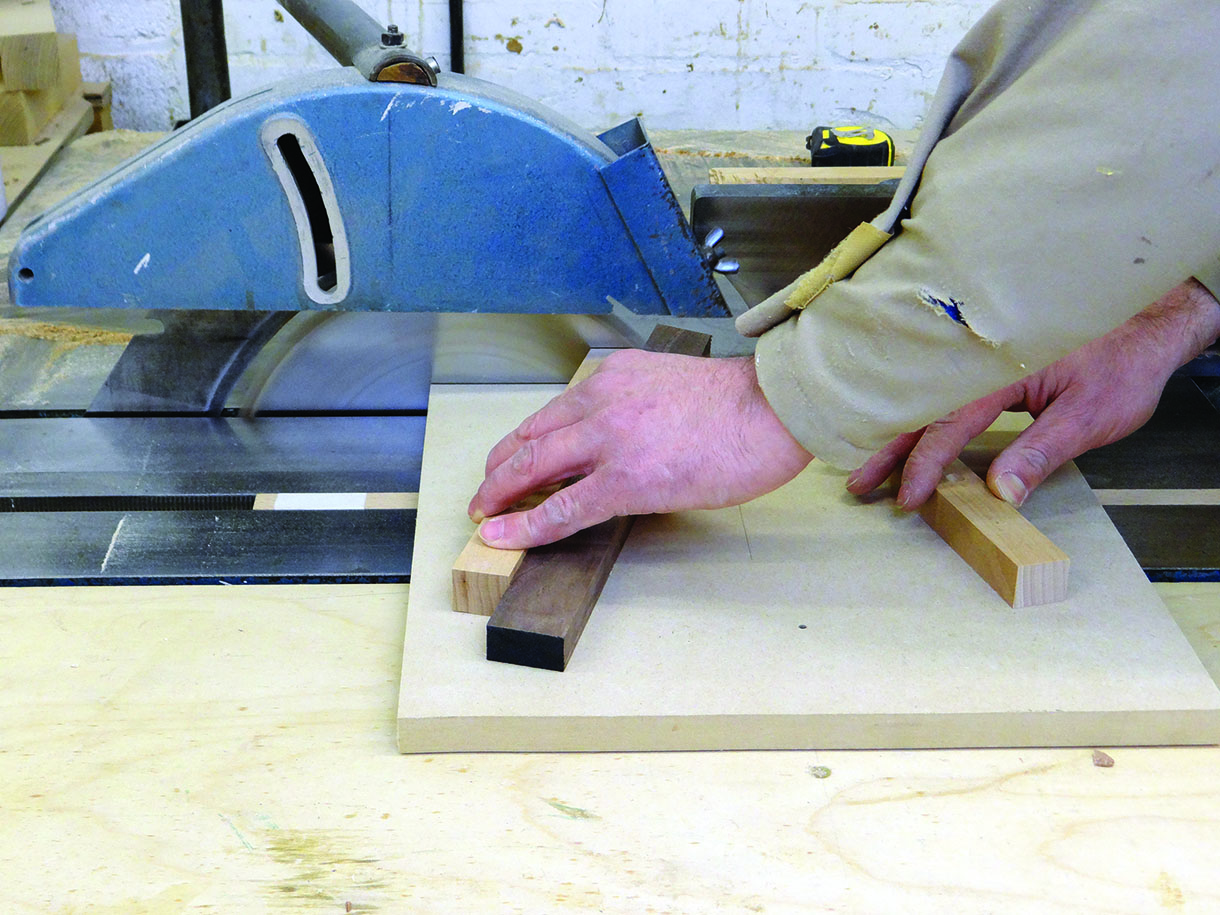
… alternating between the two positions to produce the correct angles on each segment
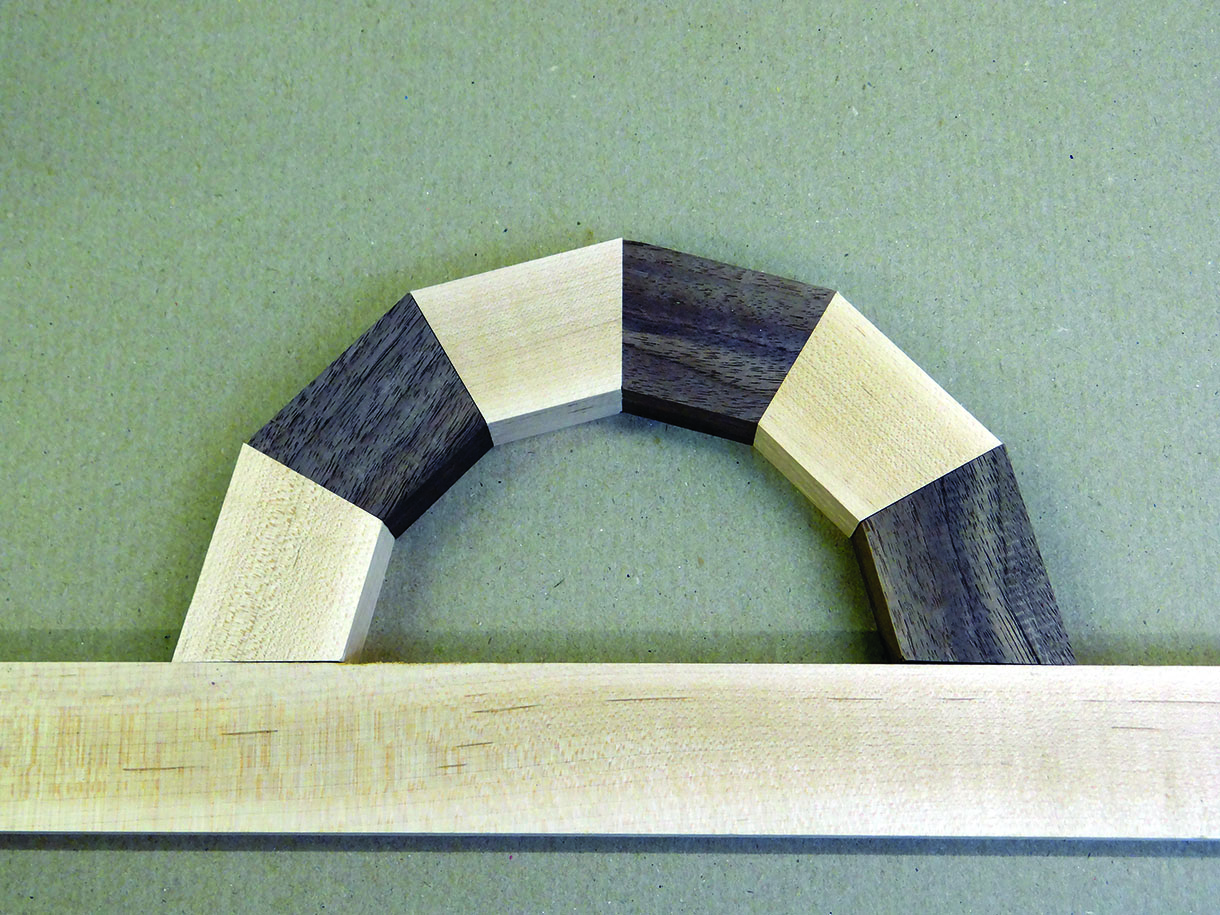
The semicircle laid out dry shows only a tiny discrepancy
Using my finger, I spread an even smear of glue over one face and, laying the blocks flat on the bench, I rub the joint together. As I do, I feel the joint get tighter, which is reassuring. I make sure the joint is flat and sitting evenly, then I repeat. As my earlier experiment had shown a tiny discrepancy, I decide not to try to
form a complete ring, but to form four half rings, which could be adjusted once dry and then glued up. This seems to be an accepted technique from my research.
The glue is spread with my finger
Forming the rub joint
Type of glue
In my workshop, I use two types of glue: polyurethane (PU) or resin-based, white wood glue. PU is great for big glue ups or things that need to be done quickly, as it is incredibly strong, dries very quickly and is easy to apply. I use it in cartridge form, held in a sealant gun. The down side to PU is that it foams as it dries, which means you get great coverage, but also requires good clamping pressure to keep all parts together, which I don’t have here. The resin-based white glue is like a standard PVA. The beauty of this glue is that it forms a very strong bond with an almost invisible glue line and, most importantly of all, it resists creep. Creep is when the wood moves after it has been worked, which frustratingly means you can feel the join a short while after finishing the job; this is something I really want to avoid.
Flattening
With the semicircles left overnight to dry, I can look at forming the rings. Before anything else, I want to smooth the surfaces to ensure they are totally flat. I fix a sheet of 180 grit abrasive tightly to a piece of MDF and carefully rub the semicircles over the abrasive. I keep it moving so I don’t wear down any one spot. As the abrasive is tightly wrapped around the MDF and is laying flat, it won’t round the edges of the timber. Regular checks ensure that I only do what is needed; no more and no less. I am pleased with how well this works and I repeat the process at various stages of making the rings.
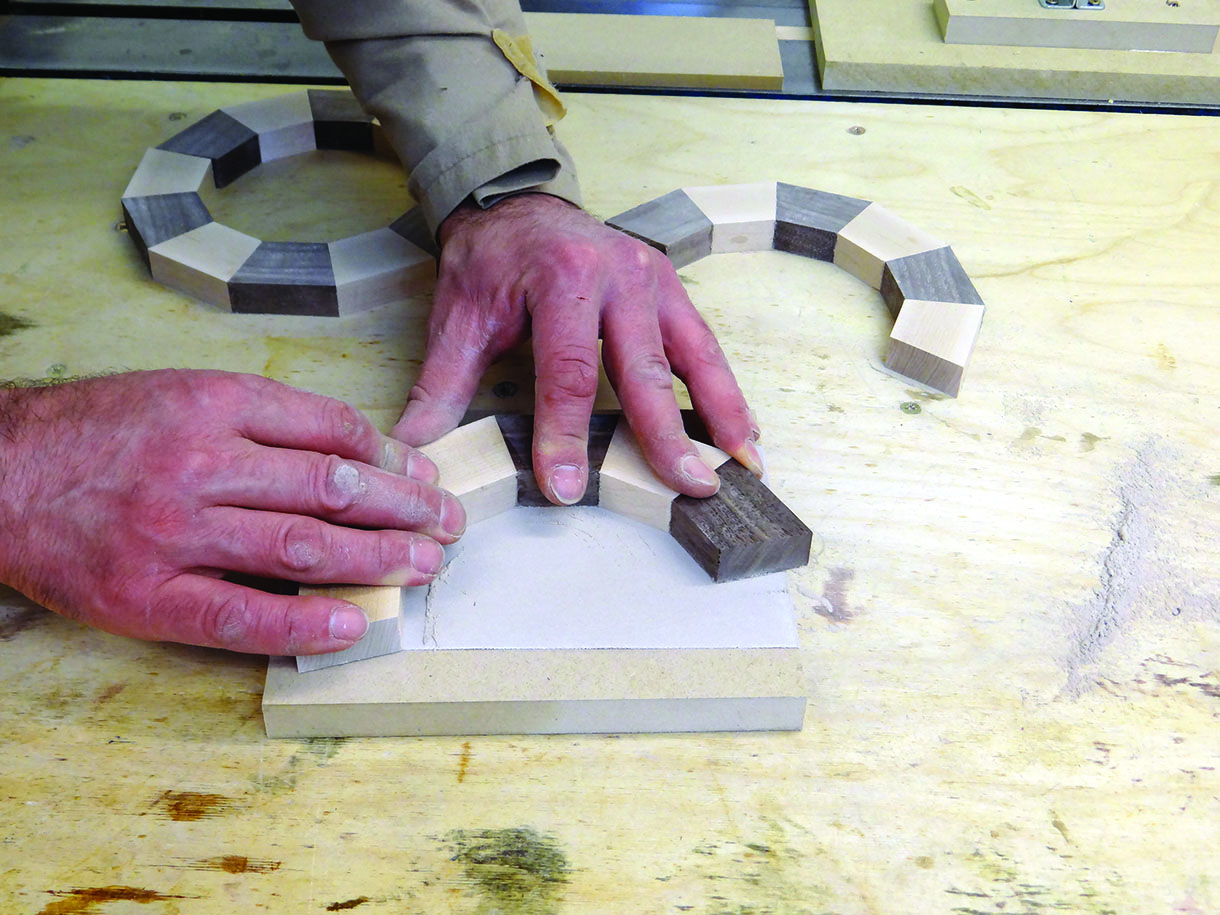
Flattening the rings
Correcting the angles
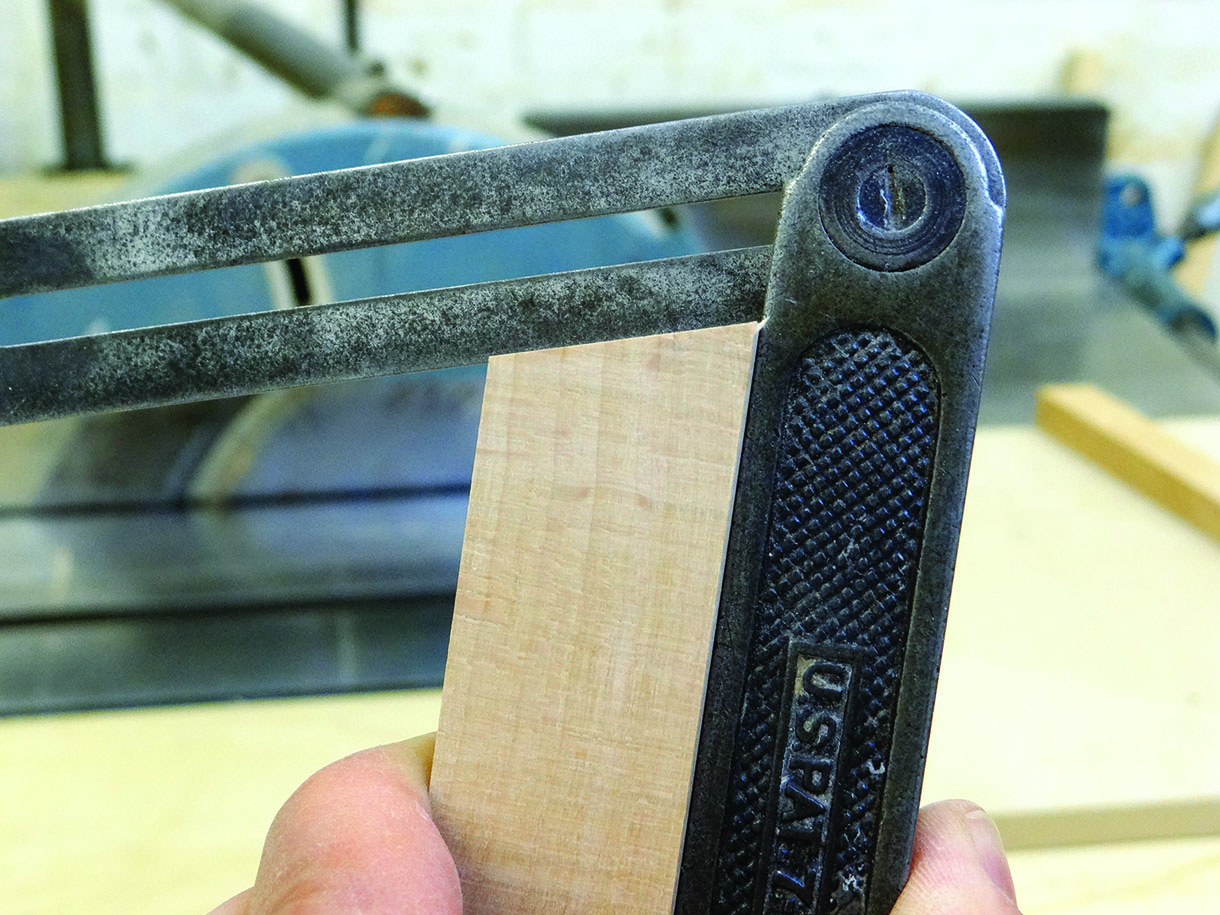
With the semicircles flattened, I need a way of correcting the angles, so another jig is in order. I have been mulling this over since realising there was a slight correction needed and have come up with a simple jig that should do the job. I repeat the first steps of the previous jig by cutting a batten for the slot in the saw and fixing it to a piece of 18mm MDF, then running it past the saw to give a reference face, parallel to the saw blade. Onto the base board I fix a toggle clamp, fixed to a block to raise it to the correct position to hold the work. I can then position my segmented semicircles right up against my reference edge, with just the tiniest piece overhanging the edge, which will be removed and correct the angle. To ensure I hold the semicircle firmly, without applying undue strain to the joints, I lay another piece of thinner 9mm MDF over the segments to spread the gripping load. The jig simply slides past the blade and cuts the edges of the segments, flush to the edge of the MDF. I tested it out first on my trial glue up and was happy to proceed without adjustment on my chequered segments. I could then glue the semicircles together to form my rings, using the same rub joint technique as before.
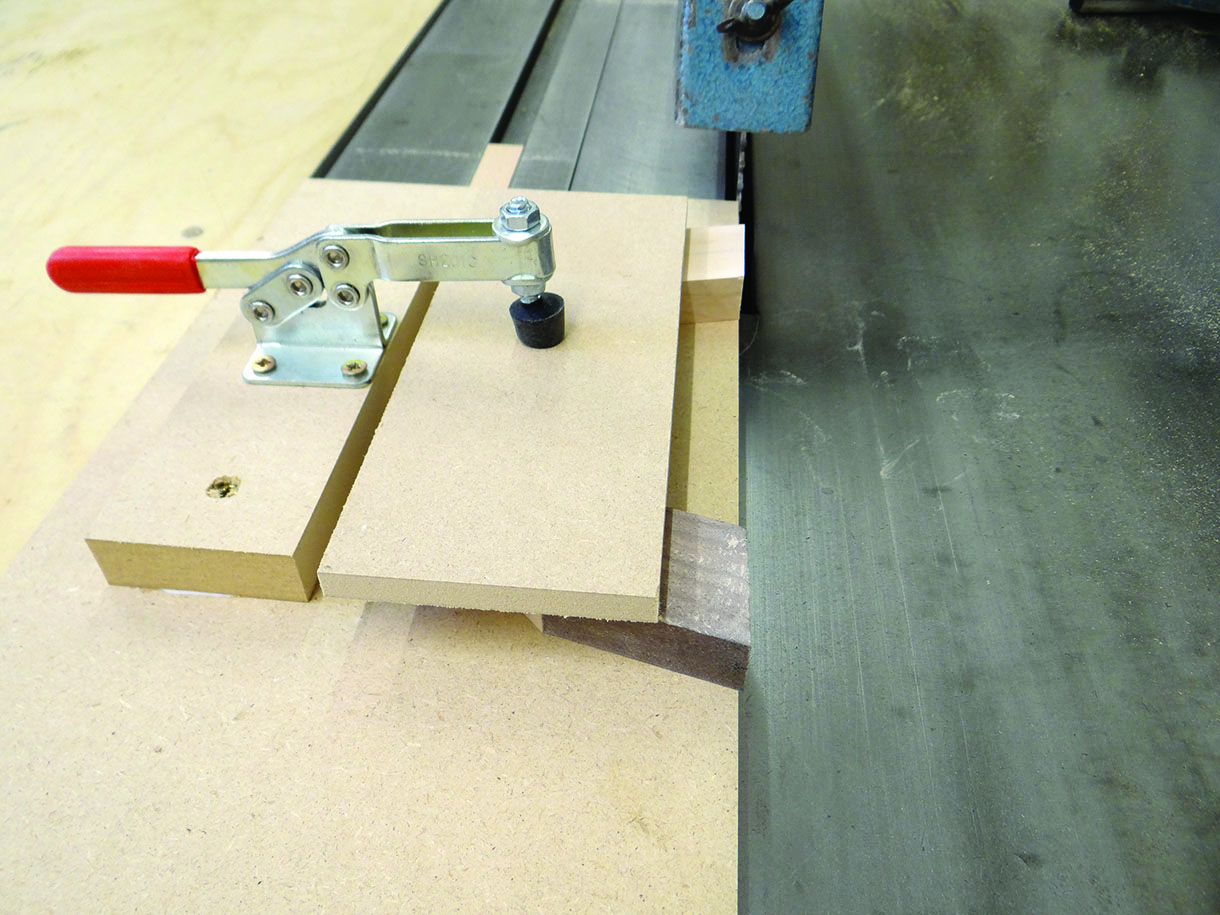
The correction jig…
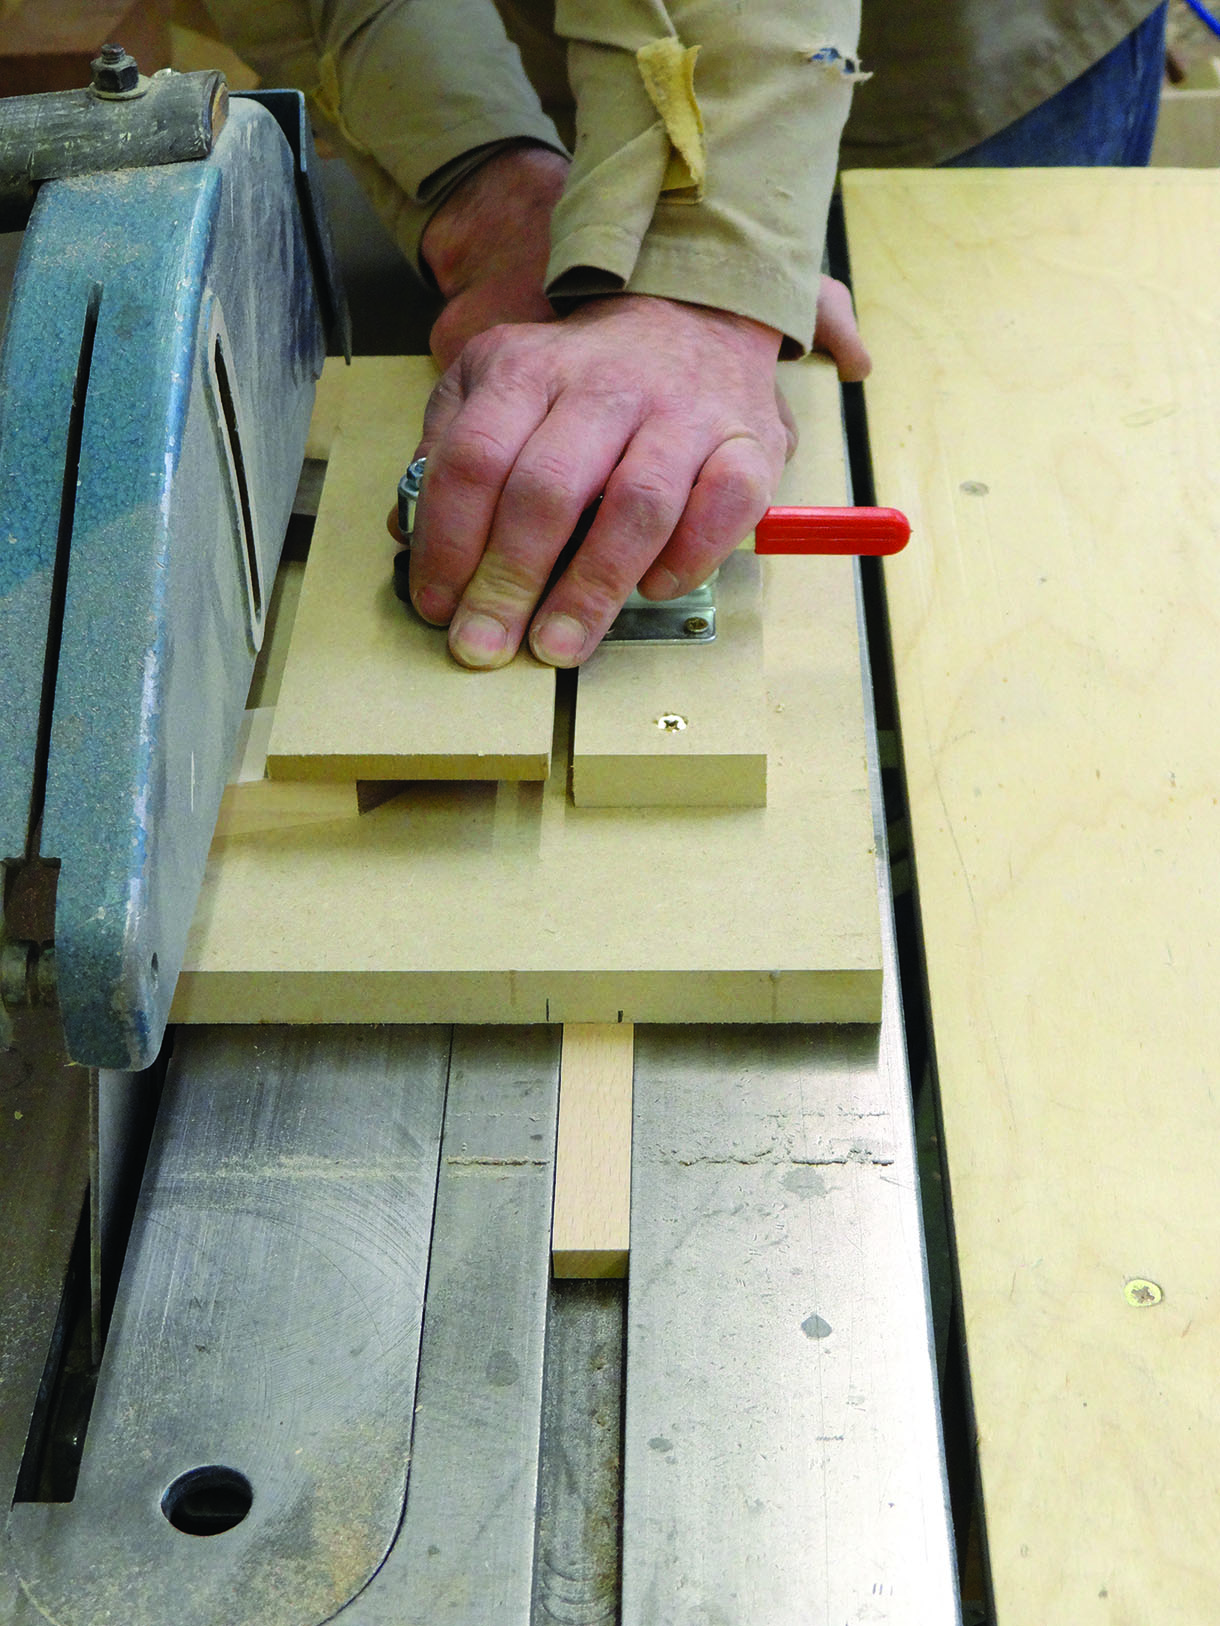
… in action
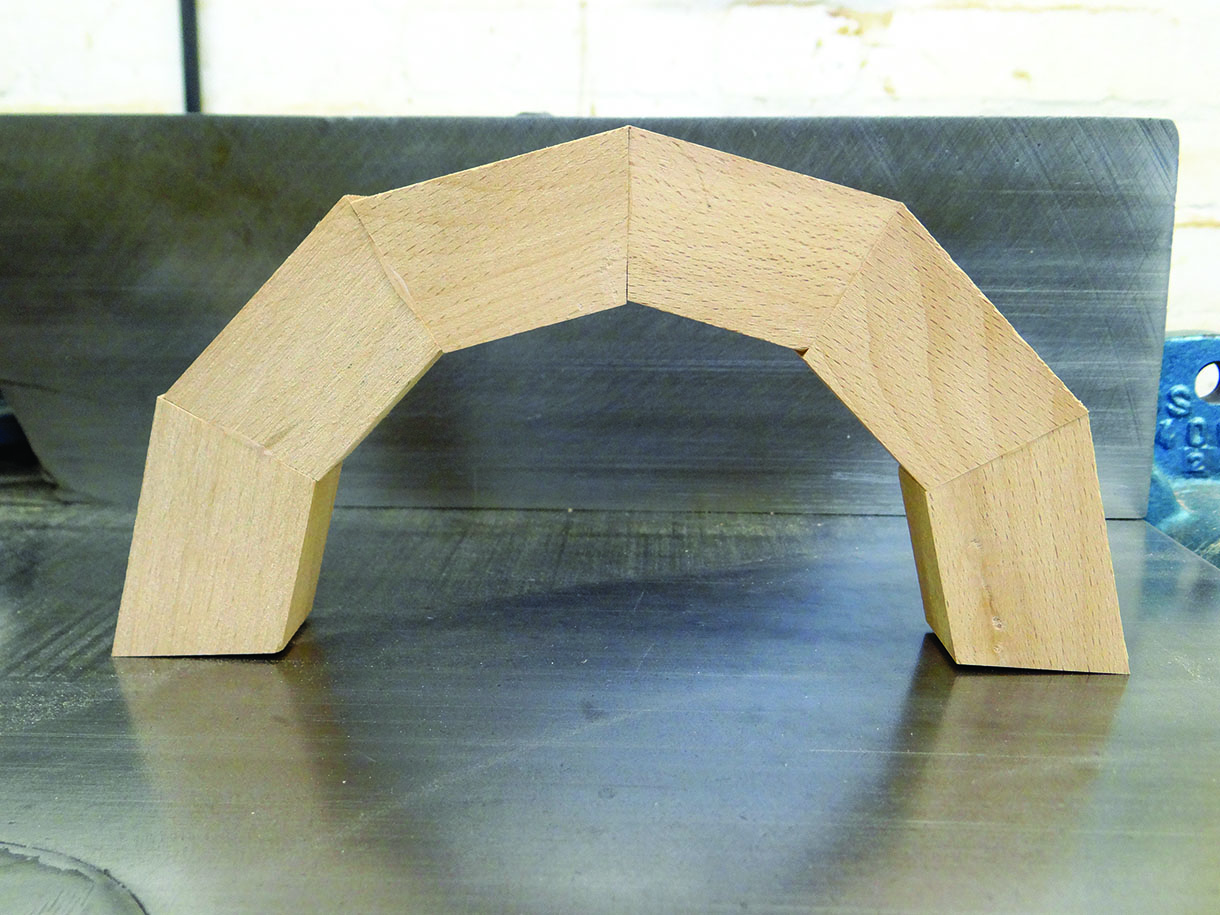
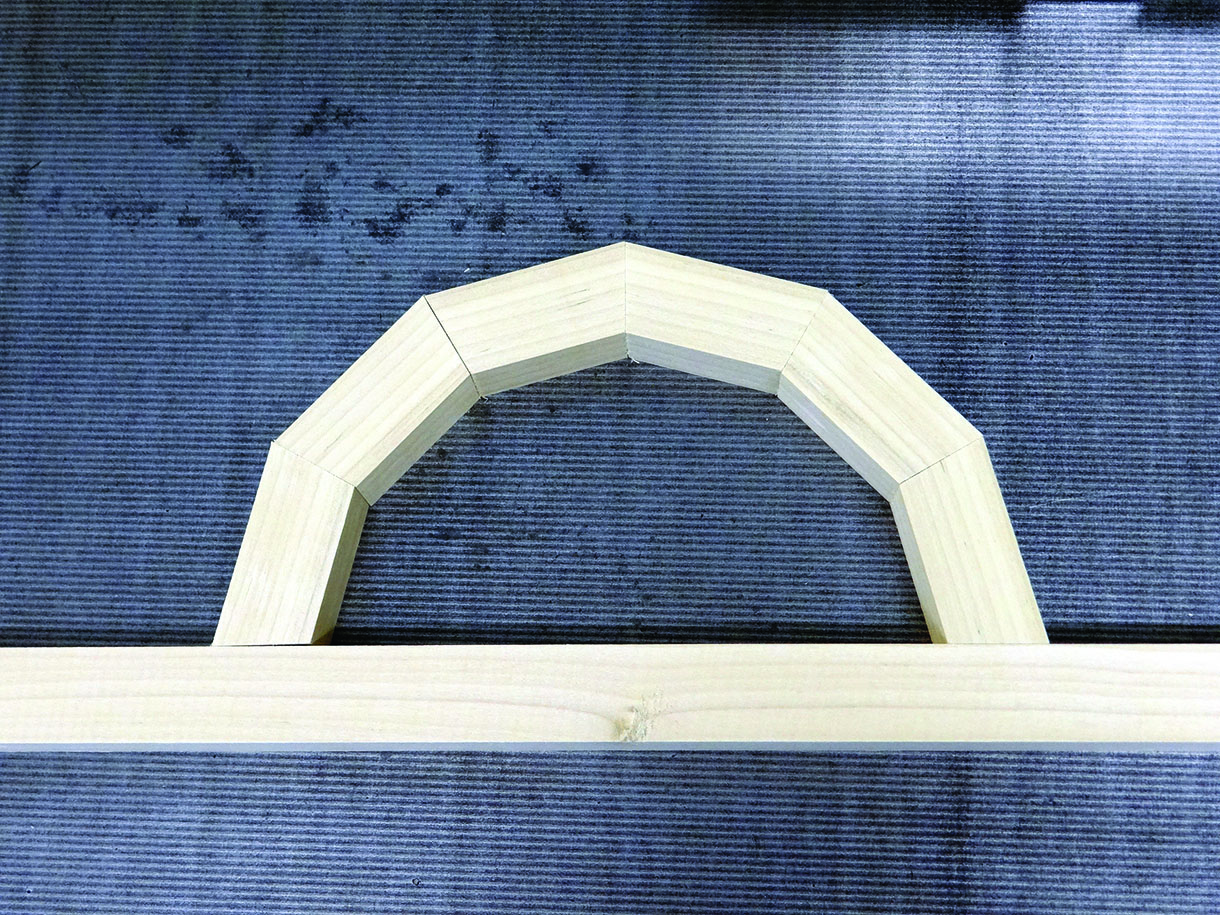
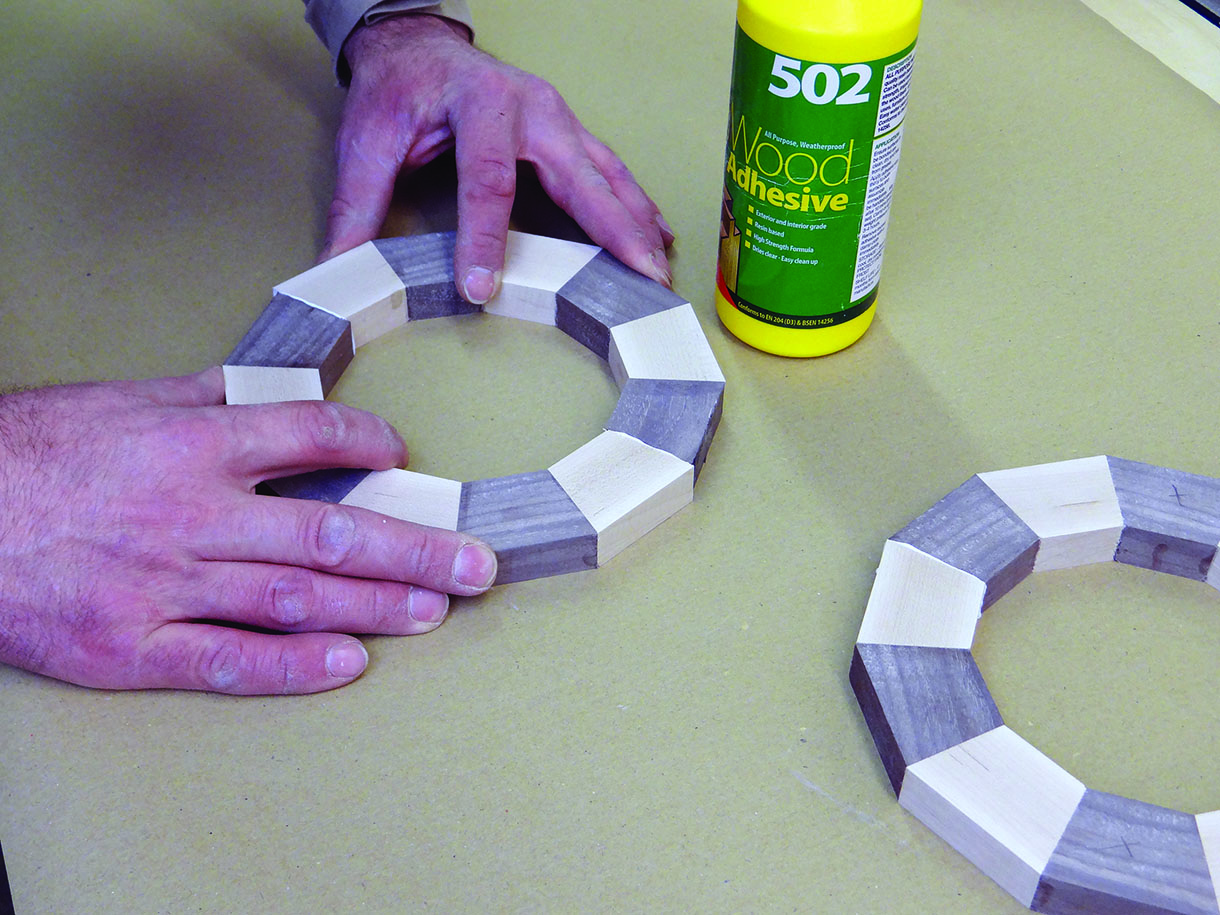
Segmented rings
After once again drying overnight, I have my two rings. As before, I rub the new joints over the abrasive fixed to the MDF block to flatten them and I am ready for the next stage of the glue up: to glue the rings together. My next decision is whether to glue them like a chequer board, with the maple directly over the walnut blocks, or to glue them like a brick wall, with the joint over the centre of the block beneath it. I decide to go with the chequer board look, deciding that the brickwork design is probably best for bowls that are entirely segmented. As I only have two rings of segments, and I’m using timber that naturally lends itself to a chequer board look, the choice is simple. Whether this is the best choice will only really reveal itself when the job is done, I think.
I spread an even layer of glue over one surface and rub the two rings together. I know that larger items can slide while left unattended, so I pre-prepare some G-cramps and lightly grip the rings in the correct position. I say lightly, because I don’t want to damage any of the joints I have already formed; I only need enough pressure to hold them in position while the glue cures.
The rub joint to form the full ring
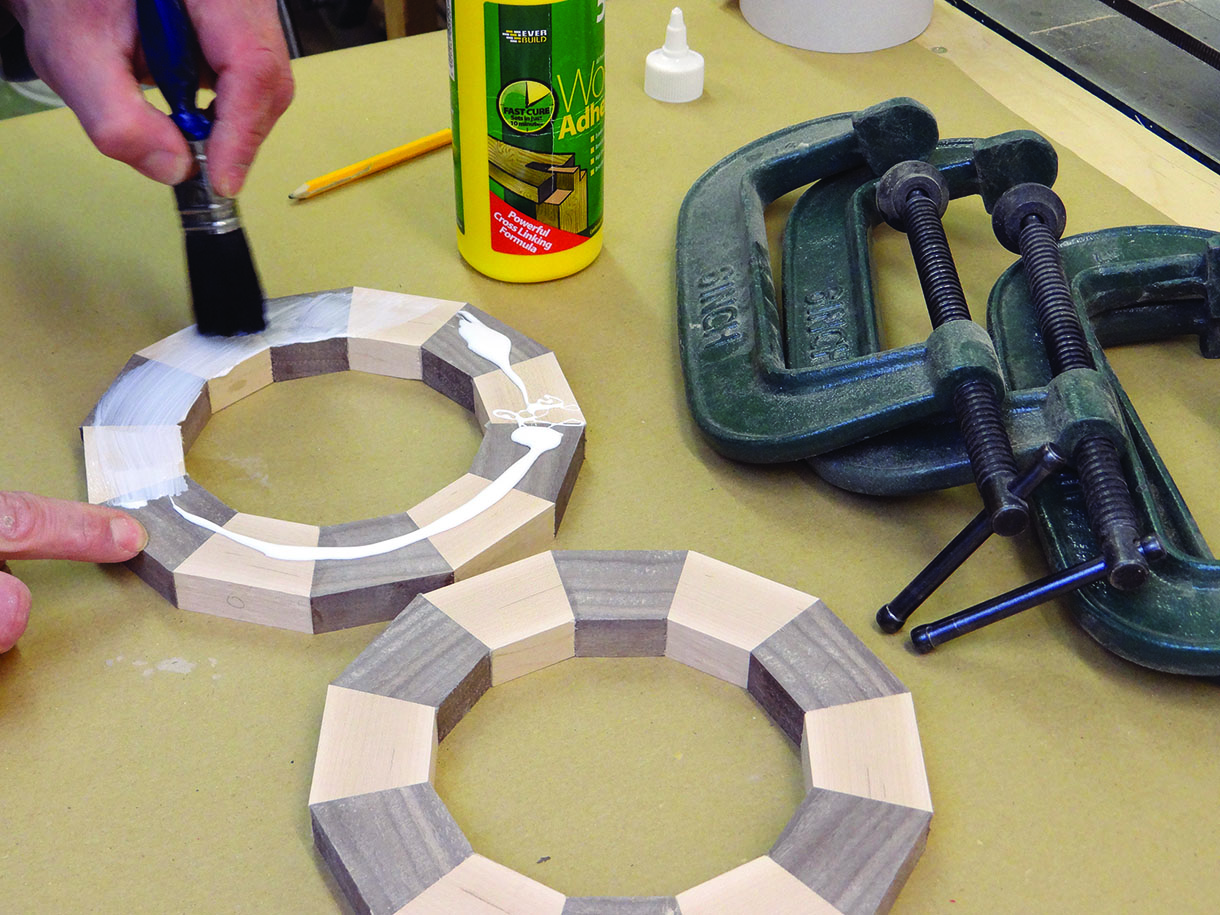
Spreading the glue to join the rings
Making the bowl
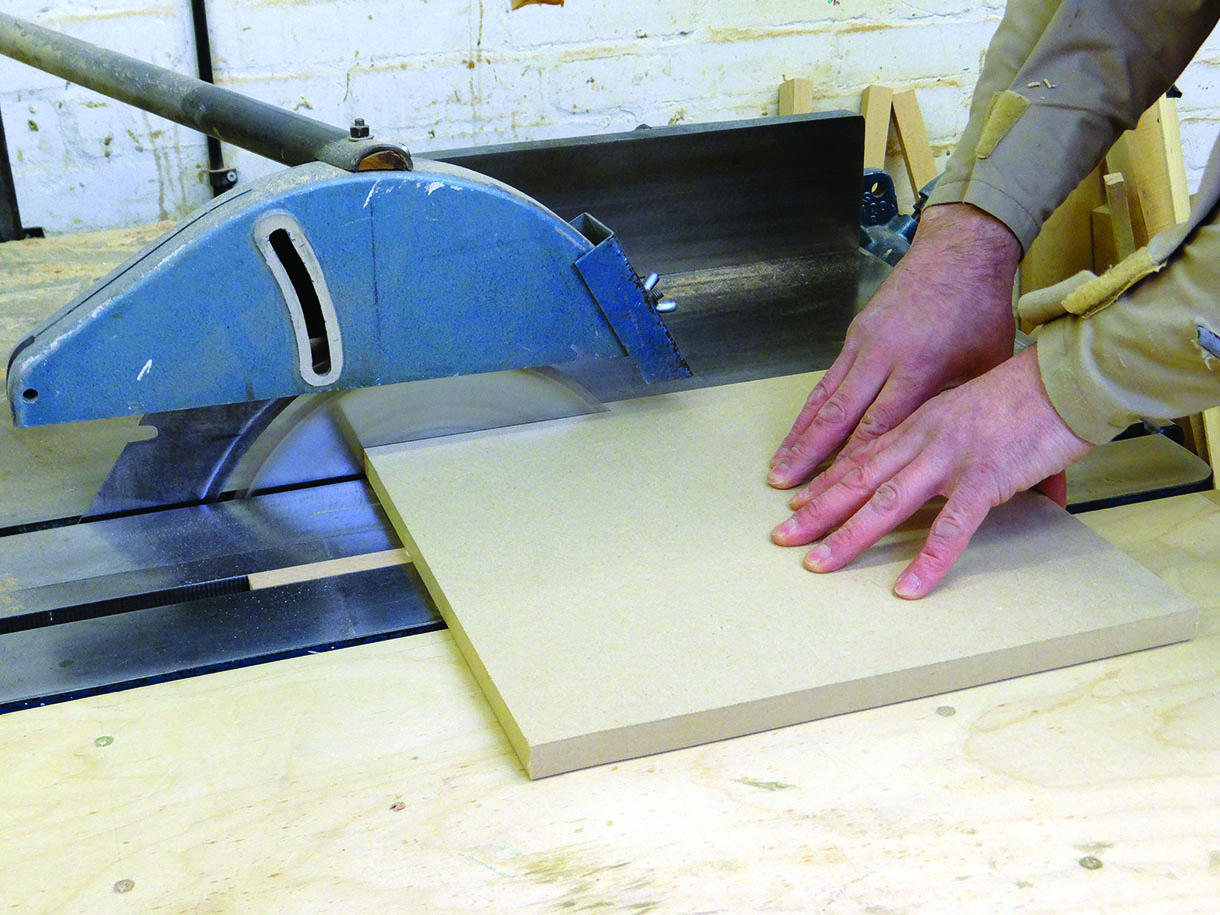
While the rings are drying, I prepare my bowl blanks, using some 80mm European oak (Quercus robur) that I have in stock. I plan to use a full thickness piece as the base, then fix the rings, adding another piece of oak to the top to form the rim. I cut a section long enough to get two blanks from and pass it over my planer to give a flat surface suitable for gluing the segmented rings to. I then deep cut it on the bandsaw to around 50mm deep, before cutting it into discs. This is deeper than I want the rim, but better to have too much timber, rather than not enough. I fit the two pieces together to see how they look best, with regards to the flow of the grain, and mark them with a pencil to guide me in the next part of the glue up.
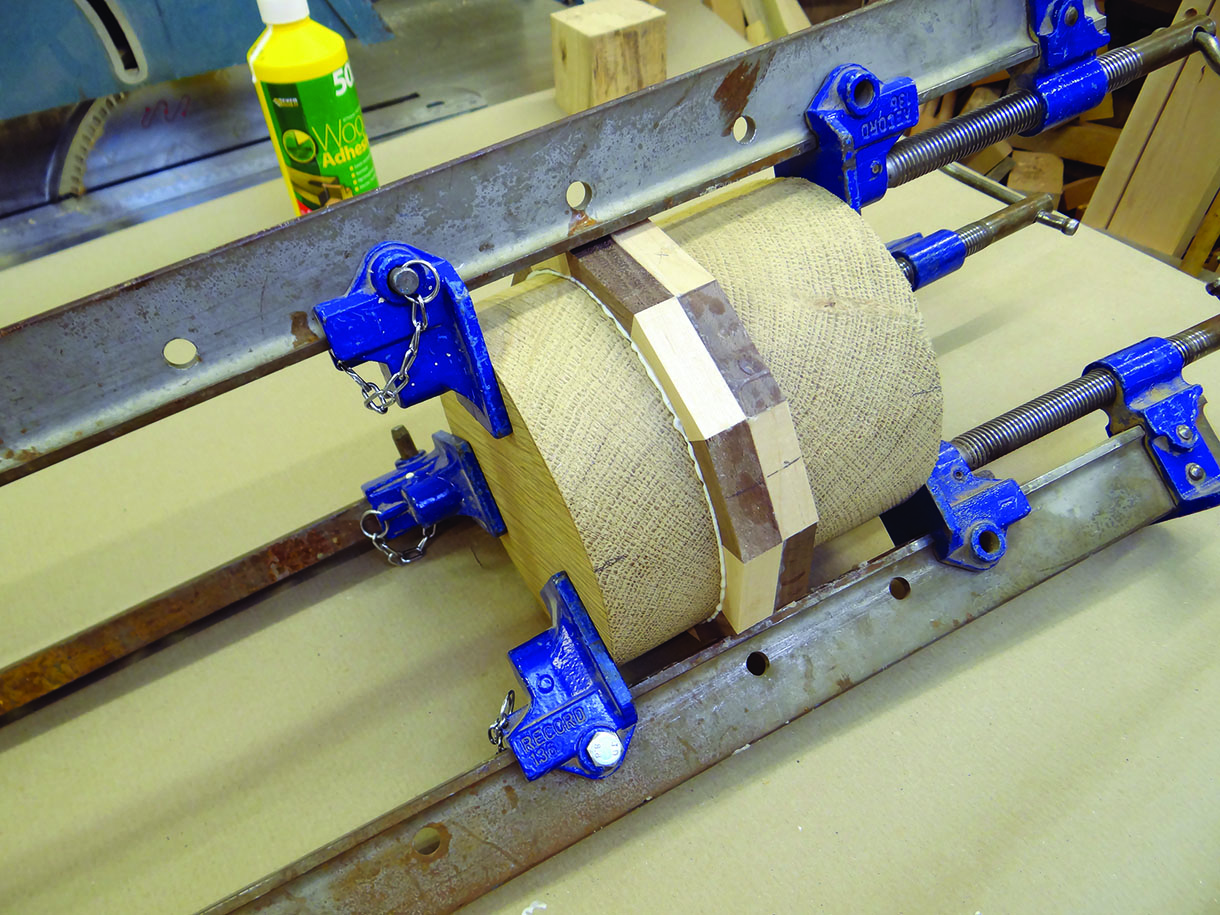
The final glue up
Final glue up and mistake number two
With the segmented rings dry and flattened again to ensure they are totally flat and ready for the final glue up, I start to prepare everything I need. This glue up will definitely need cramps, so I use three large sash cramps. I always find glue ups slightly stressful, but if they are well planned, things will usually go smoothly. It’s not until I spread the glue and am trying to position the three sections together that I realise my error. During the early stages, it seemed like a great idea to make the segmented rings bigger than the bowl blank to allow for positioning during glue up, but now, in the midst of that glue up, I realise that if everything is the same diameter, then this whole thing would be a lot easier! It’s too late now, but for next time, I know that they only need to be a tiny bit bigger than the bowl blank and not 12mm all around. After much wiggling and persuasion, the blocks are fixed in the sash cramps and all I can do now is wait.
Turning
The waiting time is actually really useful, because it allows me to mull over my error and to think of ways to limit any problems. It occurs to me that the main focus of centring the blank on the lathe needs to be getting the segmented rings centralised. If they are off centre, the segments on one side of the bowl will be larger than on the other. I’m not sure if this would be noticeable, but it could potentially be a problem.
To ensure the rings run centrally I use a compass with the pencil well extended to find the centres of the bowl blanks, relative to the segmented rings rather than the actual centres of the oak blanks. I then
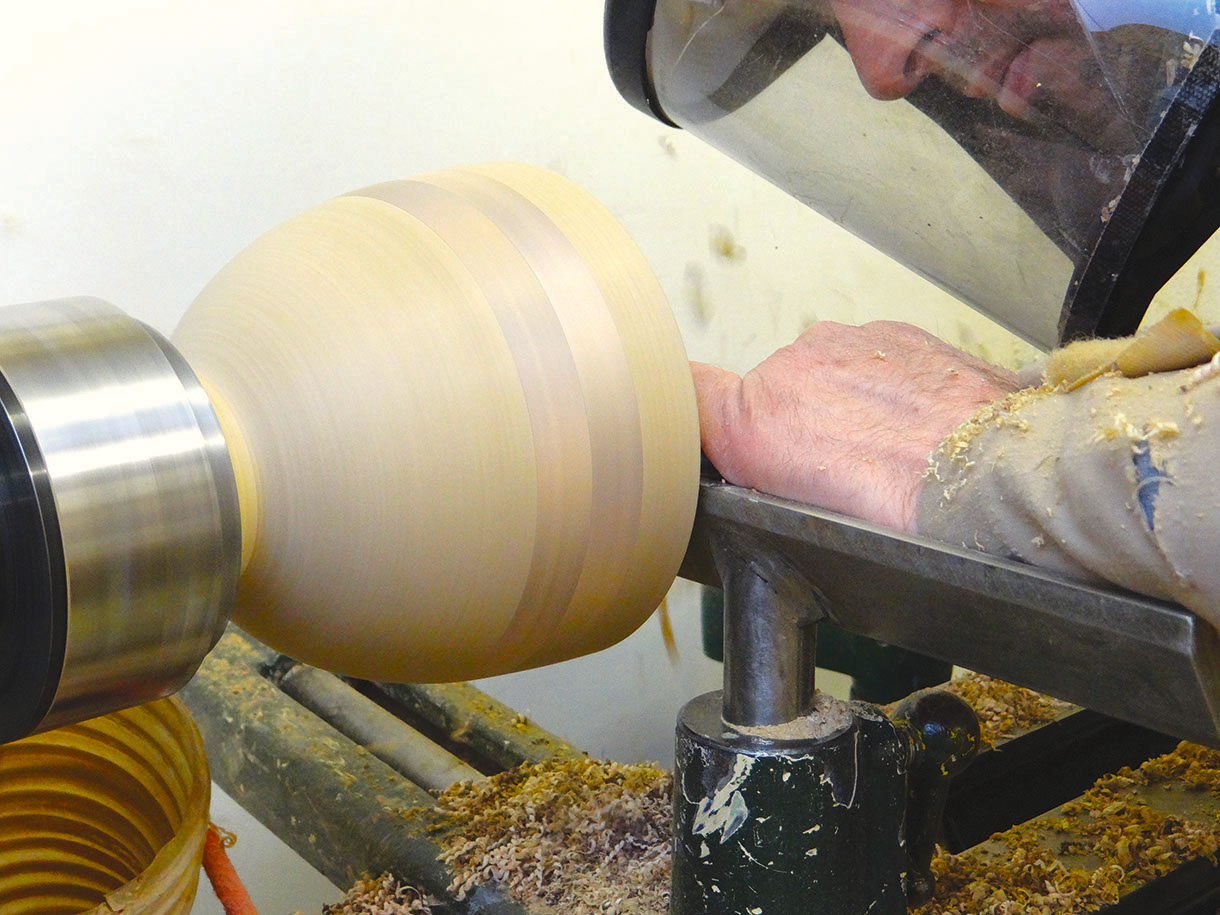
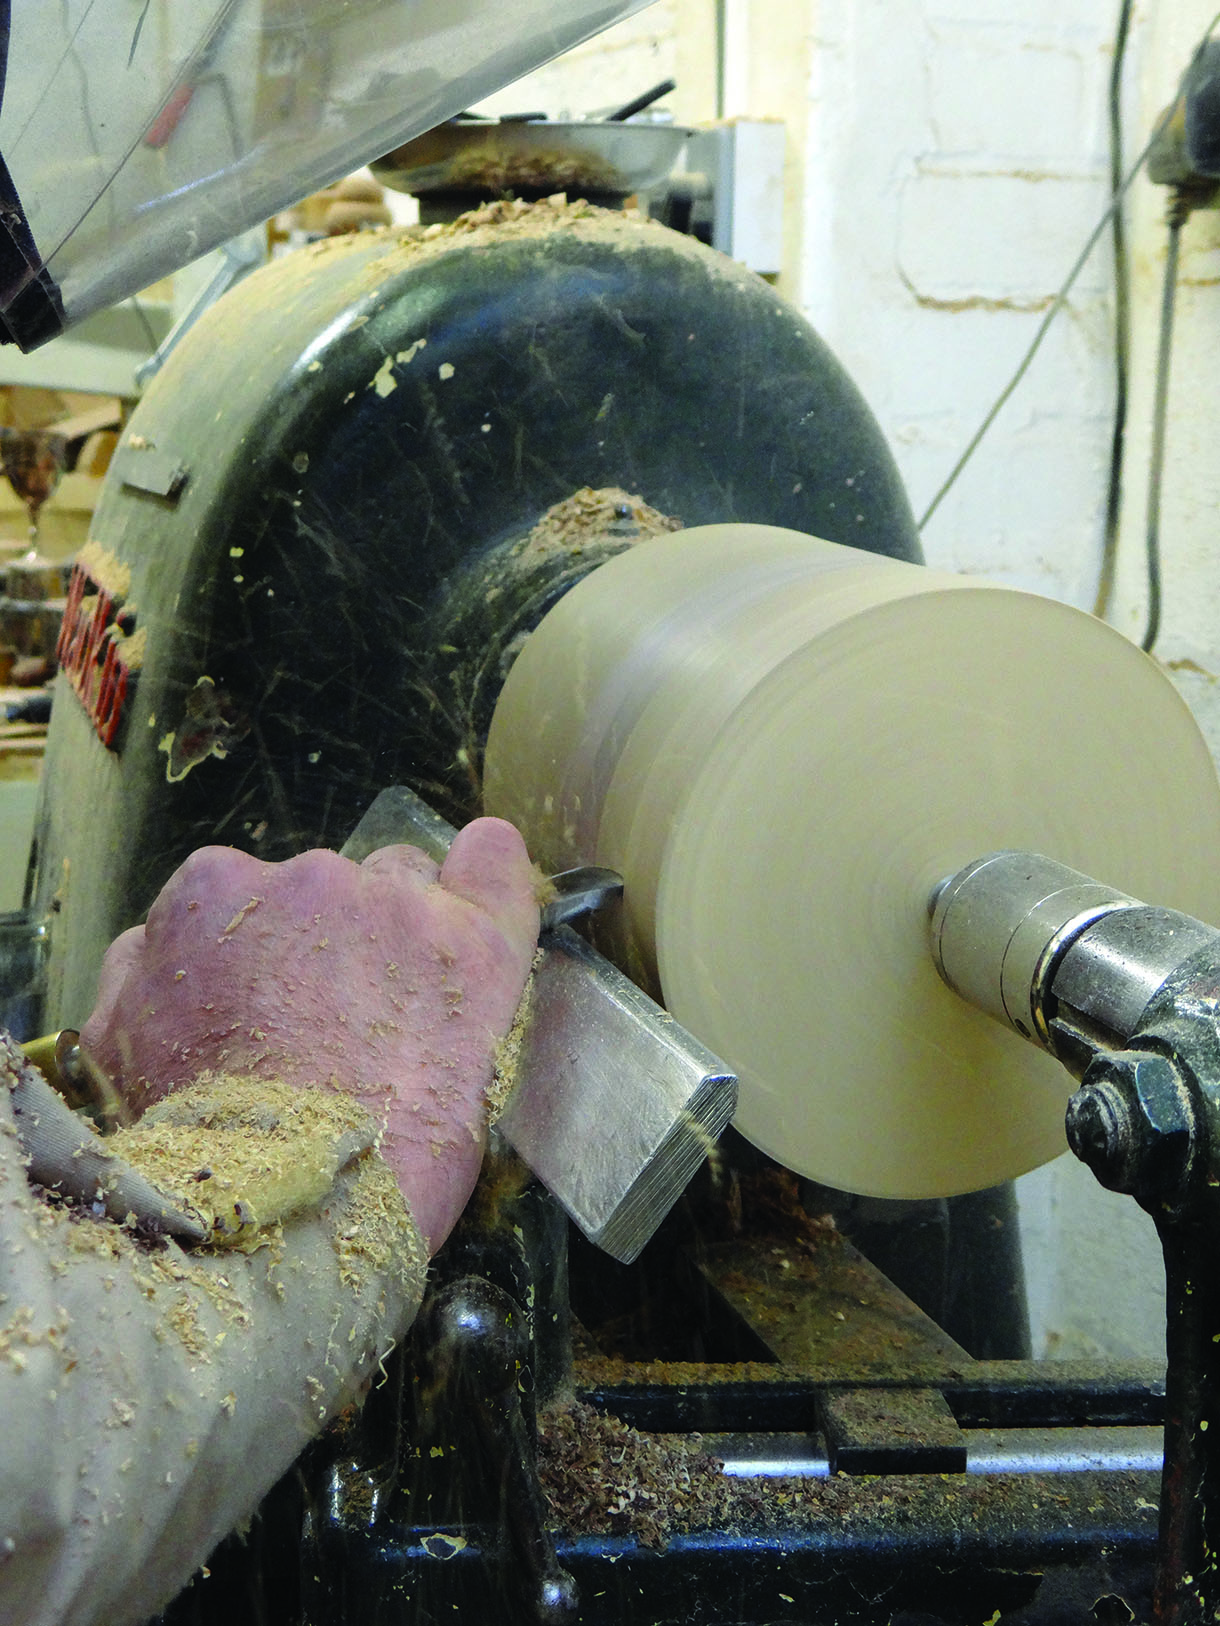
mount the block between centres to ensure it is positioned correctly. Using this method, I can adjust as necessary, rather than be fixed in one position as I would be by a screw chuck or faceplate. Once I’m happy that the rings are running centrally, I simply true up the block with my bowl gouge, cut a holding spigot in what will be the top of the bowl and, holding the bowl with this spigot in the chuck, I turn the bowl as I normally would. The bowl is sanded to 400 grit and finished with hard wax oil.
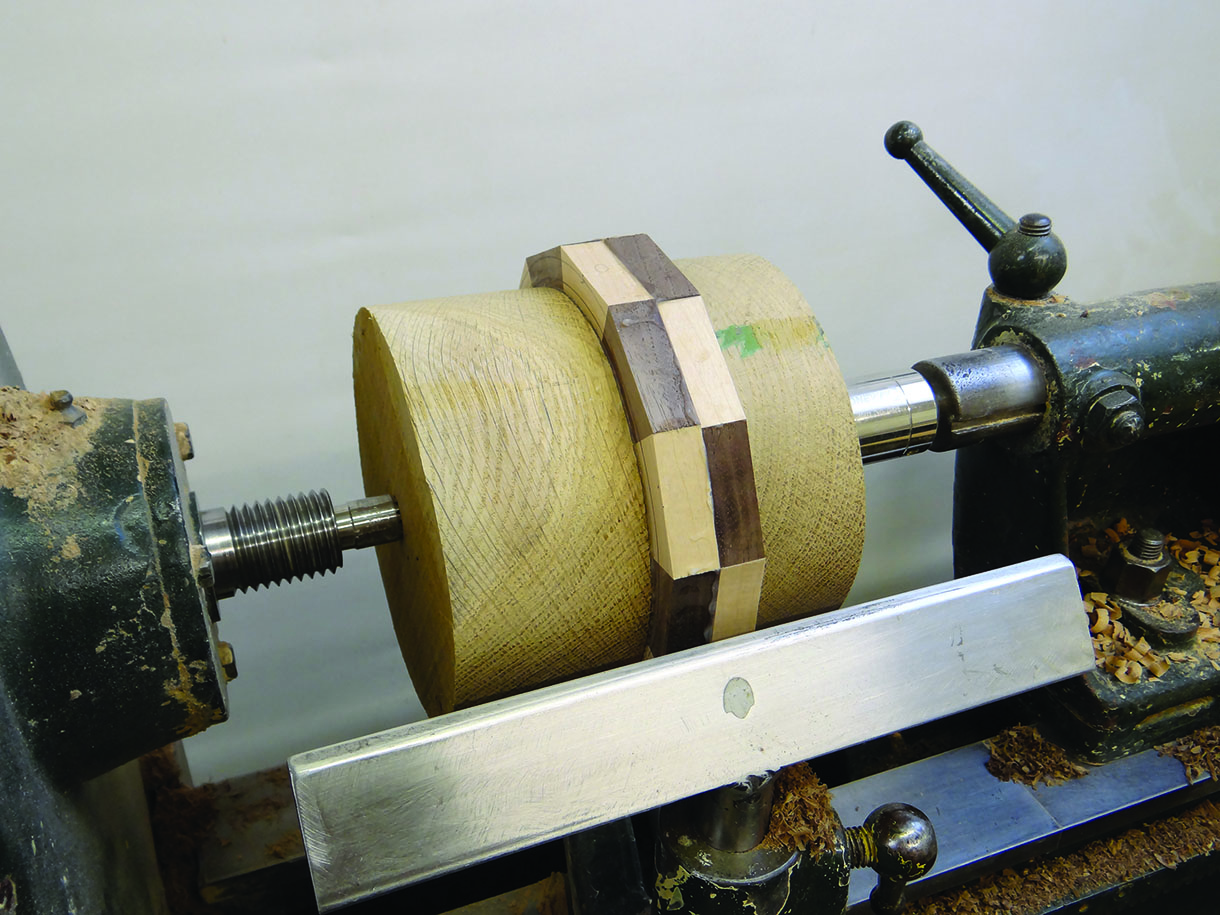
The blank held between centres to centre the rings
Truing the blank
Conclusion
I enjoyed the process of making this bowl. It challenged me in a number of ways and enabled me to employ some of my joinery skills that have been underused in recent years. Were I to do this again, I would spend a little longer on the angle jig, although it worked admirably. I would also know to cut the rings to the same diameter as the bowl blanks to make the final glue up easier.
Overall, I am very pleased with the end result. The joints are tight and there are only a couple where the joins of the chequering don’t quite line up as well as I’d like, but I suspect this is due to me needing to adjust the semicircles to make them meet up properly. I’m certain that my next one will be better, if there is a next time!
I would recommend this project to anyone who feels they have mastered turning standard bowls and wants a challenge to further their woodworking and turning skills. Like all of these projects,
I haven’t done it before, but I do have a wide range of woodworking experiences to draw on to achieve the end result. This technique is a fascinating combination of skills that all need to be done to a high level to achieve an end result of good quality.
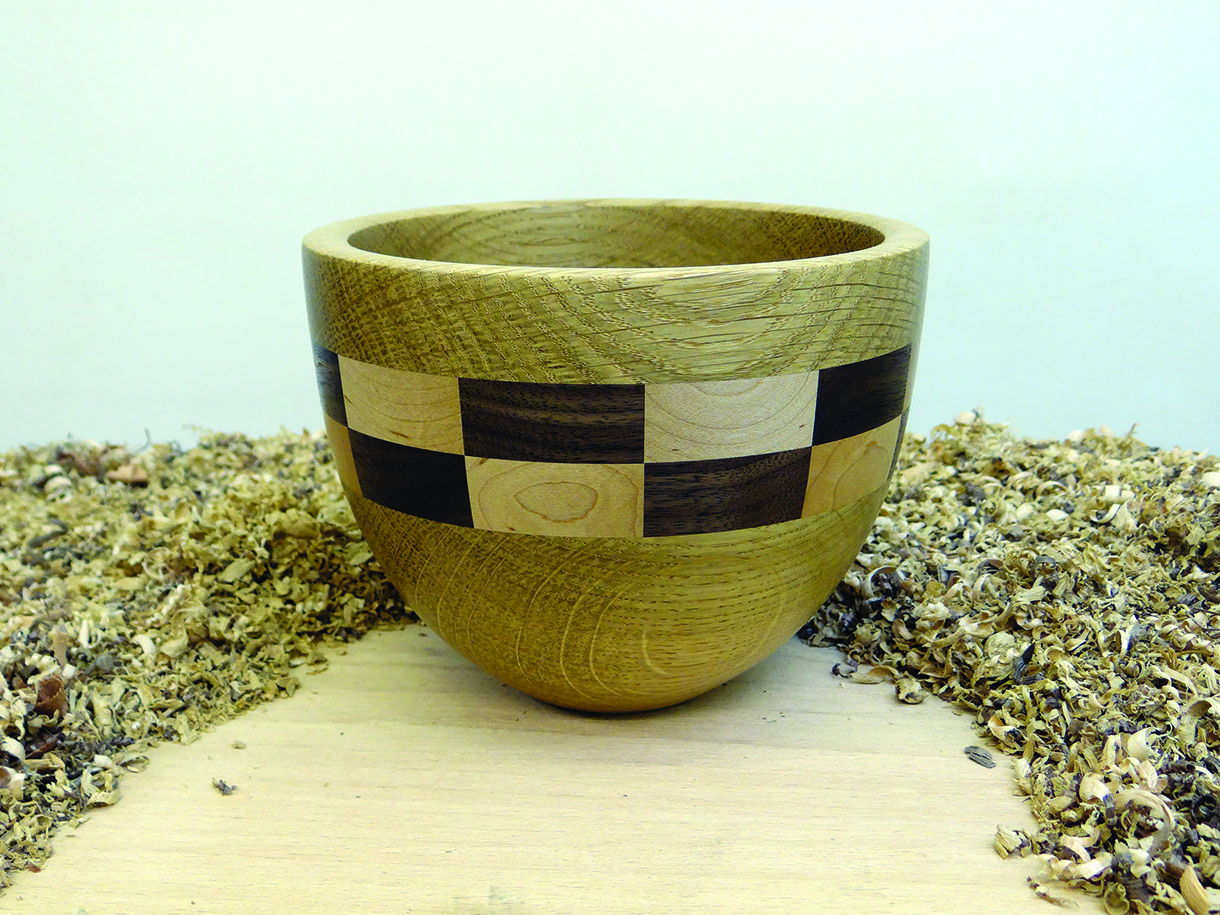
The finished bowl is 160 x 125mm, with an oil finish


