Hendrik Varju builds an oak urn with deep family meaning

My father, also named Hendrik Varju, was born in Hungary in 1936. He survived the Hungarian Revolution in 1956, escaping the country to Austria, then Bristol in England and then Canada. Over 60 years later, at the age of 81, he is still here and I hope he will still be with us for a long time to come. After my mother’s death in 2015, I started to think about my father’s passing as well. Not that I expected it to happen imminently, but I knew my father wished to be cremated and I wanted to design and build an urn in which to bury his ashes. I knew I wouldn’t have the strength to do it immediately after the shock of his passing, so I wanted to be prepared ahead of time. Fortunately, my father has never been afraid of talking about death. When I told him, uncomfortably, that I wanted to build an urn for him he said, ‘Good idea. That’ll save some money on the funeral.’ In fact, when I built a brick-lined pit in my backyard to cook a Mexican dish known as ‘cochinita pibil’
(a Mexican pork dish wrapped in banana leaves and cooked underground – my mother was Mexican), I showed it to my father. He said, ‘That’s great. Now you can cremate my body yourself and save even more on the funeral!’ Needless to say, I’ve decided against that suggestion.
The design
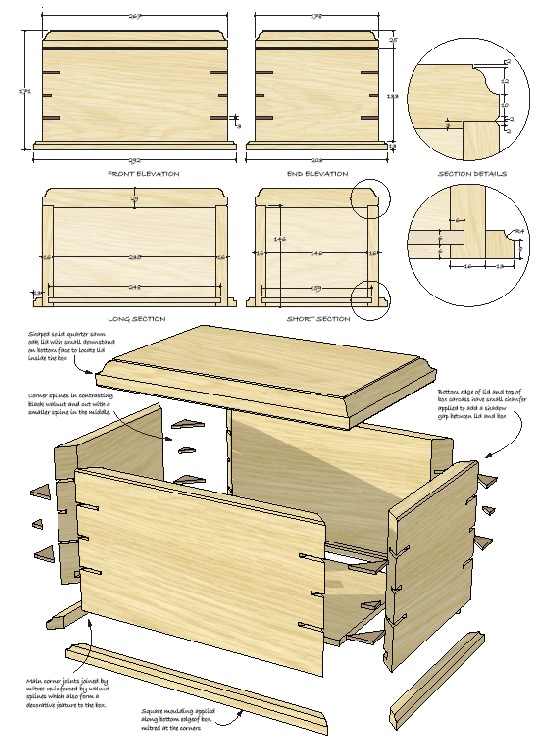
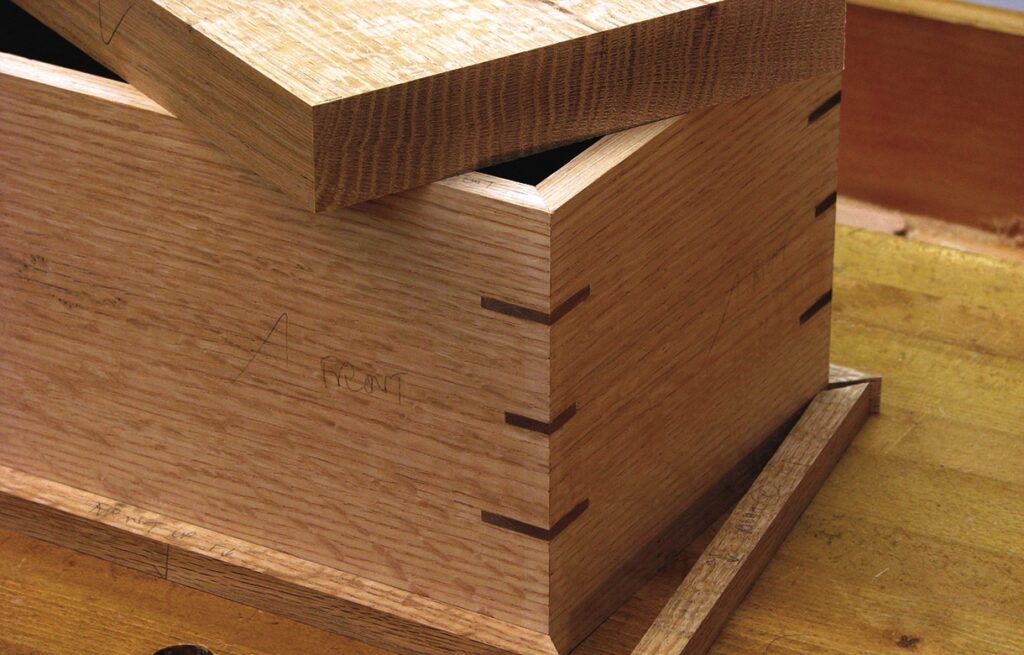
My mother was buried in a casket and the cemetery will allow an urn with my father’s ashes to be buried in the same plot. So it made sense to contact the cemetery first to confirm any special parameters. I was told the urn must be a maximum size of 12in in all directions but a minimum of 200 cubic inches in volume inside with the lid on. It was awkward to ask, but I wanted to know how much bigger it might need to be for a more ‘generous’ sized man. They said that 300 cubic inches would be very generous, but 200 would almost always be enough. I ended up with about 285 with outside box dimensions of 7in wide x 10½in long x 6¾in tall, not including the mouldings. I knew right away that I would build the urn as a box given that I’m not a turner. I chose quartersawn white oak for its weight and stability, with walnut splines for colour contrast. I thought mitred corners would be elegant but I needed to strengthen them so I incorporated splines, or slipfeathers, of two different sizes. The bottom is made of a piece of ¼in thick oak veneered plywood and I happened to have a pre-finished piece left over from another project. I added a mitred moulding to give some visual weight at the bottom. I also decided on a lid that just fit inside as opposed to using hinges. Hinges add complexity and I felt that simplicity was the best way to go.
The basic box
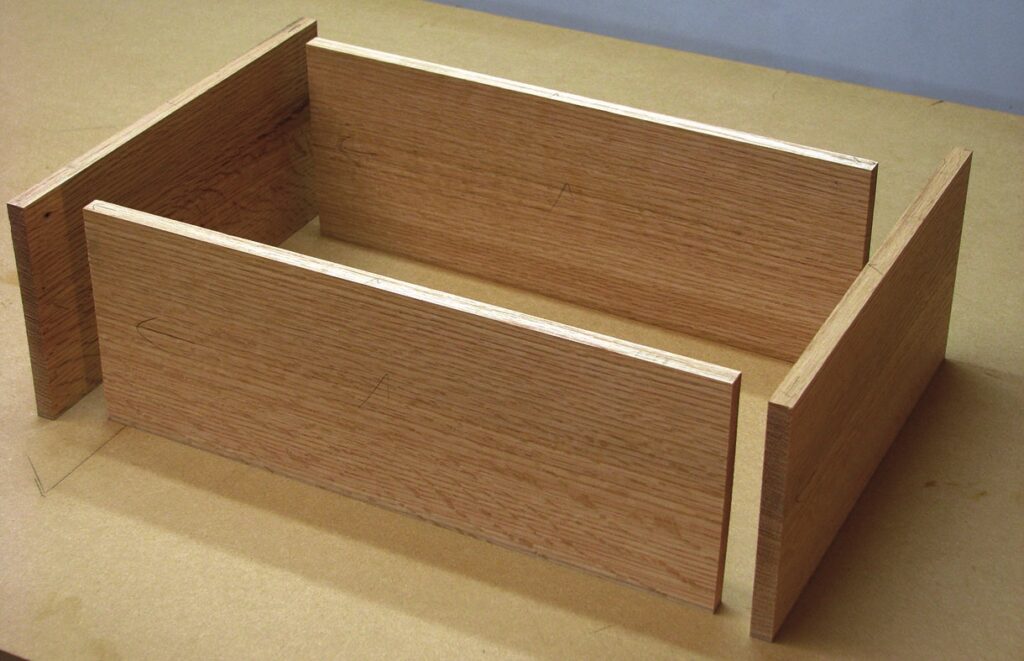
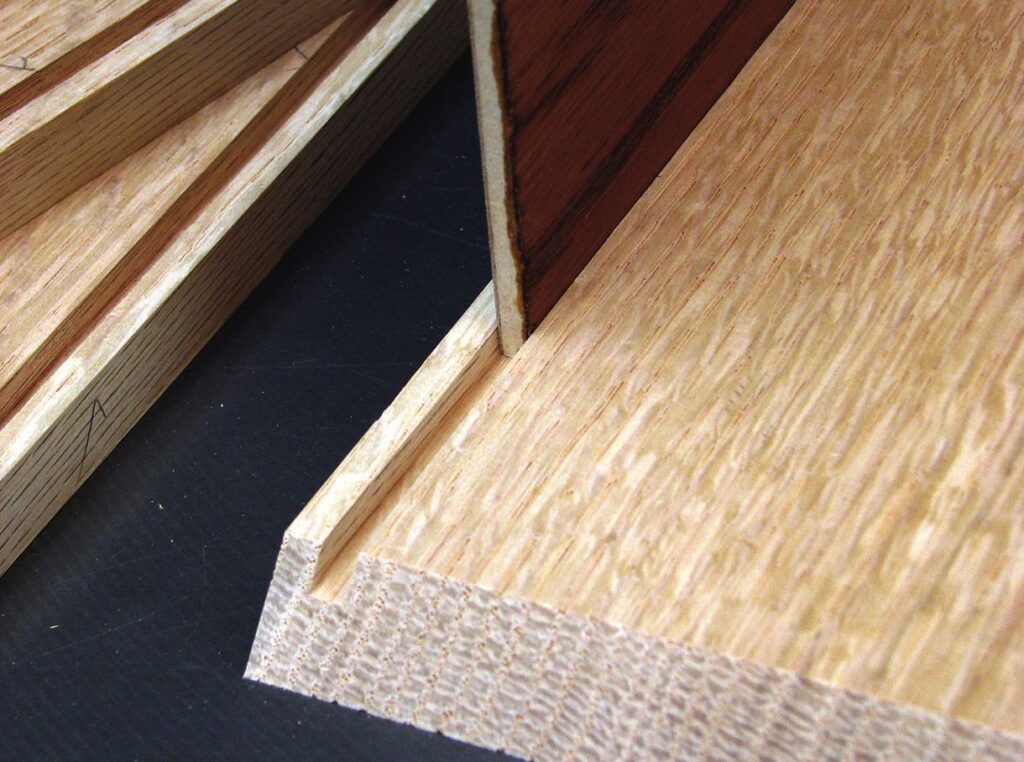
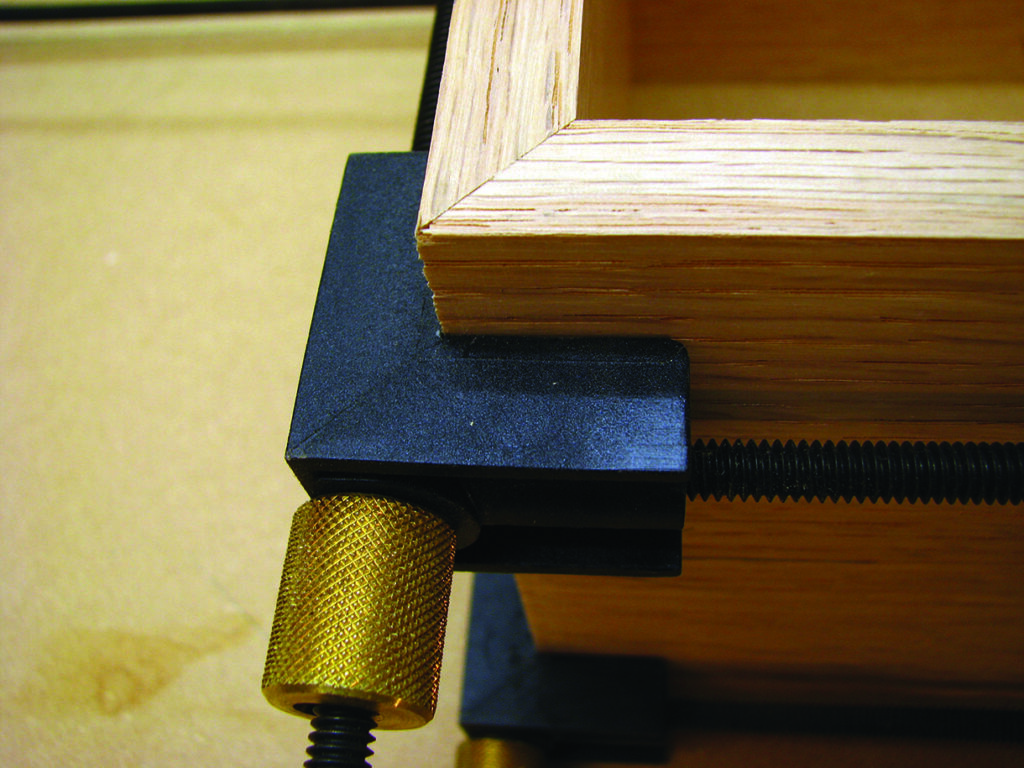
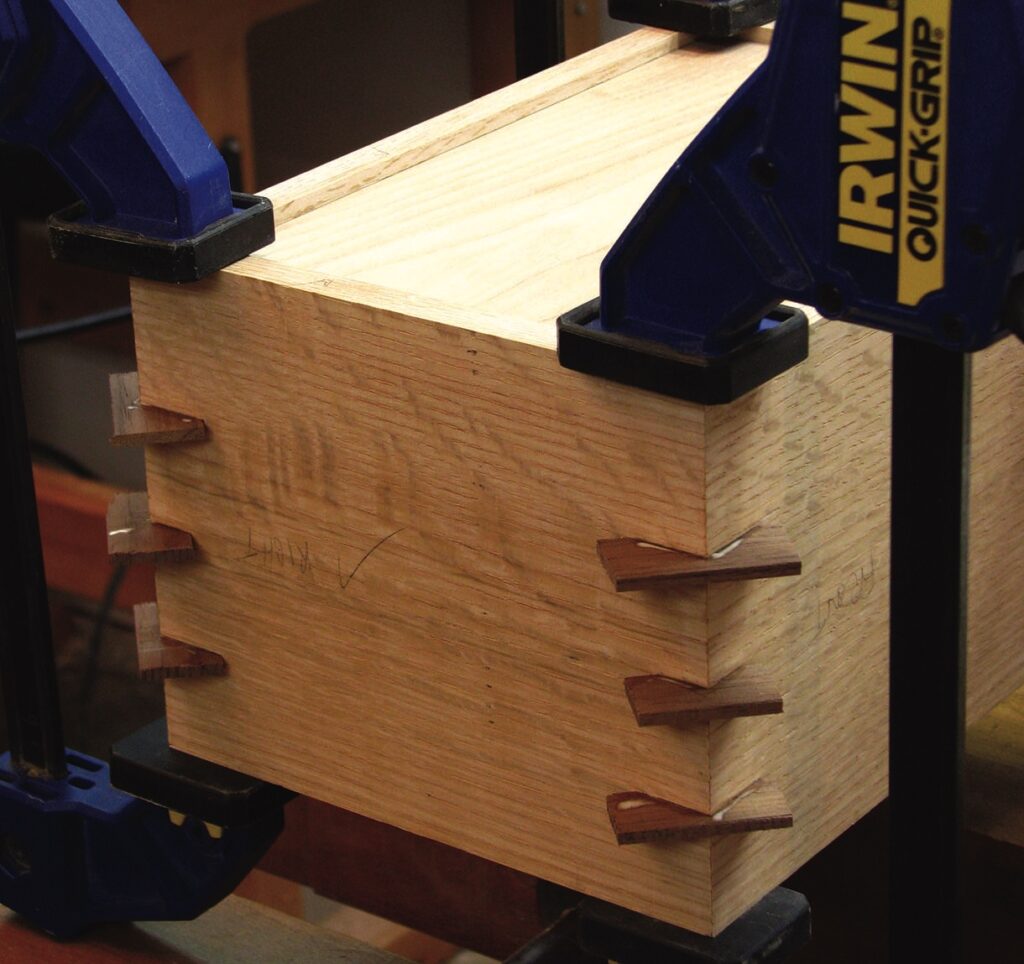
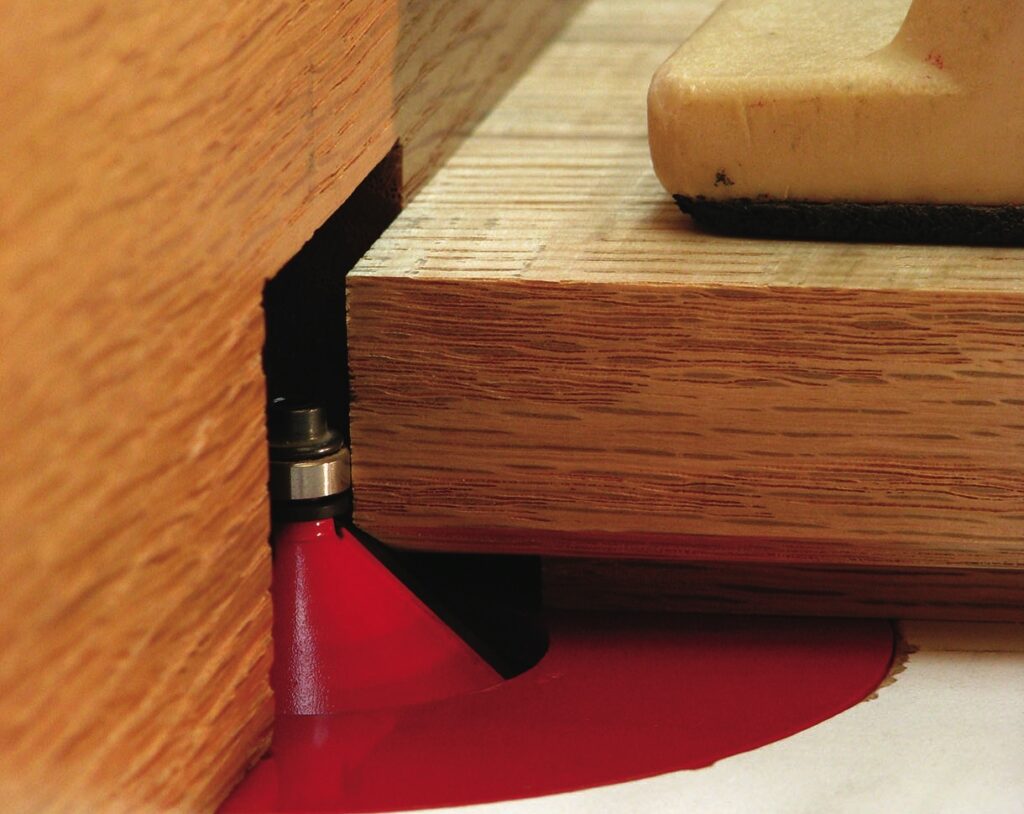
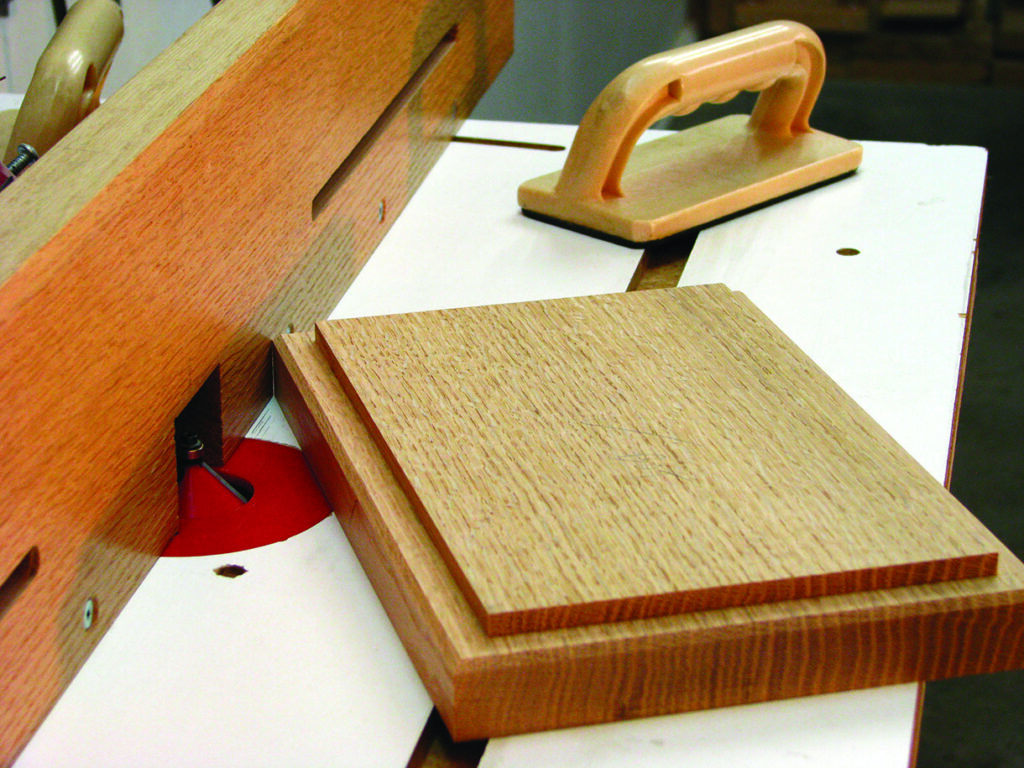
If you’ve cut box mitres before, you know that it’s harder than it sounds. I used a Freud 50 tooth combination blade on my tablesaw because the angled cut is actually partially a rip. A common error is to use a 60 or 80 tooth crosscut blade, but it will often burn and you’ll see some overcutting at the entry and exit points, resulting in a slightly curved cut. Try a combination blade if you never have and you’ll see a marked improvement. I used a mitre gauge set at 90° with the blade angled to 45°. After a couple of test cuts, check to see that the resulting joint is 90° and tweak the blade if necessary. Errors will multiply by the time you cut 8 mitres to form 4 joints, so this needs to be quite accurate. If you have any error, it is best for the inside corner to be slightly gappy rather than the outside corner that is most visible. Once the mitres were cut, it was simple to cut a through groove for the plywood bottom. You can achieve this on a router table with a grooving tool or by hand with a plough plane. Then I sanded the inside of the box before assembly and glued the box sides together with the bottom trapped in the grooves. A little glue on the mitres is plenty to hold the box together temporarily until the slipfeathers can be added. Veritas 4-way speed clamps are the simplest way I know of to glue up a mitred box and they worked beautifully.
Slipfeathers
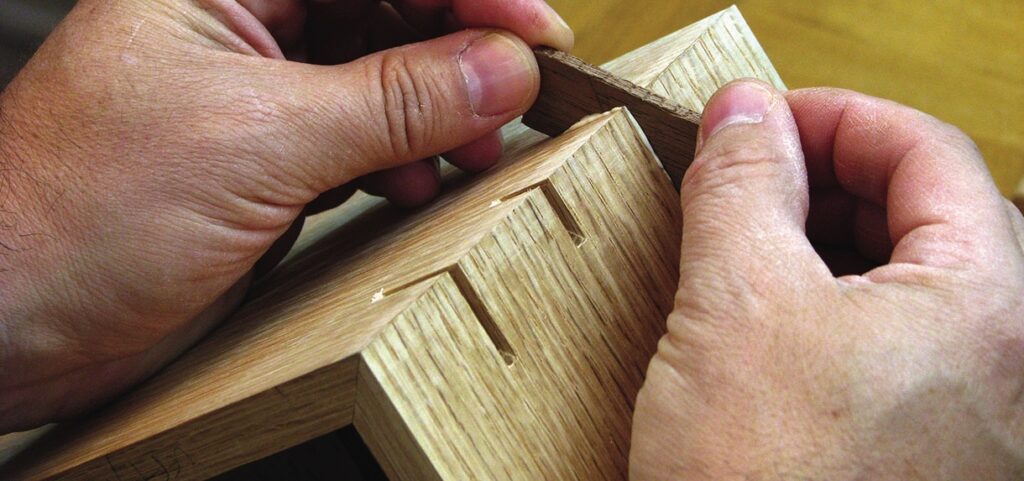
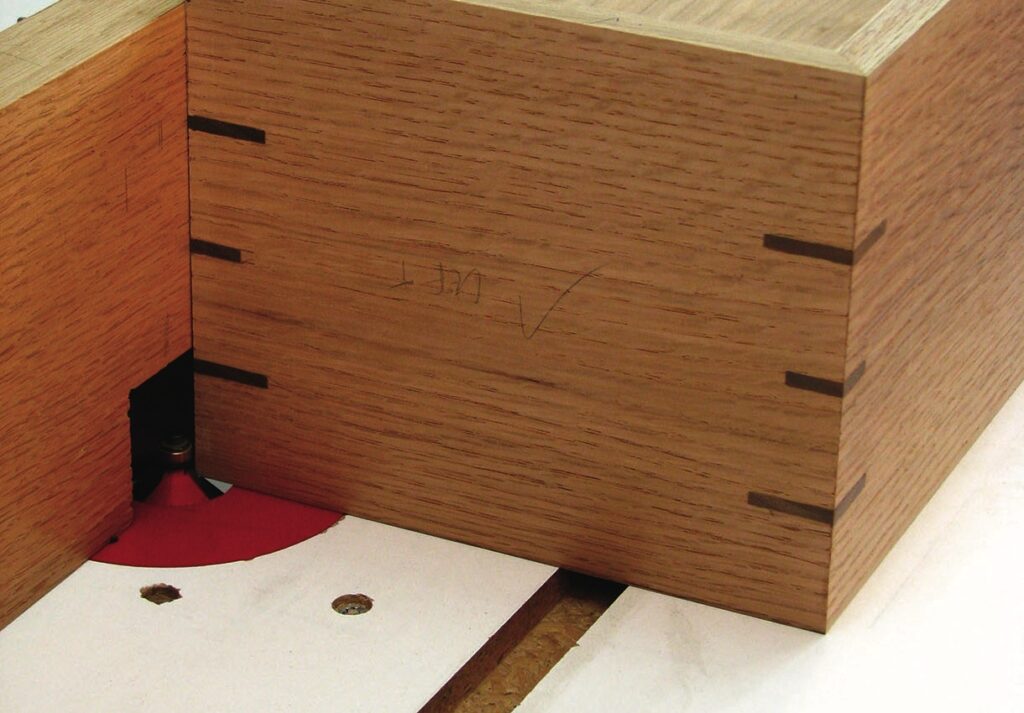
After the glue dried overnight, I cut grooves in the corners for the slipfeathers, also on the tablesaw. A rip blade works best and a sliding fence setup allows me to clamp the box at exactly 45° and then stand back while I slide the fence forward. Blade height is set about 1⁄16in below the inside corner of the box so that the slipfeather doesn’t poke inside. I lowered the blade for the centre slipfeather so that it would be smaller. Notice that in laying out the spacing of the slipfeathers I accounted for the moulding detail that would be added later. When making the slipfeather material with planer and thicknesser, I aim for a fit just .001in thinner than the kerf size. After the glue dries, remove excess slipfeather material with a flush trim saw and use a hand plane to trim fully flush. Always plane with the grain of the slipfeather, which means from the corner of the box to the middle. I use a low angle block plane since the slipfeather is partially end grain, but be careful not to cut the surrounding material as the lower effective cutting angle is likely to cause tear-out if cutting against the grain. A little sandpaper can be used at the end if necessary.


Mouldings
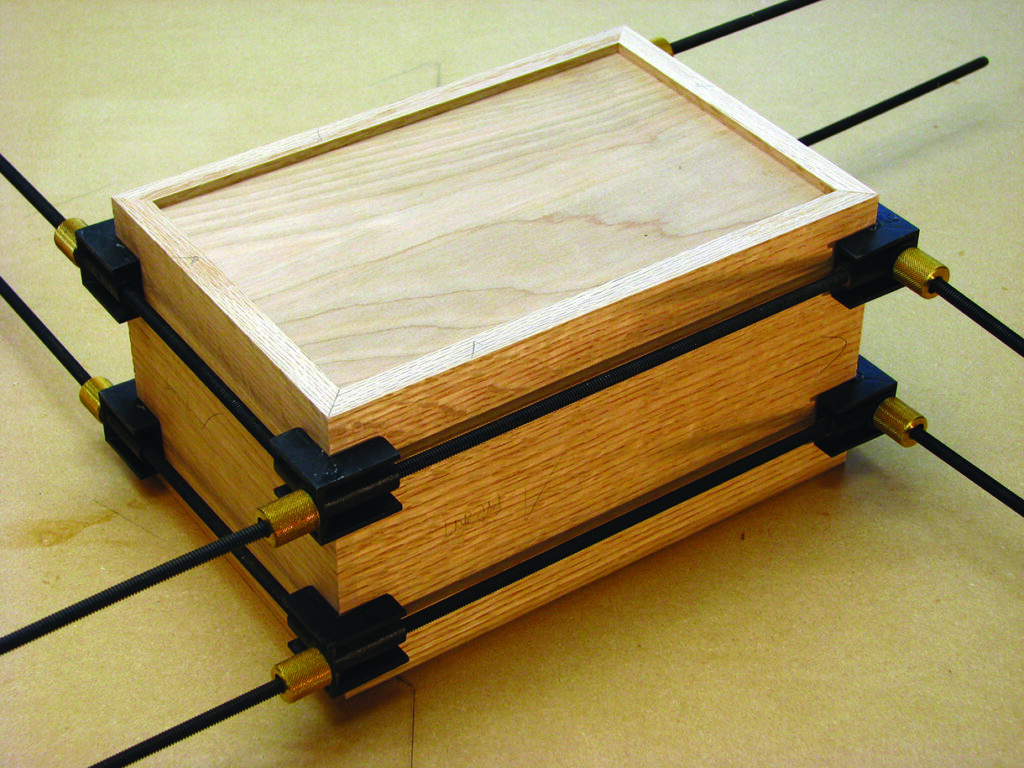
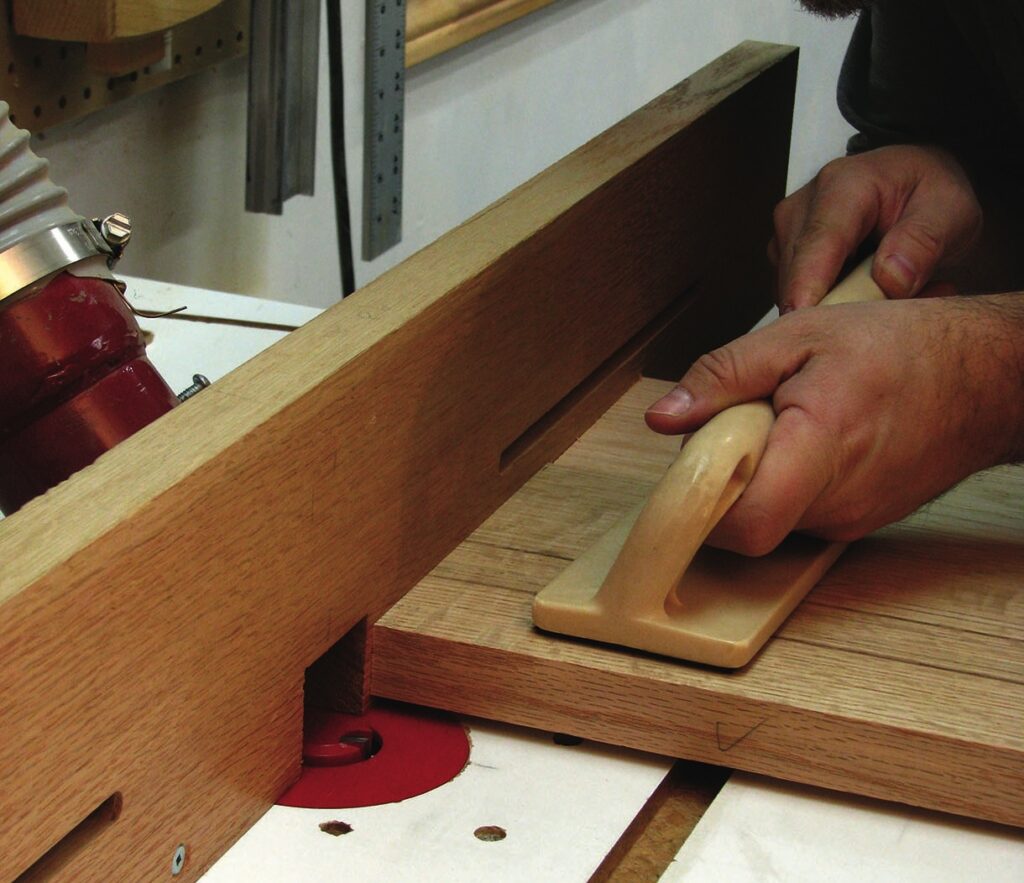
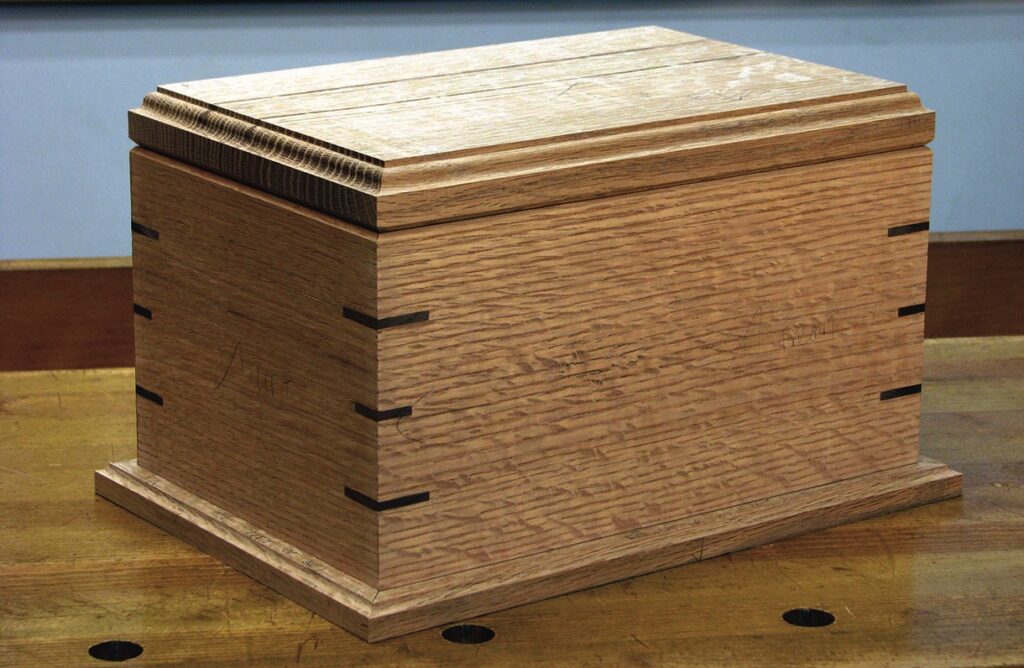
Next came simple mouldings just ½in square in profile. I cut the mitres on the tablesaw but this time with the blade vertical and the mitre gauge angled to 45°. Then over to the router table to add a decorative profile. Because the parts are small, use featherboards to hold the wood to the fence. You can also use a featherboard or pushstick to keep the wood tight on the table. Before glueing on the mouldings, remember to final sand the outside faces of the box because this will be harder to do afterwards. You can also sand the top edge of the mouldings. Then a tiny bead of glue along each moulding and a drop at each corner will do.
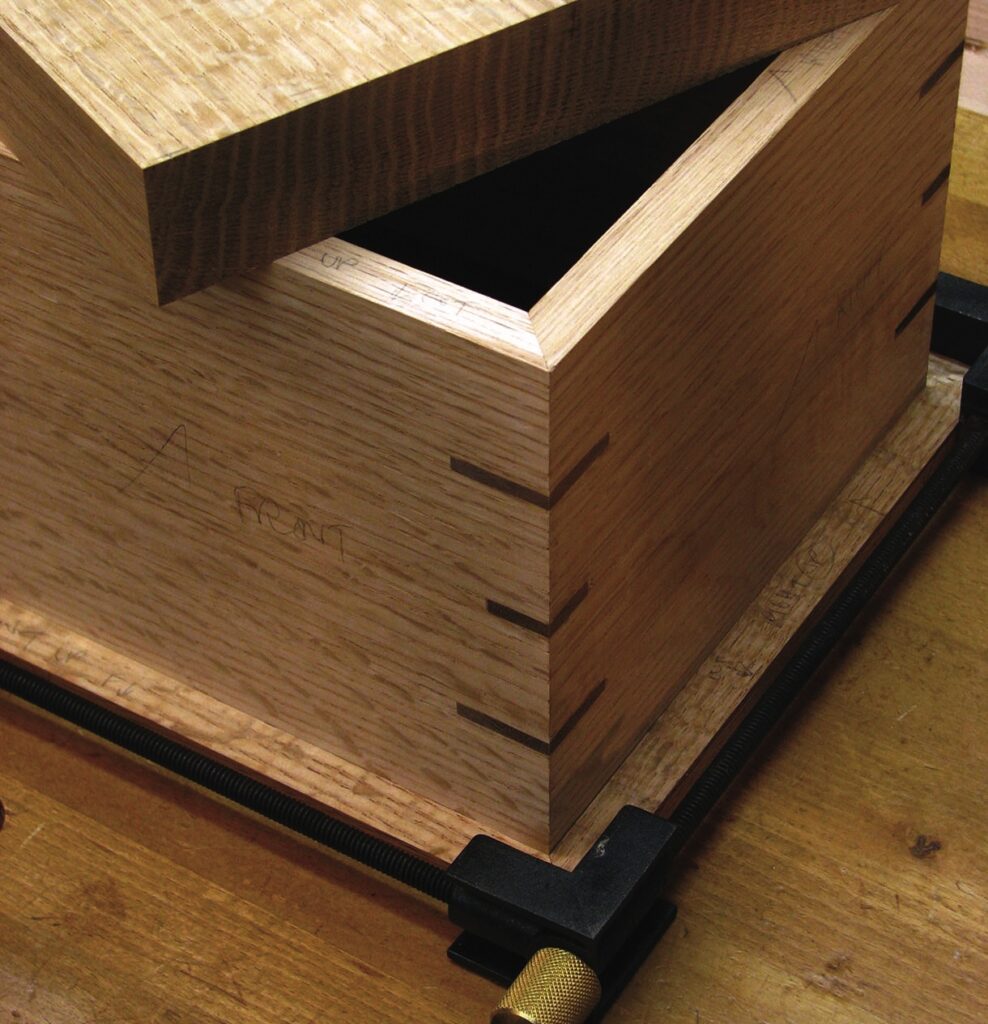
The lid
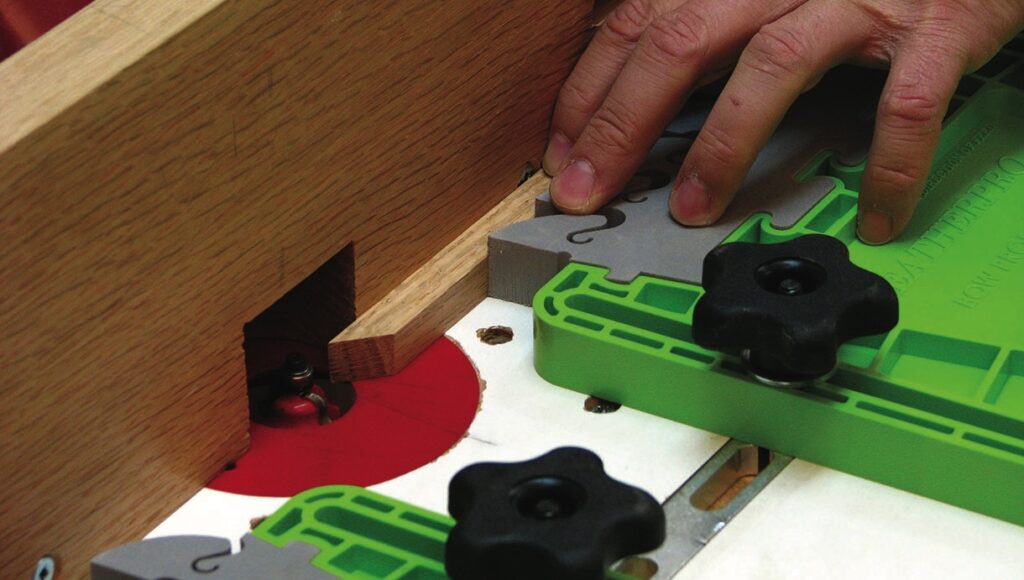
For the lid, I chose a quartersawn piece of wood. I milled it and cut it to the exact size as the outside of the box. Then I just needed to rout a rebate to fit the lid into the box. You’ll notice that I chose a piece of wood that was unusually thick, but once part of the lid was inside the box and the top corners received an ogee profile, it looked well proportioned. The rebate is easily cut with a straight bit or rabetting bit; the larger the diameter the better to reduce tear-out. Make each rebate cut on the ends of the lid first, using a wide backer board to eliminate break-out on the exit point and also to help guide the lid safely along the fence. Then make the same cuts on the long edges of the lid. Keep cutting about 1⁄16in deeper per pass until you are happy with the overall depth. You must also customise the width of the rebate cuts so that the wood left in the middle of the lid will fit inside of the box. Aim for a fit which is just a bit loose to account for expansion of the lid from front to back in humid weather. After the rebate and ogee profile, I also routed a small chamfer on the underside of the lid and at the top of the box, which gives a nice line of separation between them.

Sanding and final steps
After completing the lid, there was more sanding to be done on the mouldings, the bottom, the top edges of the box and the lid on both sides and edges, I also added my signature on the bottom. My father and I have the exact same name so the signature identifies the maker and the person for whom the urn was made.
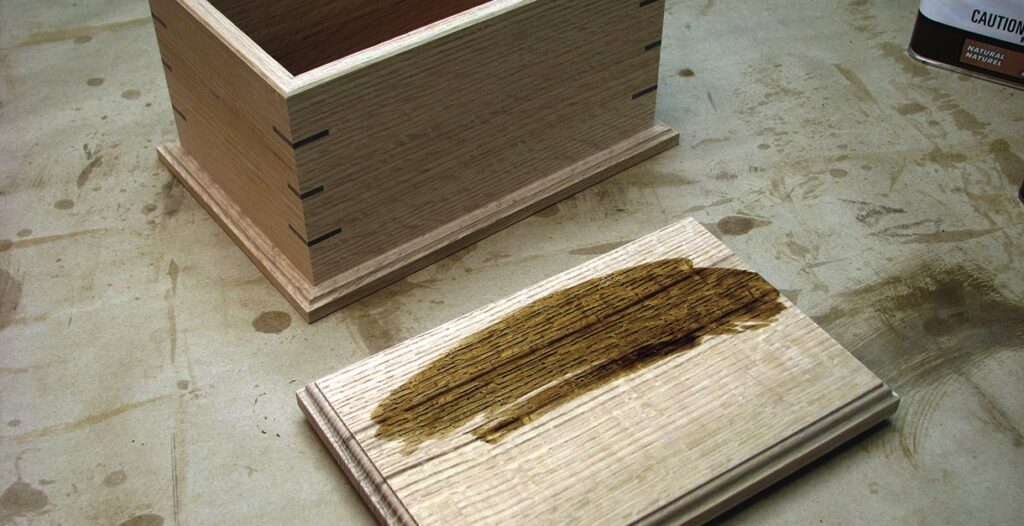
While the urn looked great with the lighter coloured white oak and darker walnut slipfeathers, I felt that a darker colour would be more appropriate. I added colour by using black walnut tinted Watco Danish oil, which is a ‘stain and finish in one’ product that colours with asphaltum. I stained all areas except I used a natural (unpigmented) Danish oil mixture on the bottom panel so as not to obscure the signature. Because the black walnut tone was quite cool, I added 25% cherry Danish oil to warm it up a little, which equates to one part cherry to three parts black walnut. I then took that mixture and added 25% satin varnish resulting in a one-part oil-based satin varnish to three parts Danish oil mix. Five coats of this is usually enough, and it’s as easy as can be; wipe on a generous amount and then wipe off the excess with a rag, rubbing in the direction of the grain. I also wet sand the surface with 600 grit wet/dry sandpaper while applying the last coat, which makes the surface silky smooth. Three or four weeks later, one coat of paste wax applied through a rag and then buffed off with another rag and the urn really feels spectacular.
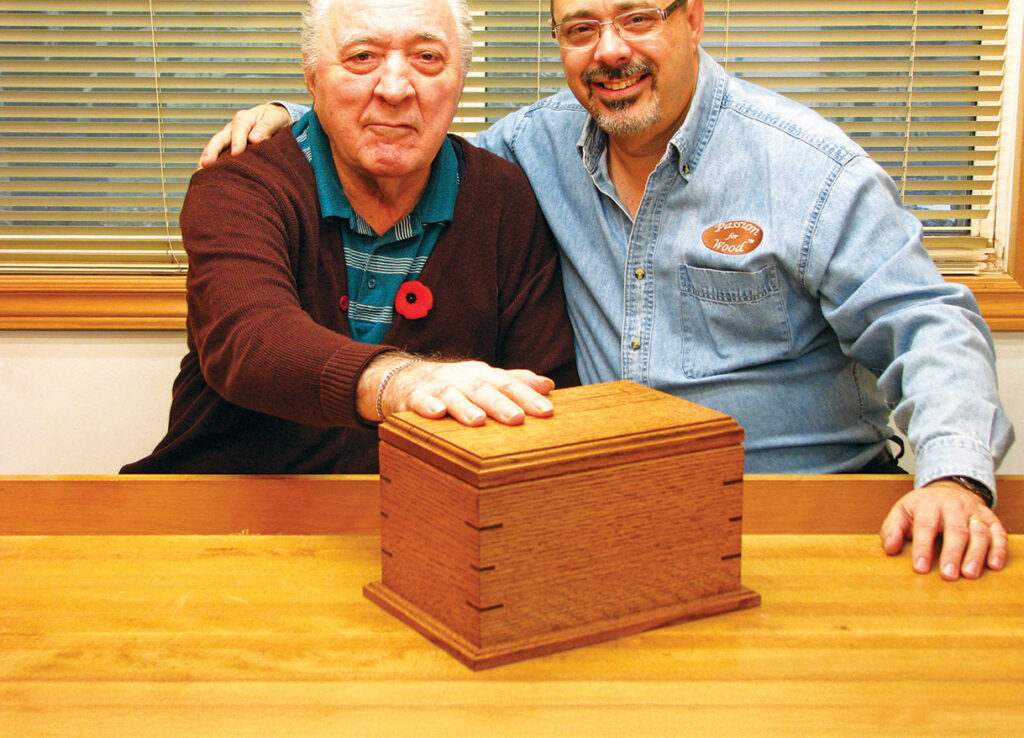
Presenting the urn
When I completed the urn, I invited my father to my workshop to see it and take a few pictures of us together with the urn. Admittedly, I was a bit nervous about it. While my father has not shown any fear in talking about death, it still doesn’t feel like a ‘proper’ conversation. Still, I now feel a sense of relief knowing that the urn is done and ready for whenever it might be needed. My father’s initial reaction was to say, ‘Really? I’m going to fit in there?’ I showed him how heavy the super thick lid is and he was surprised at its heft. I told him that given all he has survived in his life so far, I was afraid he might try to get out if the lid weren’t heavy enough! He laughed.
While I could have purchased an urn fairly inexpensively when needed, it has great meaning to me that this project represents the last thing I can do for my father. This is the only project I’ve ever built that will be buried and will disappear forever yet it is so much more meaningful than most knowing that my father can finally rest in peace when he is ready.