Goblets are a popular topic for turners of all levels of ability, but there is much to be understood in what is really a complex project. By breaking it down into small components the process can be far more achievable for any turner, and you can make use of your favourite timber combinations along the way.
Turning a goblet is an exercise in working back to front according to how most people assume the item is made. Generally you grip a turned cylinder firmly in a chuck and hollow the ‘bowl’, then trim its profile down to the stem and finally the base, all of which requires working with straight-grained timber which provides strength to the item.
Burrs have swirling grain, which makes them visually fascinating, but structurally weak when turned down to thin sections, a key requirement in the stem of a goblet. I decided to break this goblet down into pieces that can be completed individually and, if you choose, from a variety of species that complement each other, as I did. There are many burrs available on the
market sold under a number of names. Many burrs of Australian origin are referred to as ‘eucalypt burr’ regardless of their true botanical grouping, but depending on your supplier, you should be able to determine exactly what the burr is that you’re working with, if that’s important to you. Most often it’s the colour and grain that make us stand back and say ‘wow’.
For this project I used coolabah burr (Eucalyptus microtheca), which has a pale sapwood and rich red inner colour, contrasted with the black colour of ancient red gum (Eucalyptus camaldulensis) – a timber to be covered in a future project – which highlights the stunning beauty of eucalyptus burrs.
Focus on coolabah
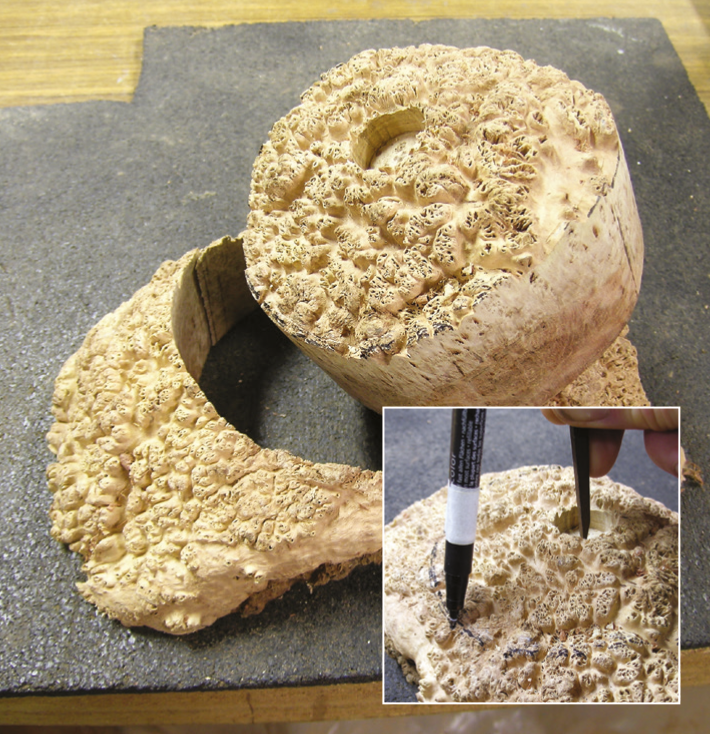
Coolabah burrs cut on trees
Coolabah or coolibah (Eucalyptus microtheca)
Grows: Australia. Western Australia to Queensland in semi-arid zones
Density: 1050-1120 kg m3
Coolabah is generally only harvested commercially in burr form as the trunk does not grow to a size that makes milling of boards economically viable.
Burrs are growths that form when a tree undergoes stress caused by injury, virus or fungus. They most commonly occur on trunks of trees and consist of swirling grain, including voids and covered in bark. Depending on the species the wood can be quite compact and dense, or porous. Trees that eke out a living in tough, dry locations will generally grow smaller burrs, however in some areas a burr can encircle an entire trunk.
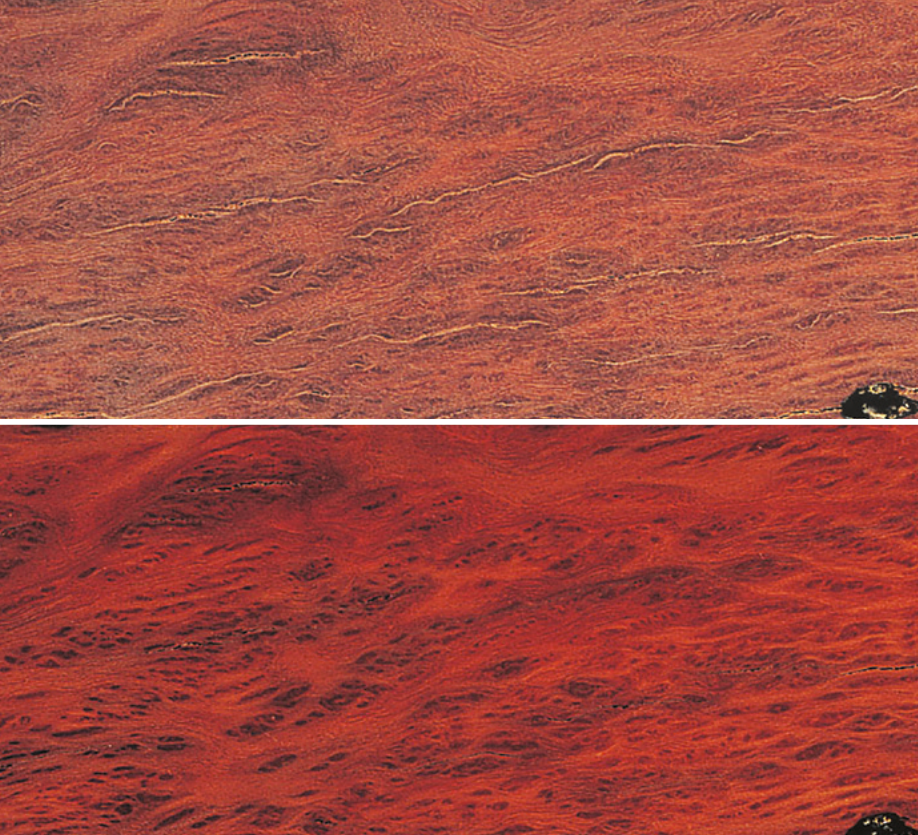
The sapwood is whitish – creamy pink and narrow – the heartwood reddish-dark to deep brown red with a blackish tinge. Generally the trunk of the tree is quite short and is not processed commercially, however burrs have a wonderful swirling grain that includes bird’s eye patterns. Colour can vary depending on location and soil it grows in. The burr may contain small splits/checks.
Working with it
Coolabah has a sweet fragrance that you notice either when cutting or sanding the burr. The wood is stable once dry but, as with all burrs, it will distort significantly when turned wet. However, it is generally sold either semi or fully air-dried. As mentioned, it may contain micro- checks or splits. The wood I used was firm but not ultra-hard with dense qualities that enabled it to both cut and scrape with ease, generating lovely fluffy shavings and leaving a clean surface off the tool. The denser, harder areas respond well to taking a slower cut.
Sanding was equally easy as it responded well to all grades from 120 to 320 grit, and resulted in a smooth, shiny surface when abraded with micro-fine abrasives. It can at times gum up the abrasives, so use fresh faces of abrasive regularly. I performed some carving trials where the wood cut easily and cleanly, leaving a smooth surface and holding a clean edge on both side and face grain. It worked well with gouges, veining carving tool and skew. It is capable of holding quite fine detail.
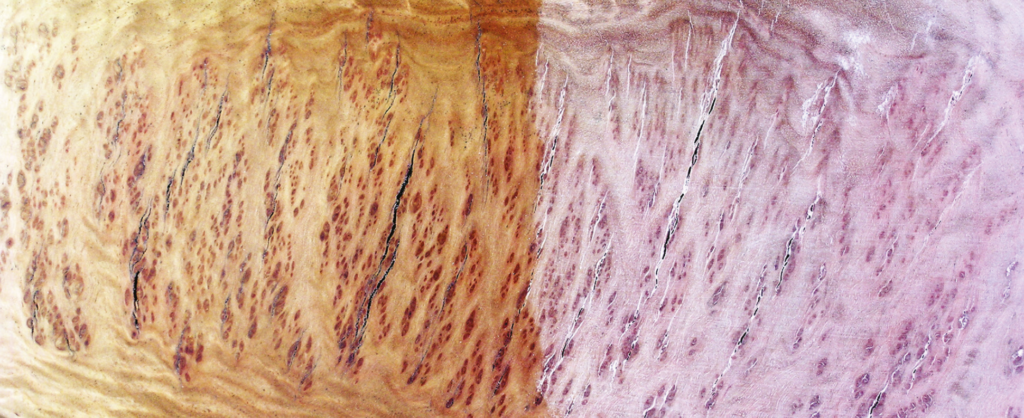
Coolabah burr plain and oiled sections
Other eucalypt burrs
Although coolabah is a specific species, several eucalypts – including bimble box (Eucalyptus populnea), red mallee (Eucalyptus oleosa) and yellow mallee (Eucalyptus incrassata), which grow alongside each other and also form burrs – tend to be grouped together, sometimes referred to as eucalypt burrs or mallee burrs. There are many other eucalypt species that are sold asburrs too.
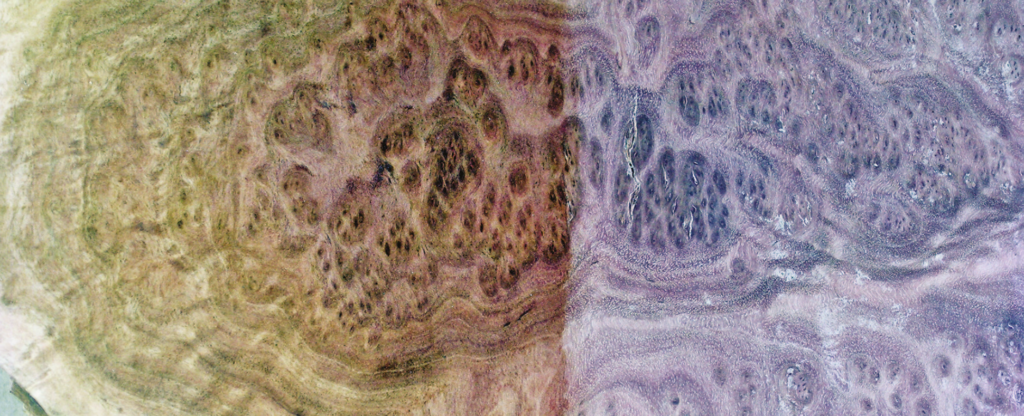
Bimble box(Eucalyptus populnea) burr with and without oil finishRed mallee (Eucalyptus oleosa and Eucalyptus socialis) burr plain with and without oil finish
Tools and materials
Personal and respiratory protection equipment
10 & 13mm bowl gouge
13mm spindle gouge
Parting tool
French/round-nosed scraper
Chuck
Drill chuck
4mm milling bit
3mm drill bit
120-400 grit abrasives
Micro-abrasive or pad to abrade to a fine finish
Cyanoacrylate adhesive
Double-sided carpet tape
Holt-melt glue gun and adhesive
Materials
Finish of your choice
Timber of your choice
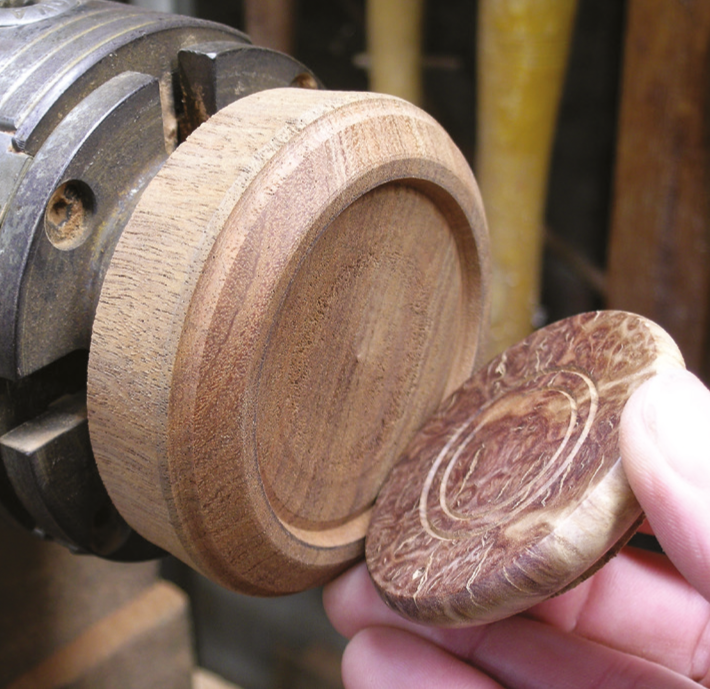
Shaping the cup
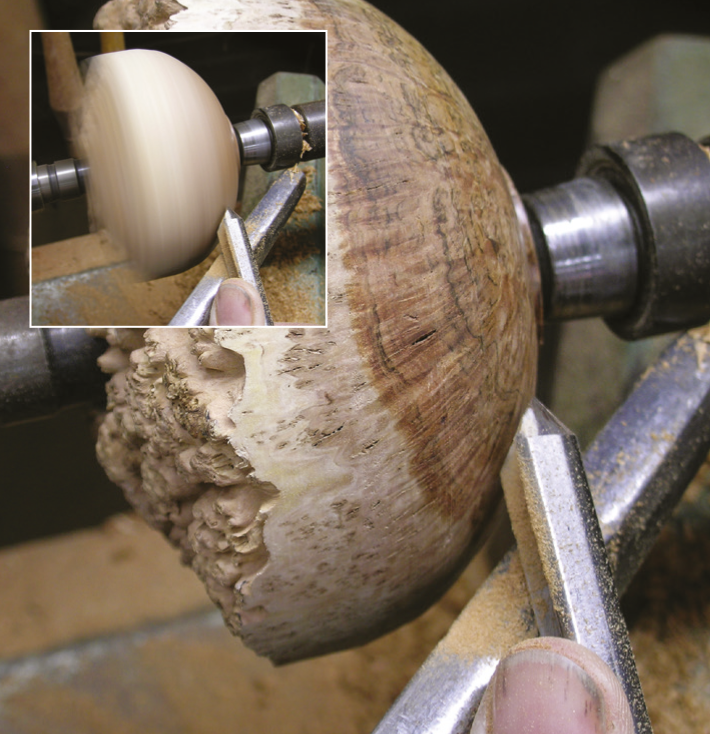
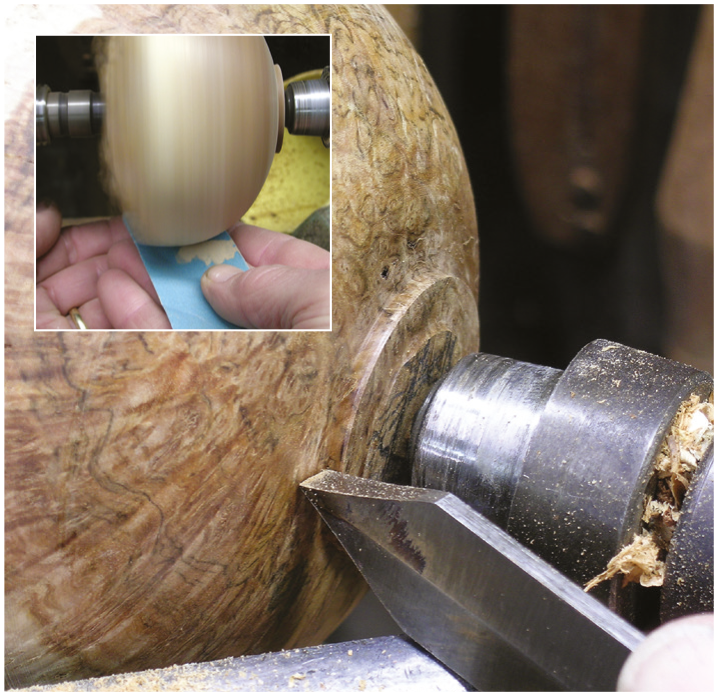
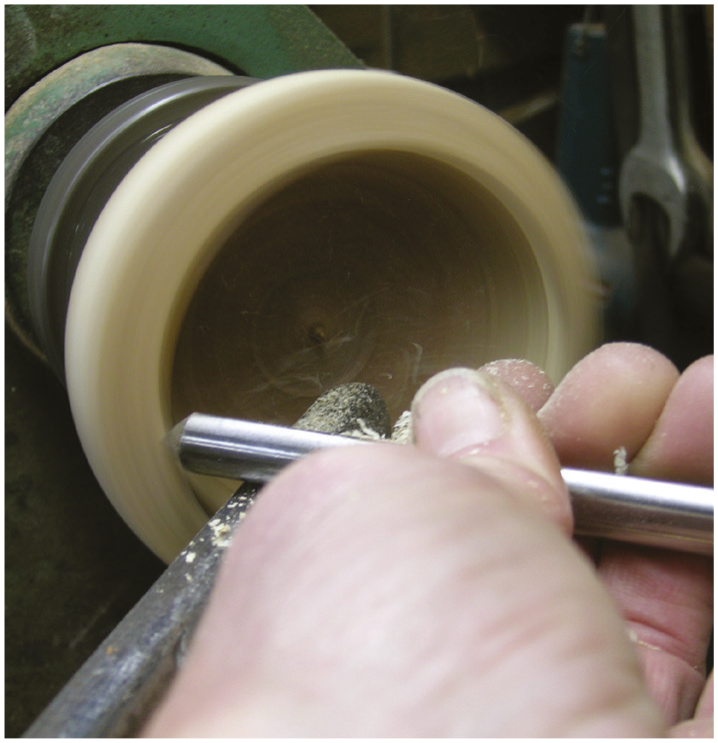
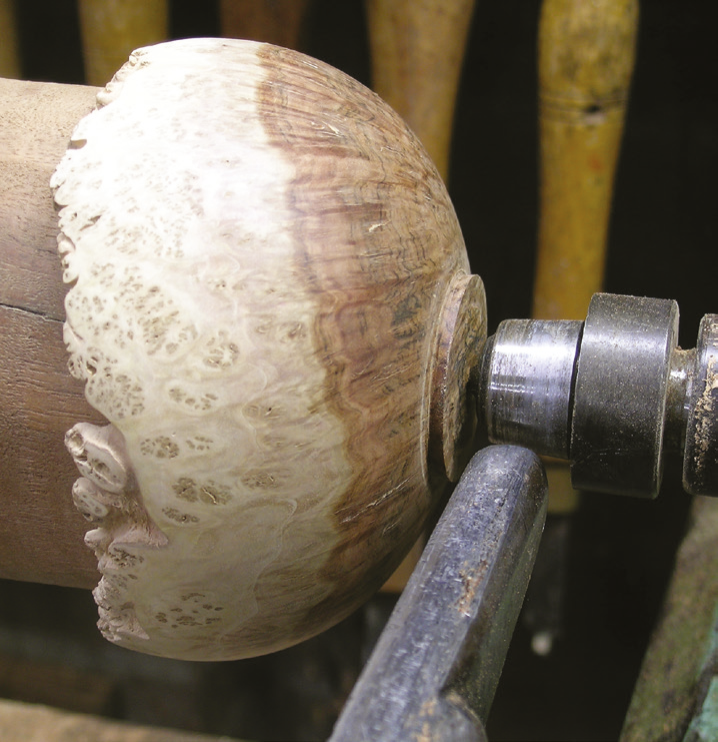
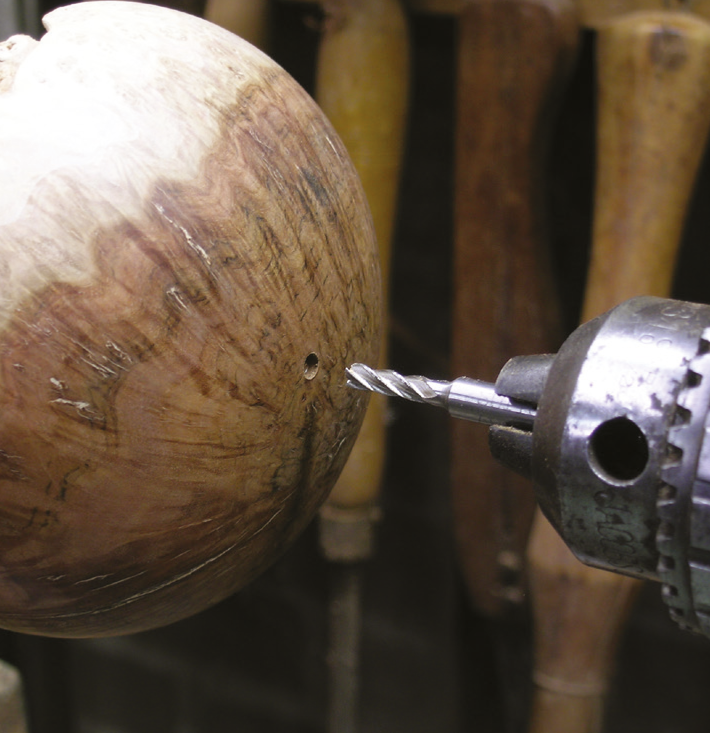
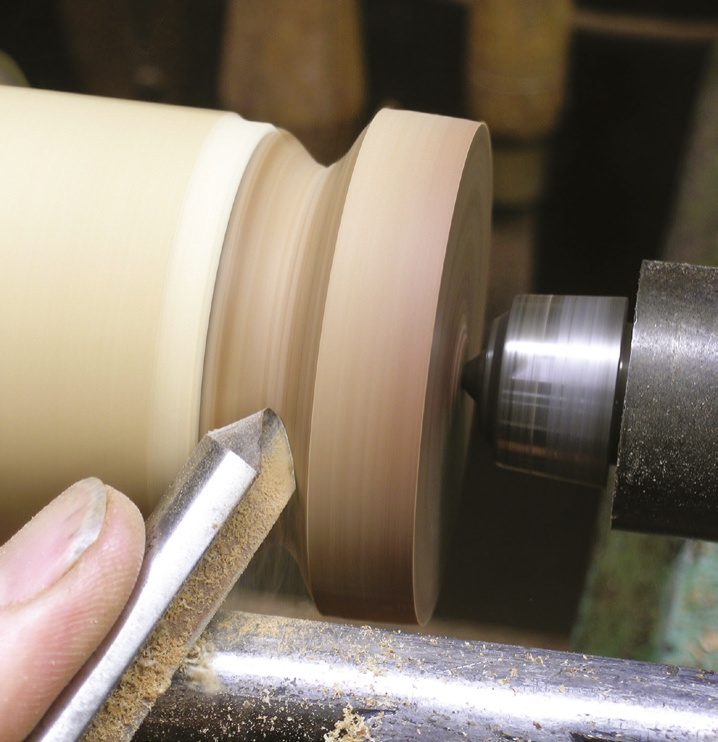
1. To hold the work securely between centres for initial shaping, drill a hole in the centre of your small burr blank to the level you reach solid timber. Now use a compass and, locating one point in the drill’s centre, mark a circle of the size of cup required. Then use a bandsaw to cut out the blank required2. Mounted between centres, the blank can be trimmed to shape. I like to use a fingernail-shaped 10mm bowl gouge rolled over on to its side so it acts as a shear scraper, which leaves a cleanly cut surface requiring minimal sanding. The wood is dense and works easily, either with a gouge or scraper. Unlike some burr species, this one does not have a dry or brittle feel and yields a clean surface that requires little sanding3. Cut a tenon at the bottom with a parting tool to hold the cup in a chuck while hollowing. Once cut, sand the piece. Sanding the outer surface of a form that has an uneven edge raises safety issues. Never have your fingers pointing into the oncoming natural edges. I point fingers down in the direction of the spinning wood and gently bring overlapped fingers holding the abrasive into contact with the spinning wood. This allows a gentle deflection of sandpaper and fingers away from sharp edges that may otherwise catch either4. Remove the just-shaped cup off the lathe and mount it in your chuck on the tenon just cut. Use a bowl gouge to hollow the inside, but keep your revolving tailstock in place as long as you can, only removing it when it is in the way5. With the tailstock removed, refine the wall thickness, aim for 3-4mm thickness at the top and 4-5mm at the bottom. If required, use a scraper to help refine the inside. Once the interior of the bowl section is completed sand down to 400 grit6. Now create a carrier for the cup. Do this by mounting a waste-wood section in your chuck and shape the end to match the internal form of the cup. I used a profile gauge to help with this. Once shaped, apply double-sided carpet tape to the end. Use only enough tape to hold the cup without it easily coming off. Now, remove the tape covering…7. …and press the internal cup on to the taped face using the revolving tailstock to align it perfectly. Once fitted keep the tailstock in place and remove as much of the tenon as possible. For the last bit, stop the lathe, remove the tailstock and check the cup is held securely, then, using a low lathe speed, make gentle cuts to shape the very bottom area creating a smooth rounded form, then sand it8. Now you need to drill a blind hole. Since I didn’t want to drill through to the inside of the cup, I opted for a 5mm milling bit mounted in a Jacobs chuck fitted to the tailstock of my lathe. This left me with a flat-bottomed hole and minimal waste
Base section
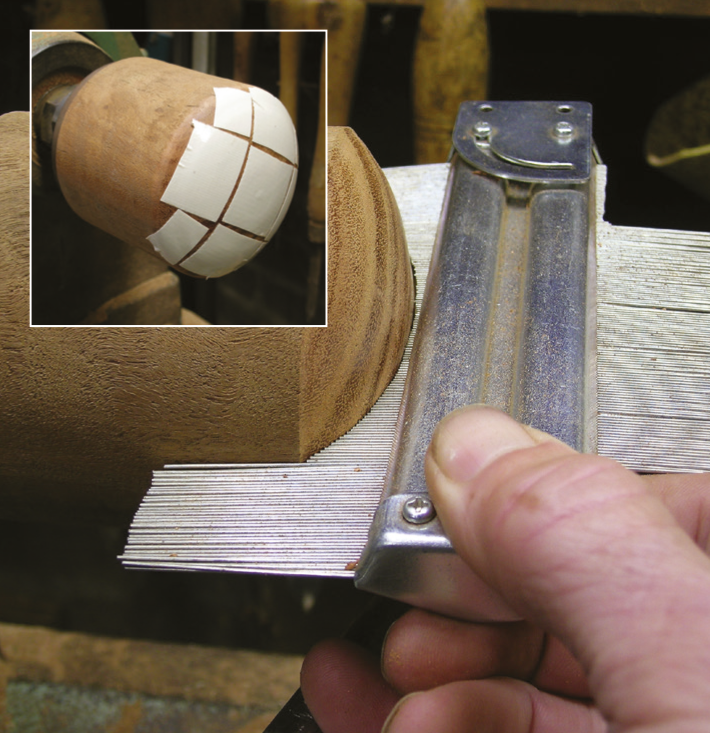
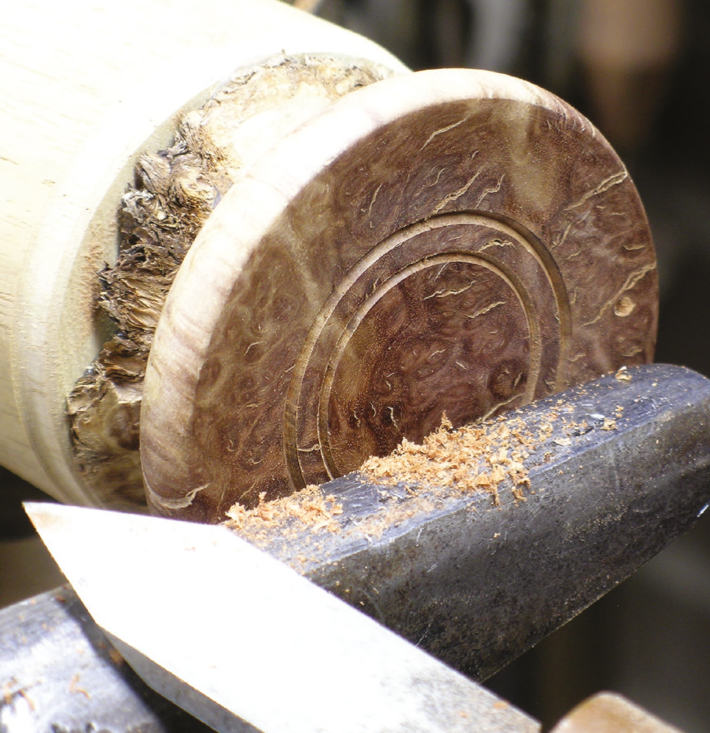
9. To minimise waste create a glue chuck. Mount a waste section of wood held in a chuck and trim the end flat so the burr base section can be attached to it securely with hot melt glue. When ready, apply the adhesive and press the timber to the block using the tailstock to ensure alignment and that it seats properly on the glue chuck. Once set, use a bowl gouge to create the beginning of a domed base with an underside that ‘tucks’ under the broadest part of the curve. Once complete the base will look as if it sits up off the surface it rests on rather than appearing to sit on its haunches10. With the shape established and underside of the base shaped you can cut a couple of V-grooves to add detail and then sand to 400 grit. To cut the grooves I use a homemade V-scraper but you could use the corner of a parting tool11. To complete the base, remove it from the glue chuck and turn a jam chuck. This requires you to cut a recess in a waste section of wood of a diameter that is roughly similar to the diameter of the base material. How large to make the recess and what angle I have no answer for, it really is a matter of trial and error. Once you can hold the wood securely, create a nice domed top and drill a blind hole in the middle to accept the stem
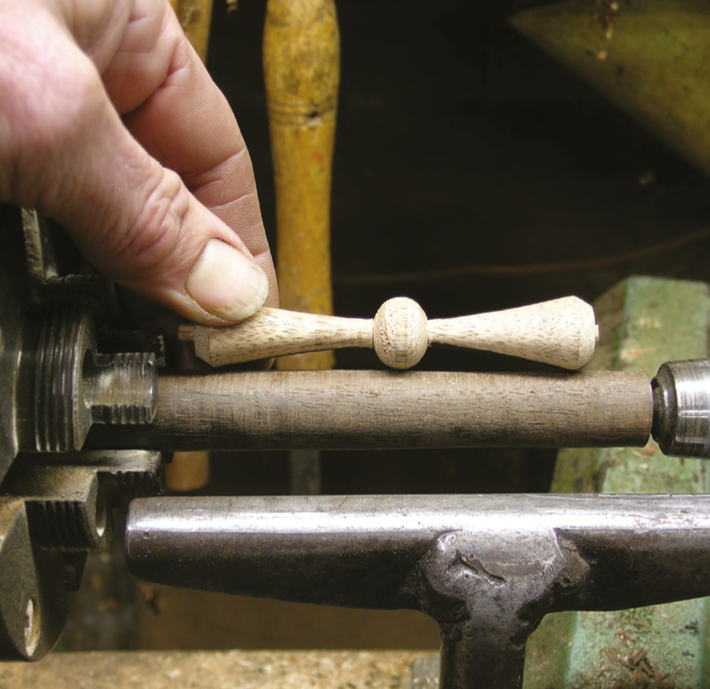
Goblet stern
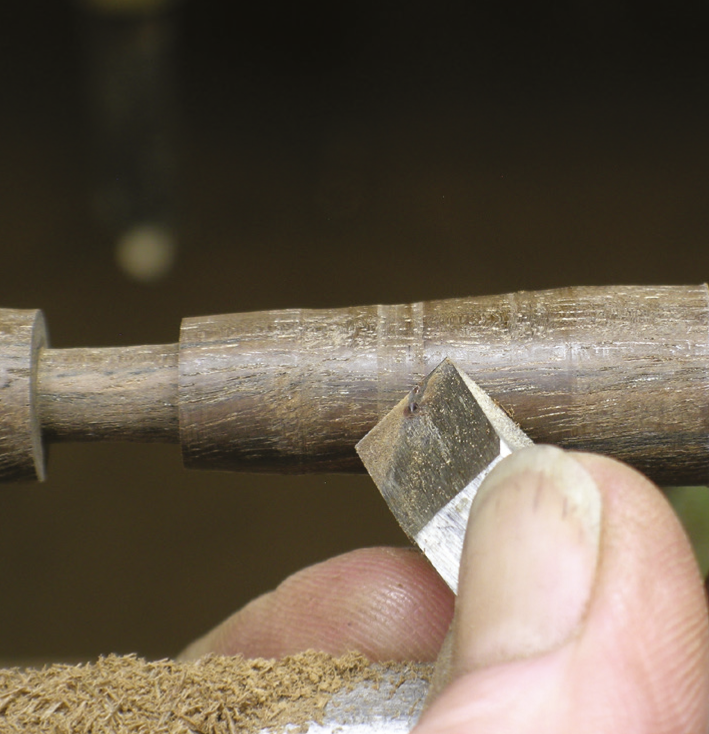
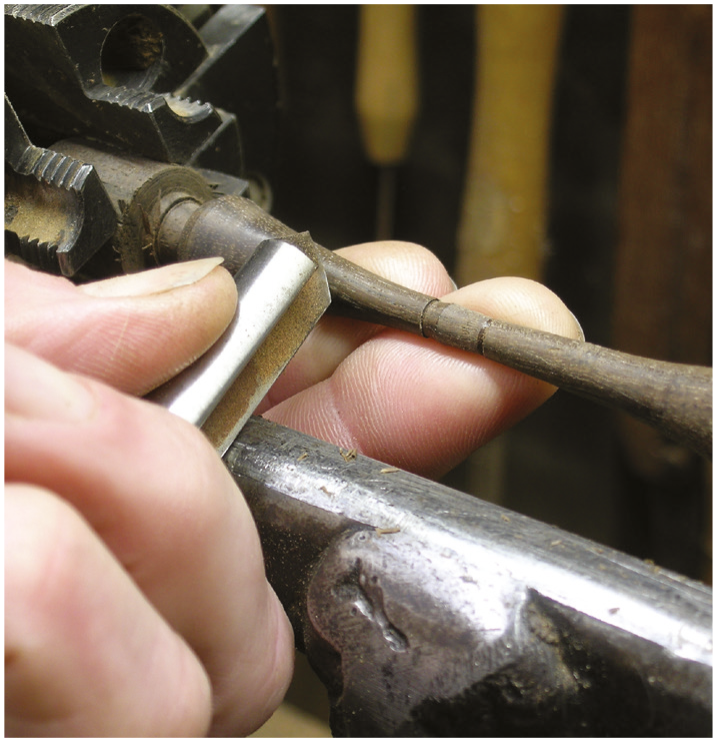
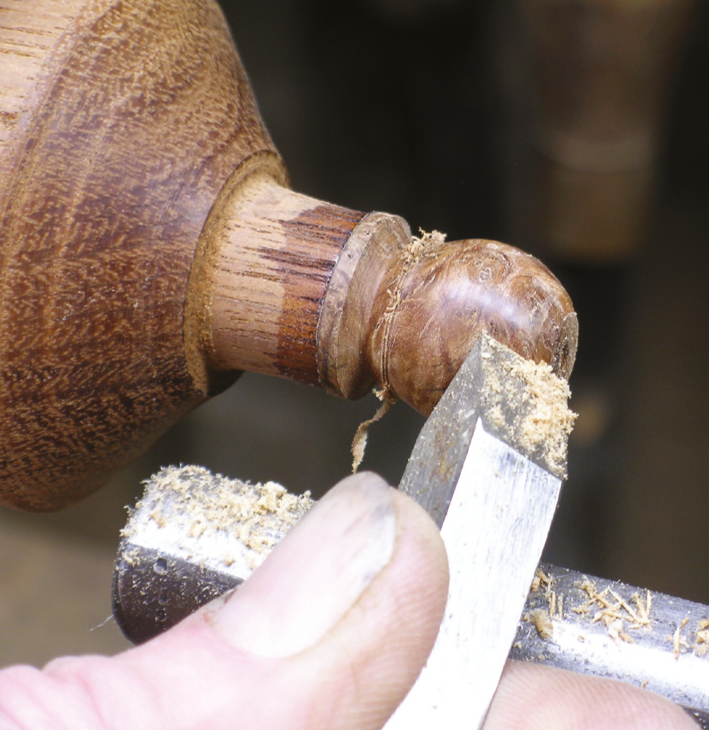
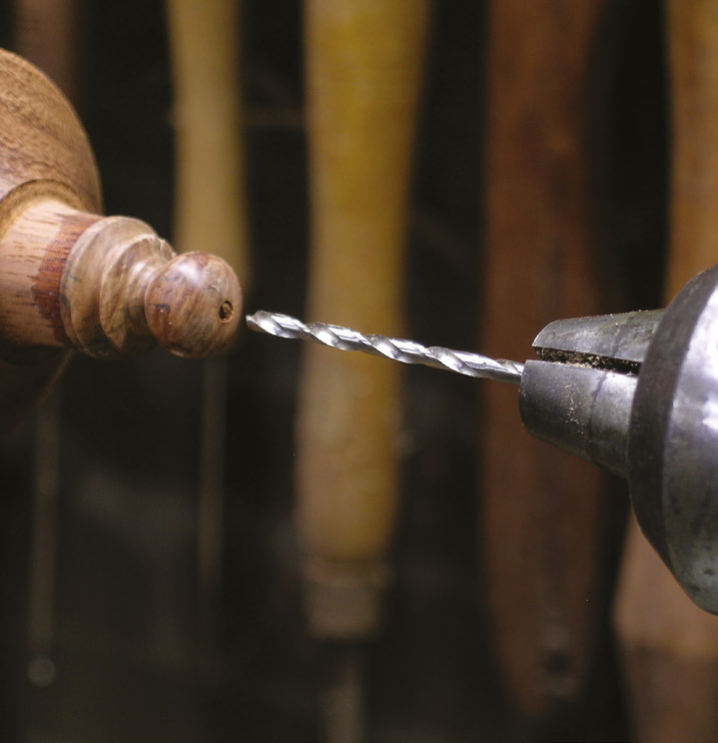
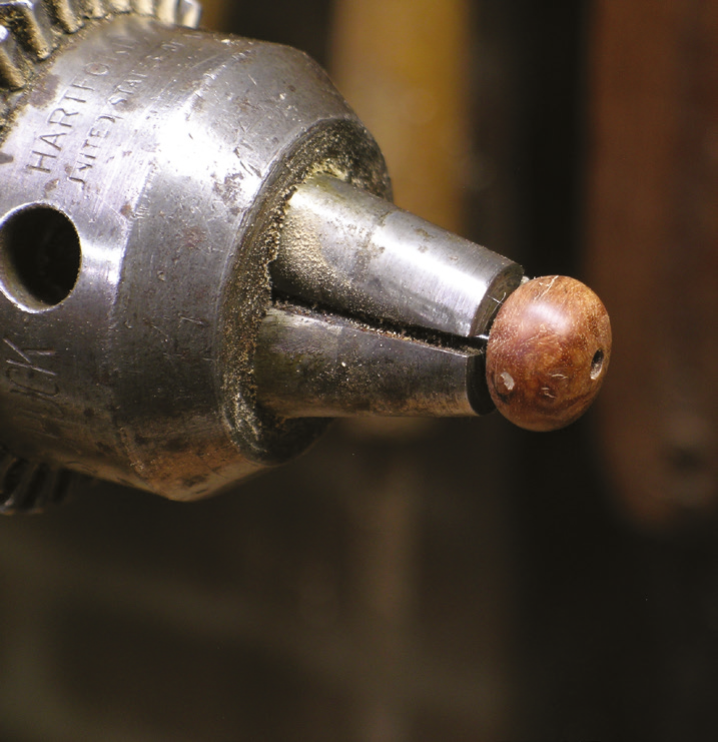
12. To ensure that I had everything looking nice and balanced I turned a sample stem from bland timber to check everything was OK13. I opted to make the final stem in one piece which would later be cut apart. Initial turning was completed using a beading and parting tool – a skew would also work14. For fine shaping I used a bowl gouge rolled over on its side so the cutting edge was at an angle similar to that of a skew chisel to slice the fibres. As the spindle narrows it will become flexible, so you will need to support it with fingers, keeping your hand and fingers away form the chuck jaws and only do this in smooth, round timber. I hook my index and middle fingers under the toolrest and pull my ring finger and pinkie around the shaft of the gouge, using my thumb to guide the tool along the wood15. Once the stem is shaped, sand to 400 grit. A 2-3mm-diameter tenon needs to be cut with a parting tool between the main parts of the stem. The unfortunate part of this multi-part project approach is that the thinnest middle section needs to be thin enough to act as a tenon that locks into a hole drilled into the contrasting colour timber bead later. All of this fiddling and precision can be overcome if you turn the stem and bead out of one piece of wood. The tenon’s shoulders need to be slightly undercut at each end of the stem so there aren’t any visible gaps when the various components are finally assembled16. For the central bead, I found it easiest to glue a small piece of wood to a to glue chuck with CA adhesive, which, once dry, can be rough-turned to shape with the tailstock in place17. After rough shaping, mount a drill chuck, fitted with a 3mm drill bit, in the tailstock and drill through the bead to accept the stem’s tenons. Once drilled, you can now part the bead free with a skew chisel, being careful you don’t lose it18. Next, fit the Jacobs chuck into the spindle of your lathe and, gripping the 3mm drill bit the wrong way around so the tang protrudes by about 6mm, push the finished end of the bead on the plain metal section of the drill bit. It should be a snug fit. Now, using a low lathe speed refine the unfinished end of the bead and sand it once shaped. Now glue and assemble all the parts, wiping off any excess glue and, when dry, apply a finish of your choice
To provide the best experiences, we use technologies like cookies to store and/or access device information. Consenting to these technologies will allow us to process data such as browsing behaviour or unique IDs on this site. Not consenting or withdrawing consent, may adversely affect certain features and functions.
Functional
Always active
The technical storage or access is strictly necessary for the legitimate purpose of enabling the use of a specific service explicitly requested by the subscriber or user, or for the sole purpose of carrying out the transmission of a communication over an electronic communications network.
Preferences
The technical storage or access is necessary for the legitimate purpose of storing preferences that are not requested by the subscriber or user.
Statistics
The technical storage or access that is used exclusively for statistical purposes.The technical storage or access that is used exclusively for anonymous statistical purposes. Without a subpoena, voluntary compliance on the part of your Internet Service Provider, or additional records from a third party, information stored or retrieved for this purpose alone cannot usually be used to identify you.
Marketing
The technical storage or access is required to create user profiles to send advertising, or to track the user on a website or across several websites for similar marketing purposes.