You can buy Wooden Jewellery Boxes for only £13.50/ $21.50 (+P&P)! Usual RRP £16.99 / $26.99
🇬🇧 For UK readers, visit giftstome.co.uk and use offer code R6005
🇺🇸 For US readers, visit IndiePubs.com and use offer code IPP4024
Offer ends 31st January 2026
Book review
If you’re looking for some design inspiration, technical advice and tips on using up offcuts, then this collection of 20 projects will tick all the boxes – quite literally! Ranging from small ring boxes and trinket containers to larger boxes with several drawers, the projects in this book showcase a variety of construction and decorative techniques, such as dovetails, inlay, veneering and using contrasting timbers. Each project is described in detail and is illustrated with colour photographs.
Many of the boxes were designed to keep treasured items safe and are destined to become precious heirlooms in their own right. You can take inspiration from the designs the authors came up with to mark their special occasions, and advice is also given on how to personalise the projects.
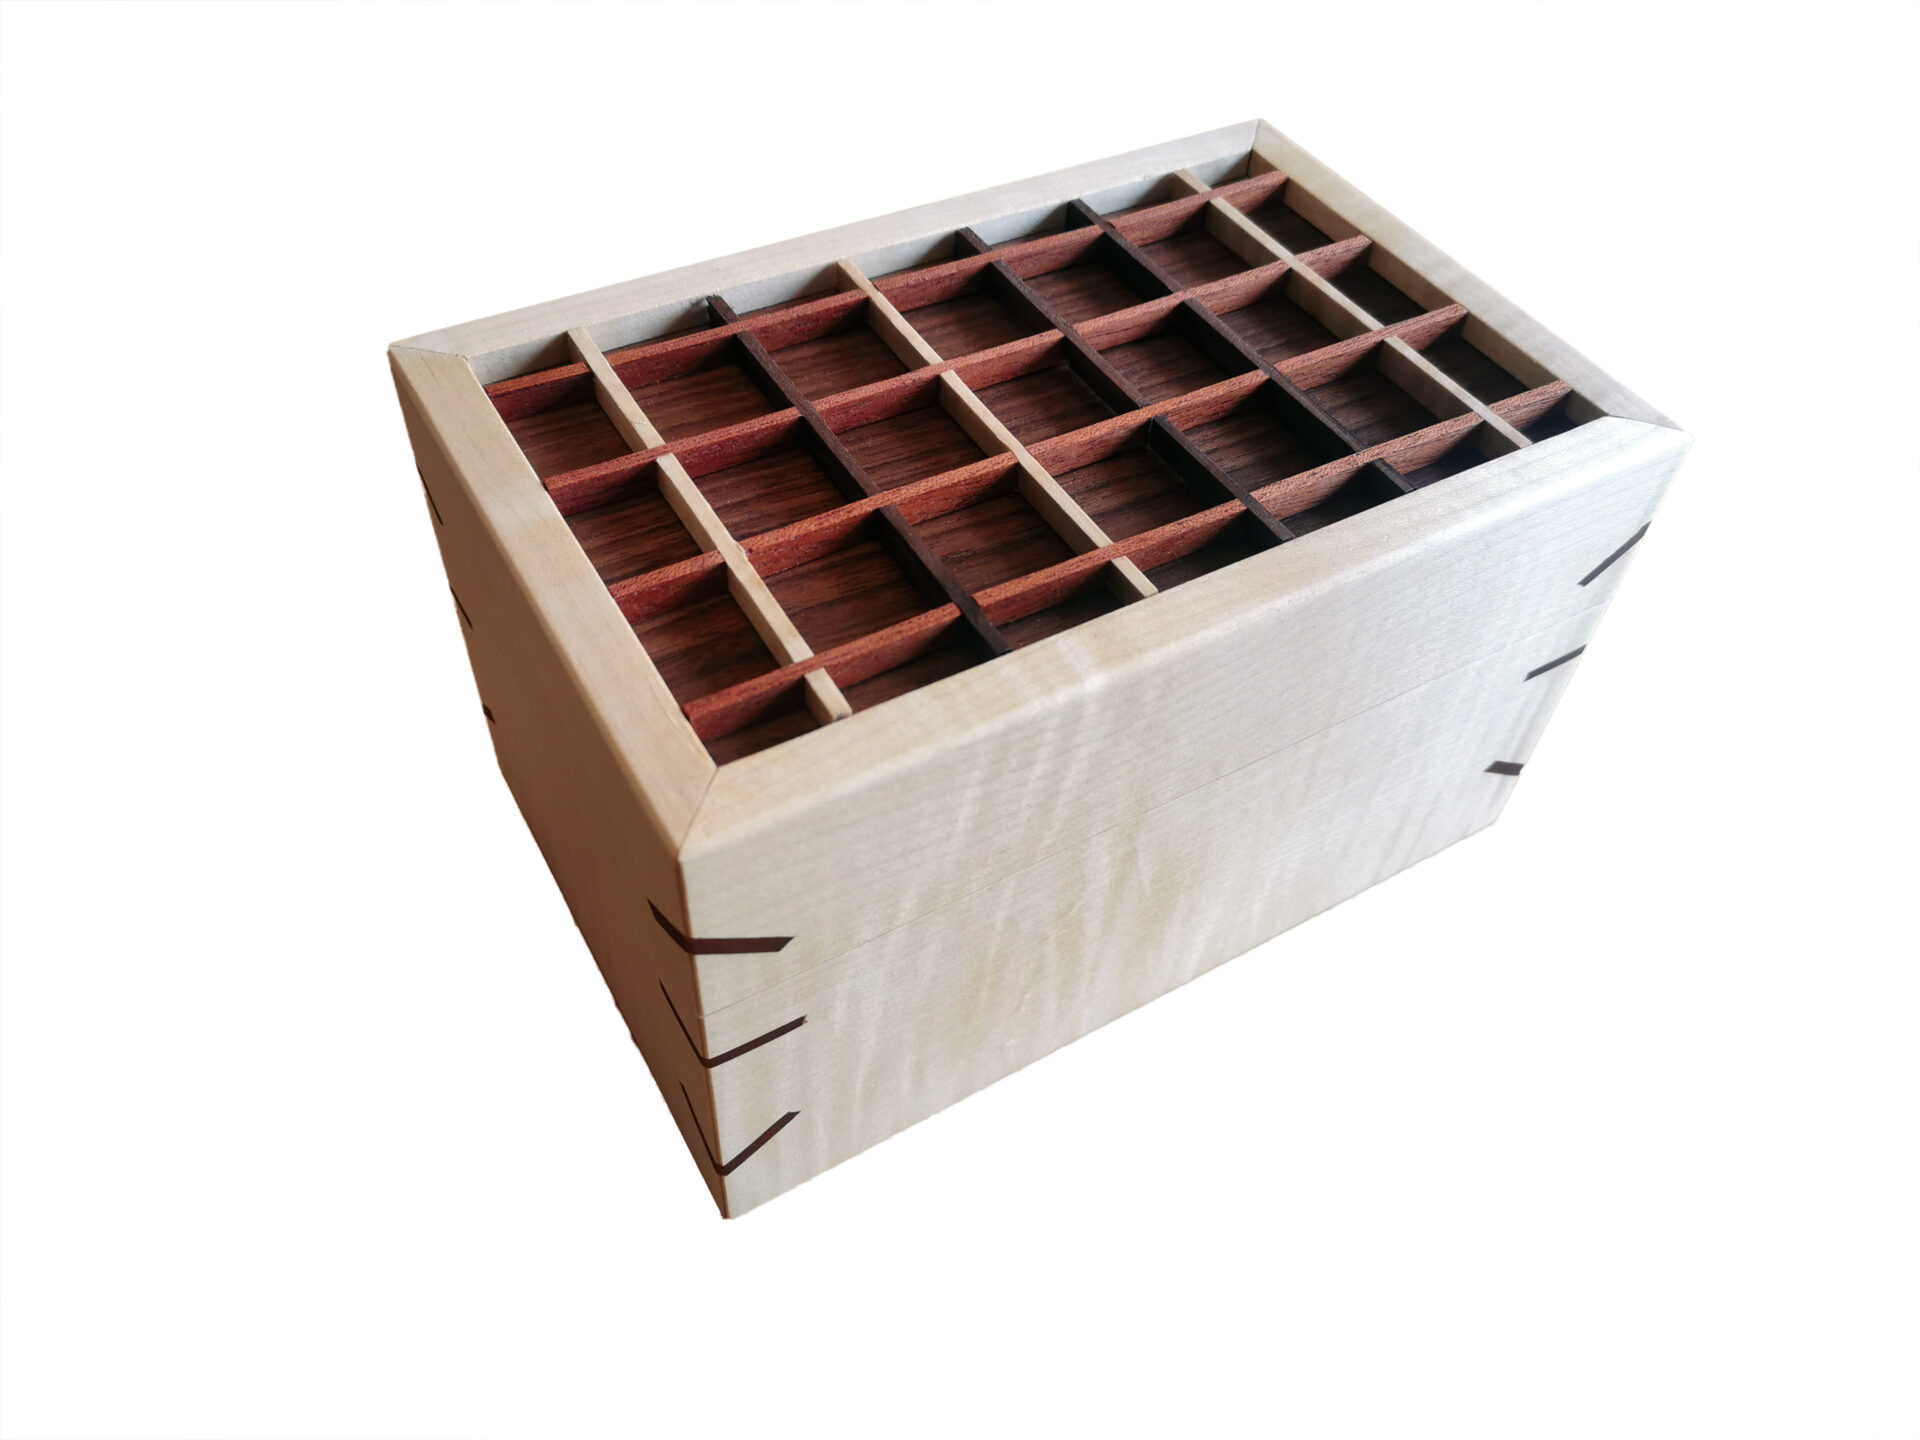
In an extract from Wooden Jewellery Boxes, Dave Clement makes a decorative box with Japanese-style inlay
As a timber machinist for a hardwood company by day and a furniture maker by night, I’m forever finding myself with an abundance of very pretty pieces of timber that are too small to use for furniture. As space is at a premium in my garage workshop, I decided to do something productive with some of these offcuts.
When I’m not making sawdust, I’m often to be found watching other people do it on YouTube, and I’ve always especially enjoyed Japanese woodwork and joinery. The precision, patience and aesthetics of it are always impressive. I decided to use my offcuts for a Japanese-inspired keepsake box. The idea for the decorative inlay on the top of my box came from kumiko and shoji screens, which are often used on a larger scale either as decorative wall art or in place of walls themselves when lined with thin paper. I also decided to add contrasting ‘keys’ to the mitred corners for both aesthetic and structural purposes.
The bulk of the box is made from a lovely piece of rippled sycamore that I’d been trying to find a use for months, while the contrasting elements are in American black walnut and utile. The ideas and techniques can be adapted to suit pretty much any size and any kind of timber – it’s a great way to use up offcuts. I worked out that I had enough sycamore for the four sides and the bottom, while the rest of the components would come out of the walnut and utile.
Step by step

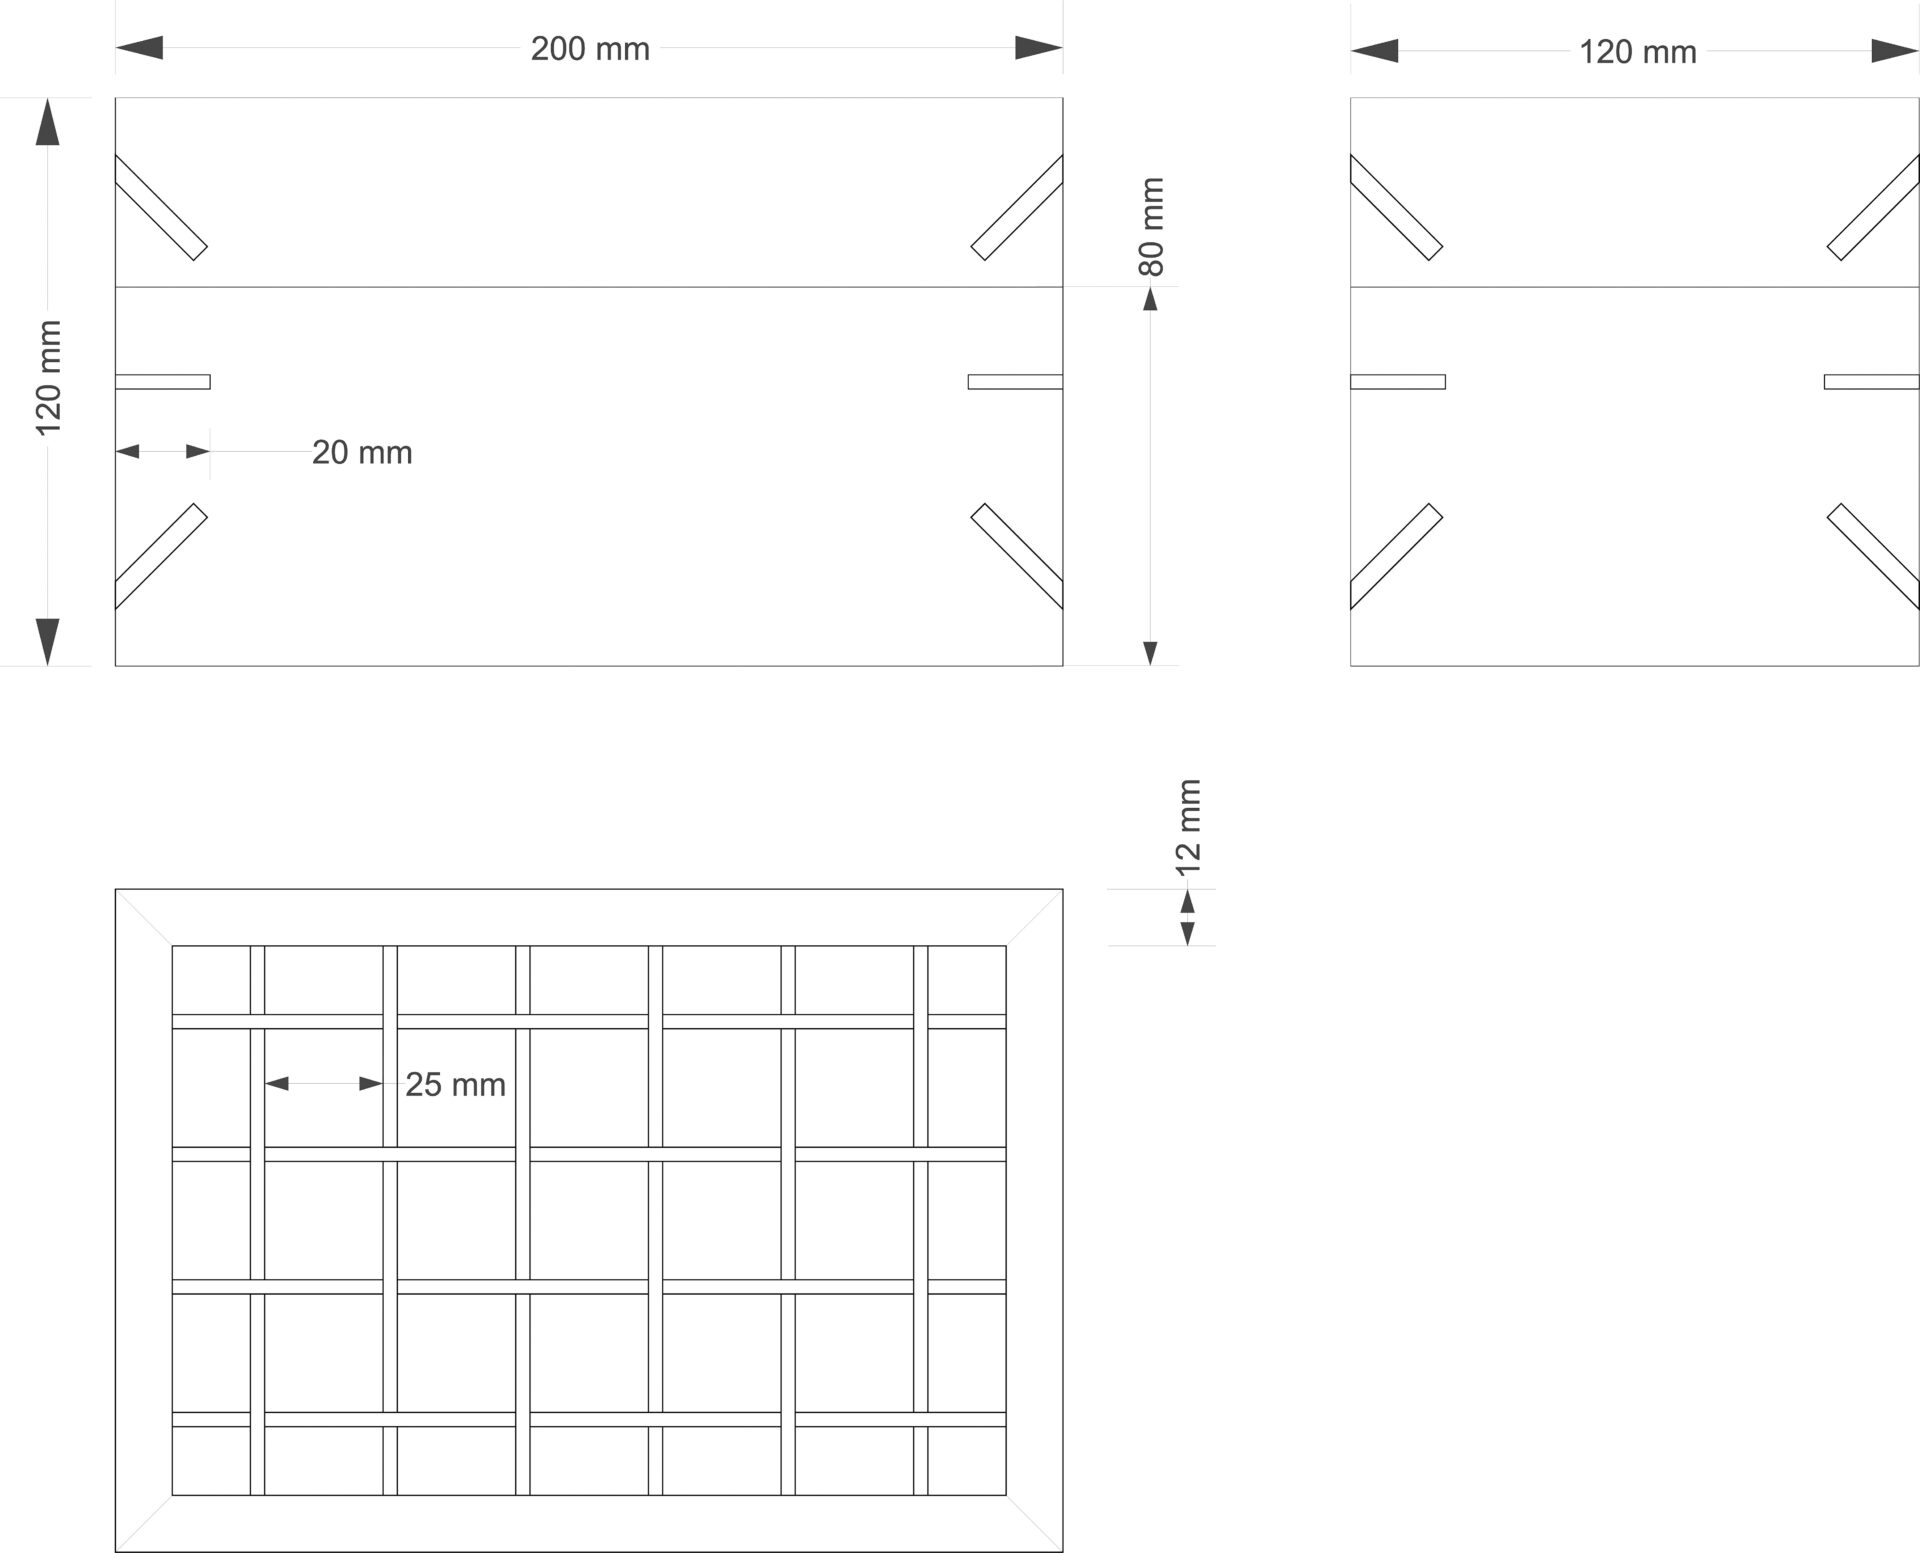
1. The box carcass was made from boards of rippled sycamore


Sizing the materials
I started by bringing all of my material to width and thickness. The sides would end up 12mm thick, while the top and bottom came in at 6mm. I’m lucky enough to have access to a six-head moulder at work, so I used this to ensure accurate sizing and a clean finish. The rest of the work was carried out in my garage workshop at home.
Before cross-cutting for the sides, I ran grooves along the entire length of the sycamore board, set 6mm in from each edge, to accommodate the top and bottom. I did this using my tablesaw with an offcut clamped to the rip-fence for downward pressure, and just kept nibbling away until the groove was a snug fit. If I were making a dozen boxes or using thicker material, I’d set up a router or spindle moulder for this stage, but for a one-off the tablesaw did a fine job.
The box carcass
Next, I cross-cut my material using a sled I built for the same saw. I wanted the grain to flow around the box, so I measured (twice!) and marked out ‘end-front-end-back’ along the board and numbered them to keep them in order. I cut the material square before tilting the blade and cutting the mitres, purely because it was easier on the saw and ended up more accurate. Whatever saw you’re using, I’d recommend a new blade, especially for anything as hard as sycamore.
Again, if I had to make more than one of these boxes, I’d set up stops to ensure all pieces are the right length, but in this case I just had to make sure the front and back matched and the two ends matched.
I cut the top and bottom to size, leaving a gap of 2-3mm on the width to allow for movement across the width of the timber, then sanded all the internal faces to 180 grit prior to assembly. ^LI held everything together using parcel tape and my trusty frame clamp while gluing, measuring the diagonals to ensure it was all square. Once the glue was set, I gave the box a good sand all over to make sure every face was flat, square and clear of excess glue.
For the keyed corners I made a simple jig that clamped to my cross-cut sled. With this in place I could present the box on its corner, set the blade height and angle and make my cuts. I machined the keys to match the kerf of my saw blade and glued them in place, and once the glue was dry I trimmed them flush.
The next stage was cutting the top off the box, which I again did on the tablesaw, using the rip fence and setting the blade just high enough to cut through the sycamore. If you’re more confident than me with a hand saw you’d lose less material that way, but I went for the easy option, leaving me much less planing and sanding to ensure a good fit.
Next, I made the black walnut lining for the box interior. I machined a strip wide enough that it would sit proud of the sides and provide a rim for the lid to sit around, and thin enough that I wouldn’t lose too much of the internal dimension of the box. I went down to about 4mm before losing faith in my thicknesser. I ran a radius along the entire length on one edge, as I figured this would be easier than doing it on individual smaller pieces, and again sanded the internal face prior to cutting the mitred corners and fixing the pieces in place. If your mitres are a good fit you’ll need minimal clamps, probably just one in the middle of each piece while the glue dries.
Making the inlay
With the main carcass of the box sorted, the next stage was the kumiko/shoji-style inlay on the top. Traditionally this is hand cut, uses no glue or nails and involves a much more complex design than the one I’m making here. For more complicated designs there are jigs you can make for bringing the material to size, cutting angles on the pieces and cutting the slots. There are many tutorials to be found online, and if you’re anything like me it’s easy to get stuck down a rabbit-hole watching these for hours!
I wanted my inlay to sit flush with the top, so I machined my material to thickness to match the recess, then, to make life easier (some might call it cheating) and help with accuracy, I cut grooves across the pieces at a depth of just over halfway. I did this using my crosscut sled on the tablesaw again, with the blade set to just the right height. I’d decided to try for a weave pattern to make things interesting, so the grooves needed to alternate between top and bottom. I put simple pencil marks on my crosscut sled to ensure even spacing. After this I ripped the pieces into strips to match the thickness of the grooves, with a fraction left on for sanding. I wasn’t planning on doing this all without glue, but wanted them to be a snug fit nonetheless! I made sure I had plenty of pieces to experiment with and left the strips over length by 10mm or so with a view to trimming the screen to size once assembled.
At this point I decided to apply my final finish to the box and the inlay pieces, as getting into all those corners would be a bit of a chore once the inlay was in place. I took the sharp corners off with a few strokes of a block plane, before sanding everything to 240 grit using my orbital sander and finishing by hand with 320 grit going with the grain. The whole thing was finished with tung oil, which is easy to apply and brings out those ripples in the sycamore nicely. I wiped it on with a clean lint-free cloth, then let it soak in for a while before taking off any excess. This process was repeated a few times to achieve the desired finish.
When it came to putting the inlay together, I immediately discovered I’d have to make some further cuts to achieve the weave pattern, so these were made with my extra-fine gent’s saw, taking care to place the cuts on the underside of the pieces, so they’d be cunningly hidden and nobody would ever know. I secured all the pieces together with tiny dots of superglue, then cut the screen to fit snugly in the recess using a fine saw and a sharp chisel. Again, if this is a snug enough fit, you’ll need minimal glue. I applied a few small dots of superglue to the underside of the screen, then applied pressure until it was fixed in place. You’ll want to apply the glue very carefully, as cleaning up any excess is a fiddly job.
Finishing
As a nice finishing touch, I lined the bottom of my box with some self-adhesive baize that I had left over from another project. I cut a small piece of hardwood to fit in the bottom of the box, leaving it a fraction under to allow for wrapping the baize over the edges. With the lining applied, I secured the piece in place in the bottom of the box with a few spots of glue, holding it in place with something heavy while it dried.
There was a fair bit of trial and error involved in this piece, but I’m really pleased with the outcome and it was a fun little challenge. These decorative boxes are a great way of using up smaller pieces of timber (nobody likes to waste it!), and are perfect if you’re pushed for timber storage space in your workshop. I’ll certainly be making more in the future.