Steve Bisco turns and carves a Classical vase of fruit and flowers
Photograph by Steve Bisco
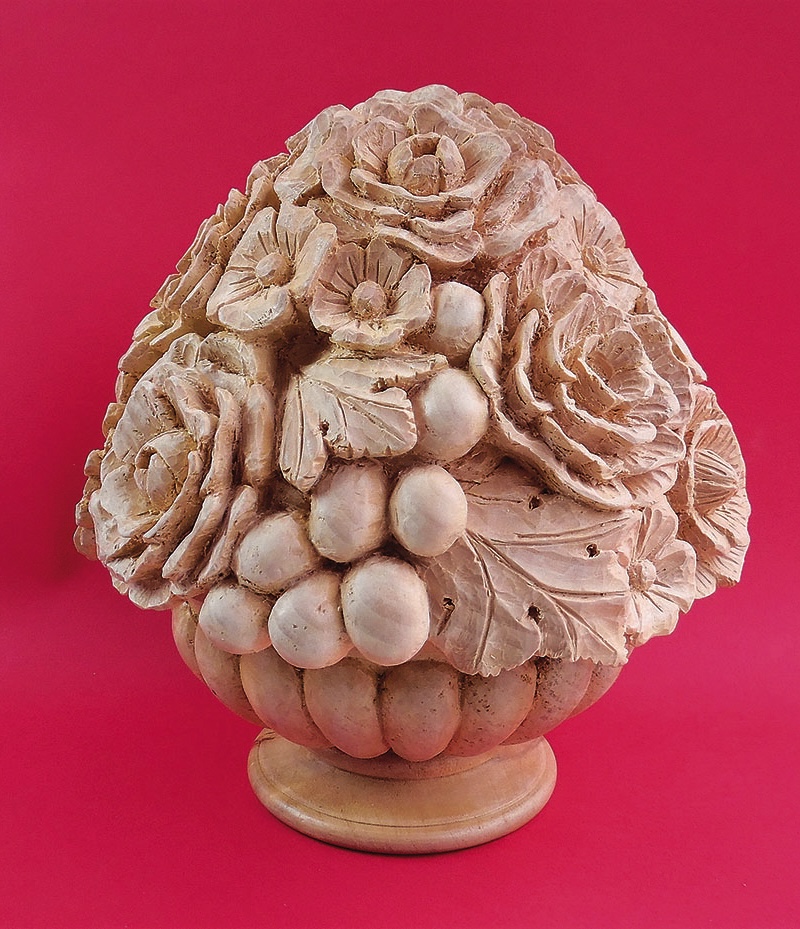
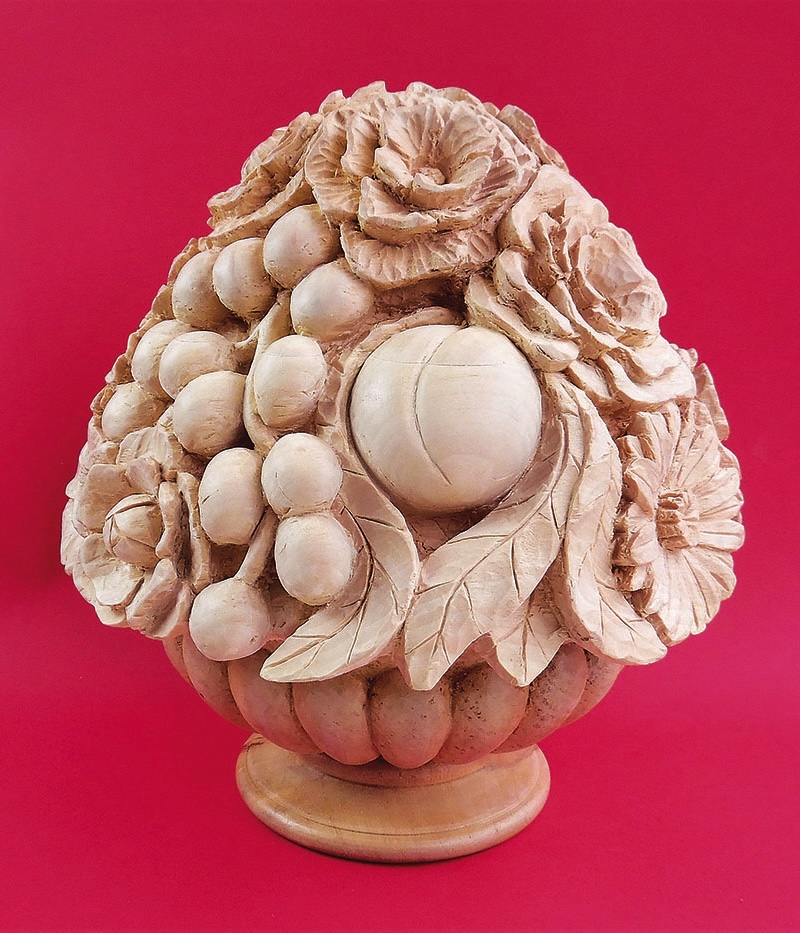
Vases and baskets of fruit and flowers were regular features in the Classical styles of Ancient Greece and Rome. They also featured prominently in the Baroque and Neo-Classical styles of more recent centuries, sometimes carved ‘in the round’ as in this project, and sometimes in flattened form in crestings and friezes (see Woodcarving 137). The number of carved examples is far exceeded by the 18th-century porcelain creations of Meissen, Sèvres and other fine makers, whose style I am aiming to emulate by carving the fruit and flowers in the delicate ‘limewood foliage’ style, though in a slightly more robust form as the free-standing vase is more likely to get knocked about in use than a wall-mounted carving.
A carving in the round necessarily has a more complex construction than a flat panel. If the object is truly round, as in this case, a woodturning lathe is usually the best tool for shaping the form to the point where it is ready for carving. The Classical vase itself is turned and then carved with fairly straightforward gadroons, so it doesn’t have to be in limewood. I used a poplar (Populus spp.) woodturning blank I had in stock, but any wood that can be turned and carved will do. The fruit and flowers need to be carved in a limewood ‘dome’, 150mm deep and 230mm diameter, which you will probably need to build up with two or more ‘laminations’ as indicated in the drawing, then turn it to shape on the lathe. The rim of the vase is recessed into the underside of the flower dome so the lowest flowers can overhang the rim – a process which is most easily done on the lathe.
Although woodturning and woodcarving may be regarded as separate hobbies, in a traditional carver’s workshop the lathe would have been just another tool for shaping wood. Many hobby carvers also dabble in woodturning to a greater or lesser degree, so if you don’t feel able to tackle the woodturning preparations yourself, make friends with a turner who can prepare the form to the point where you can carve the details. If not, create card templates from the drawing and shape the pieces by hand.
Materials: • Flowers: Lime (Tilia x europaea) 230mm dia x 150mm high, or laminated in sections (see step 4). • Vase: any suitable wood 180mm dia x 100mm high that can be turned and carved. • Finishing: sanding-sealer, white chalk paint, clear wax polish
Drawing
Using the drawing
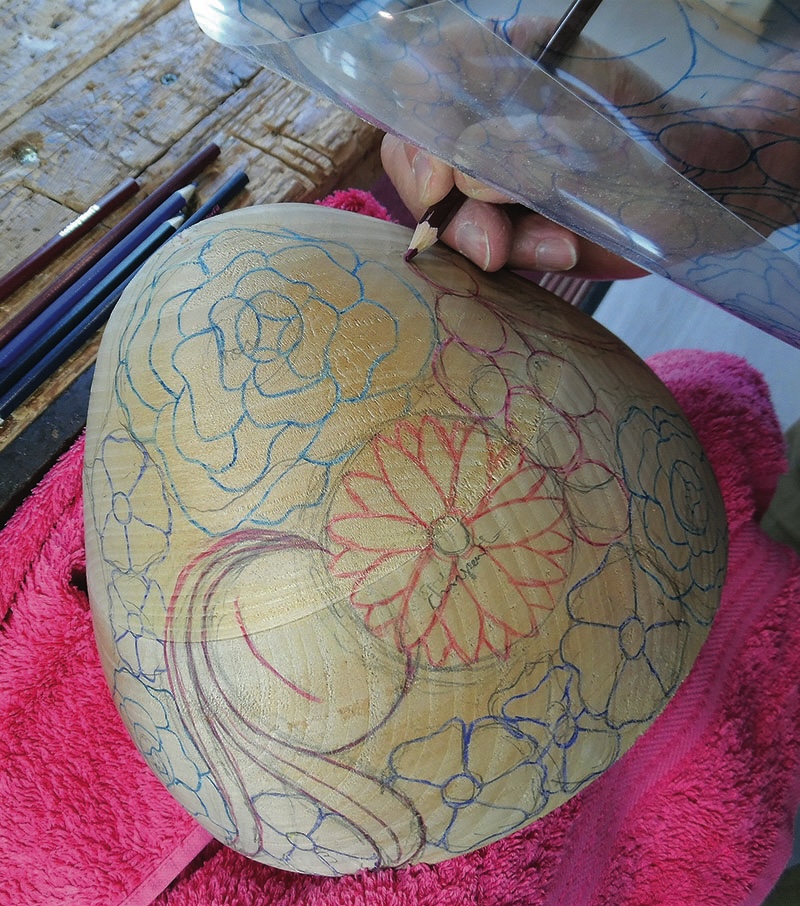
The drawing should be enlarged on to an A2 sheet so the limewood dome is 230mm in diameter and the height about 150mm. The measurements for the woodturning preparations can then be taken directly from the drawing. Because the flower pattern must be copied on to the curved surface of the dome, I have divided it into three sections, which must all be kept at the same scale as the profile. Each of these sections should be traced or printed on to sheets of transparent OHP film, which will be used as a guide to draw the pattern on to the dome.
Preparations
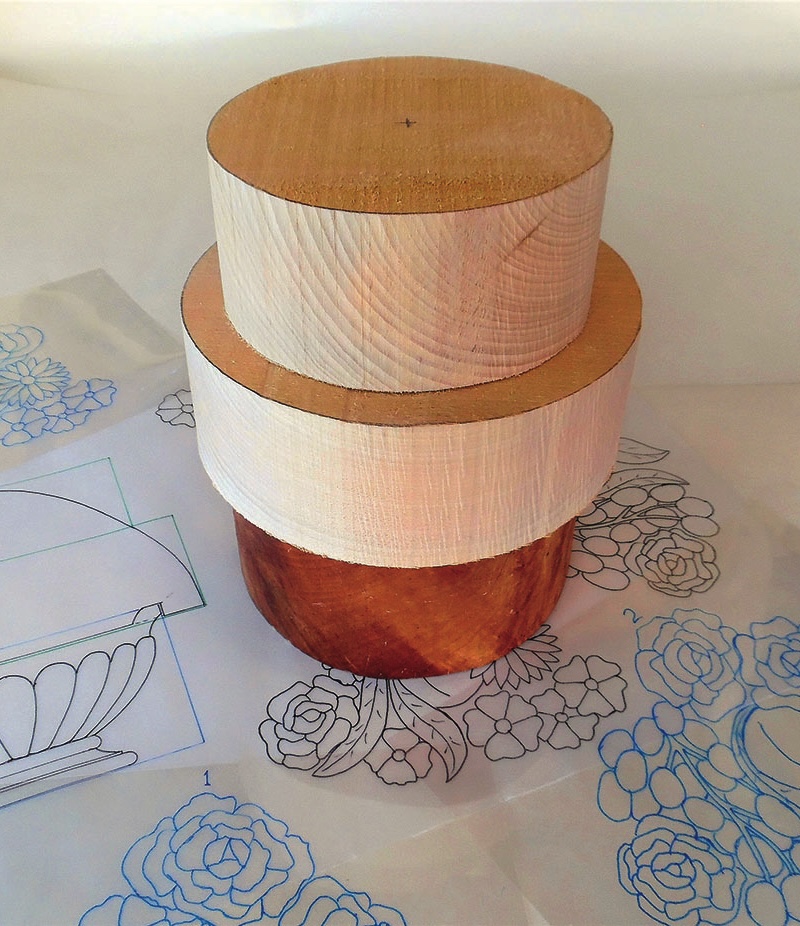
1. Make a full-size copy of the drawing. Get a suitable bowl blank 180mm dia x 100mm high for the vase. Cut some limewood into a circle 230mm dia x 150mm high, or laminate in sections (see step 4). Trace the flower patterns on to acetate sheets for use later
Turning the blocks to shape
2. Mount the vase blank on to the lathe and shape the underside and foot as shown on the drawing. Shape the bulbous section that will later be carved into gadroons. Turn a chuck recess in the base so you can remount that end on the chuck
3. Cut a hollow in the top of the vase to a flat surface at a depth of 10mm below the rim. Shape the inner edge of the rim as shown on the drawing. Turn a chuck recess in the top end as well so you can remount it by either end
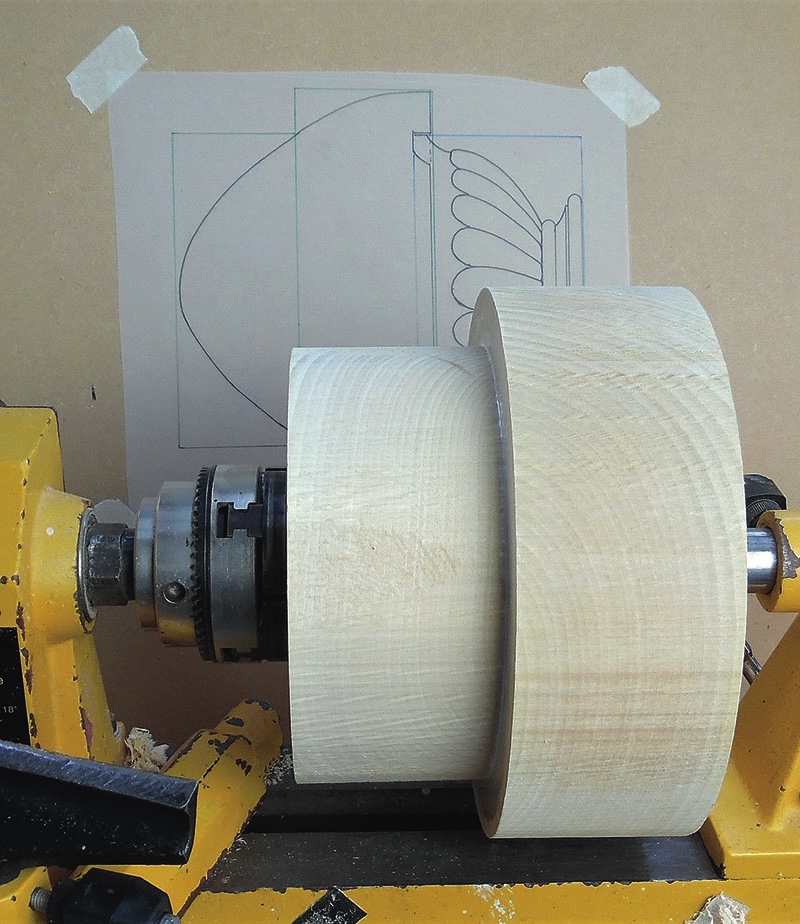
4. To get the 150mm height for the dome profile, I laminated together two pieces of lime 75mm high, with diameters of 230mm and 178mm. Mount each section on the lathe and ‘plane’ the joining surfaces dead flat with a flat scraper. Give both surfaces a thorough coating of uPVC adhesive, centre up both blocks on the lathe, then wind the tailstock in tight so the glue is squeezed out around the edges. Leave it to set overnight
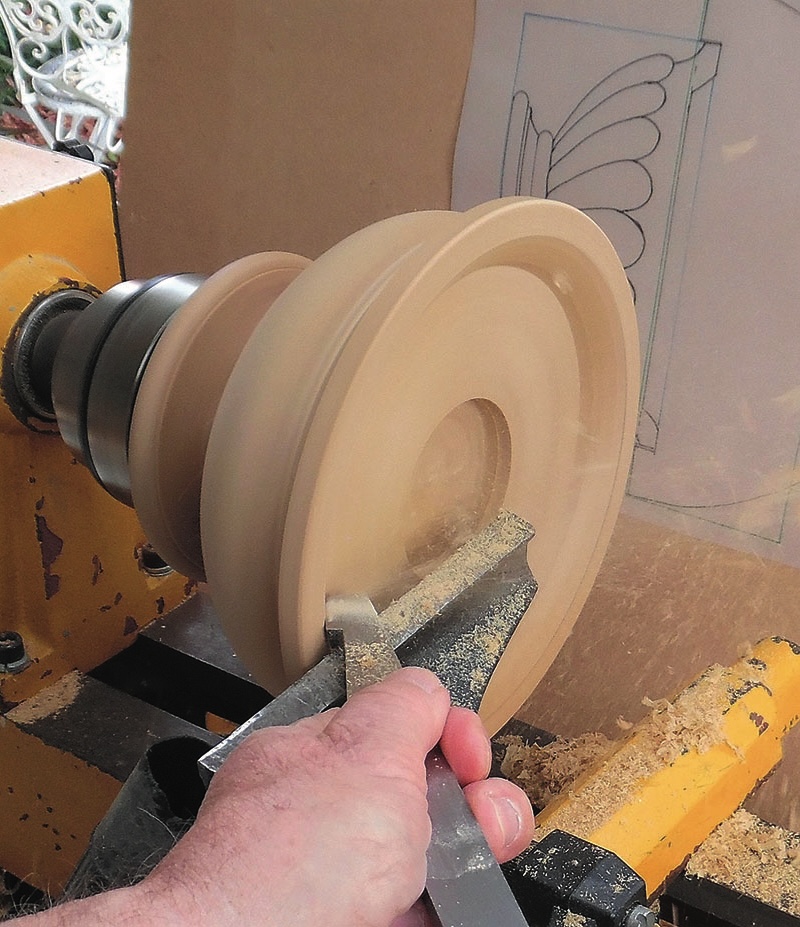
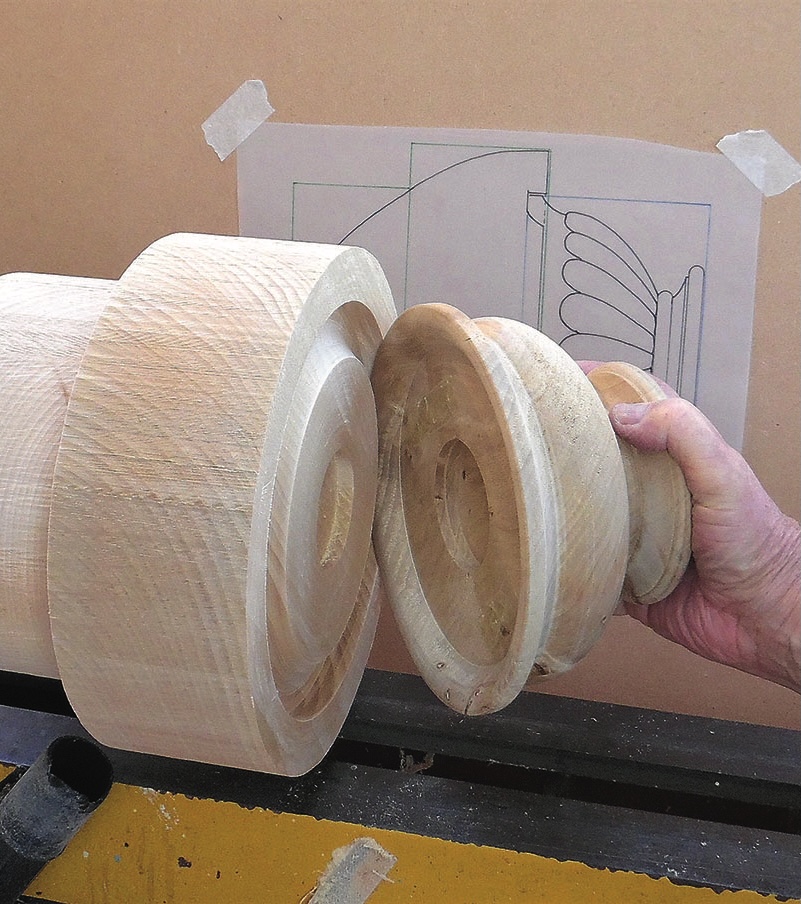
5. Cut a recess in the underside of the flower block to fit exactly on to the vase rim, with the two flat surfaces of the base and the vase meeting exactly for gluing later. You can apply double-sided tape to one flat surface to check that it is connecting with the other. Cut a chuck recess in the base
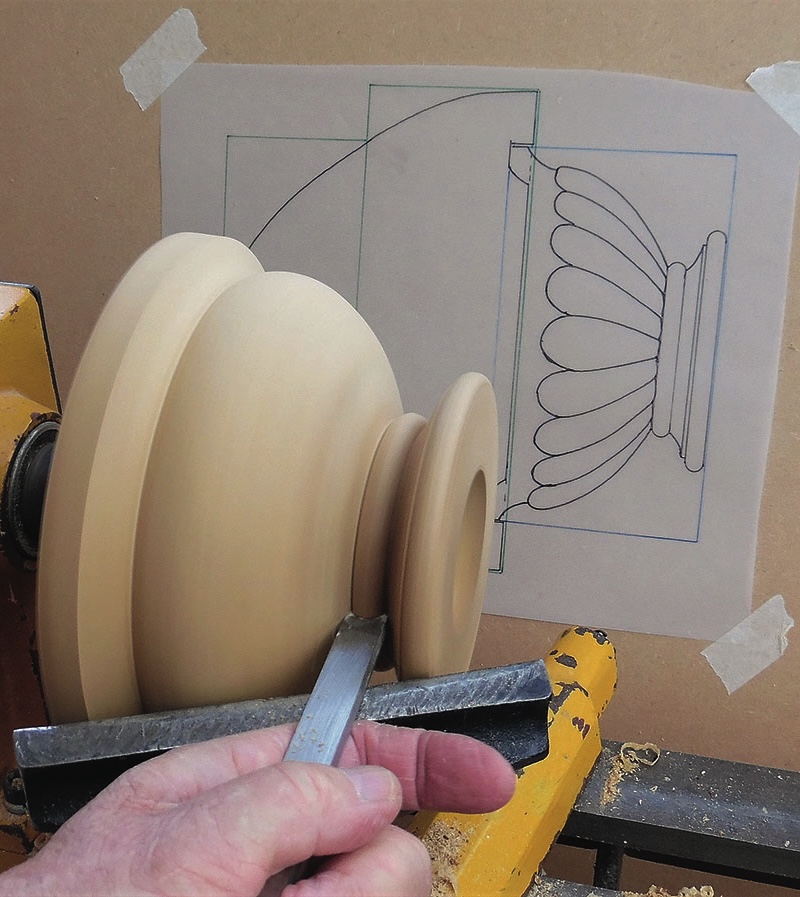
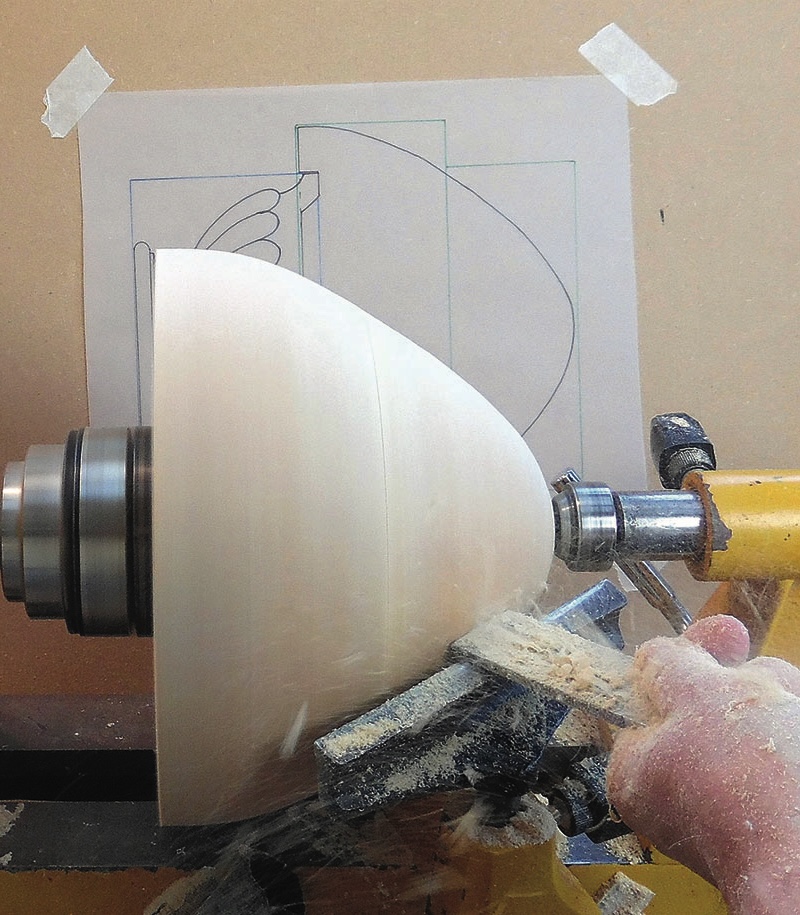
6. Reverse the flower block so the base is mounted on the chuck. Now shape the dome using the drawing as your guide. Don’t use abrasives as the grit may blunt your carving tools later
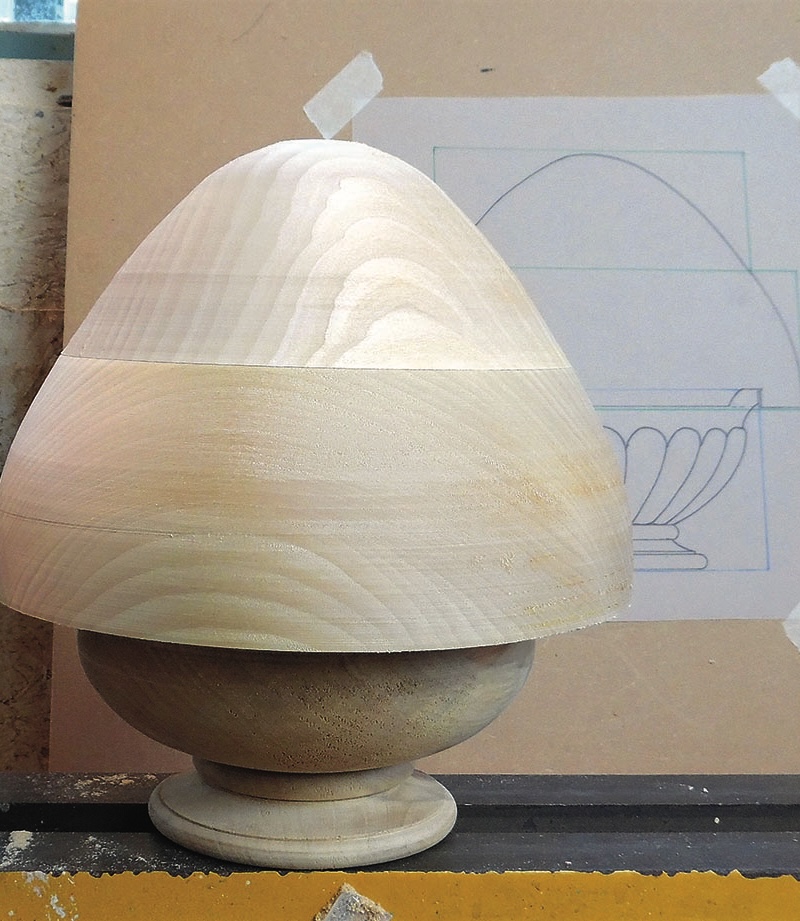
7. The vase and the flower dome are now turned to shape and are ready for the carving phase. Don’t glue them together yet
Carving the gadroons
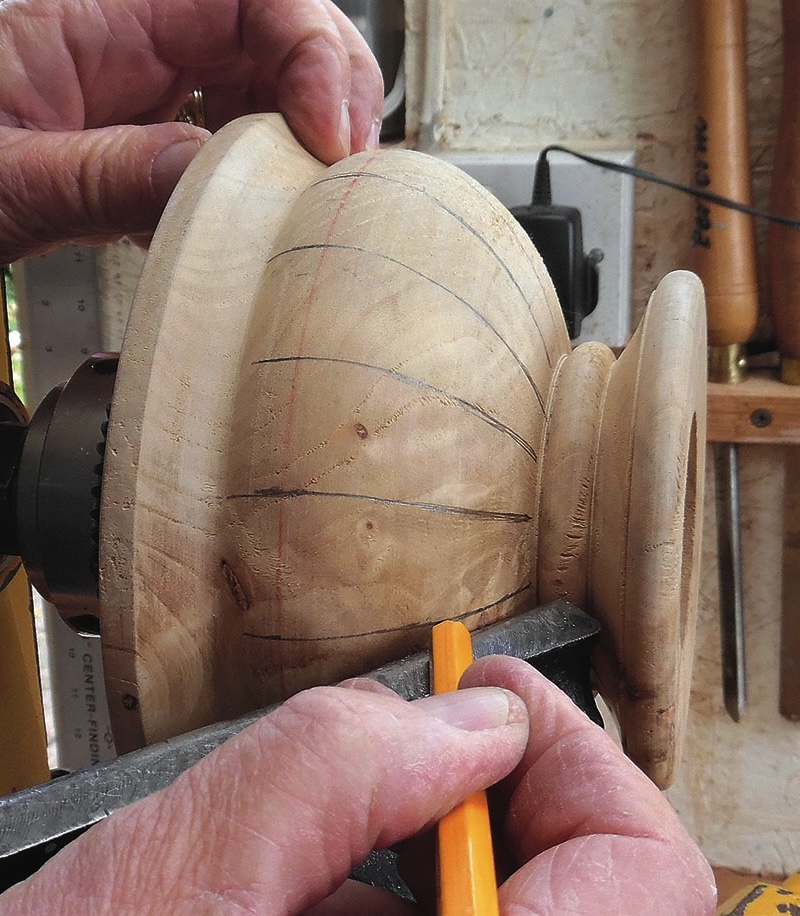
8. To mark the gadroons on the vase, measure the circumference of the widest part of the bulge by wrapping masking tape around it. Take off the masking tape, stick it to a long ruler, measure the total length (around 500mm) and divide it into 20 equal portions (around 25mm each). Stick it back on the vase, mark off the 20 divisions, then draw a straight line from each mark towards the centre of the base
Top tips
• On a circular convoluted surface it can be difficult to keep track of grain direction, so draw arrows on your bench or backing board and keep checking them when carving. • When working on the lower sides of a carving fixed to a backing board, you can tilt the backing board by placing some timber under one edge to make access easier.
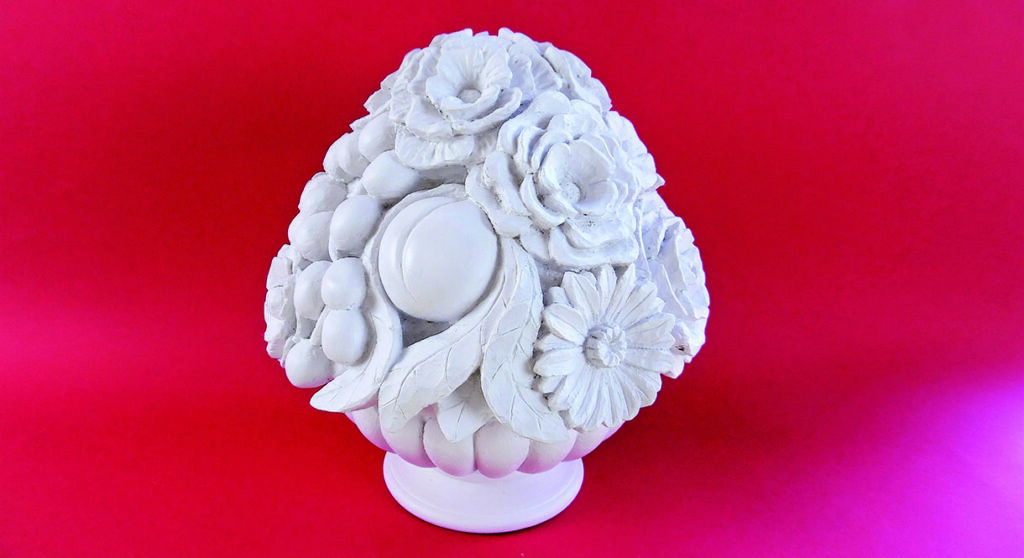
Going round in circles
When you are carving into a circular block be aware of: 1. The grain direction will keep changing from side grain to end grain as you rotate around the circumference, so you will need to allow for this when carving. 2. As you carve deeper towards the centre of the dome, the elements will all become closer together, so you need to make adjustments with size, position and overlaps.
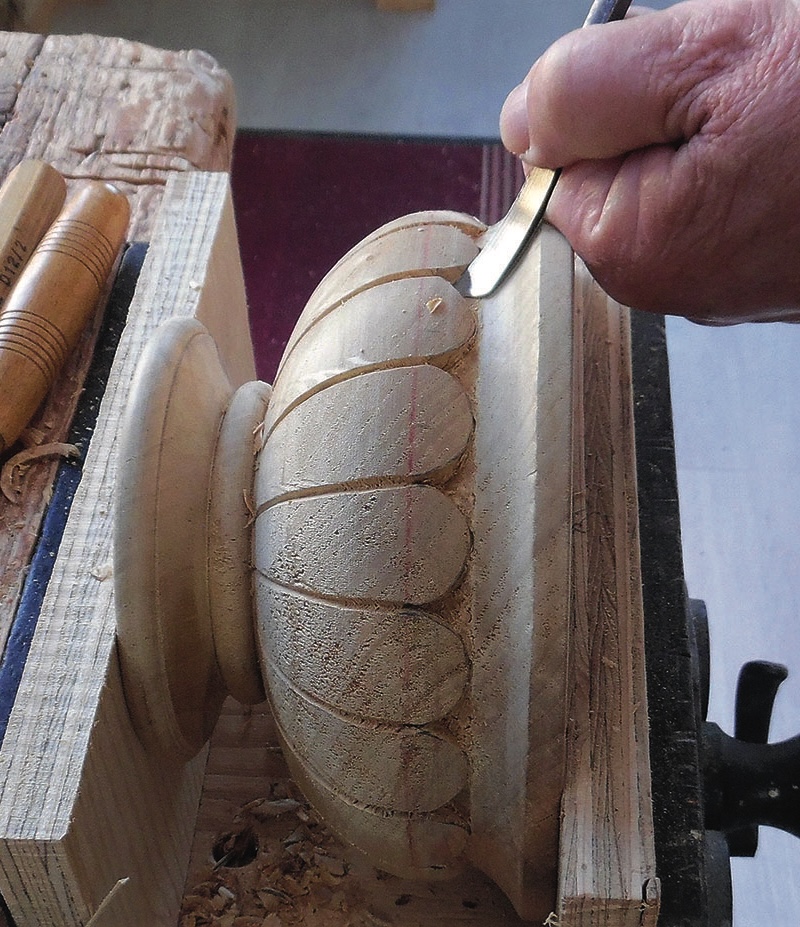
9. Cut a dividing line between each gadroon with a V-tool. Draw a semi-circle at the top of each one and cut round it with a No.3, 10mm, then shape the cove under the rim of the vase into the V between the semi-circles
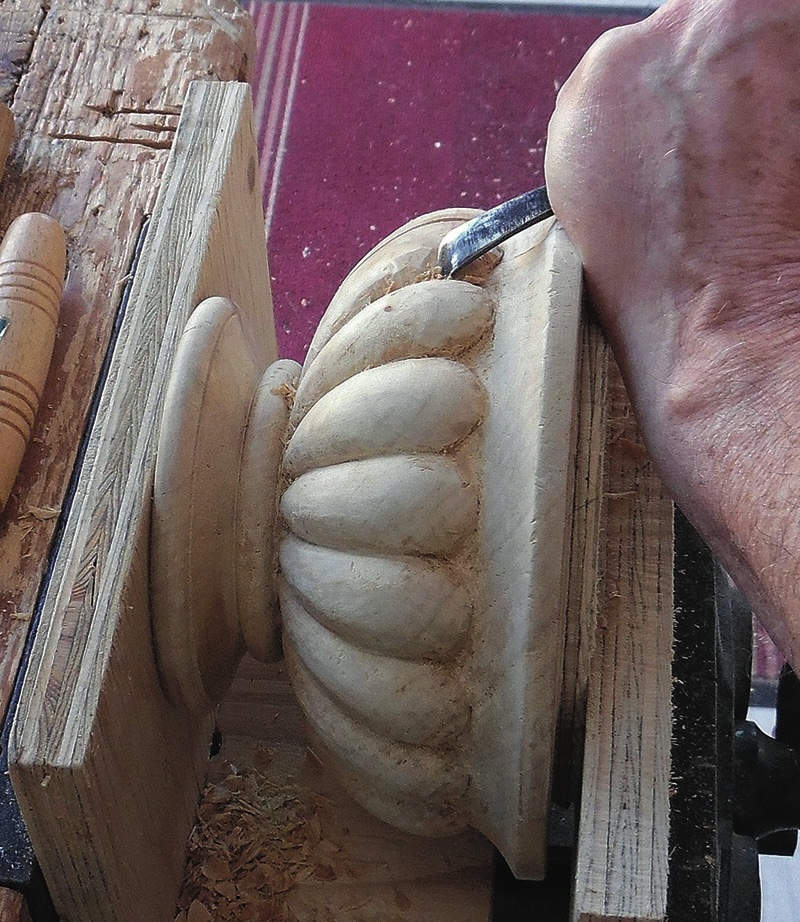
10. Carve each gadroon into its smooth bulging shape. You can use rifflers to refine the shape, and abrasives to make each gadroon smooth and even. When the vase is finished, give it a coat of sanding-sealer
Roughing out
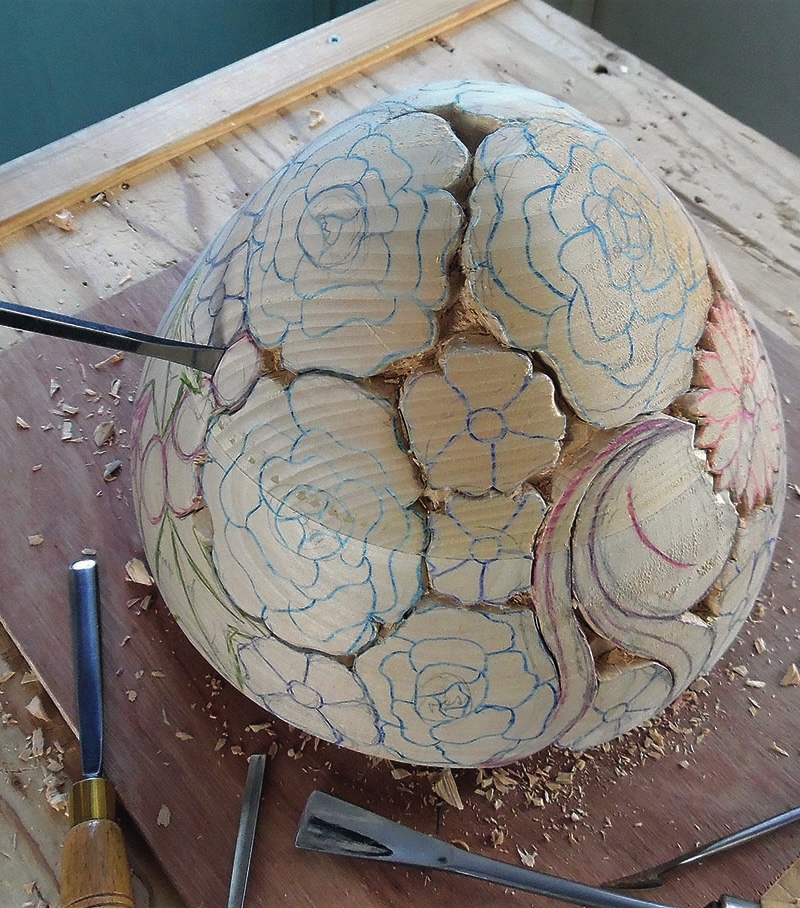
11. Now you can start on the limewood flower dome by drawing the pattern on to the wood. Hold the transparency over the area and look through it to lay out the position of each element. Make adjustments where necessary to fit it all together, then draw in the detail design for each item. It helps to use different colour wax pencils for each type of flower
12. For workholding you can fix some plywood to the base and screw that to the bench, or use a carving clamp if you have one. Prick round the outline of each element and chop out some of the gaps between them so you can see what’s what
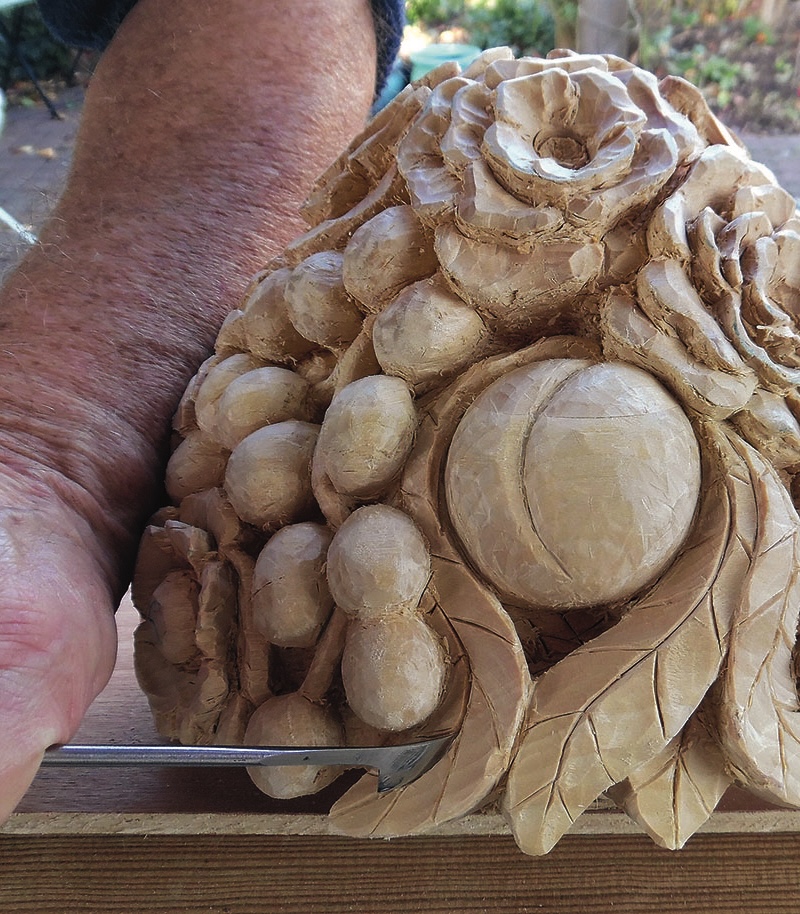
13. Roughly shape the peaches first as they need to be cut back deeply to create their half-spherical shape. The leaves should curl around the peach and flip out to the outer edge
14. The grapes and their leaves are also cut in quite deeply to form convincing bunches
15. Rough out the flowers. The roses should be slightly domed with the outer petals layered towards the background. Vary the shape so they don’t all look the same. The chrysanthemums dish inwards in the middle and their thin petals must overlap each other for support. The small primrose flowers can be fitted in among the larger elements. Arrange the flowers to break up the shape of the dome as much as possible
Carving the detail
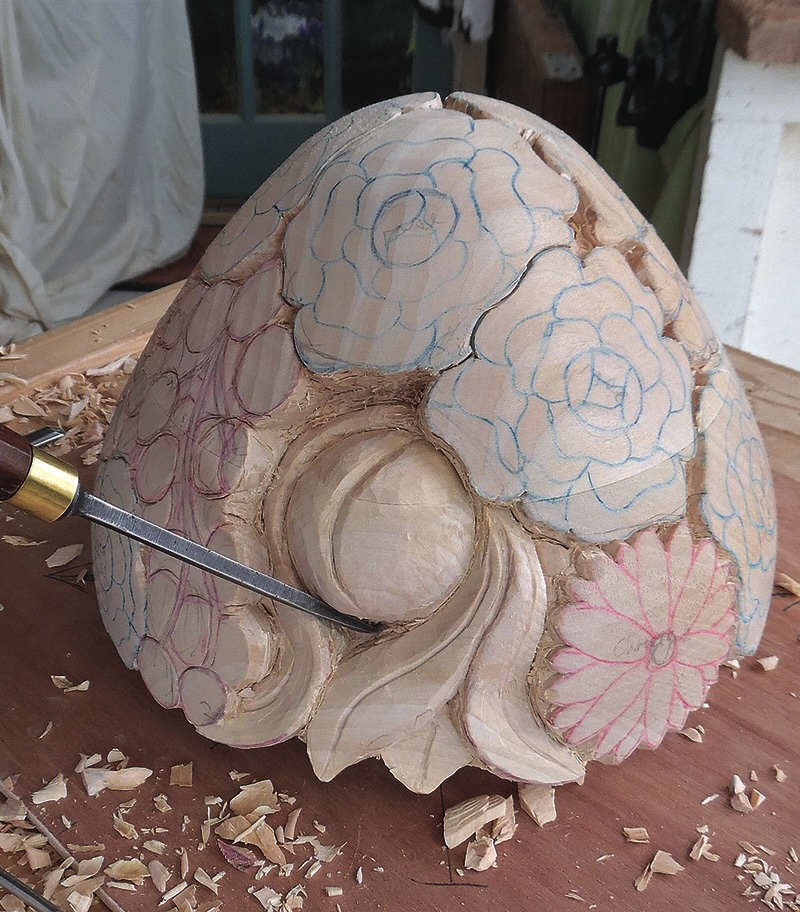
16. The two bunches of grapes – one on each side – are a good place to start the detail carving. Carve each grape into an individual ovoid that appears detached from the background and its neighbours. In the larger gaps between them, shape the background surfaces into shallow domes to infer other grapes behind them. A 16mm hooked skew chisel is good for picking out the triangular gaps under and around the grapes
17. The two peaches on opposite sides both show a three-dimensional rounded half of a peach, which must be carved smoothly with a broad, shallow gouge, and some long, narrow peach leaves that curl around them. Put plenty of curl into the leaves and carve narrow veins along them, then scoop between each of the outward veins with a shallow gouge
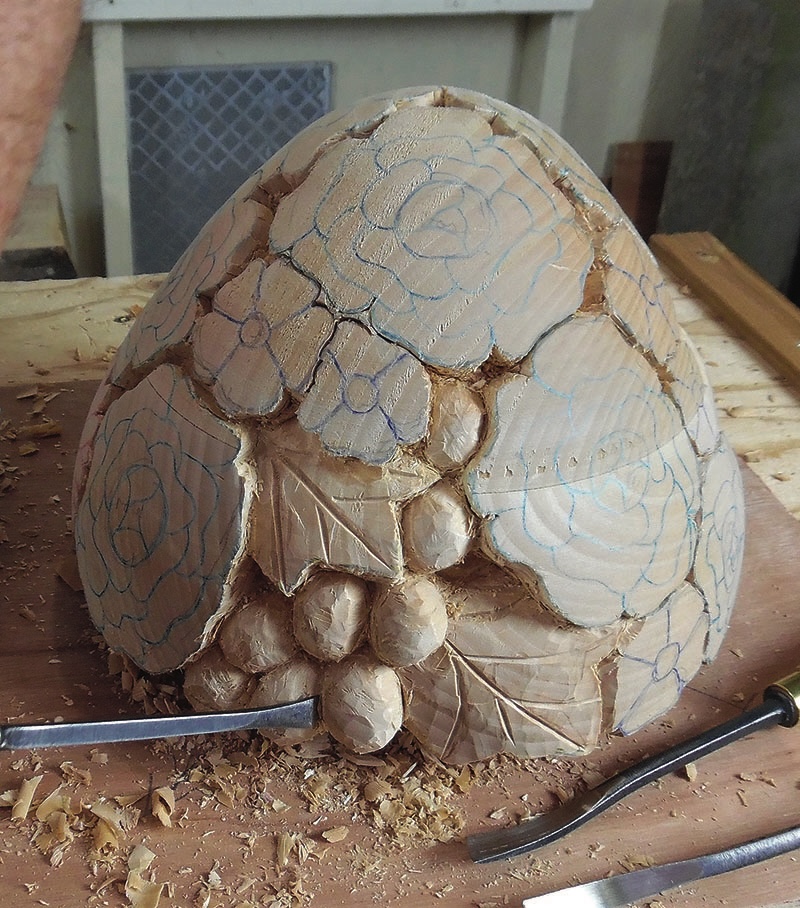
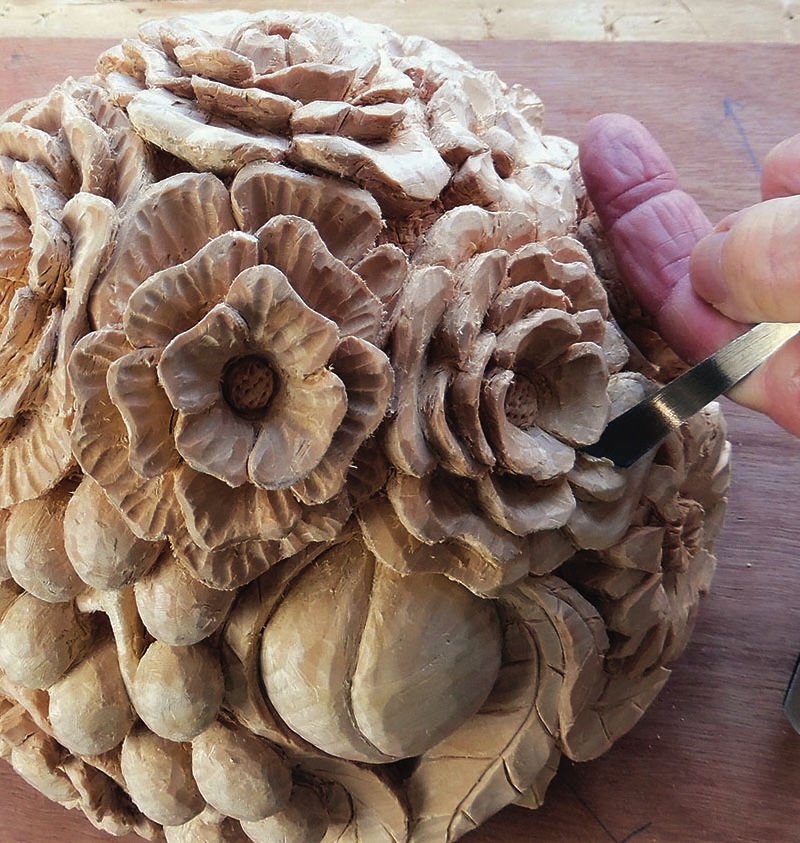
18. There are eight roses in the display. Starting from the middle and working outwards, carve each petal as deeply as possible without breaking the one above it. Use skew gouges to carve a smooth curl on each petal, working with the grain direction. Give some petals a smooth finish and others a crinkly texture by carving grooves inwards with a narrow gouge
19. There are two chrysanthemum flowers on opposite sides. Carve the narrow petals with sharp edges that overlap each other, cut a slight hollow down each one with a shallow gouge, then a central vein with a 2mm V-tool. Undercut the back edges just enough to make them look detached without losing vital support from behind
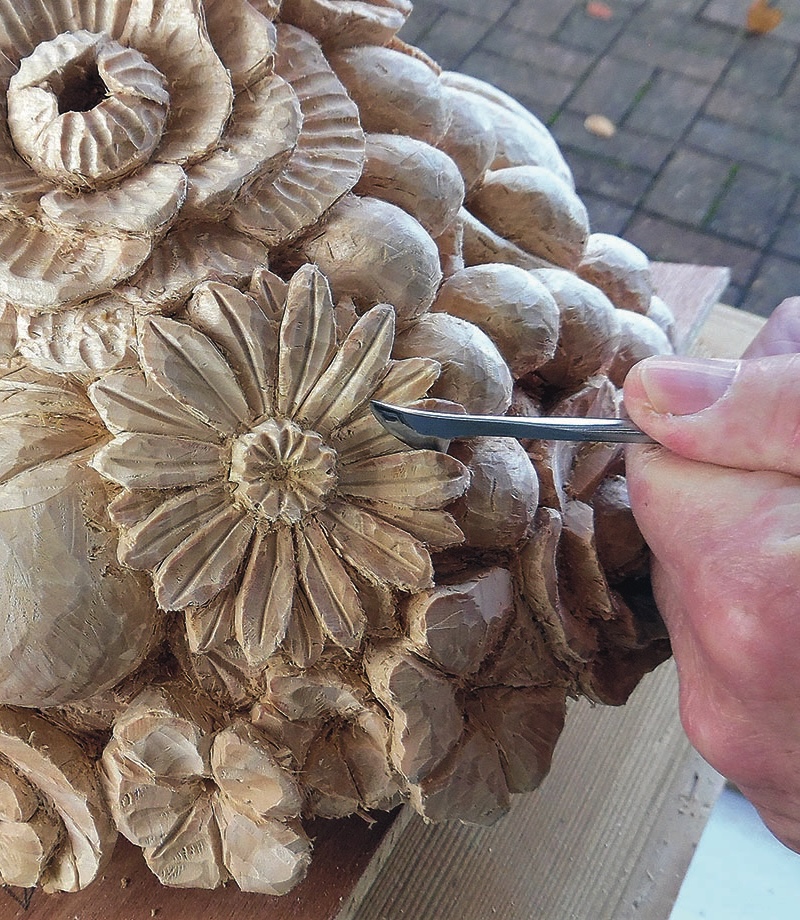
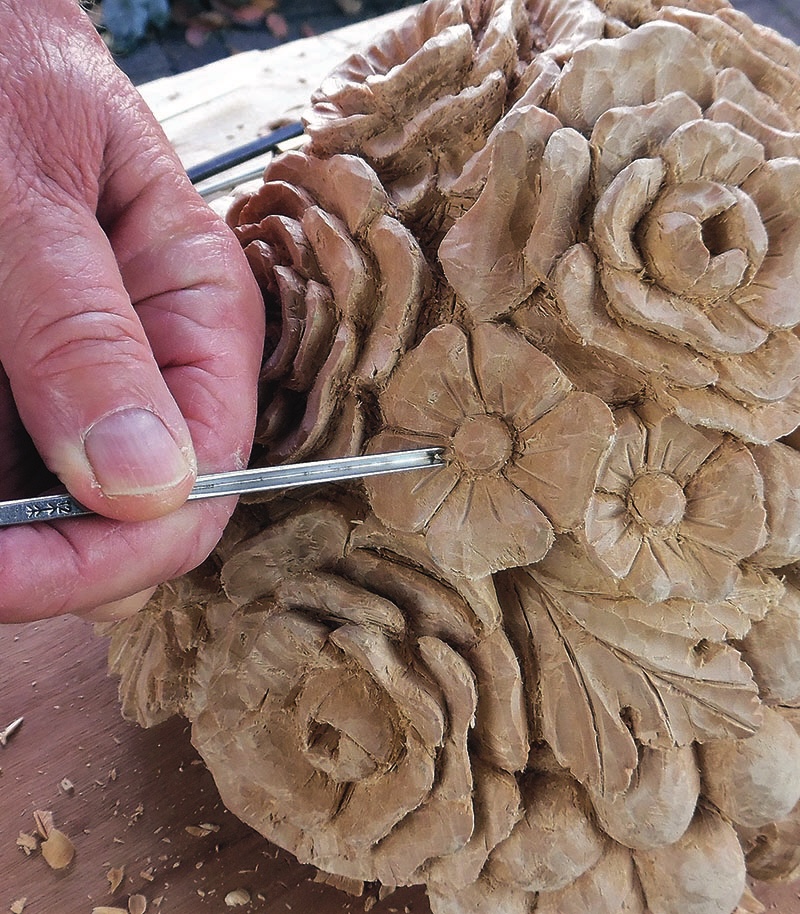
20a. The nine primroses are straightforward, but use skew gouges to get a smooth finish where grain direction is awkward. With all the flowers finished, slightly undercut all the elements to make them look detached. Where there are open areas between flowers, cut these deeply and mark the background areas with leaf veins and some cross-hatching in places to darken and disguise the blank areas.
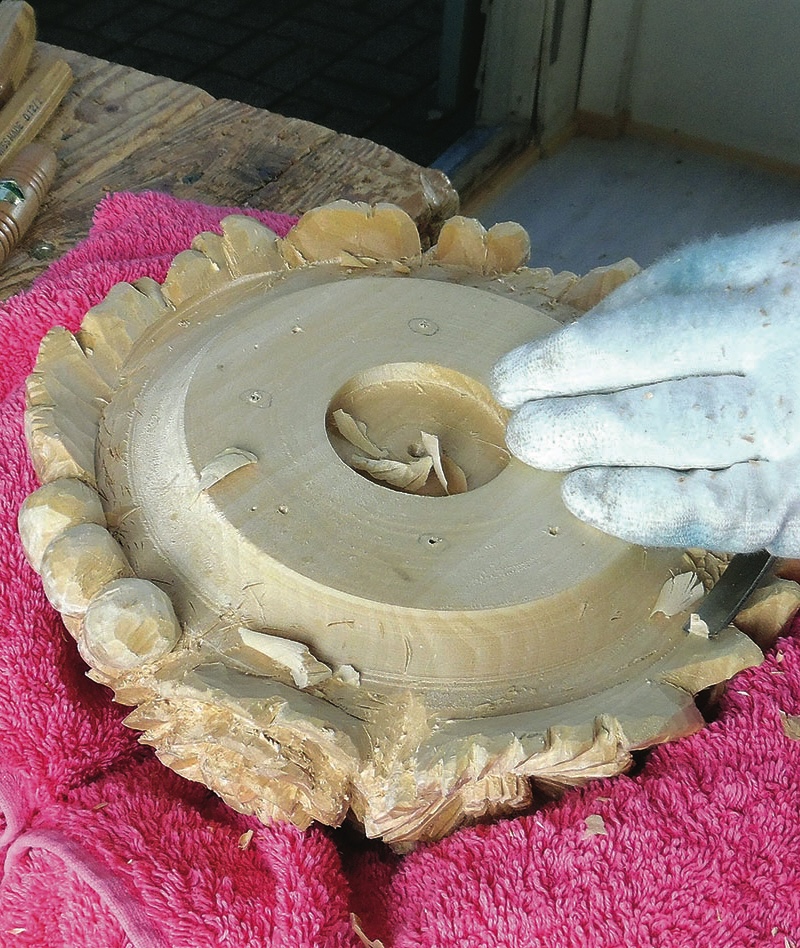
20b. We finish the carving by undercutting and shaping the lower edge where it overhangs the rim of the vase. Support it in the bench vice with lots of soft padding, shave away the inside of the leaf edges and round over the inside of the grapes. Sit it on the vase to check how it all looks from the front
Finishing
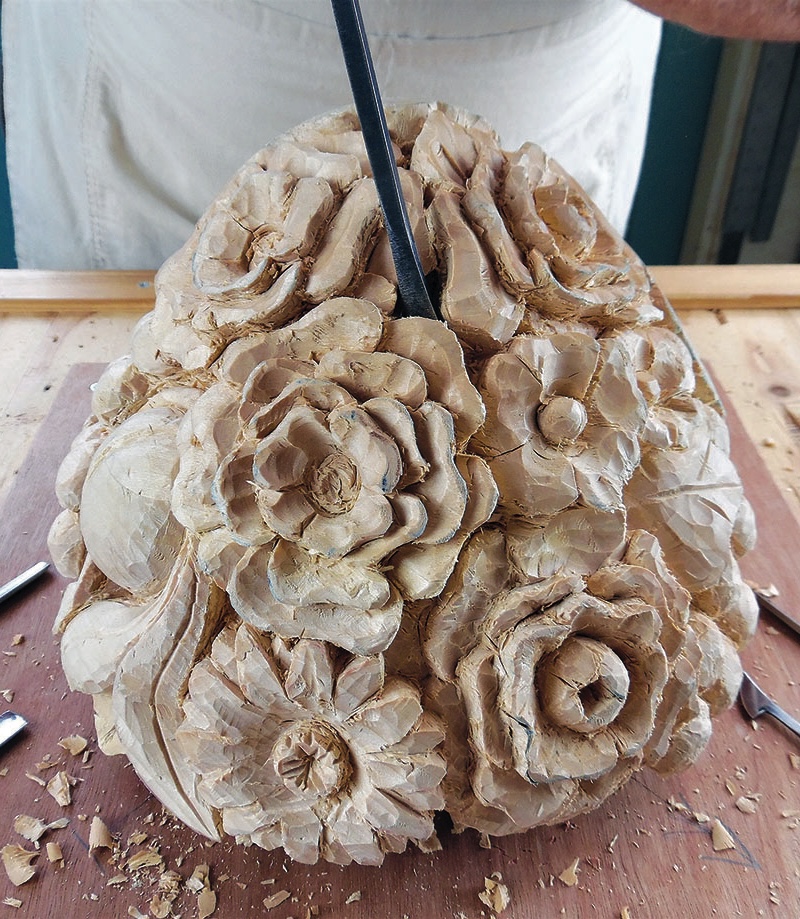
21a. Give the peaches and grapes a thorough sanding to a smooth finish
22b. Give the whole carving a coat of sanding-sealer, then a light sanding to tidy it up. Now glue the carving to the vase
22c. Show the finished carving in relation to the three sections of the pattern illustrated in the drawing
Painting carvings
Not everyone is comfortable with painting woodcarvings, but in decorative carving there are often sound reasons for doing so. In Georgian times nearly all woodcarving was painted and/or gilded, and timbers such as lime and pine are quite plain without a painted or gilded finish. But don’t clog the detail with thick gloss paint, primers and undercoats. One or two thin coats of chalk paint over sanding-sealer, with a clear wax finish on top, will give a more delicate, Georgian-style finish to a decorative carving.
22. You can choose your own finish. I have given it two thin coats of white chalk paint and a coat of clear wax polish, to create a subtle Georgian ‘porcelain’ finish
To provide the best experiences, we use technologies like cookies to store and/or access device information. Consenting to these technologies will allow us to process data such as browsing behaviour or unique IDs on this site. Not consenting or withdrawing consent, may adversely affect certain features and functions.
Functional
Always active
The technical storage or access is strictly necessary for the legitimate purpose of enabling the use of a specific service explicitly requested by the subscriber or user, or for the sole purpose of carrying out the transmission of a communication over an electronic communications network.
Preferences
The technical storage or access is necessary for the legitimate purpose of storing preferences that are not requested by the subscriber or user.
Statistics
The technical storage or access that is used exclusively for statistical purposes.The technical storage or access that is used exclusively for anonymous statistical purposes. Without a subpoena, voluntary compliance on the part of your Internet Service Provider, or additional records from a third party, information stored or retrieved for this purpose alone cannot usually be used to identify you.
Marketing
The technical storage or access is required to create user profiles to send advertising, or to track the user on a website or across several websites for similar marketing purposes.