Hendrik Varju uses traditional butcher’s block joinery to capture the beauty of beech end grain.
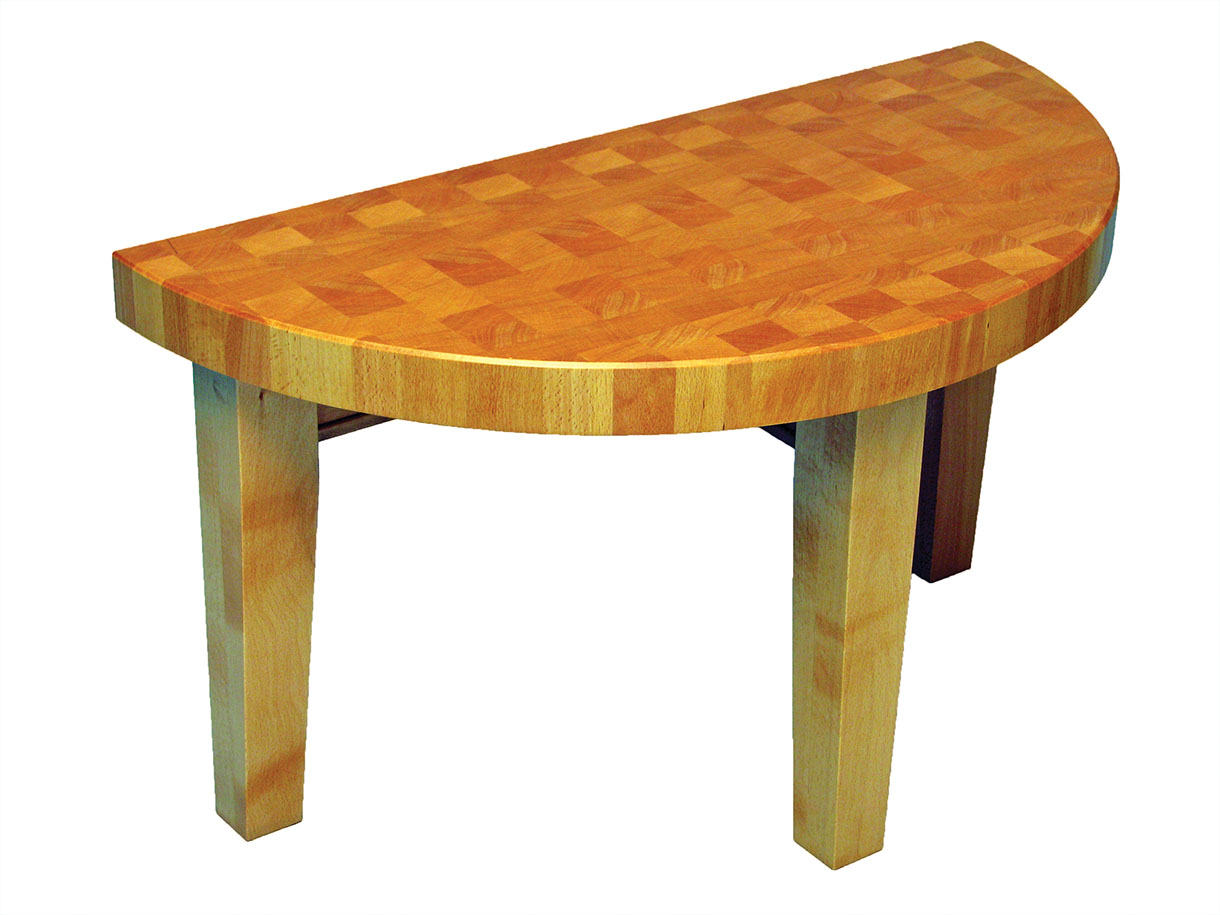
I’ve been wanting to replace two black semi-circular end tablesin our family room for a very long time which, I’m embarrassed to say, my wife and I bought at Ikea close to 25 years ago. It wouldn’t be so embarrassing if they were at least made of wood, but they’re plastic! I’ve always liked a demilune table design at the end of a sofa, but I, of course, wanted to use wood. I built an end-grain coffee table for the same room some years ago using four species of wood but for these end tables, I decided to use only one species – European steamed beech (Fagus sylvatica) – for the end grain table tops.
I didn’t want the tables to be too busy looking, with three of them in the same room, plus the growth rings visible in the end grain table tops give more than enough visual interest as they are. I do plan to use just a tiny piece of cherry (Prunus avium) decoration on the bottom of the aprons to match my coffee table, but otherwise will use beech everywhere else.
End table plan
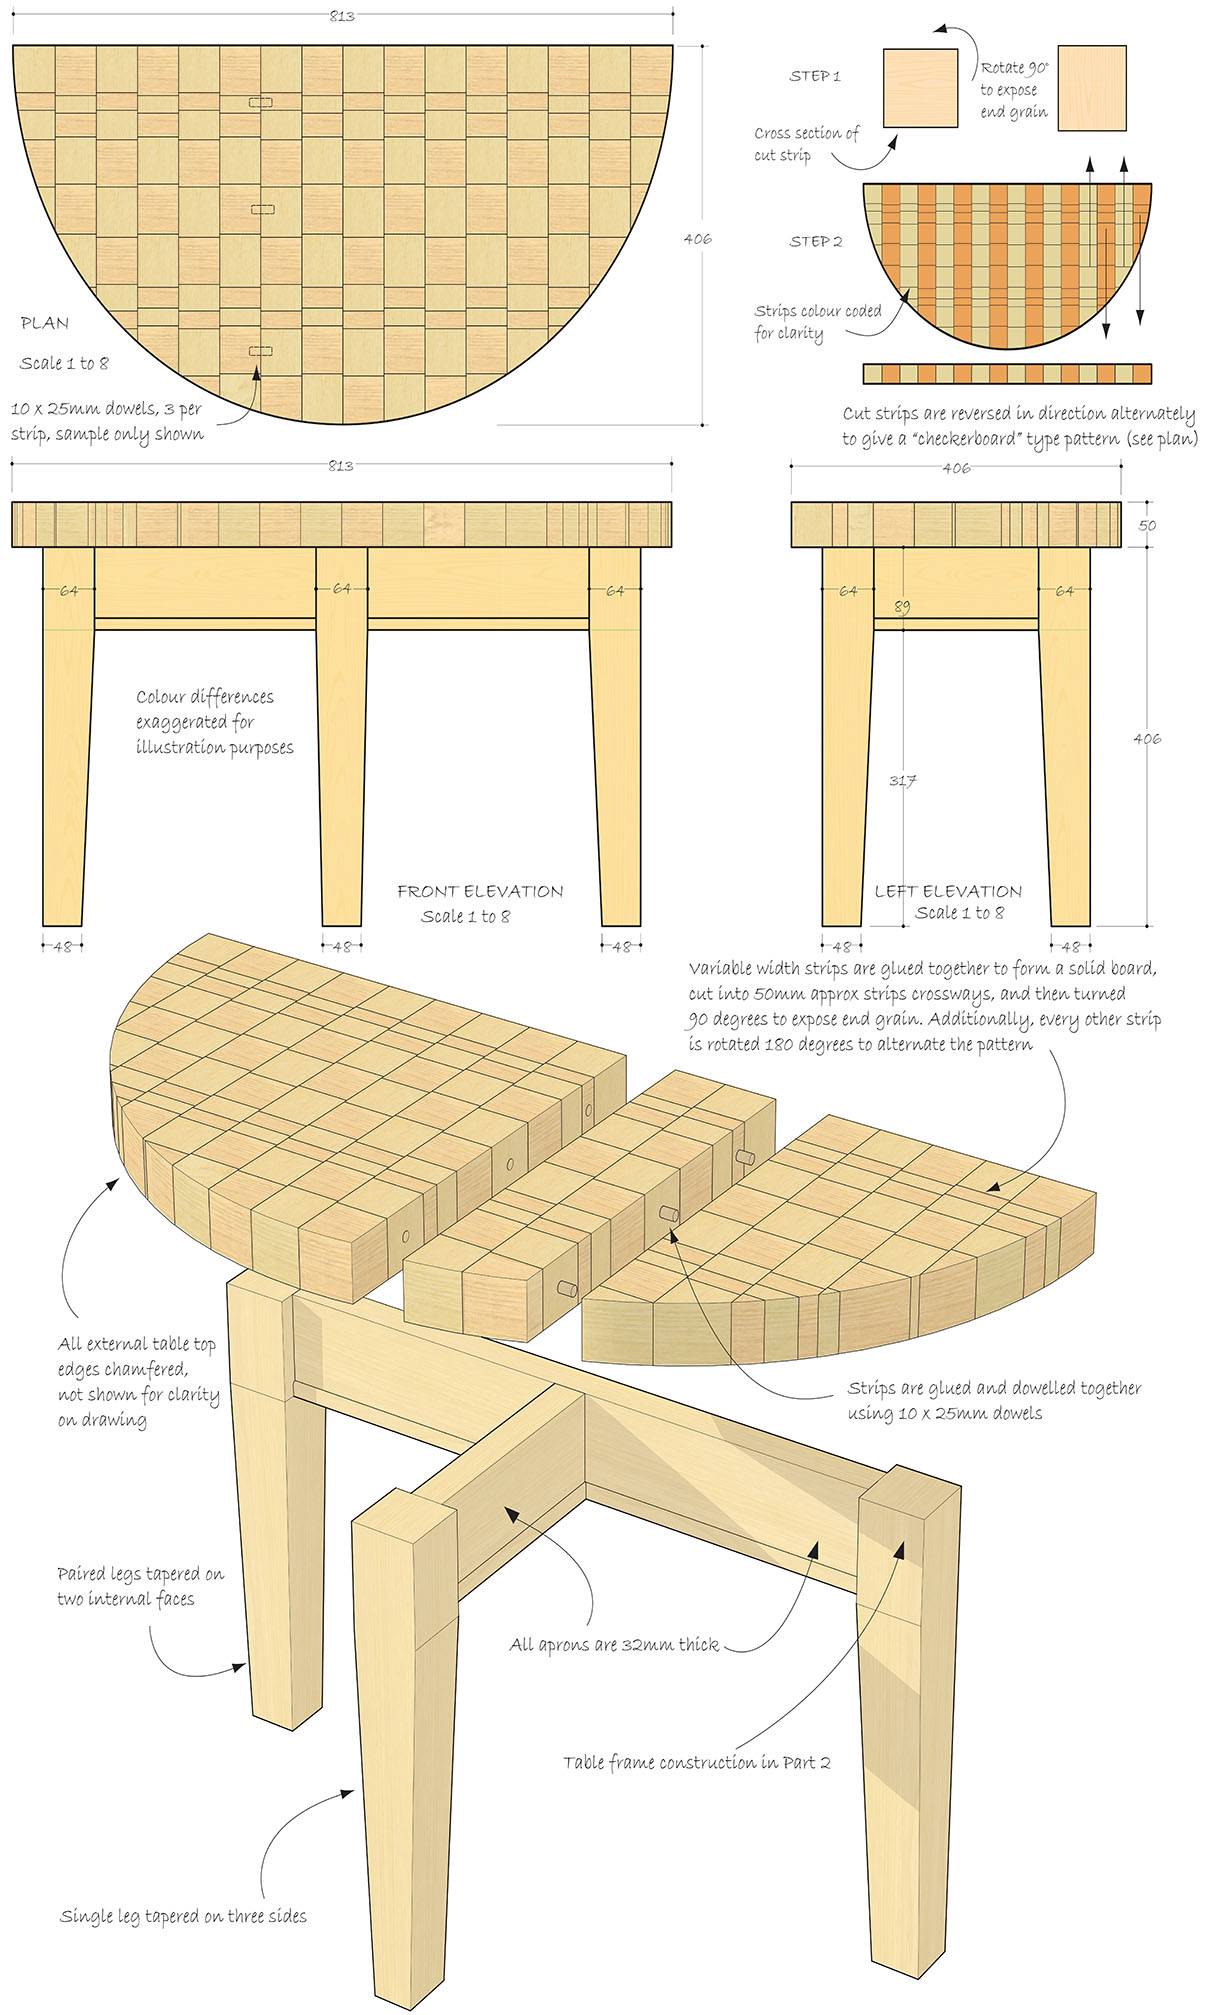
Table tops come first
I decided that working on the table tops first made the most sense as I think they are more difficult overall. There was a lot of material to mill up, two glue-ups, lots of cutting of strips, dowel joinery between the strips and even some template routing. Plus I figured that if the table tops were cut slightly off plan then I could adjust the bases when building them afterwards. So this first article covers how I built the two table tops. The first step involves jointing and planing all the lumber to make what I call ‘the long grain slab’. I milled a number of boards 51.5mm wide, aiming for 50mm wide squares in the final design, and about 1145 to 1220mm long. While the table tops would be only 815mm long in the end, there is a lot of waste involved when cutting so many strips.
The thickness can be completely random from one board to another resulting in squares or rectangles of random sizes. For ultimate randomness, you can mix in different thicknesses of stock, such as 4/4, 5/4, 6/4 and 8/4. In my case, I had a number of large 6/4 boards in stock so I used only the one thickness. However, I still milled them all to random thicknesses that varied from one board to the next depending on the milling loss involved when jointing and planing.
The long grain glue-up
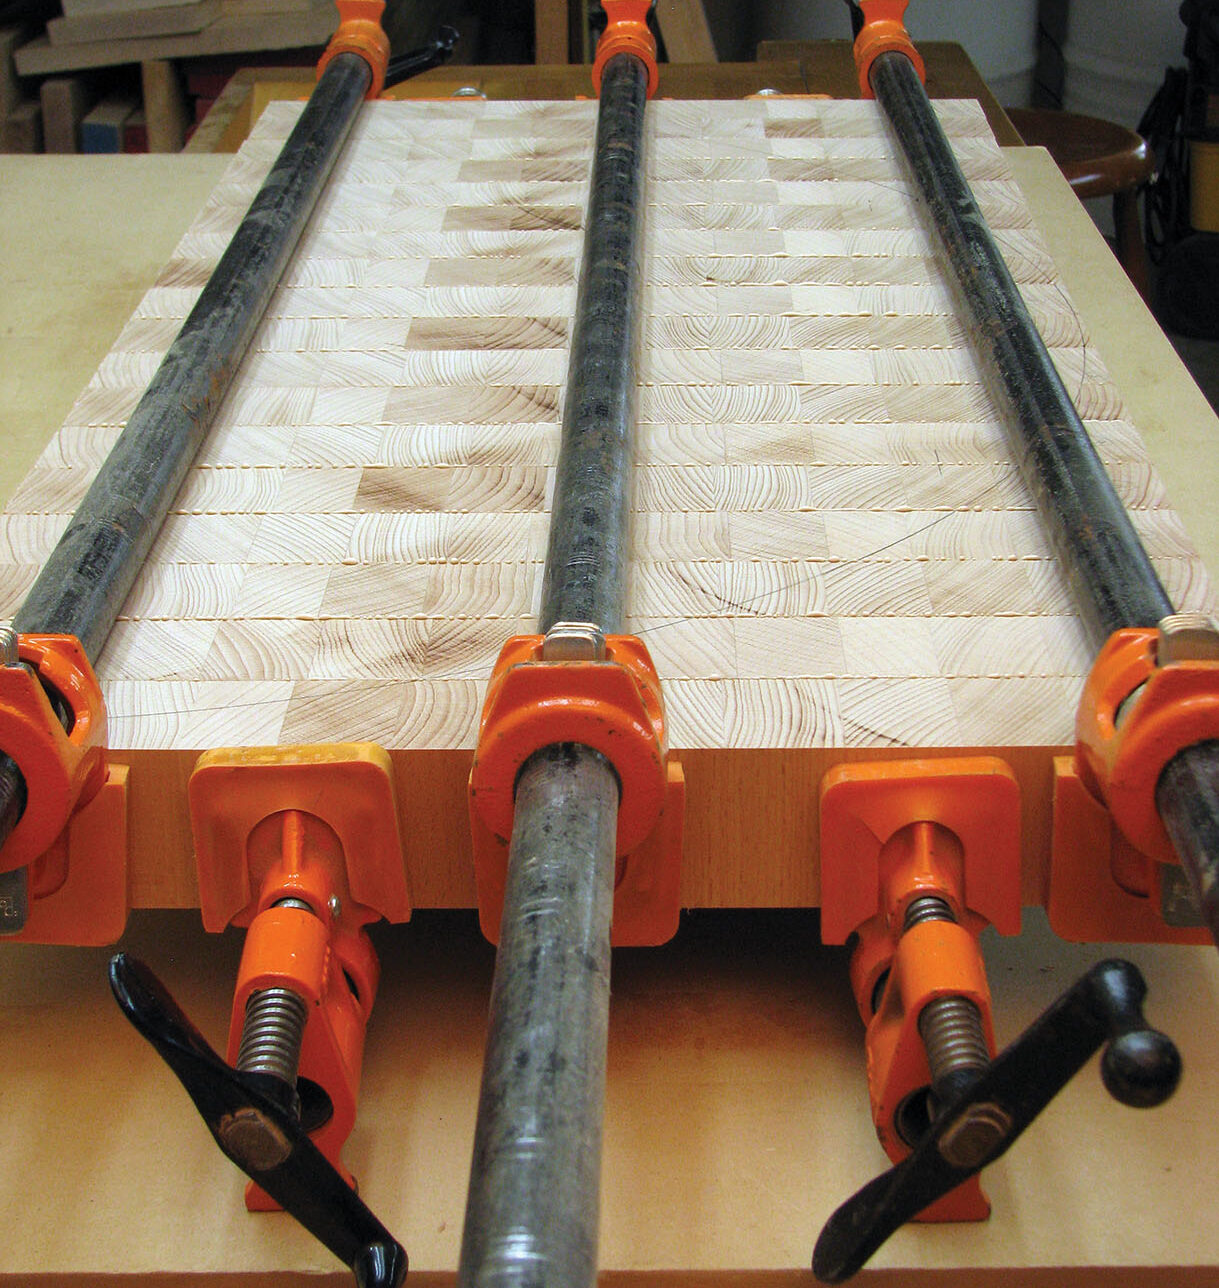
Once milled, I turned the boards onto their edges, orienting them as if they were quartersawn. Then I glued them together as one would glue-up a workbench top. I used pairs of clamping cauls with F-clamps to keep the faces aligned, and lots of pipe clamps to pull them tight. It’s important that the pipe clamps alternate from top to bottom when gluing together a slab like this to ensure it ends up as flat as possible without any excessive cupping or twist. After the glue dried at least overnight, I hand planed off some of the excess glue that I wasn’t able to remove with a putty knife immediately after the glue-up. A standard angle block plane made quick work of this. The goal is to remove glue beads that protrude from the surface. You do not need to remove every glue stain or oxidation stain (from the clamp pipes) from within the wood because the next step with my thickness planer would take care of that.
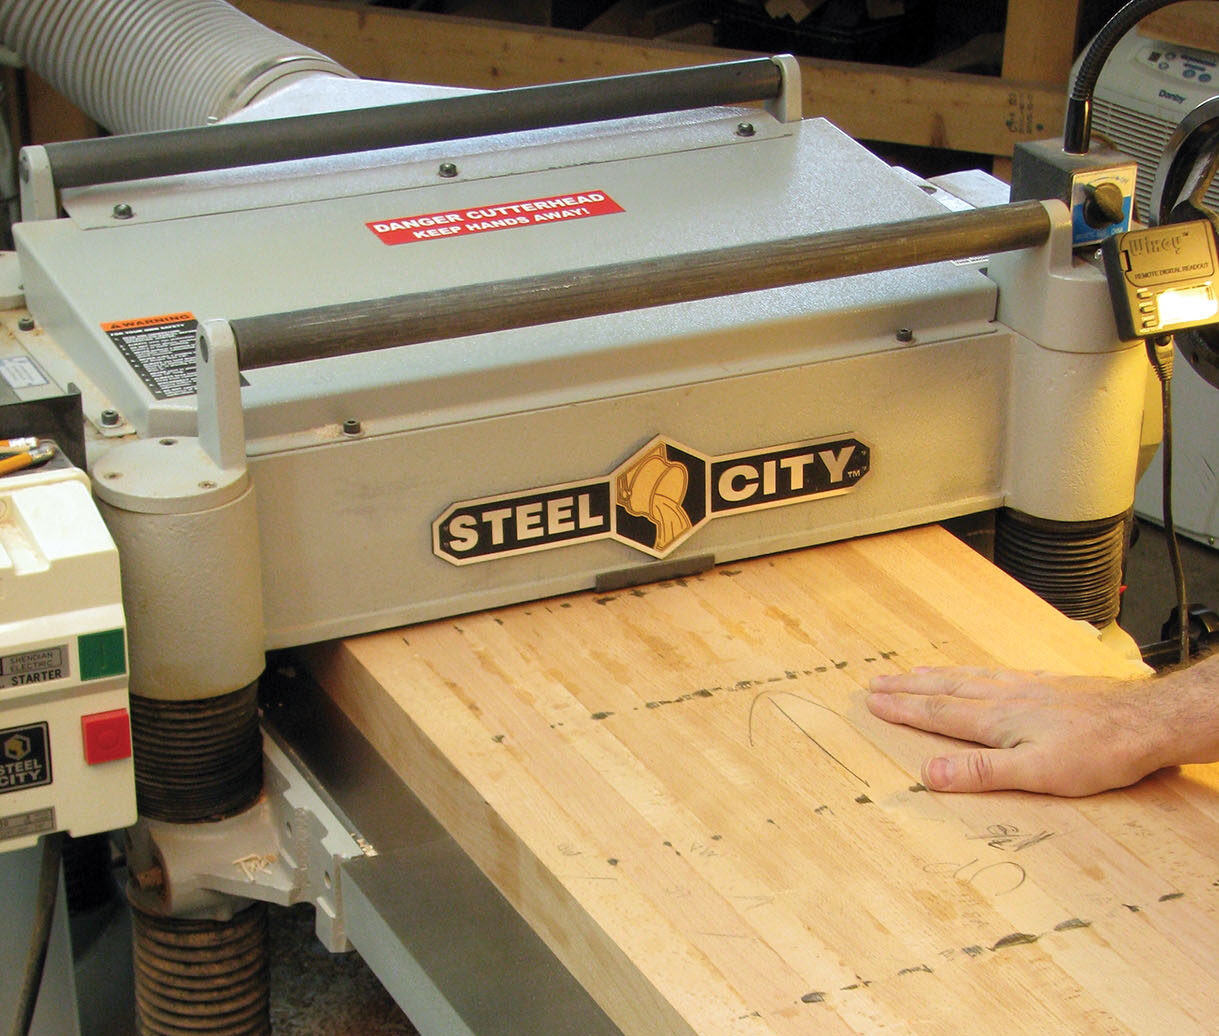
Fortunately, the long grain glue-up turned out very flat because I don’t own a planer large enough to face joint something that wide. If your glue-ups don’t go as well, you’ll need to at least flatten one side with a hand plane. And if your thickness planer isn’t wide enough to accept the slab at all, you’ll need to hand plane both sides. As long as your thickness planer is wide enough (mine is 510mm wide), you can plane the second side that way instead. n my case, I chose the flattest side (slightly concave is preferred to convex) to ride on the thickness planer bed while planing the opposite side flat. Then I could flip the panel end-over-end to plane the second side. From there, I was ready to cut the panel into strips to achieve the ‘end grain up’ orientation.
Cutting and joining the strips
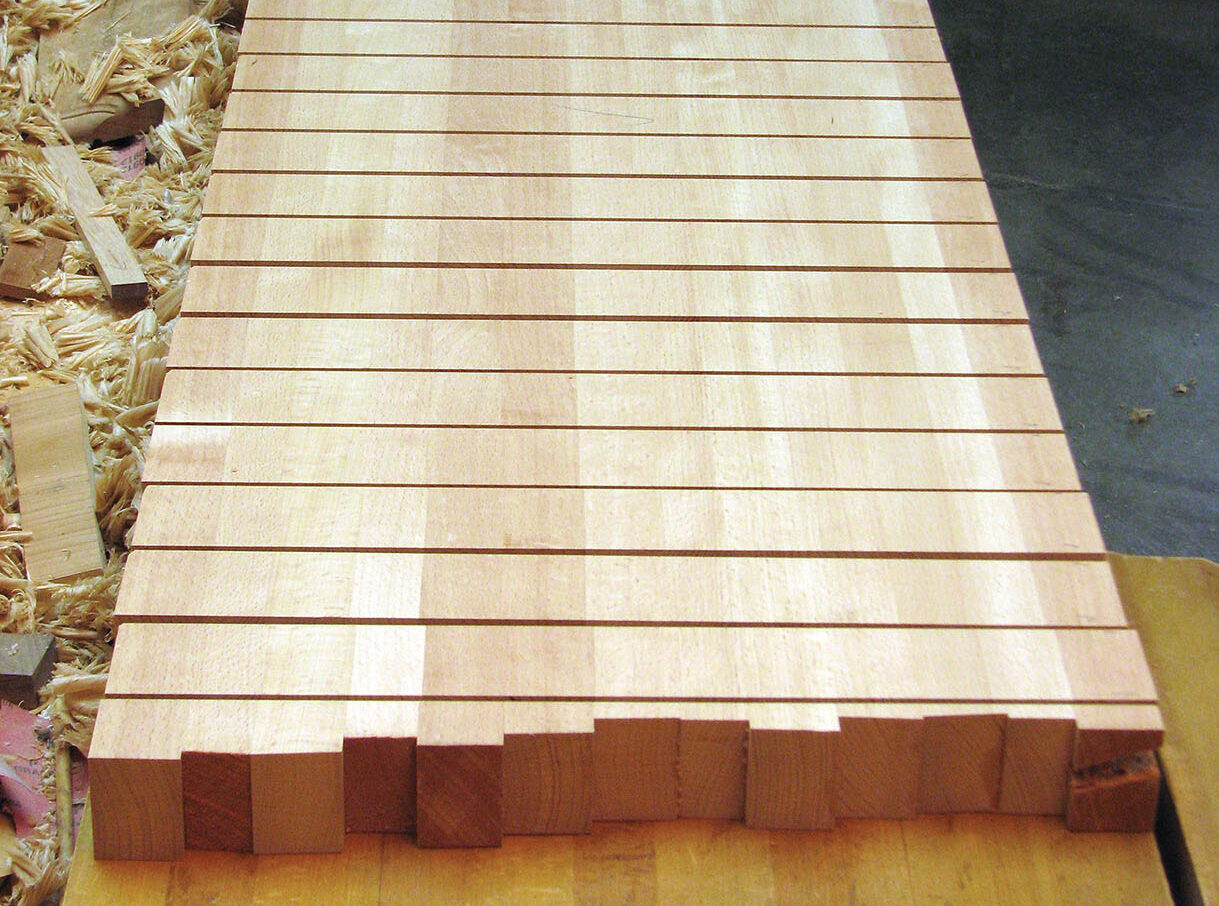
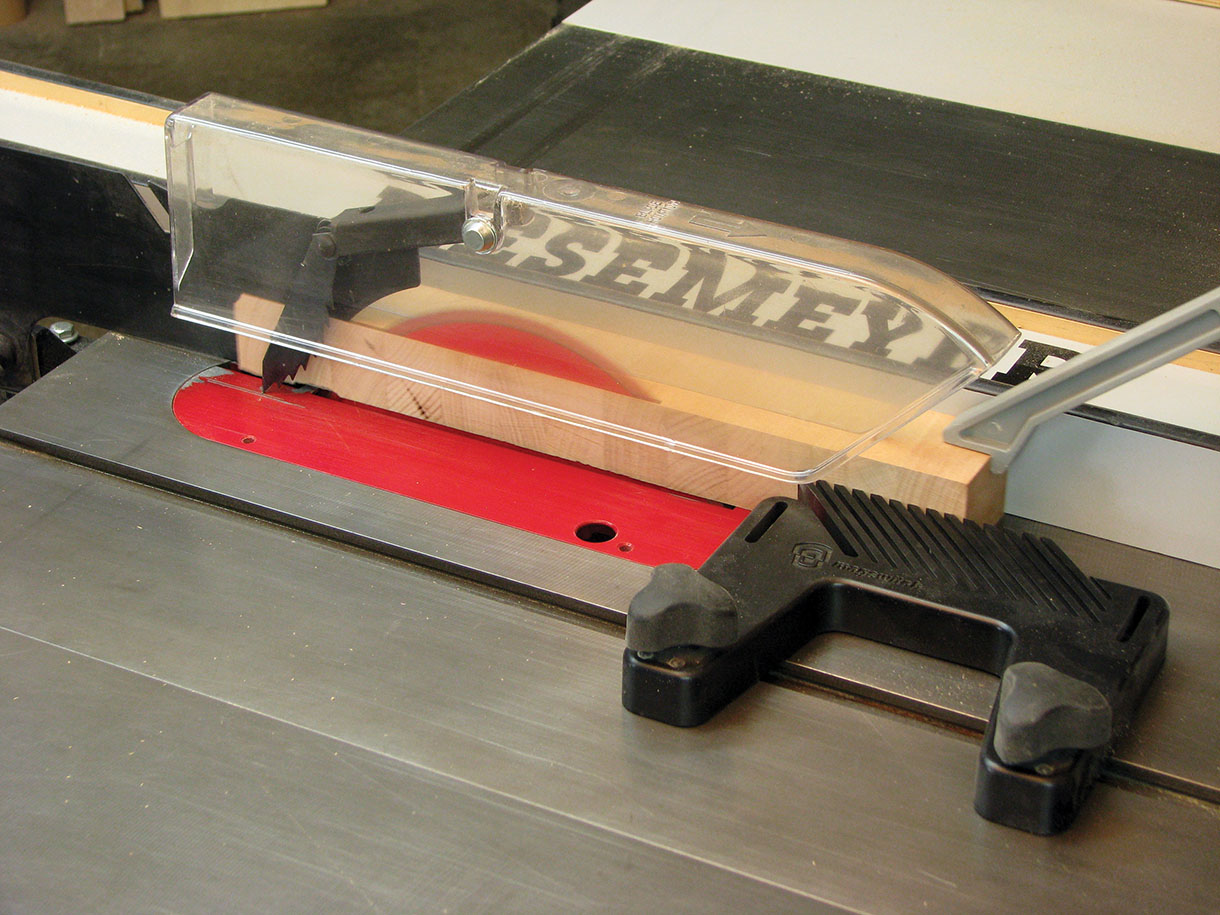
I like to cut the panel into strips with a crosscut sled. The width of each strip determines the thickness of the final end grain slab. So if you want the table top to be 50mm thick in the end, aim for about 55mm per strip. I like to trim them to final width later as a ripping operation to ensure they are all identical and to remove as many saw marks as possible. When you cut the strips, only the side of the strip on the clamped side ends up a near perfect cut. When on the offcut side of the blade, you can expect the strips to bend slightly, making the cuts somewhat irregular and often burned as well. After all the strips had been cut, I ripped them to 51.5mm width, hoping an accurate glue-up would yield a final table top about 50mm thick.
The strips are then turned 90° to achieve the ‘end grain up’ orientation. Also, every other strip is rotated 180° (front of strip to the back of the table top) to create the staggered but mirror image rectangles for the final pattern. Watching the pattern develop before your eyes is pure joy.
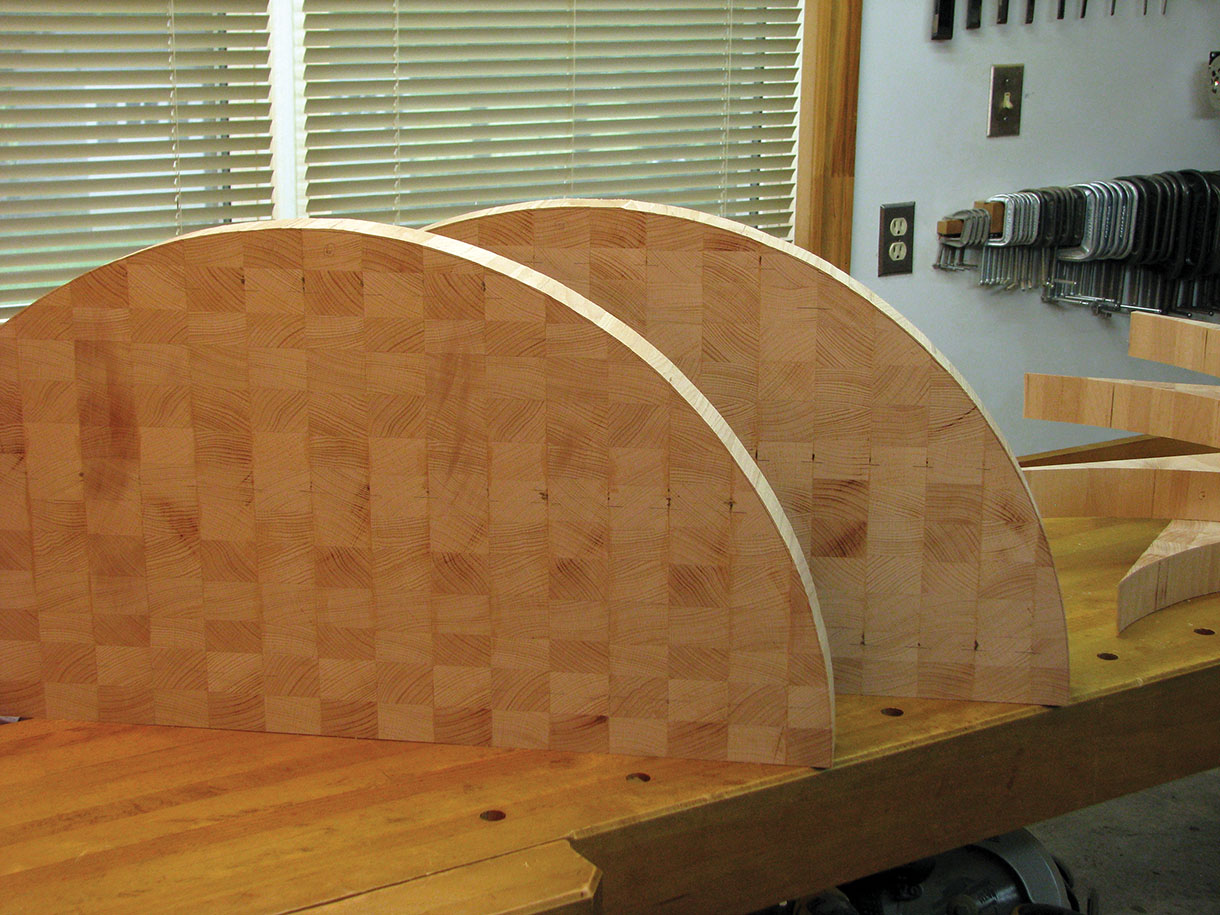
Making a template
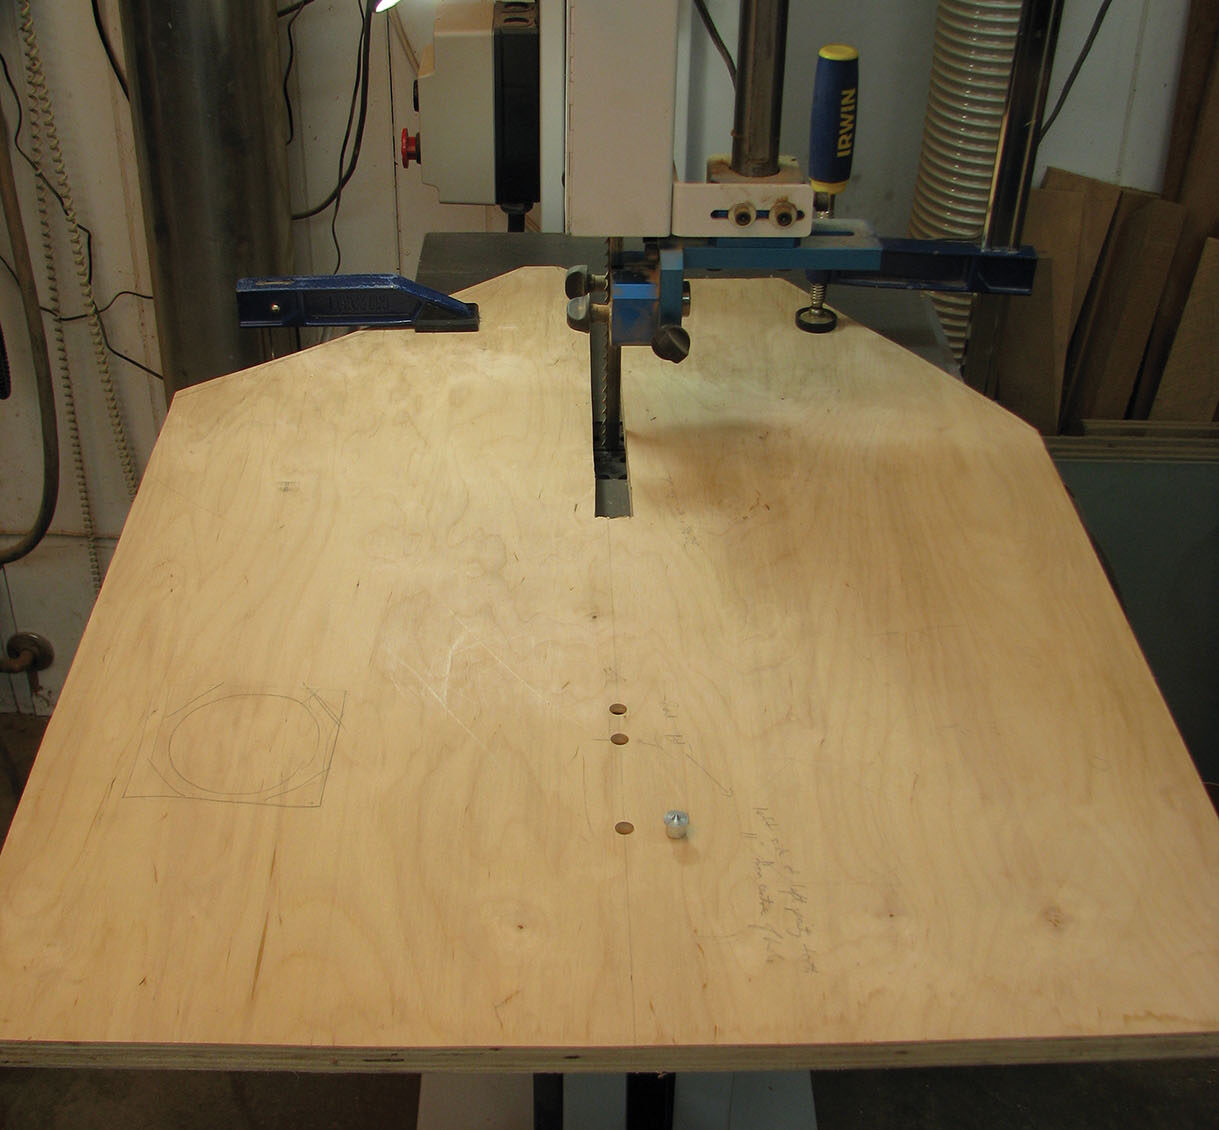
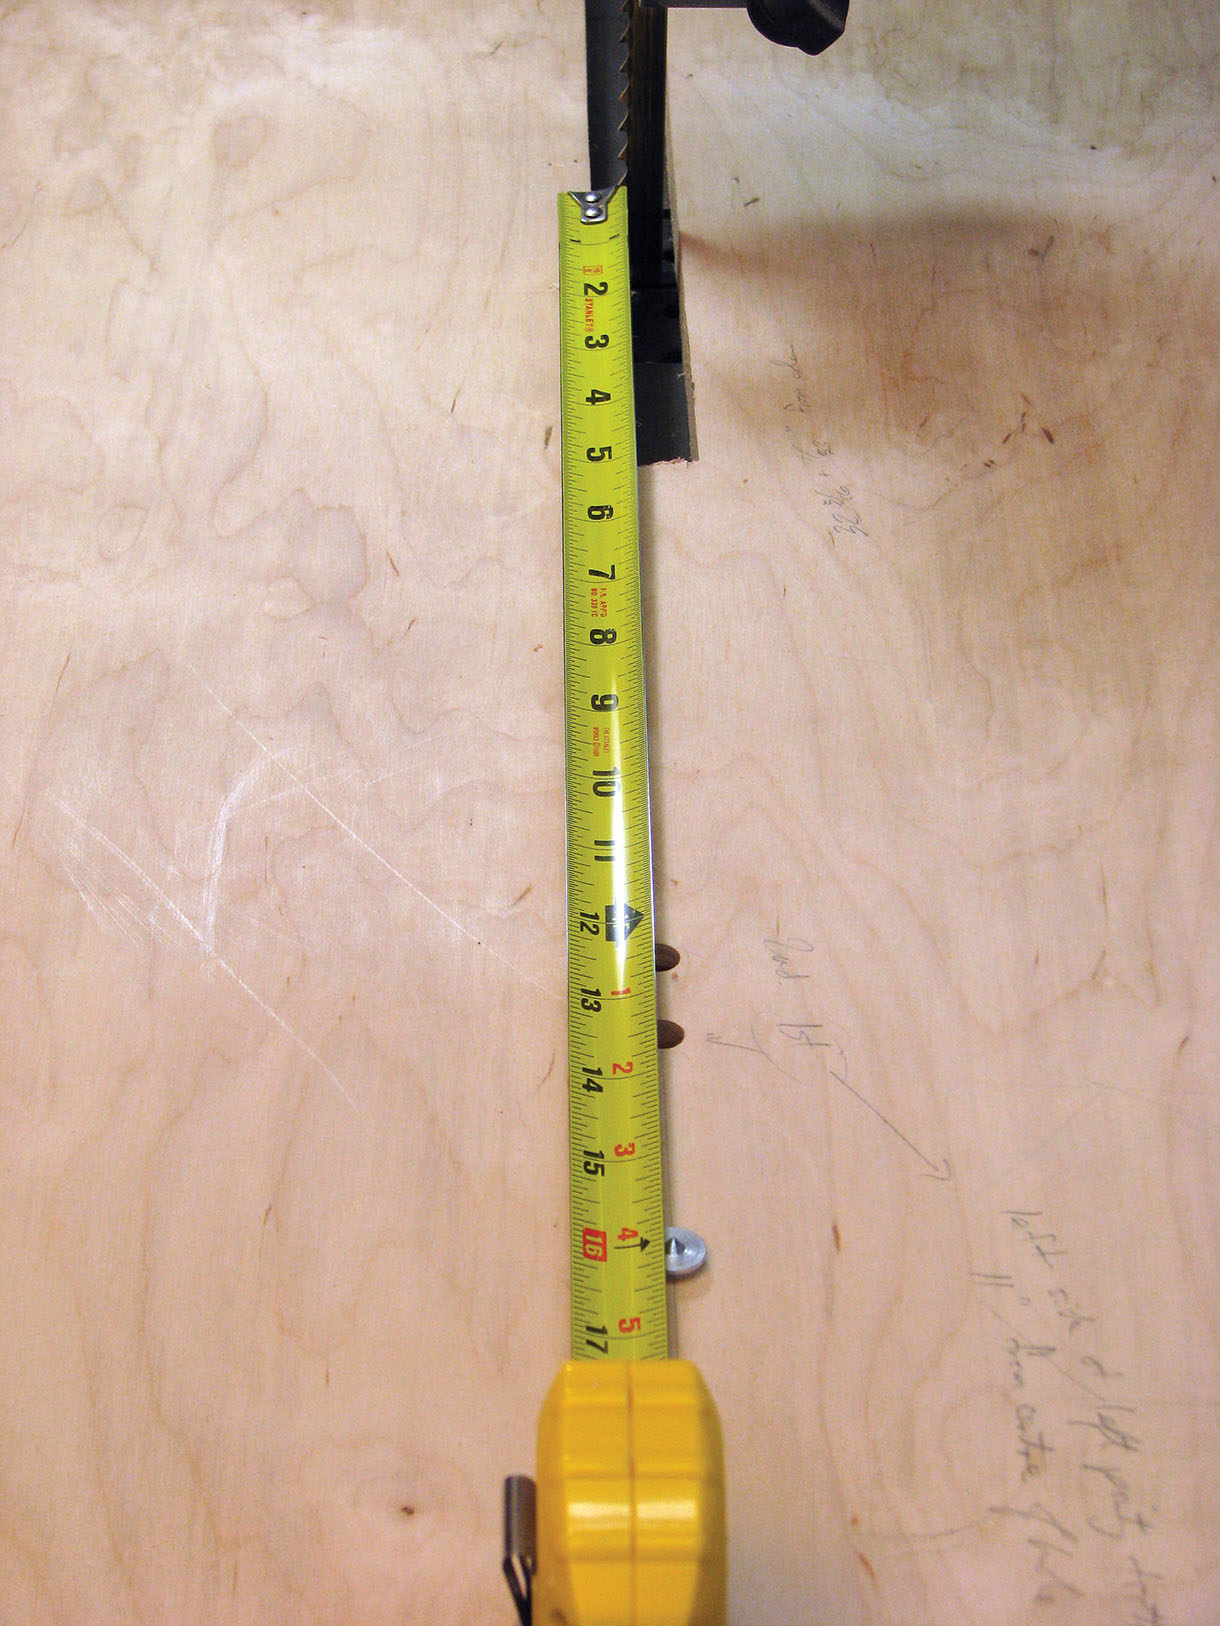
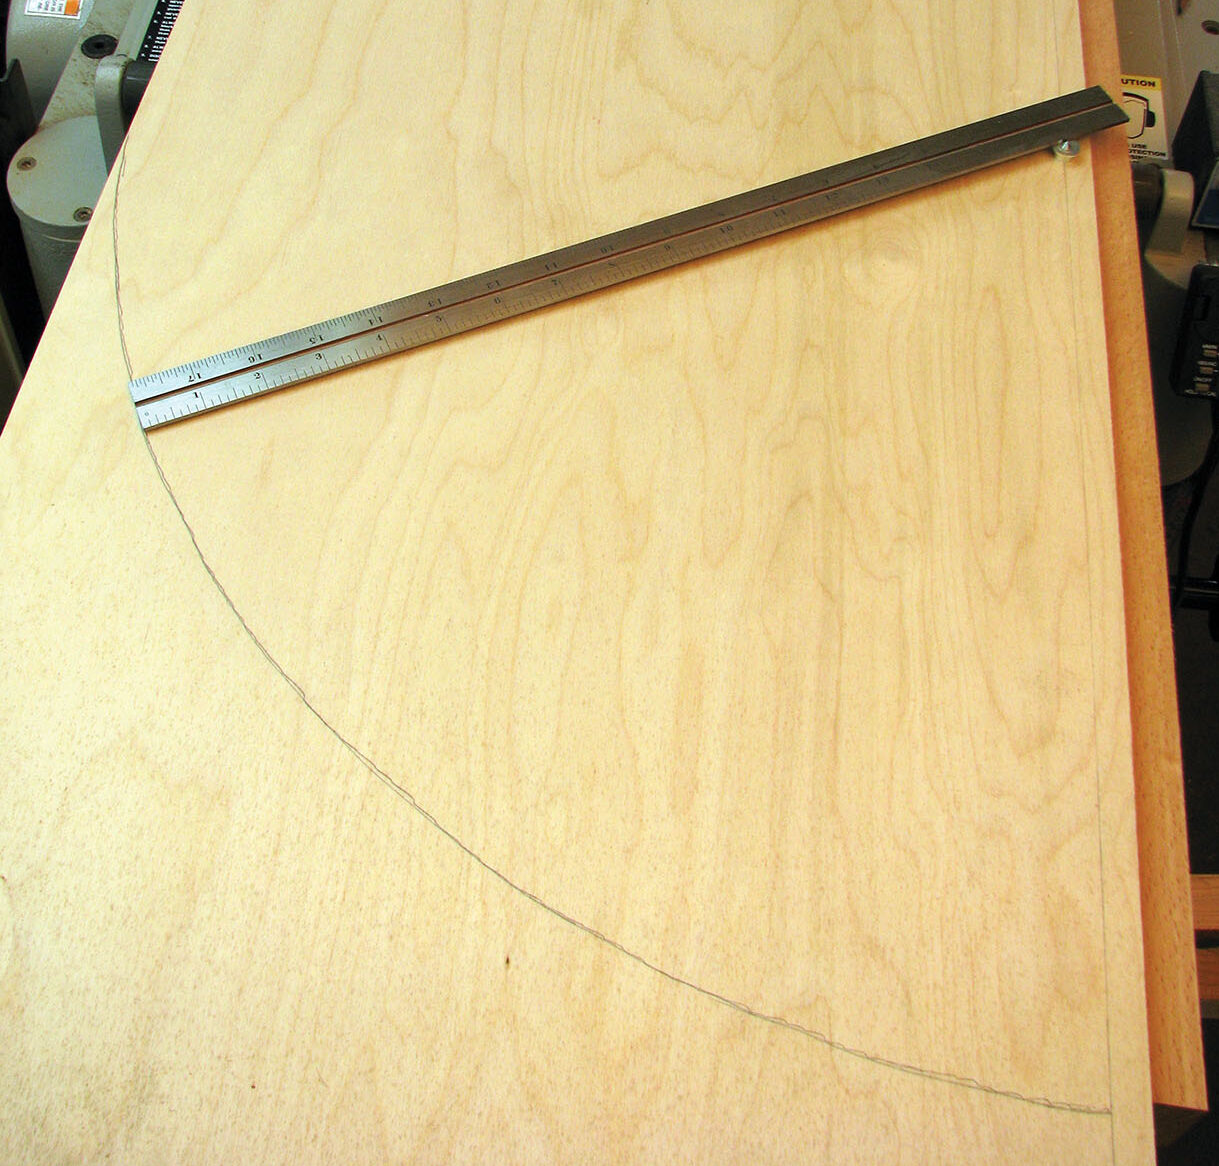
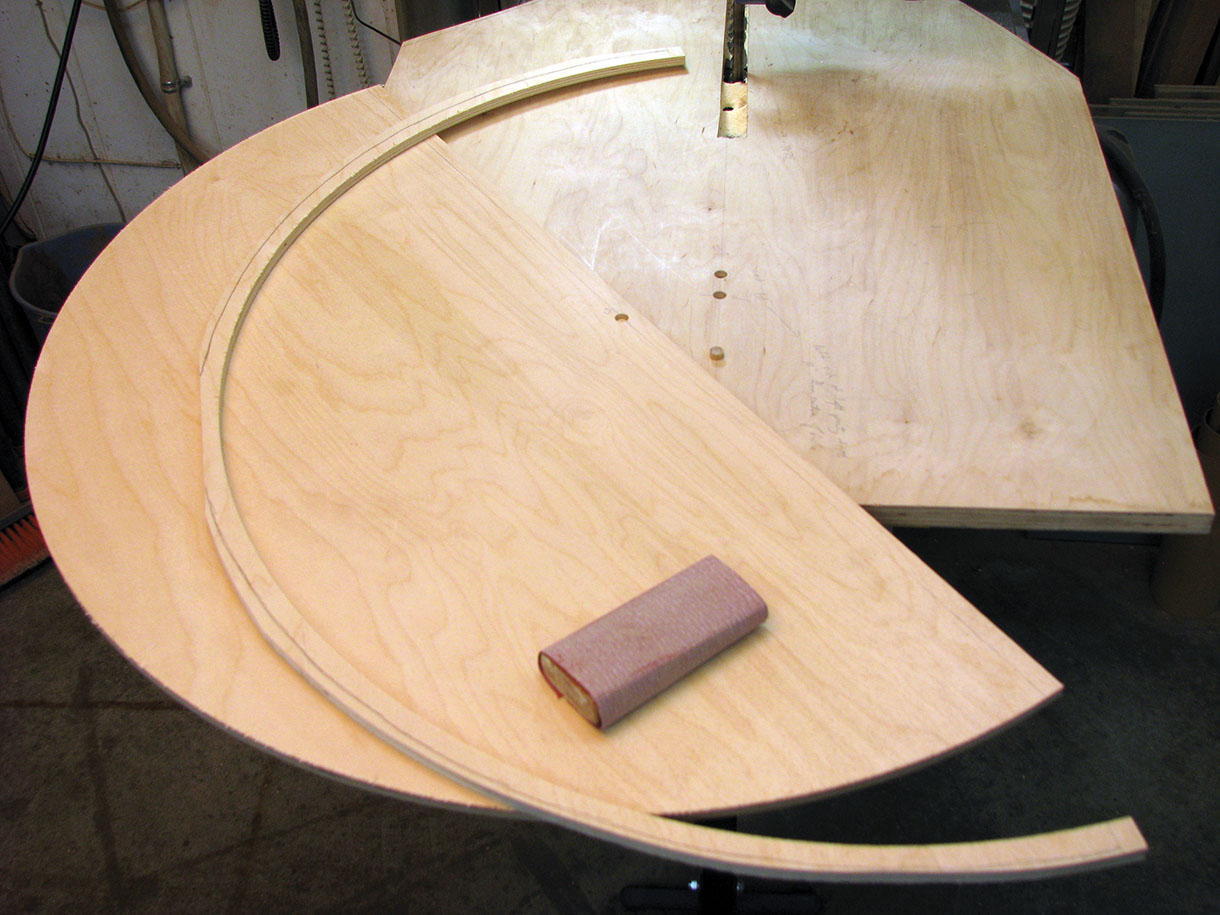
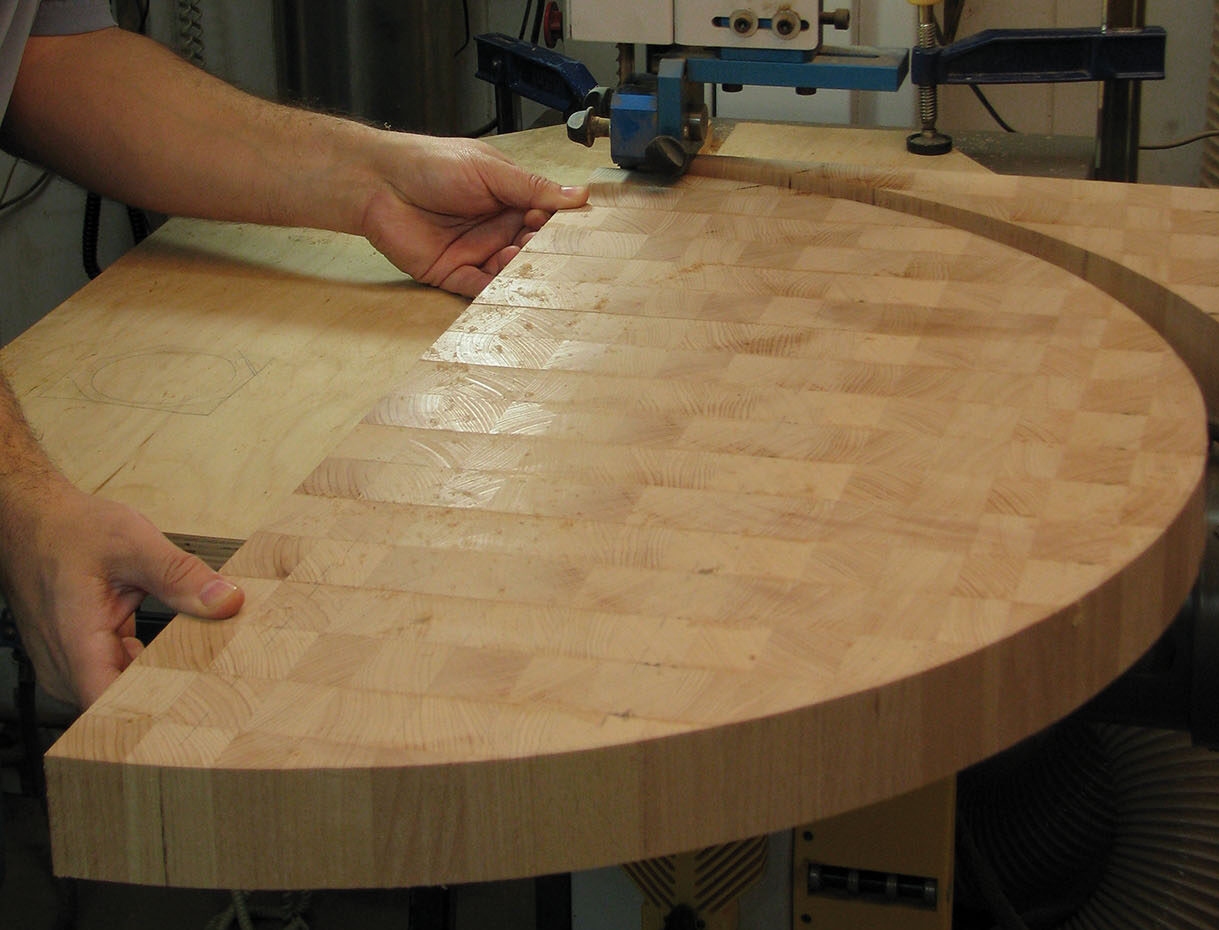
For the semi-circular top, I needed to make a template to allow template routing later and minimise sanding of the edges. I used 12mm Baltic birch plywood and used a simple circle cutting jig on my bandsaw to cut out a 405mm radius semi-circle. Leaving the plywood a little wider, I drilled a hole about 12mm from the edge that could become my pivot point. A dowel inserted in that hole allowed me to spin the template on the bandsaw after positioning the pivot point on the jig 405mm from the right side of a right-pointing tooth on the blade. I could sand the edges of the template easily compared to how much sanding would have been required on the table top edges if I had cut the semi-circles to final size on the bandsaw. Freehand cutting of the semi-circles would, of course, be even worse, so a template routing approach really yields great results. I was able to sand the template’s edges just by hand, but an oscillating spindle sander or sanding drum on the drill press could certainly be used.
The end grain glue-up
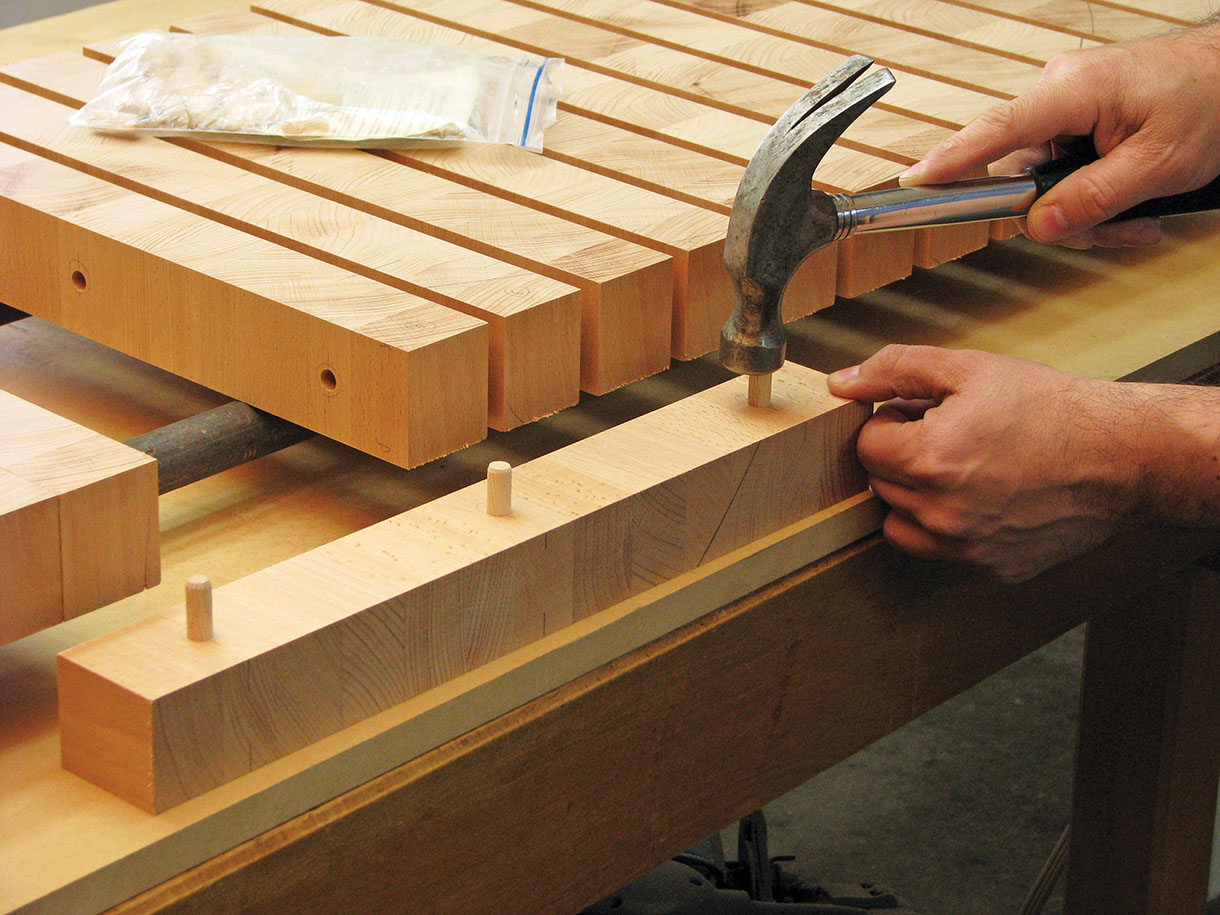
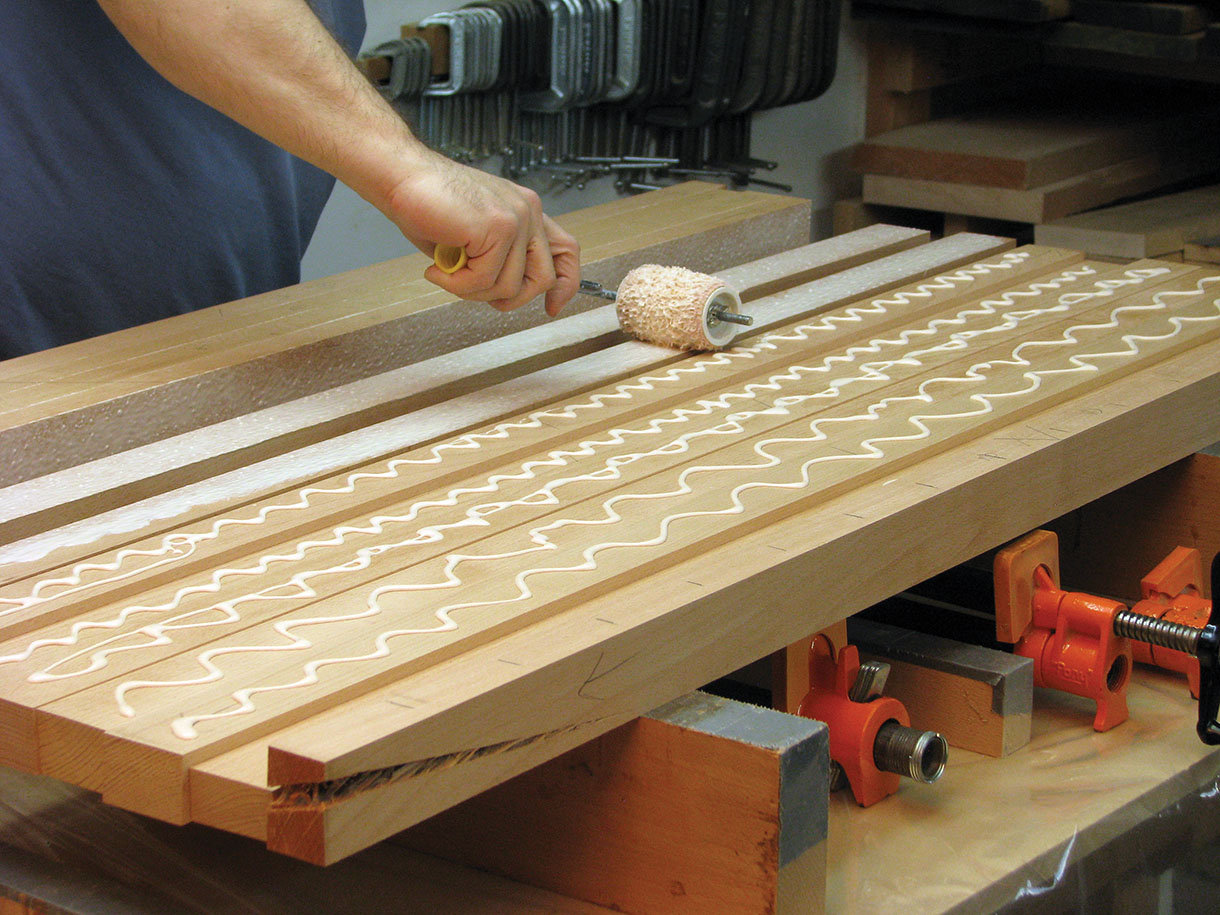
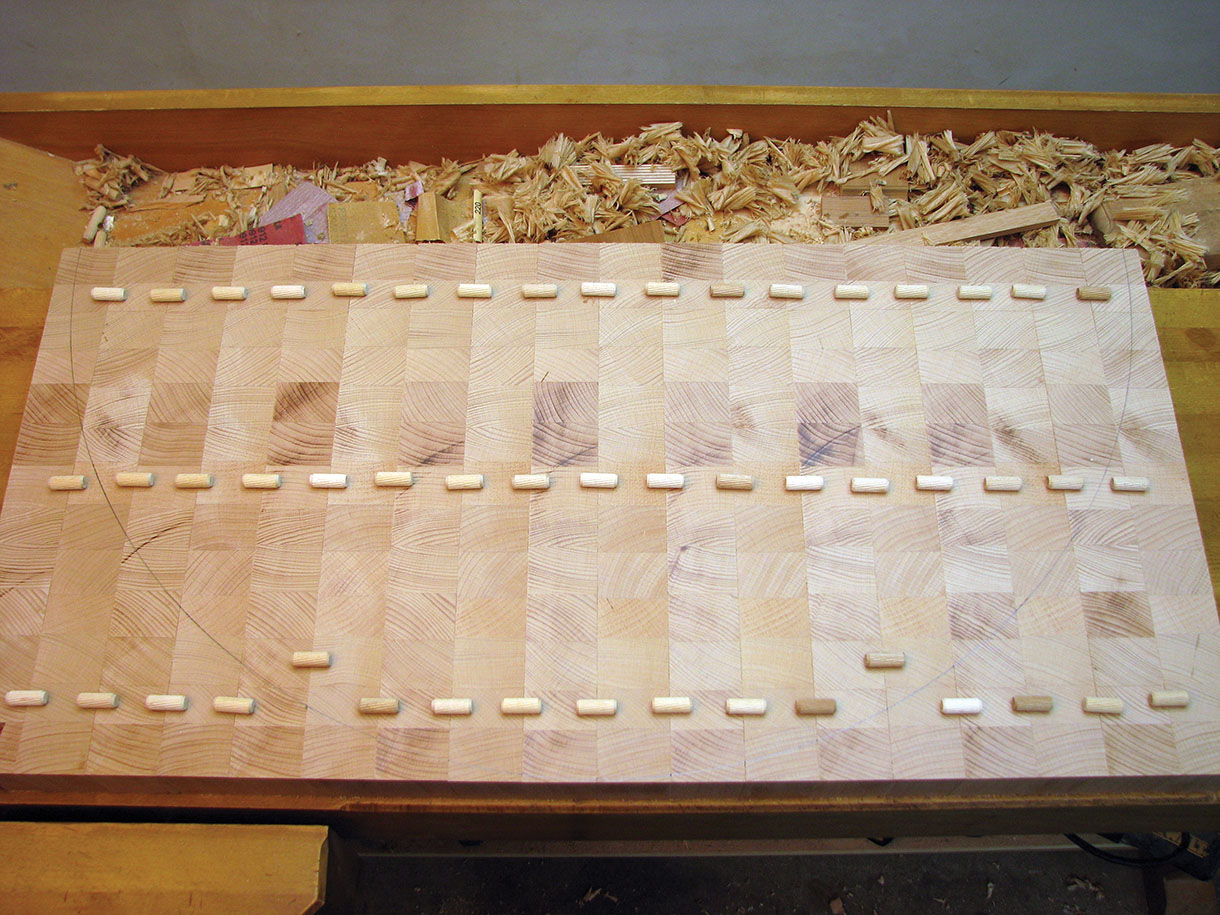
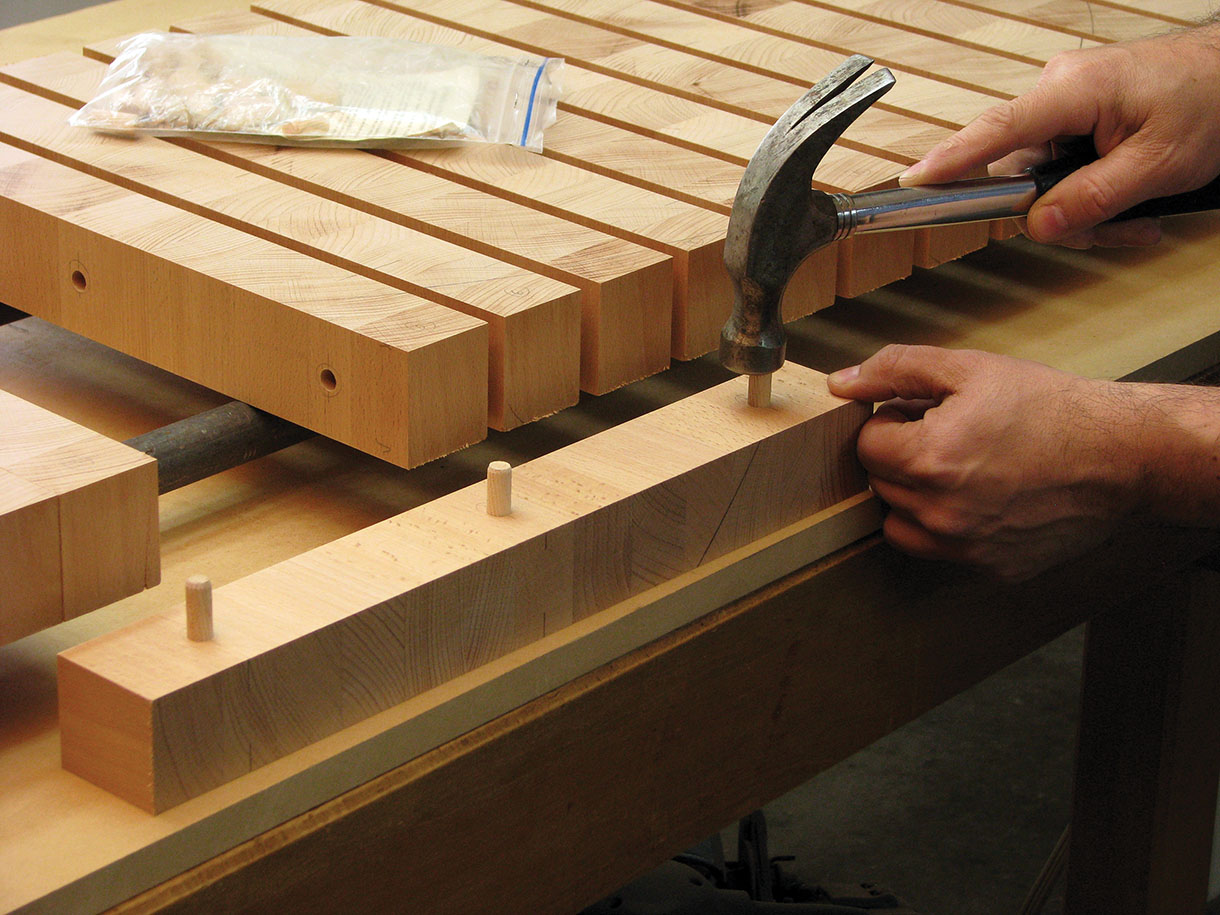
When building end grain table tops or cutting boards, I’ve always preferred to position dowels between the strips to aid with alignment. This frees me from needing any clamping cauls at all, so I have more room for the pipe clamps. In this case, though, I had to position the dowels carefully to ensure they would not cross the area where I would later cut the semi-circular shape. Then I drilled the holes on the drill press, using a fence and a single reference face on all strips to ensure everything would align.
The dowels were 10mm diameter by 25mm long, so I drilled the holes about 0.8mm deeper than 12mm on each side. From there, I could pound the dowels into one side of each joint and apply glue to the other side very quickly with a thick nap paint roller. I try not to get glue in the dowel holes, as the dowels are there for alignment, not strength. Plus if the dowels were glued they would restrict natural wood movement in the panel, causing distortion and possibly cracking. Remember that an end grain slab expands and contracts in all directions except thickness and you want to allow that movement to happen as needed.

Final shaping
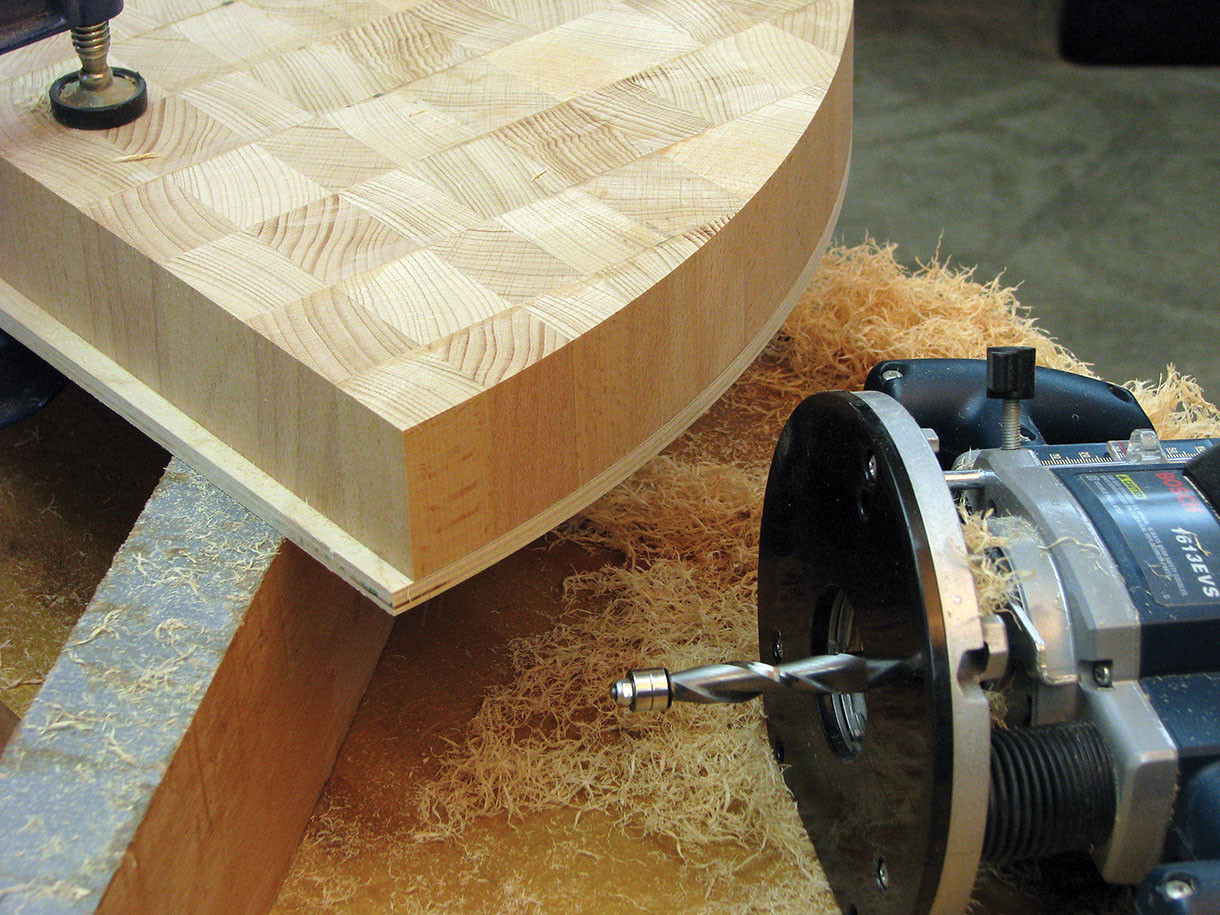
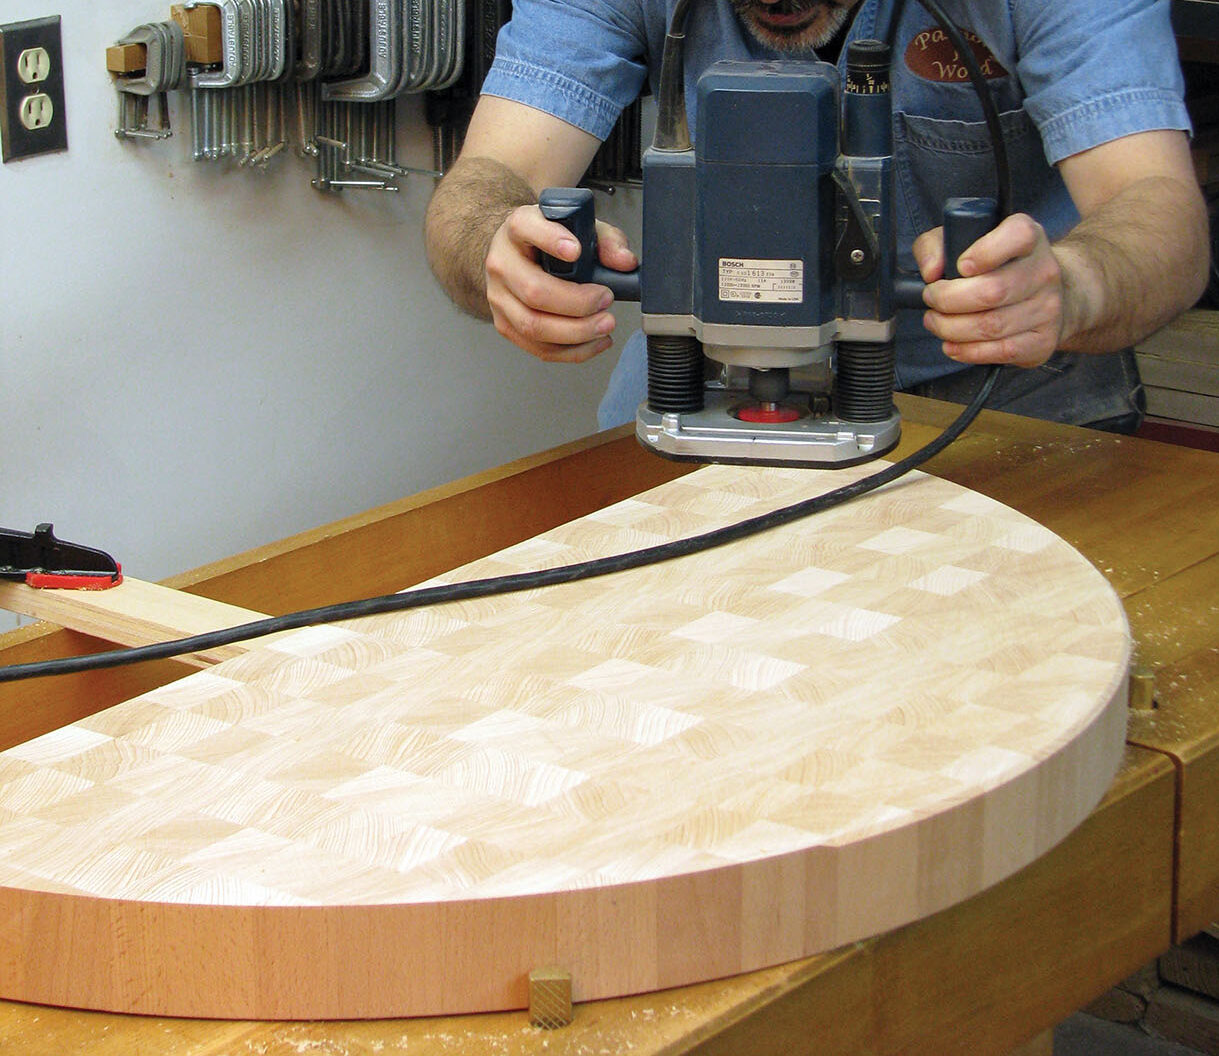
After the end grain slab dried overnight or longer, I could remove excess glue with a low angle block plane and do a little more planing if necessary. If the glue-up went well, sanding alone might work fine, first with a belt sander and then random orbit from there. I could even true up the back edge of the table top with my jointer. While this constitutes crossgrain cutting, it does work. Then I drew the semi-circular shape onto the slab with the template and cut just outside of that line freehand on the bandsaw. From there, some double-stick tape secured the template to the slab and a flush trim bit made quick work of final shaping. I used an up spiral flush trim bit and cut just a little at a time given the 50mm thickness of the table top. Remember that the orientation of the wood is such that this cutting is crossgrain, which cuts more easily than long grain.
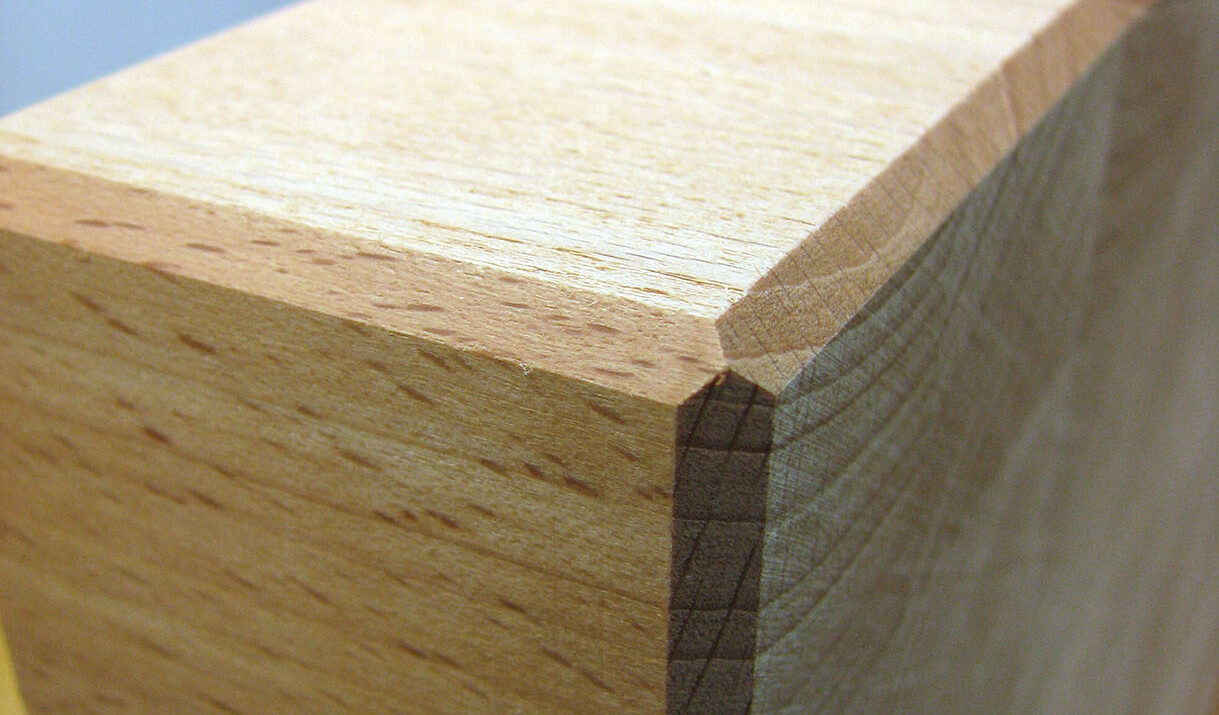
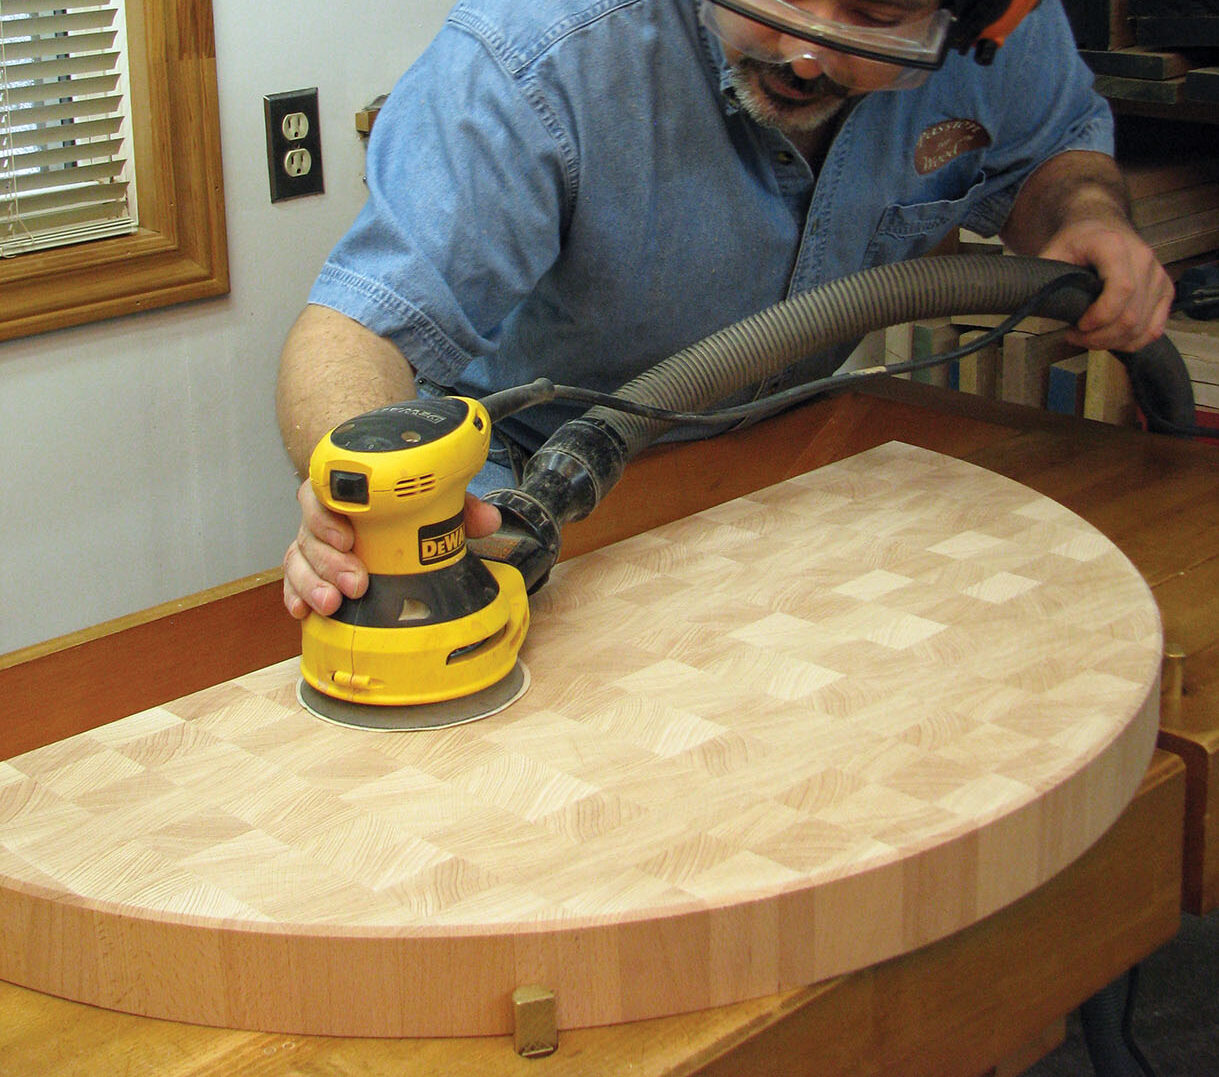
A small routed chamfer around the top edge of the table tops finished them off, as well as a small chamfer on the vertical rear corners as well. I then completed the final sanding with a random orbit sander, working my way up from coarser grits to 220 grit at the end. The edges needed to be sanded by hand, preferably sanding in the short vertical direction to avoid sanding scratches.

In my next article, I’ll show you how I built the table bases and joined them to the table tops. While these tables look simple, don’t underestimate the impact of an end grain table top. They are truly incredible and really showcase the beauty of nature in those growth rings.
Further reading
PHOTOGRAPHS BY HENDRIK VARJU