Have you ever stood in a room and considered how many joints you are surrounded by? Probably not. It is a fascinating thought often overlooked – that the minutiae and might of the built world is contingent on the humble joint.From mitre joints in your kitchen cupboard, to technical expansion joints on the biggest bridges; the means by which two parts are conjoined is an integral part of our history – literally unifying societies across great divides, and making unsightly kitchen appliances vanish. Yet for their cosmic brilliance, joints are subject to earthly stresses and failures – hence why it is important to choose the right joint for the job. Little wonder then that there is such a variety to choose from, each with their own pros and cons. The Question is, which one is the right one?
In this two-part series, Douglas Coates takes a forensic look at the insides of a joint. By expounding on the forces that act within, David provides practical guidance about choosing and building solid joints that last. Drawing on his extensive woodwork experience, our author shares his time-proven tips and tricks that will give your furniture the upper hand against the forces of gravity and time.
What is a joint?
A joint is a connector – a component whose job it is to conjoin two or more structural members together. An effective joint allows stress to flow efficiently and completely through the joint and out of the structure. To understand how joints work, we need to consider the various conditions that exist inside a joint. We use joints to create structures, and in doing so change wood grain direction – such as a fence to a step-over stile, the changing grain direction at the corner of a picture frame, or the various components of a stretcher.
There are exceptions (a scarf joint), but turning a grain corner is one of the main reasons for joining two components. This results in a combination of the strengths from both grain angles, with a typical angle of 90°. For example, this is what gives plywood its dependable strength. By placing each piece of wood at 90° to the previous grain, the strength of each grain direction is combined to create a very strong sheet of wood.
Knock down joint
This simple knock down joint is deceptive. Provided the mortise is given broad shoulders (along the vertical) these structures do not have any play – they are amazingly stiff and strong. They also alleviate any play from wear and tear, and are quick to dismantle if necessary.
Mortise and tenon joint
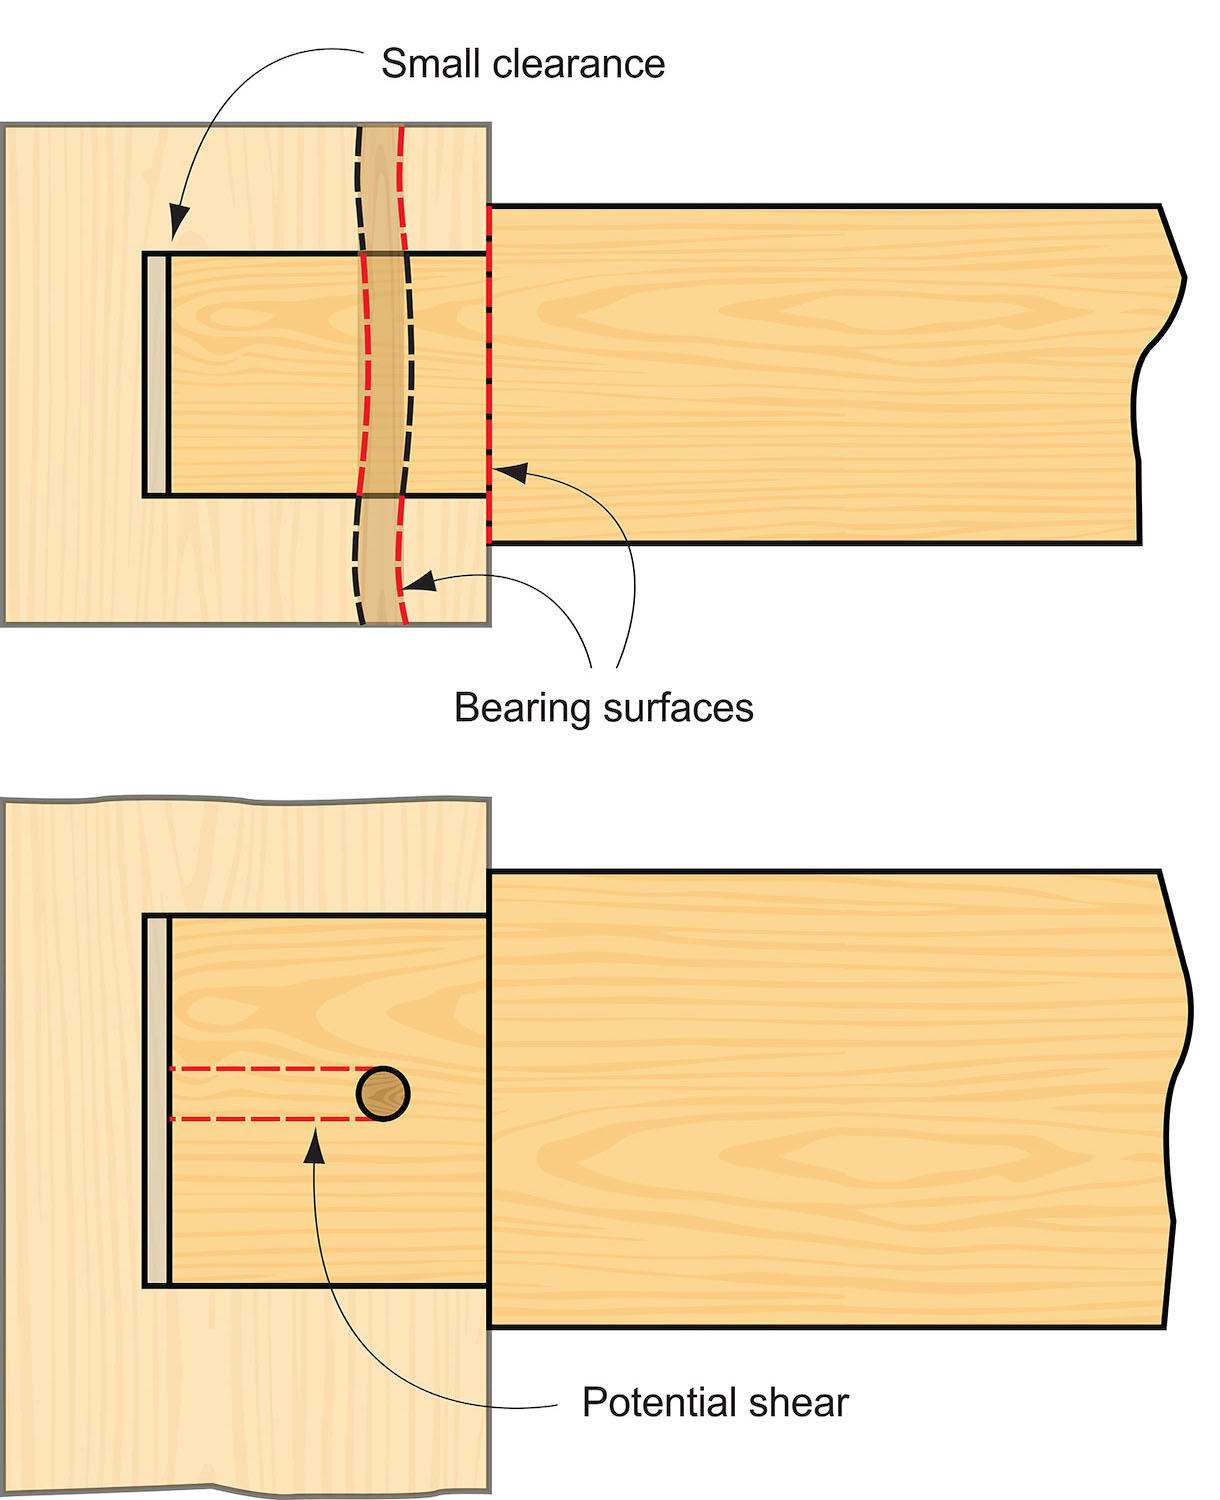
Let’s use a stretcher to demonstrate what happens in a loose, or failing joint. The mortise and tenon illustrated below is experiencing movement. As a result, the tenon is trying to rotate within the mortise. Assuming the cheeks of that tenon are bonded (if not it’s failing already), then there is a notional fulcrum within the joint. The length of the stretcher is a powerful lever that will exacerbate play. As such, even small loads convert to huge loads inside the joint.
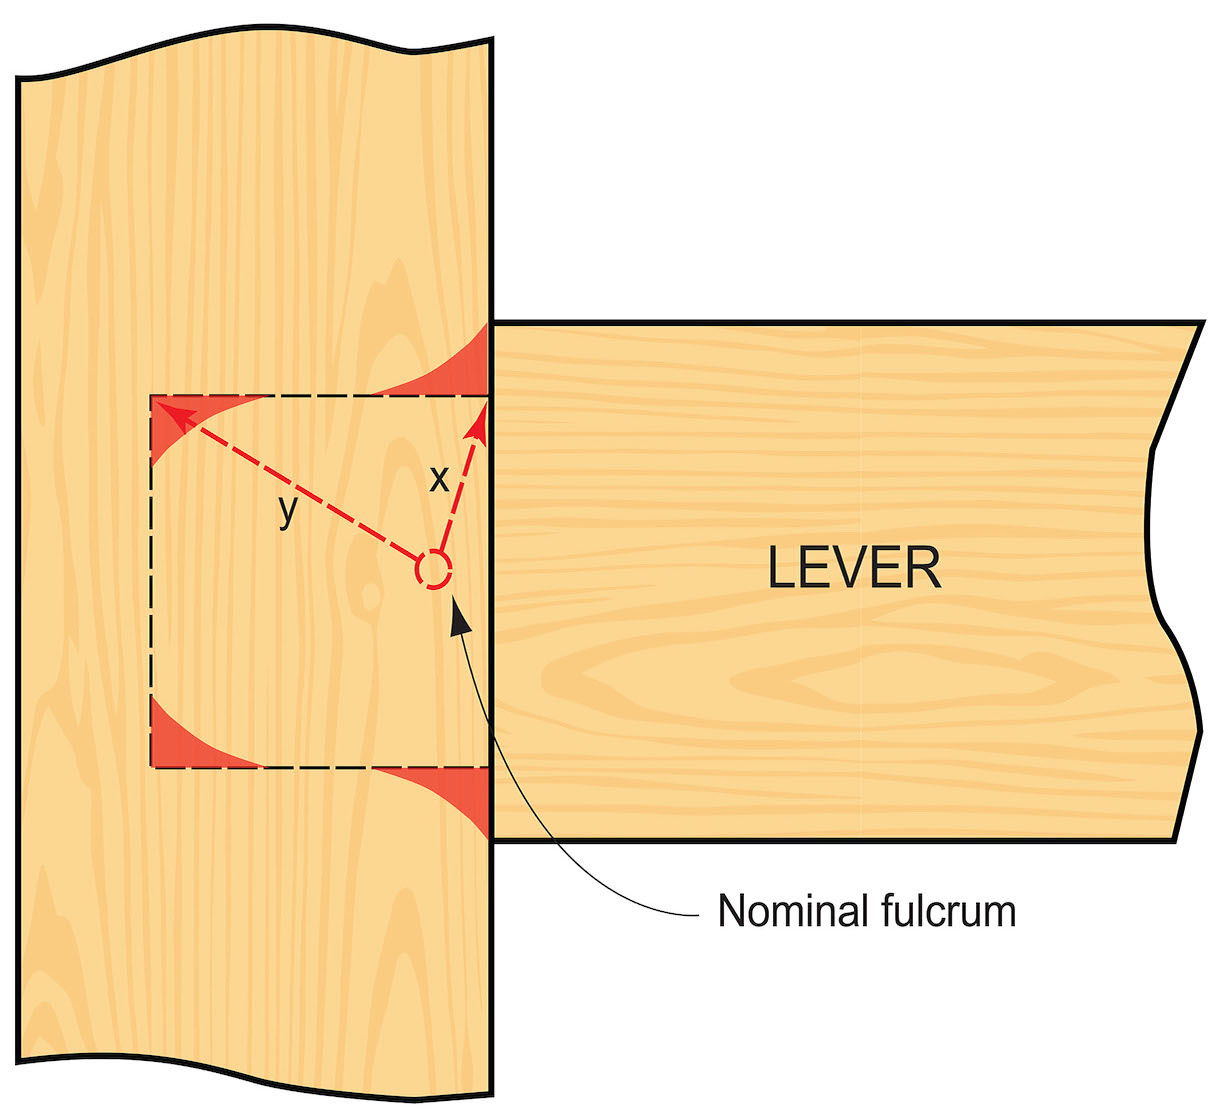
These loads are concentrated into a small proportion of the joint’s internal volume. If the bond fails, then the fulcrum point is free to move. This leads to distortion and eventually failure. It is small areas of any joint that resist these high forces, and this is why making joints well is integral to the durability of the stretcher. In pursuit of good joint construction, we need to create the largest possible area of contact between the two components, with minimal structural disruption. Each mating face will have a job to do in the joint. These are:
- Reference (locational)
- Bearing (to take main loads)
- Bonding (gluing surfaces)
All contact faces are locational by fixing the two pieces precisely. It’s easy then to determine what are bearing and bonding faces.
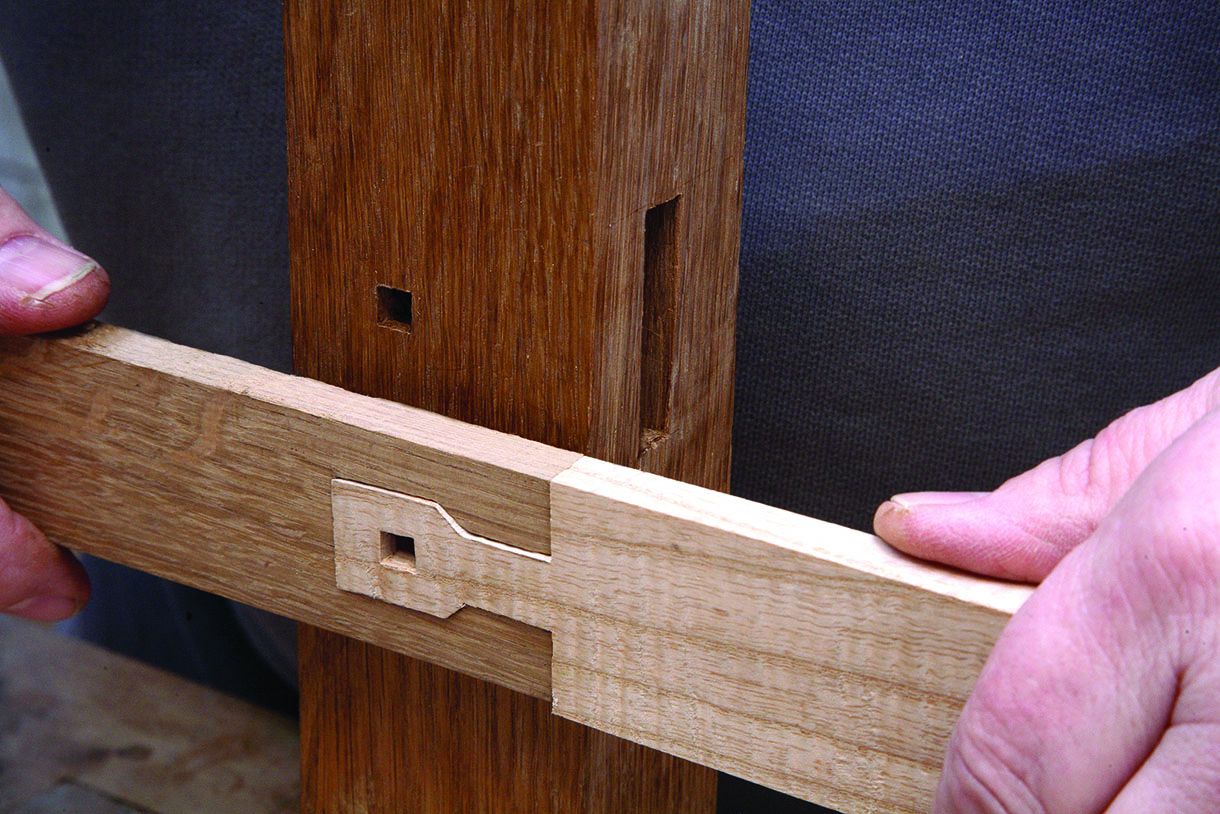
The bridle joint
This is a simple bridle joint. An excellent joint, except in tension upwards, whereupon the main piece will simply slide out. The sides are load-bearing faces, so they need to be a tight fit. Clamping tightens the third (hidden horizontal) face also. By adding the pegs, the strength and application of the joint is greatly increased. The bridle joint has the maximum possible bonding area with grain laid at right angles. Clamping the joint maximises the shoulder bearing load. This forms the third bearing surface.
How to make a strong joint
Volume
The total volume of a joint comprises the two components. Typically, it is approximately a 50/50 split, thought this can be adjusted for the application. It can also be compromised because the integrity of the joint is not our only consideration. For example, blind joints are chosen for aesthetic reasons, but lack the strength of a tenon.
Grain
Consider grain orientation. Laying grains at 90°, or similar, will greatly increase joint integrity.
Bearing
Optimising bearing surfaces. Wood compresses most readily across the grain and is very resistant to compression along the grain. End grain is an excellent bearing surface. It is also a poor bonding surface.
Bonding
Maximise bonding areas. These need to be long grain to long grain. Faces at angles to each other will be very strong and stiff. But these faces are not the best bearing surfaces. Generally speaking, very hard woods like lignum (Guaiacum officinale) are excellent bearing materials in all orientations (tricky to glue though).
Proportions and tolerances
Long grain is the best wood for giving a joint its strength and stiffness. Therefore, it is also of benefit to include as much long grain material as possible into the joint. This means removing as little long grain as possible when working the two ends of the joint. By thinking about the loading the joint will experience, and identifying the bearing and bonding faces, a good joint design can be achieved. For example, deeper tenons for a mortise and tenon joint maximise these surfaces. Steeper angles on dovetails increase the interlock area. A resistive contact, or even some tightness is good on any bearing surface.
Reinforcing joints
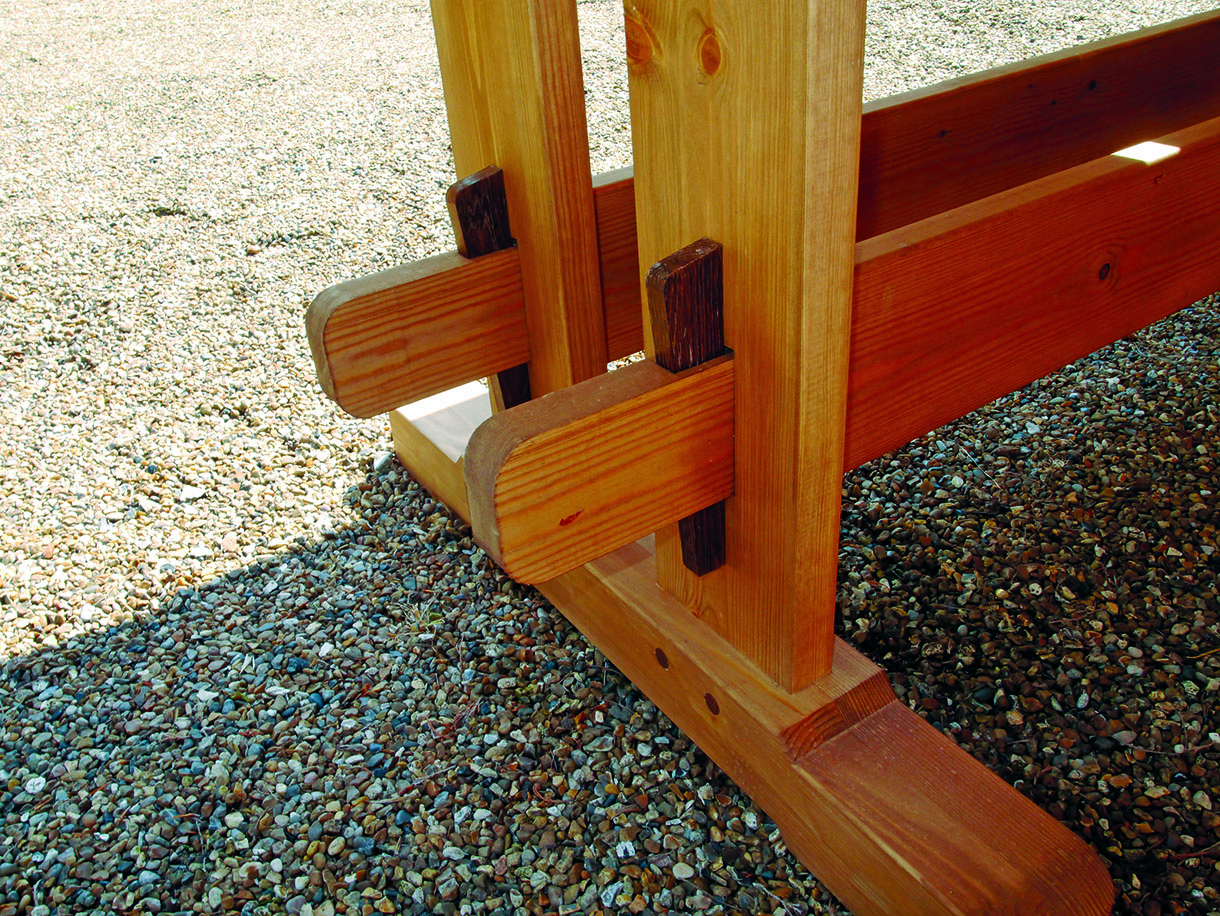
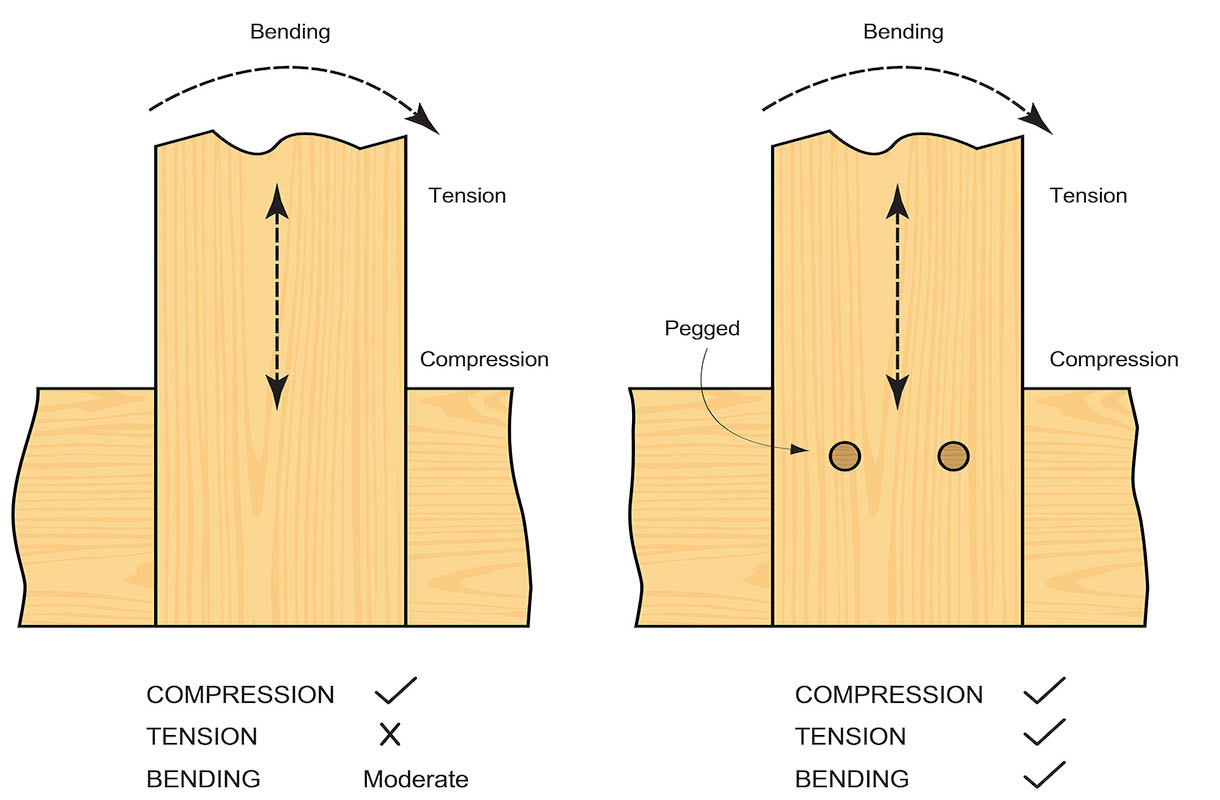
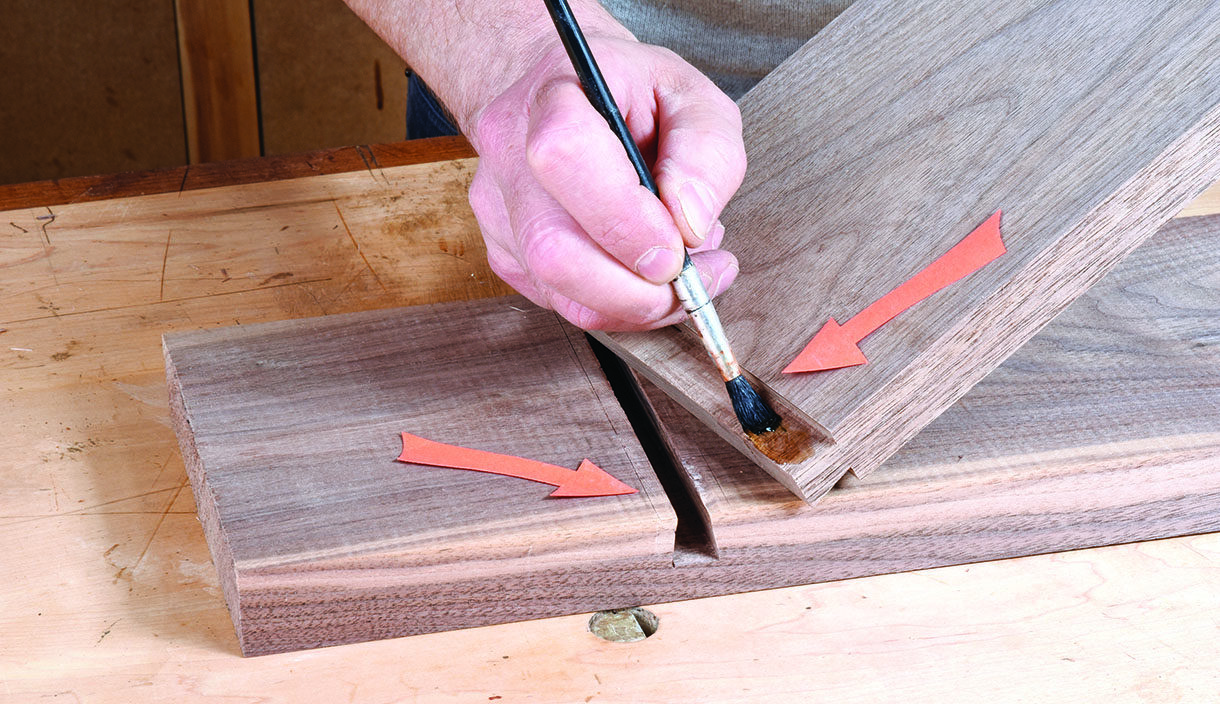
Adding a third component to a joint will improve its performance. Splines, keys, wedges and pegs (or dowels) are all used to lock joints together, increase bonding area and tolerate specific loads. An example is the addition of a spline to a simple mitre joint, which is otherwise quite weak. Biscuits are just splines by another name. For any critical applications, the time invested in adding this joint detail will be well worth the gain in strength. In some cases, the third component is placed under considerable load itself, so choice of material is essential. Pegs should be straight grained and cleaved to ensure grain flows straight along the peg axis. I always use a harder wood for wedges, because I want control of the compression I place into the tenon.
If the wedge also compresses, I won’t know or feel what is going on inside the joint. I’m not a fan of draw-bored pegged joints. I think they are fine in architectural structures (green oak frames for example), but high-risk and a bit brutish for furniture. I would certainly make the offset small, 0.5mm maybe. I make sure pegs are very dry by using board ends (offcuts) cleaved and then stored indoors. If there is any moisture in the wood, I want the peg to be dryer, so as it equalises it will swell into the joint. Experience has given me great faith in wedged tenons. Made with just moderate care, they are incredibly strong and stable. Wedges need to be perpendicular to the grain flow of the receiving (mortise) component. The wedge will apply great pressure inside the tenon, and that must be transferred onto square-on end grain. I’ll mention one more example of reinforcement – the square key inserted across a scarf joint. I’ve seen it used in the arch of a Gothic door frame and it acts to pull the two parts together with considerable force – mating end grain to end grain. I think there is a real beauty in such excellent engineering.
Wedges in a joint

These are wedged tenons in ebony that have been cut along the grain. It is best to use a harder wood for the wedge – this puts all compression into the tenon, meaning you have more control over what is going on. I make the wedges a reasonable length – they can drift sidewards as they are tapped in, perhaps tracking the grain in the tenon, or simply looking for a way out. The extra length enables you to steer the wedge in.
Summary
So far we have discussed what a joint is, the malformations a joint undergoes during high stress, and ways you can increase the strength of a joint – adding dowels and wedges are big ones. In part two of this series, I will continue to assess the pros and cons of some of the more popular types of joint. I will also advise on how best to deal with moisture and movement within woods, specifically in a joinery context, and advise on gluing best practice.
One Response
I think, this app has enlightened me , so educative, easy to understand due to the simplicity of terms and choice of words used.