With the aid of a few machines, Anne Briggs Bohnett and Steve Dando solve a woodworking school’s workbench problem with this superb knock-down bench. Fancy making one yourself? In this article our author provides dimensions and work details so that you too can make this sturdy staple of any woodwork workshop.

- A great project
- Design requirements
- Cost of my workbench
- The stock
- Why choose CVG?
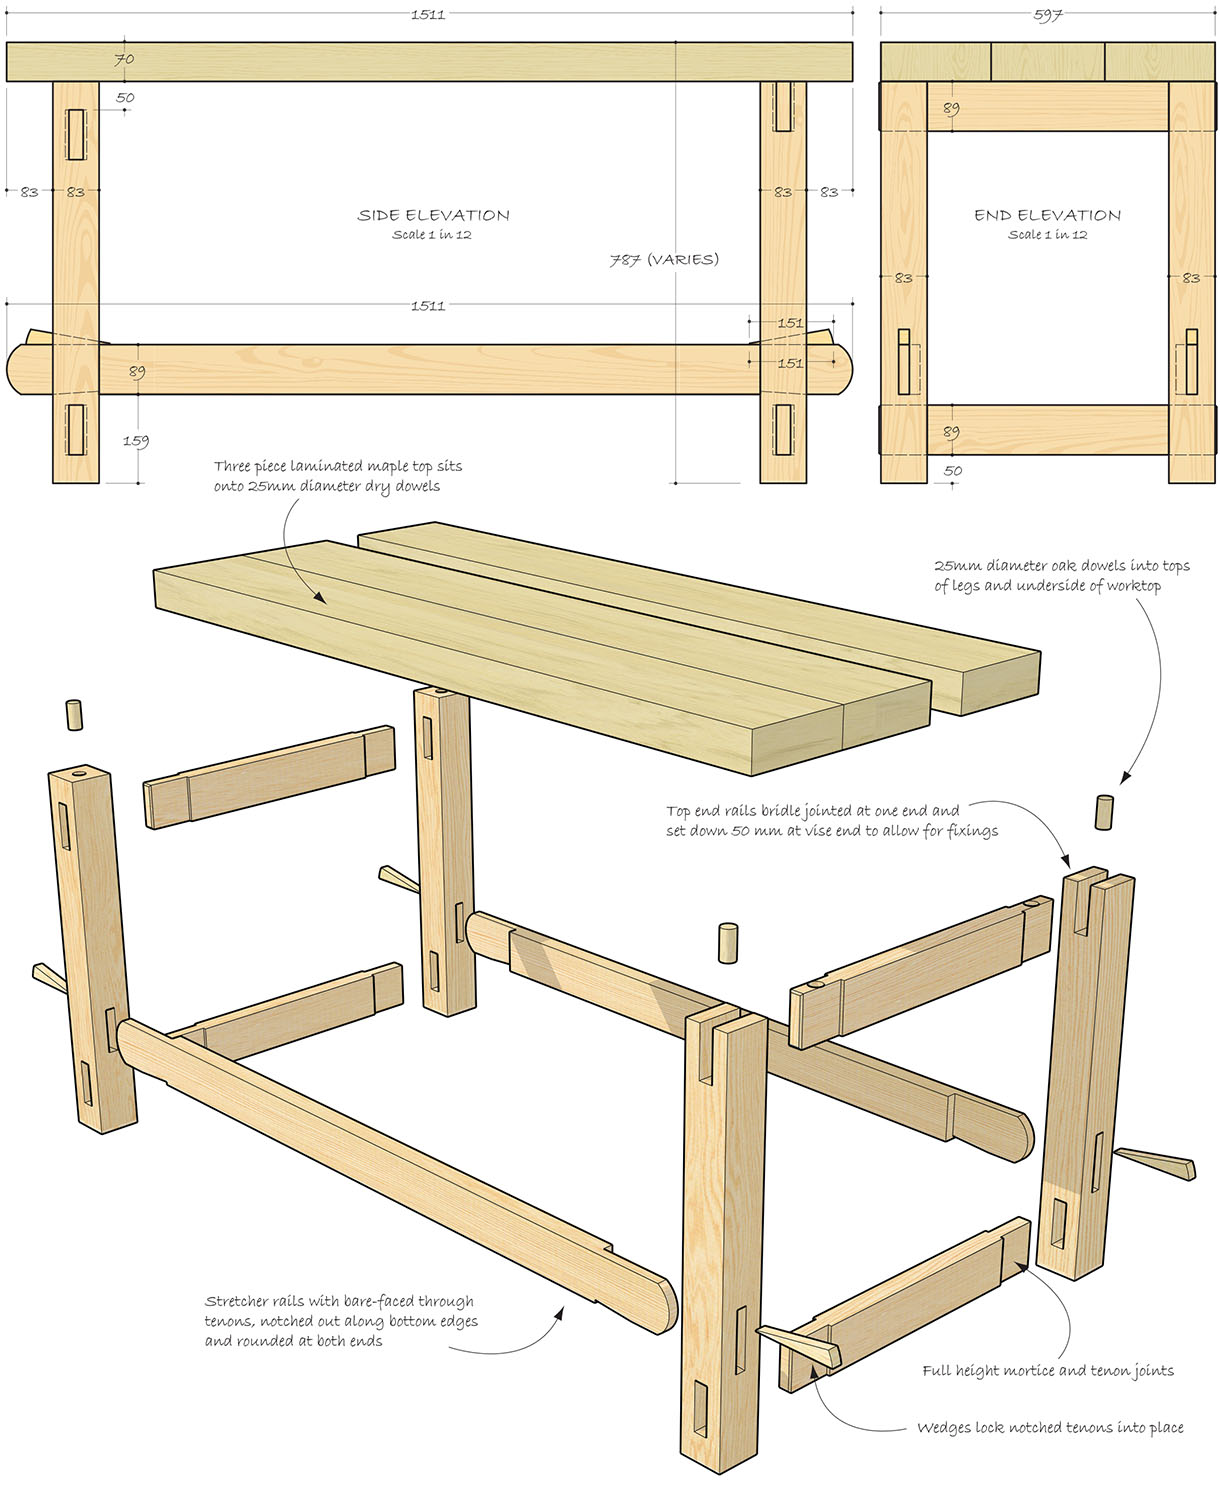
- Exploded view of workbench
- Cutting and planing the stock
- Fast and effective joinery
- Easy layout
- Alternatives to mortisers
- Machine-cut mortises
- Cutting tenons
- Making the base
- Glue up
- Easy bench top
- Worktop finish
- Summary
- Further reading
A great project
When I was hired to manage the woodworking school at Pratt Fine Arts Center in Seattle, as a woodworker myself, my first order of business was to build a hand tool woodworking programme into the school’s curriculum.
The pre-fabricated ‘workbenches’ in Pratt’s workshop faced the same issues so many cheap, factory-made items have in today’s world of ‘tool-shaped objects’. That is that they look like the item they profess to be, yet seldom perform as they should. Ever the opportunist, I figured bench-building would make a great woodworking class, and the school would end up with a few new benches.
Design requirements
The design incorporates these features:
- ‘Hybrid’ woodworking techniques (hand and power tool focused)
- To be easy enough to teach
- Can be built in just a few class sessions
- Is beautiful to look at (my school is, after all, an art school)
- Is affordable.
I worked with one of my favourite instructors at the school, Steve Dando. He is a former shipbuilder, general contractor, farmer and DIYer extraordinaire. He fashioned a design that is easy to disassemble and move; has leg joinery that can be tightened should the legs loosen with wood movement and heavy use; and could accommodate the addition of end and face vices after final assembly.
Cost of my workbench
My two favourite features of the design were that it cost less than $500 (approx. £390) to build and we were able to put it together in just two days. The price of the wood for the base of the bench was $179 (£139). Any reasonably straight, dry dimensional lumber would work to build the base, and some money can be saved here should you choose to use less expensive wood.
The stock
We started with a 12ft-long CVG Douglas fir (Pseudotsuga menziesii) 4×4 for the legs. Two 10ft long CVG fir 2x4s took care of all the stretchers. We let the dimensions of the stock as cut determine much of the final dimensions of the project. Assuming you’ll determine your own bench height and use your own stock, I’ve intentionally left dimensions out of most of this article. Though please reference the measured drawing if specific dimensions are required.
Why choose CVG?
CVG stands for clear vertical grain, which is similar to quartersawn timber. Used extensively as a material for decorative trim, it comes from big, tall, mature trees without faults or knots. Mixed grain fir can be cut from smaller diameter logs and is a more efficient way of harvesting timber. It generally results in a material with more visual interest at a more competitive price.

Exploded view of workbench
Cutting and planing the stock
The first step in the build is to cut your stock for the base of the bench to rough length. Doing this first makes the wood easier to manage as you square it all up and plane to final dimensions. If you plan to do a lot of hand planing at your workbench, finding a comfortable working height is a must.
Working height
A good rule of thumb is to stand with your arms at your sides. Measure the distance between your palm, held parallel to the floor, and the floor itself. (For reference, my finished bench is 31in tall, minus 3in for bench top thickness. The legs are cut to about 28in with a little extra length to spare). This places your centre of gravity above the bench while planning, enabling lass strain and a comfortable working height. The length of your bench legs will be that height minus the thickness of your bench top.
Stock thickness
Once you’ve got your base stock cut to rough length, square it up and plane it all to final dimension. I like to square two adjacent sides on the jointer, then true the opposing two sides with the thickness planer.
To get the maximum final dimension possible from the stock, I measure the piece that lost the most material during the squaring up process and leave it alone until the final pass with the planer, leaving all the stock the exact same thickness after that final pass. Once the stock is square and properly dimensioned, cut it to final lengths, squaring both ends in the process.
Fast and effective joinery
The next step is to begin marking out the joinery for the mortises on the legs. The barefaced, wedged dovetail joint on the bottom rails is the key to the stability of the bench and the ability to disassemble it.

A huge time saver and accuracy increaser is to clamp the four legs together and mark the mortises all at once. The 4×4 legs need a total of three mortises per leg – two straight mortises for the short stretchers, and an angled mortise for the bottom rails. The two straight mortises for the short stretchers are fairly cut and dry. They are through mortises. They can be pegged if you desire, but there is plenty of face grain inside the joint making a glue joint totally sufficient.

One of the features of this bench is the ease of installing aftermarket vices. For this, the mortises for the top stretchers are set down 2in from the bench top, so the vice hardware has clearance to be inserted above them. They can be anchored directly to the bench top without extra mortising work going through the legs or stretchers. The bottom stretchers are set up 2in from the floor to protect your feet from stubbed toes and for ease of sweeping beneath the bench.


Easy layout
Layout has always been a challenge of mine, as I’m dyslexic and notoriously bad at following instructions, especially when there are numbers involved. To that end, we made up a layout story board for the first bench. When it came time to teach the class, the students’ first project was creating their own layout story stick.
For the angled mortise, we also found it useful to have a 4° and a 10° shim to use to check our layout. They were fashioned using 4×4 scrap, marked with a bevel gauge and protractor, and cut out on the bandsaw. Those shims also came in very handy when it came to chopping out our angled mortises.

Alternatives to mortisers
This was my first time using an industrial hollow chisel mortiser, and I must say, it was a blast. If you don’t have one in your home shop, no problem – you can use a drill press, a ¾in bit (or even a brace and bit for that matter) and do a tad more clean-up at the end.
All the layout, setup and use of stop blocks will follow the same basic principle. You’ll just have to be a little more creative. In fact, for a later iteration of this design, I built a bench from oak (Quercus spp.), and the oak was too tough for the mortiser to handle, so I had to recreate our mortiser setup on the drill press.

Machine-cut mortises
After careful setup, it was time to cut the mortises. We set the depth stop just past halfway through so we could enter from both sides of the cut to eliminate the risk of blowout behind the cut.

We cut first the two outer sides, then met in the middle to prevent the mortising chisel from drifting into the open space ahead of the cut. We then flipped the board and cut the other end of the mortise the same way. Again, the straight mortises were easy. Setup for the angled mortises took a little extra thought, but once we’d mounted the legs on the shims we’d prepared for the layout process, even that step went like a breeze. We first cut the 4° angle, then the 10° on the opposite side, then removed the shims and cut the rest of the joint flat.


Cutting tenons
There are several ways to cut tenons in a machine shop. If your table saw does not accommodate a floating crown guard, a well-tuned bandsaw is the safest option. You will have to cut the shoulders by hand, but as this is a hybrid approach to construction it will be a welcome change of pace. The bandsaw will leave behind rough machine marks on the cheeks of the tenons that will need attention. A rebate block plane is the ideal tool for removing these and creeping up to a good fit into the mortise. Because Douglas fir is notorious for giving slivers and breaking away behind the cut, we chamfered every edge as we went along. This can be done with a block plane.
Making the base
Next up was creating the custom tenons for the long bottom stretcher that would go into the dovetailed mortise we created in the legs. Again, careful layout was crucial for a tight-fitting joint. It was very helpful to have the base of the bench set up so we could double and triple check layout. Our shims and custom layout tool also made our lives easier. The tenons are haunched on one edge and dovetailed on the other. The haunch is just a series of straight-line cuts, so with careful marking out shouldn’t represent too much of a challenge.
The dovetailed side needs a little more attention. Using a backsaw, I cut to the line for the angled bit of waste on the tenon. A sharp chisel removed the waste to the sawkerfs, which helped keep the wood from chipping away ahead of the cut. When my lines were gone, I was done. A quick tusk was cut from a scrap piece to knock the joint together for a test fit.


Glue up
When we were confident with the fit and finish of the base, we glued and clamped it overnight. That gave us the break we needed to mill the bench top. We let the stock on hand determine the length and width of the bench top.
Easy bench top
We laminated the top with three pieces of 3in thick hard maple (Acer saccharum). After the glue had dried, and we’d used a tracksaw to trim the ends, we set the top on the base to mark the drill locations for the 1in oak dowels that would hold the top in place. I bevelled the edges of the dowels to make it easier to assemble and disassemble the bench.


Gravity, not glue, would hold the top in place, which allows for the top to be removed. A few taps of a hammer removes the tusks to disassemble the legs and make for a portable workbench. When the dowels were glued into the base and the mortises for the dowels were cut into the bench top, all the hard work was done. We routed out the mortise for the face of an antique vice, cut the corners square with a chisel, then bolted the vice through the bench top in recessed holes. A few bench dog holes made this a work-ready bench.
Worktop finish
Because I prefer a grippier workbench top, we didn’t add finish to the bench. I plan to tooth the top using a toothing plane to add even more grip. Even though the bench has only been in Pratt’s wood shop for just over a week, I’ve already noticed it’s become the most used bench in the space.

Summary
This workbench is visually appealing, sturdy and works the way it should. For a weekend-long project, I couldn’t be more pleased with the result. If you too need a new workbench, I thoroughly recommend giving this design a go. It’s fun to build with some good old back-to-basics joinery and lovely sizeable pieces of lumber. Furthermore, it can be easily dismantled for transport or fitting replacement parts.
One Response
Do you have a detailed set of plans for this workbench? It is a wonderful, simple, straight forward design. And with the all important knock-down feature which is necessary for me.
The detailed loose wedge is not clear to me. Is the wedge 10 degrees or 6 degrees? And I may want to consider the bottom angle of stretcher greater than 4 degrees to prevent possible racking, that’s just me.
Thank you,
Tom Riley