
You can buy Whittling Wildlife for only £12/ $16 (+P&P)! Usual RRP £14.99 / $19.99
🇬🇧 For UK readers visit giftstome.co.uk and use offer code R6006
🇺🇸 For US readers visit IndiePubs.com and use offer code IPP4025
Offer ends 31st January 2026
Book review
Peter Benson first learnt to carve as a child and has been sharing his skills through classes, books and magazine articles for decades. In his latest book, Whittling Wildlife, he shares his carving techniques along with 15 projects to make.
The book begins with an overview of tools and materials and a guide to essential techniques, such as tool sharpening, knife holding and different methods for adding eyes. The projects section focuses on aquatic animals, including various sea birds, fish and mammals such as a polar bear, walrus and otter. They range in difficulty, getting progressively more difficult as you work through the book.
For each project, Peter provides a design and talks through how he made the piece step by step, however, his work is really just a starting point as he encourages readers to personalise the carvings and follow their own imagination. Throughout the book, he shares useful tips he has learnt over his carving career that will elevate your work. This is the perfect book for those who want to expand their skills and try their hand at whittling.
In an extract from his new book Whittling Wildlife, Peter Benson carves a dolphin

Photographs courtesy GMC Publications
One of the first subjects that many new woodcarvers attempt is the dolphin in one form or another. I think this is because it is a pleasing shape with very few difficult areas and, when the carving is finished, it looks good on display. However, this doesn’t mean that it’s that easy to get right – many examples that I have seen have had some serious errors! It is important to check your work against pictures of dolphins, especially as there are variations between the different types.
Before you start whittling, think about how you intend to display the dolphin – will it be swimming or leaping? And will it be attached to a mount? These choices will affect the tail position, so you might have to alter this from the pattern I’ve supplied.
This is a fairly quick carving to complete so I think it is worth making more than one dolphin, as I did, and mounting them together to make a more interesting display.
You will need
- Basswood block, 30 x 30 x 60mm, or whatever size you wish
- Pencil
- Paper or card
- Safety glove
- Knife
- Abrasives
- Finishing oil or wax polish
- Pins (optional)
- Driftwood base (optional)
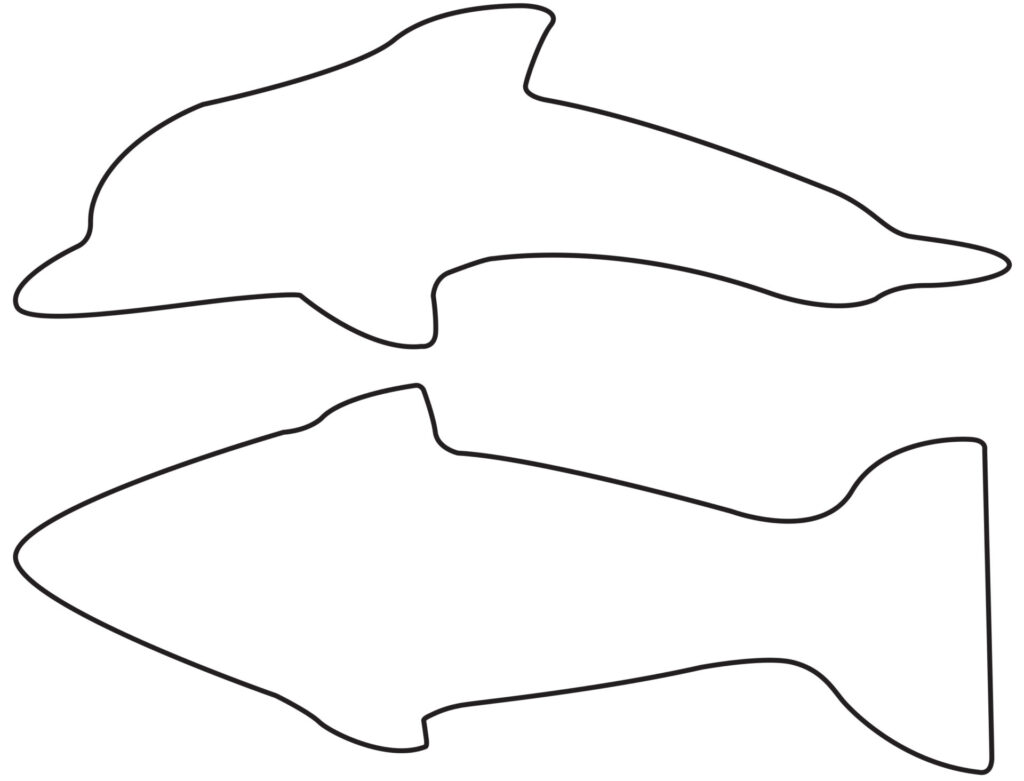
Templates to scale
Making the dolphin
- My dolphin design has fins sticking out on each side so I decided to carve it on a diagonal; this meant it was not possible to draw the pattern onto the block. In this case, I suggest that you make a card or paper cutout of the top pattern and draw the outline roughly over one long edge of the block in order to define the waste to be removed.

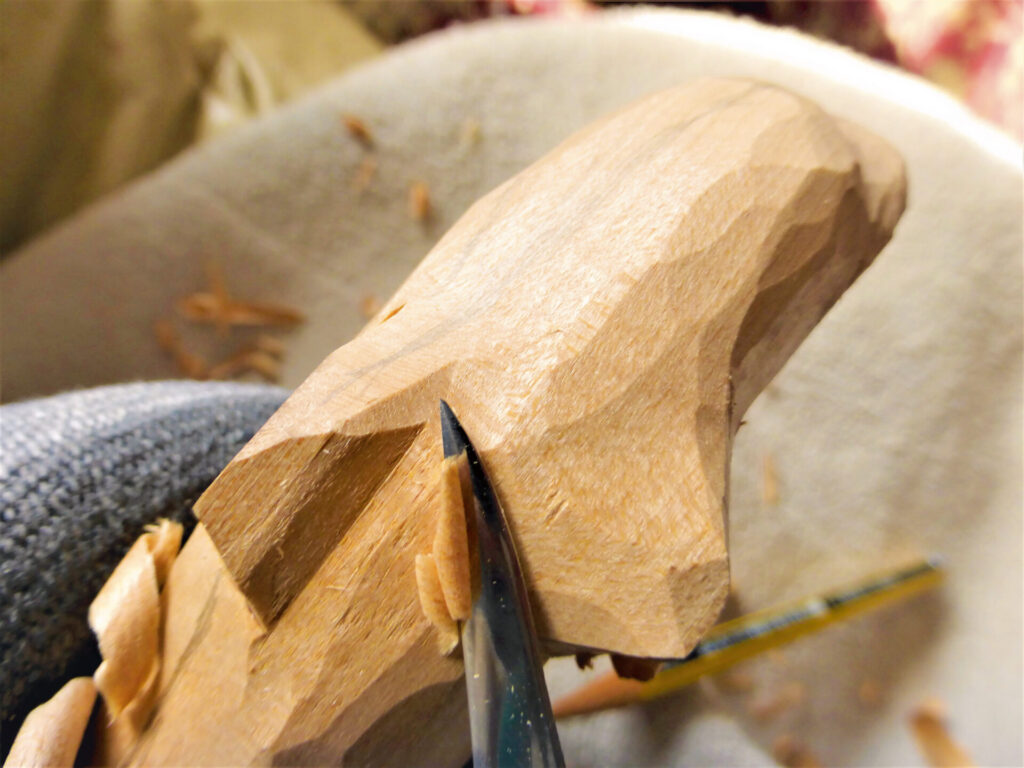
2. The waste wood can be removed using just your knife on this project. You will find it easiest to begin by making a V cut on each side of each fin and the tail.

3. Once you have done this on each side it should be fairly easy to remove the waste by cutting between the V cuts. Allow the grain to split as this will help with the cutting.

4. Trim the wood as neatly as you can, making sure that the sides match.

5. You can now draw on the side view and then remove the waste as marked with your knife.

6. At this point, you should have a squared-off dolphin shape, which you can now start to round off.

7. These mammals are extremely streamlined so make sure that there are no square or flat surfaces left on the body, head or tail. Refer to photographs of your chosen species to help you get the lines correct.


8. As you have only used a knife for the carving, you will probably have some ragged areas that need to be removed so give the whole piece a thorough sanding. Then remove it from the spare wood and finish shaping the tail. Remember that a dolphin’s tail is horizontal, not vertical like a fish. As this is a fairly basic carving, you don’t need to include eyes; however, if you do wish to add them, a couple of simple carved lines will suffice.

9. The way you mount your dolphin will depend on whether you want it to be leaping upwards or forwards. I decided that, as I had carved two dolphins, I would mount them as a pair leaping forwards. You may have to experiment a bit with the size and shape of the base to ensure that it is stable. For my project, I used a piece of driftwood and secured the dolphins using pins.
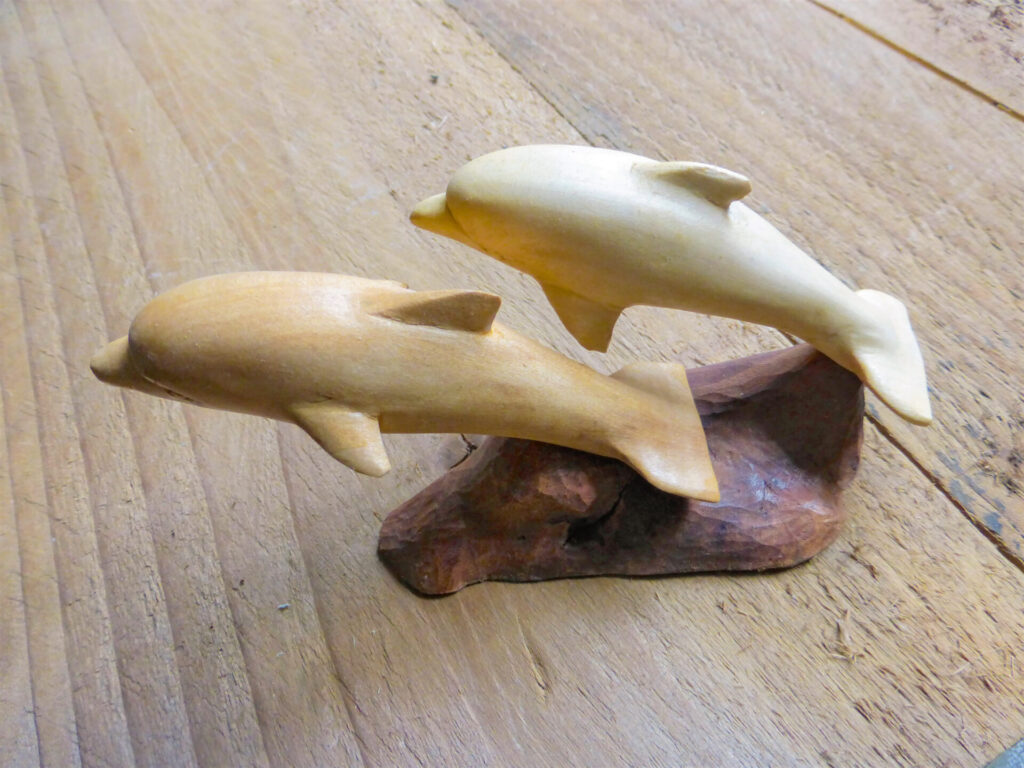
10. Finally, add the finishing oil or wax polish of your choice to complete the project.

One Response
Thank you for sharing the pattern and instructions. I haven’t tried whittling before but this has given me the inspiration to have a go.