Peter Benson suggests ways of dodging unpredictable problems in your work.
No matter how careful you may be in your preparation or execution of your carvings, Murphy’s law states that if anything can go wrong it will.
It’s a bit like driving a car – there are things that can happen that you are completely unable to foresee or prevent and others that you are able to control. There is always the chance of an animal, or something from an unexpected angle coming into the road, but breaking the speed limit is something you choose to do. Similarly, with careful preparation, you can avoid many possible hazards and minimise the number of problems that you may encounter.
There will still be a time when you will find a hidden split in the wood, or even the odd nail or fault that wasn’t obvious when you started. I have even found a bullet buried deep in a large block of wood that required quite a dramatic change of plan with my carving. More by luck than judgement, there was enough wood available to make this change possible. I learned an important lesson on that occasion. Accepting that the unexpected can happen. There are still many ways you can take the necessary precautions to make the carving process a little less stressful and unpredictable.
Planning
This all starts with a bit of thought during the planning process. It may sound obvious but the first thing you need to do is make sure that it is actually possible to carve what you are planning. One of my carvers was carving a figure of a girl looking into a mirror and realised well into the process that the mirror was right in front of the face, making it almost impossible to get tools in to carve the features.A slight adjustment at the design stage could easily have prevented this and made it unnecessary to give up and start again.
I would always advocate making a simple maquette before you start carving and check for this kind of thing. It may not be necessary for an animal’s tail to be sticking way out from the body. Just by attaching it to the body somewhere will avoid breakage. Do fingers really have to be spread out? Does hair have to be flowing and leaves waving free in the wind?
Before committing yourself to a design, try looking at the areas that may prove to be vulnerable and see if you can make these a little more secure. You could well be able to protect some vulnerable parts by careful selection of grain direction – this is particularly applicable when carving animals, keeping the grain along the line of the legs. See what bits are most vulnerable and try to place them with the grain running along their length. Anything with short grain could be attached to something else by a slight adjustment of position.
If you are copying someone else’s design don’t assume that just because it worked for them it must work for you. Pottery, clay or resin models are made very differently and may need to be changed to work in wood. Having said all this, you may well want your design to have these risks built in as part of the design, or even simply as a challenge. This is fine but, you can still take quite a few precautions and build in escape routes. What I mean by this is, once you have identified where the risks are, you make sure that you minimise the possibility of disaster while carving.
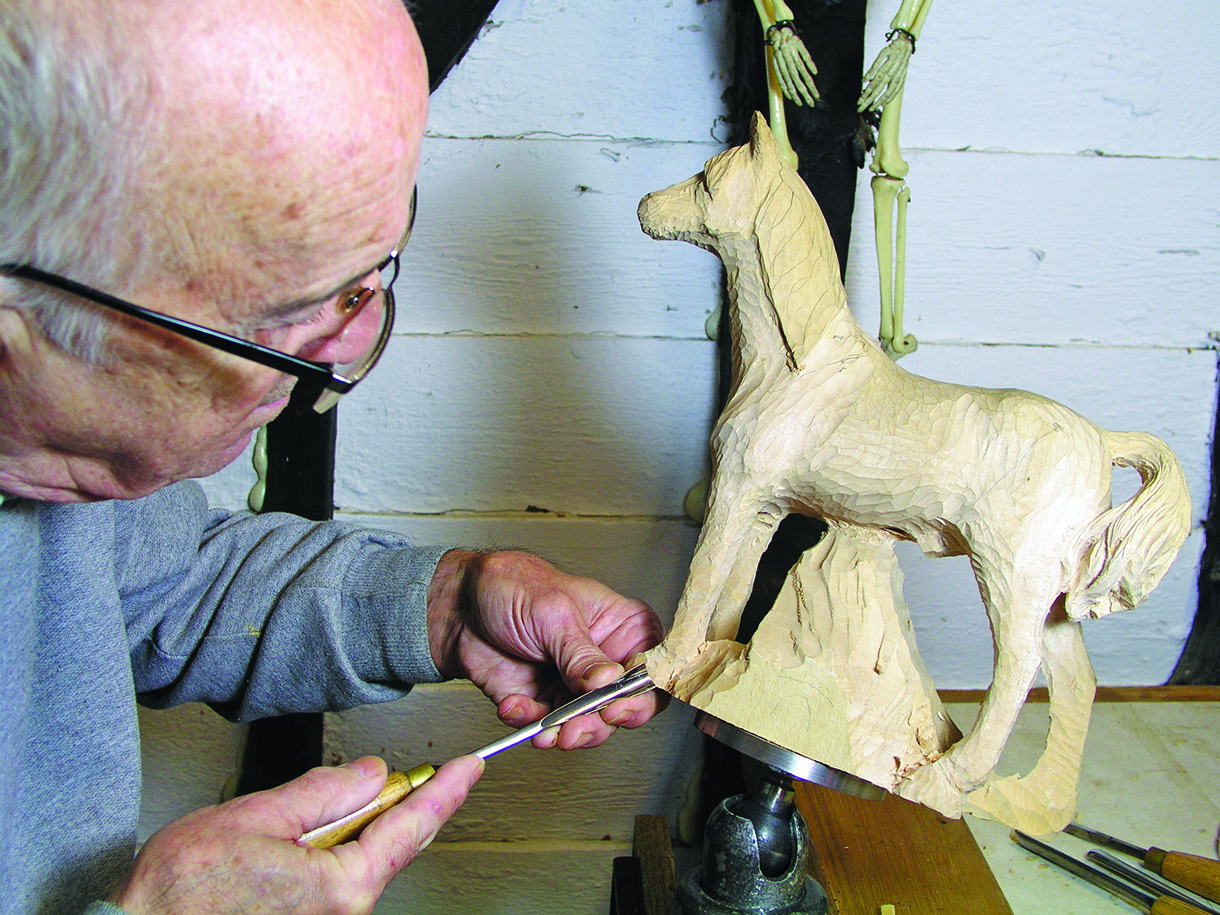
The areas with the greatest risk are those where there are unsupported or protruding elements of the carving that can easily be broken off accidentally. These can be left attached to more solid areas with, possibly, some extra wood left for necessary changes in design should things go wrong. In the opening horse picture, I left the legs attached to each other with a large block connected to the body for as long as possible. This also gave me somewhere to attach the block to a clamp for quite a time.
Supporting vulnerable areas
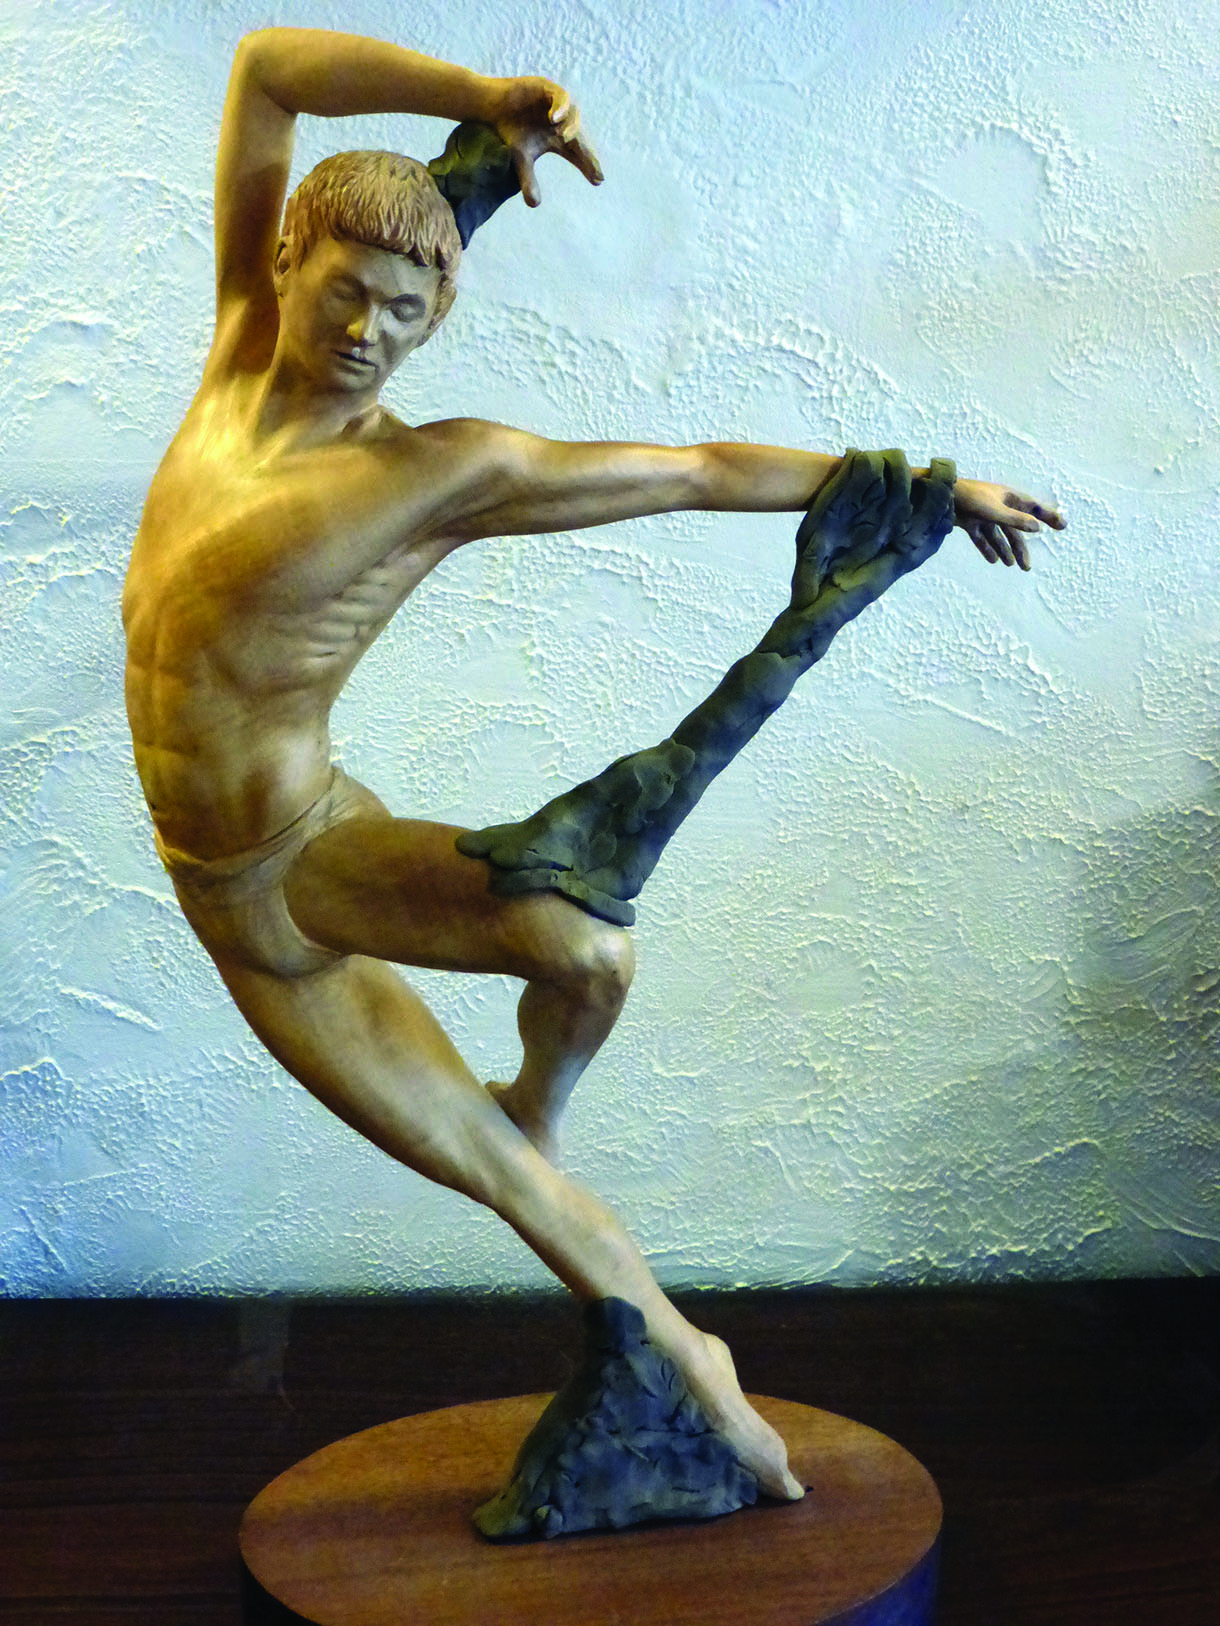
If your design requires that there are several vulnerable areas, not only can temporary support pieces be left in the early stages but you should also leave carving the most delicate detail until last to minimise the possibility of accidents as you go along. I know this again may sound obvious but, if your carving is delicate, keep it in a safe place in your workshop where it won’t have other people bumping into it, and don’t take it to your weekly or monthly carving club meetings. I suspect that more carvings get damaged in cars than workshops. In the pictures below I show you a carving I did of a dancer – first with modelling clay/putty added to represent the wood that was left in place during the carving process, and second, as a finished piece. The supporting wood was only removed after the main body and head were virtually finished – the top arm first, then the outstretched arm. I left freeing up the leg until last as this gave me something with which to hold the carving secure.
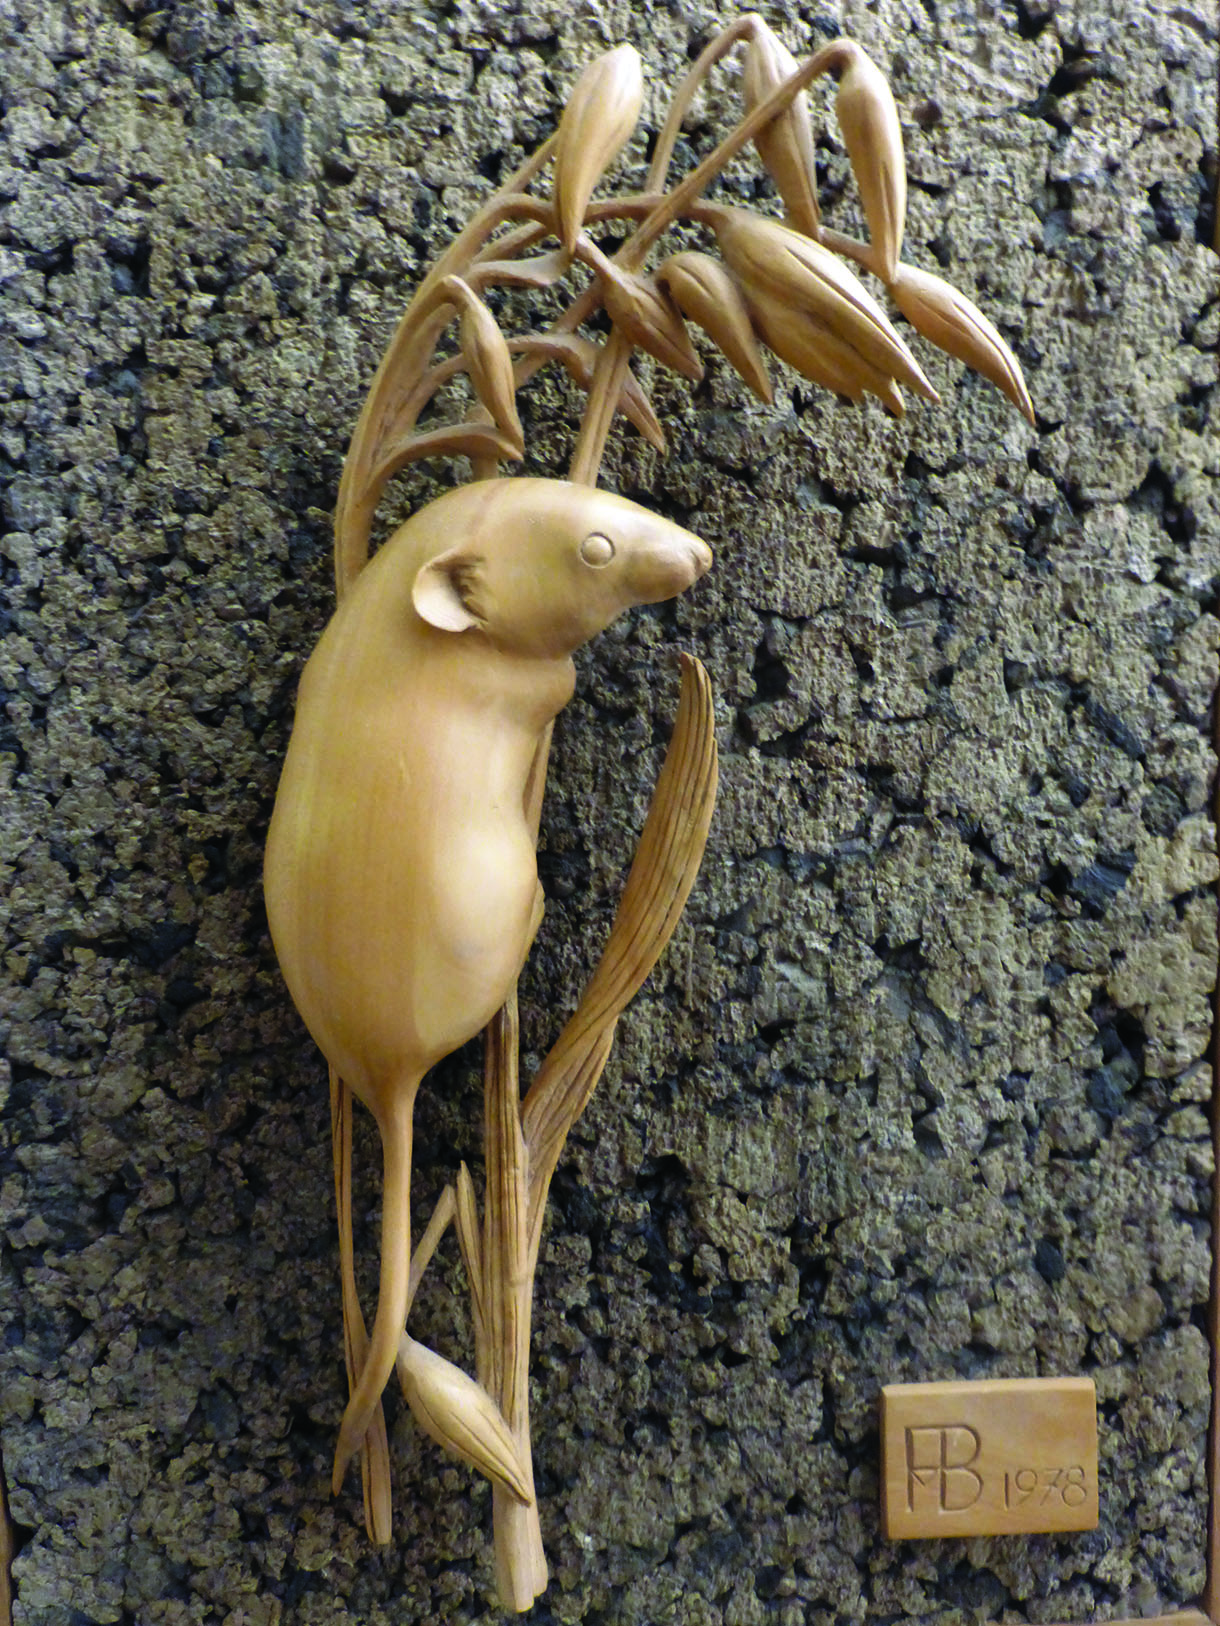
You can incorporate many supporting parts into your design with a little thought. The picture of the harvest mouse below shows a design where there are multiple areas each supporting the other. Surprisingly, none of the detail in this carving broke during the process, but it was done in boxwood (Buxus sempervirens), which is very strong and forgiving. This brings me to another point – the softer woods may be easier on the hands but a harder, close-grained wood will certainly give you fewer headaches and worries.

Repairs
It’s all very well taking all these precautions, but what about Murphy and his Law? Assuming that the arm on your carving drops off or you mess up the child’s face, what can you do about it? The answer to this depends largely upon your original design. The most common areas where carvers make mistakes are the hands, feet and heads of human figures. As long as the figure is wearing clothes, these situations don’t necessarily mean that the carver has to sell their tools and go into a mental decline. We have all done this at some time or another and there is generally a very simple solution.
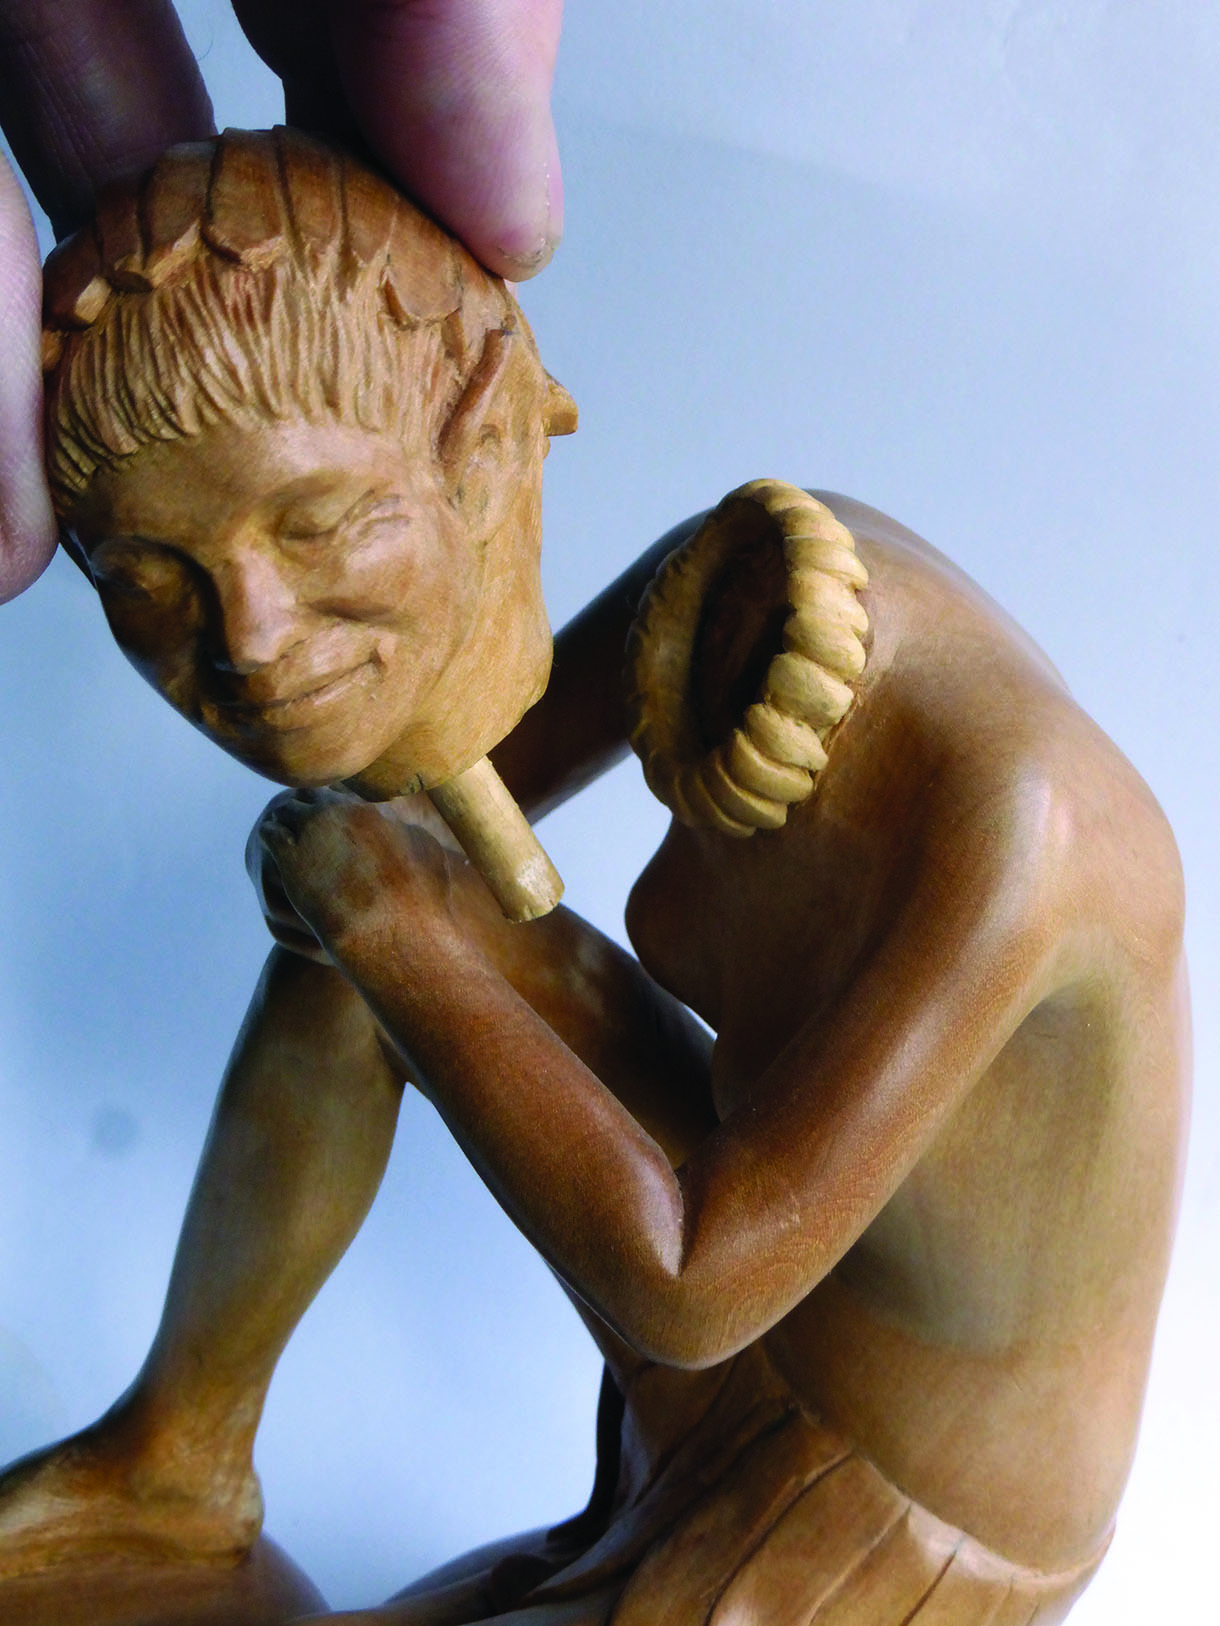
Replacement hands, feet and heads can be carved again, sorting out any errors along the way, and then inserted into an appropriate piece of clothing to conceal the join. This is not difficult to do, although care is needed fitting a head into a collar. If you are carving a nude figure with no drapery involved, there is not a lot that you can do if you break off any part of an arm or leg or have made a mistake in your proportions. The only real chance you have is to either to add a bit of drapery to cover any join formed when replacing the damaged or broken limb, or maybe introduce an arm band or something similar. Either way you will have to modify your design.
If your subject is an animal you will have the same difficulty, unless there is enough fur or hair to hide any joins. On a carving with a natural finish in a light coloured wood, any joins are difficult to hide. If you have any doubts at all about whether you would be able to complete your carving without incident, I would recommend that you use one of the darker woods, such as the various walnuts and mahoganies, as any replacement pieces are much easier to conceal with careful joining.
If you intend to paint or colour the finished piece then you have no real problems as you can glue on any replacement parts or even use filler, as whatever you use will be painted over. This always creates problems for judges in competition, as faults will be evident in a natural piece, but can easily be hidden with paint. The main thing here is don’t panic. Remember that any mistake or possible disaster you experience in your carving has happened many times to other carvers and generally can be put right. Everything described above has certainly happened to me and, in most cases, I didn’t know any other carvers to show me what to do. Sometimes I panicked (most times to be honest) but, in the end, I wondered what all the fuss was about. Some of my more recent efforts are opposite.
Final observations
My final observations contain a much repeated piece of advice. Most breakages are a result of carelessness or pressure. As already mentioned, avoid unnecessary moving of the carving to eliminate the possibility of dropping or contact with any vulnerable areas. It is most important that your carving is held securely, especially when carving any delicate areas. Hold in a vice or suitable clamp in such a way that you can get to all the areas you wish to carve with the minimum of adjustment. Unless the piece is very small, don’t work with it in your hand as considerable damage can be done by crushing it with your holding hand or pulling it towards your body. Don’t forget that you are going to be exerting roughly the same pressure in the opposite direction with the holding hand to remove any shavings.
Remember that you are generally carving hard woods that take quite a bit of pressure to remove surplus material. The blunter your tool becomes, the more pressure is needed and the greater the likelihood of disaster. If you make sure you keep your tools sharp and support any delicate areas with your free hand (keeping away from the cutting edge) when cutting, you should avoid most problems. Also, the more wood you are trying to remove, the greater the effort you need to apply. Therefore, only take off small amounts, preferably using a slicing motion, thus transferring the least amount of pressure to the timber.
The important thing is to take care, but not to get stressed out ‘in case I go wrong’. The more nervous you are about the process the more likely you are to make mistakes. Relax and enjoy yourself – after all, isn’t that why you are carving?
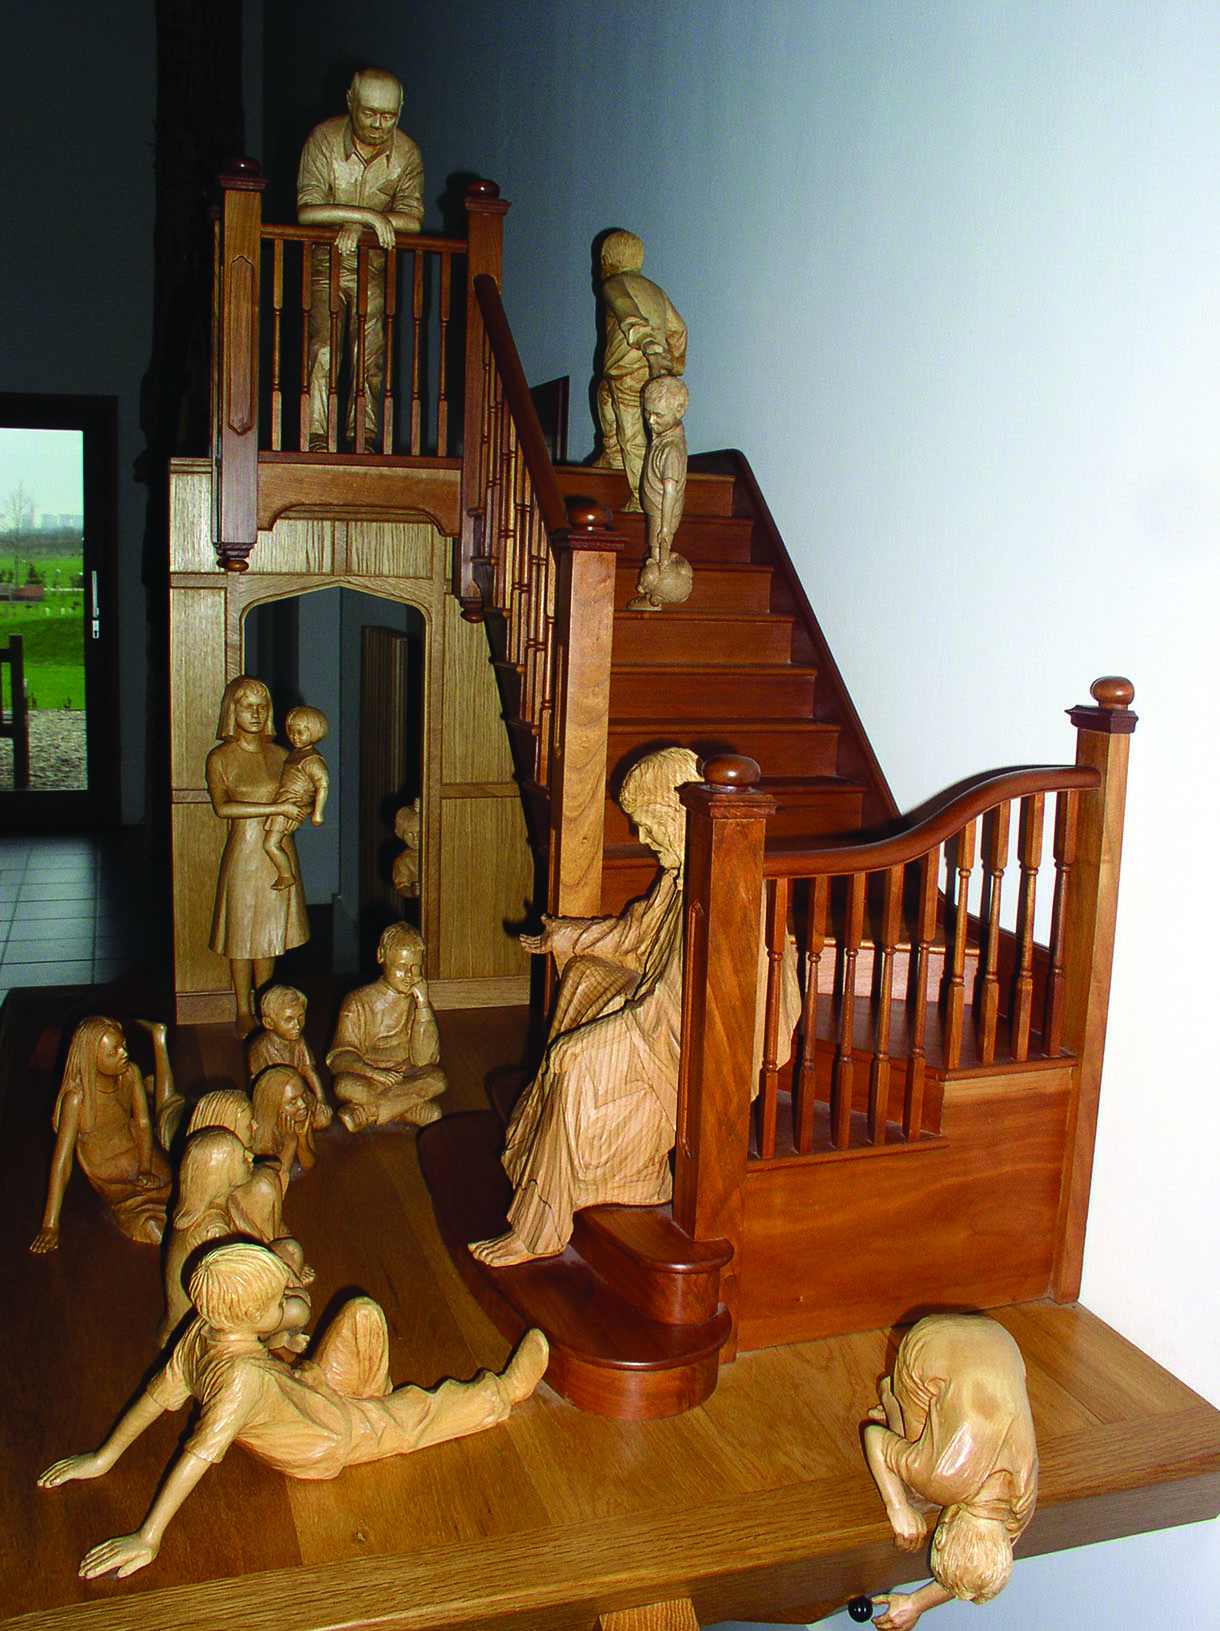
During the carving process the head of the boy was added and inserted into the shirt collar, as part of the original block was rotten. The block for the main figure wasn’t quite big enough for the left foot, which was inserted under the clothing. The hand of the main figure and the left arm of the same boy were replaced after vandalism. Great care was taken to ensure that no joins were visible.
Further reading
PHOTOGRAPHS BY PETER BENSON
One Response
Dear Peter,
Interested to find out if you are still teaching carving. I believe my father was a student who’s interested in trying a new project.