A Whisky Cabinet for the Connoisseur:
David Waite uses his new skills to make an Arts & Crafts-style cabinet.

David Waite uses his new skills to make an Arts & Crafts-style cabinet
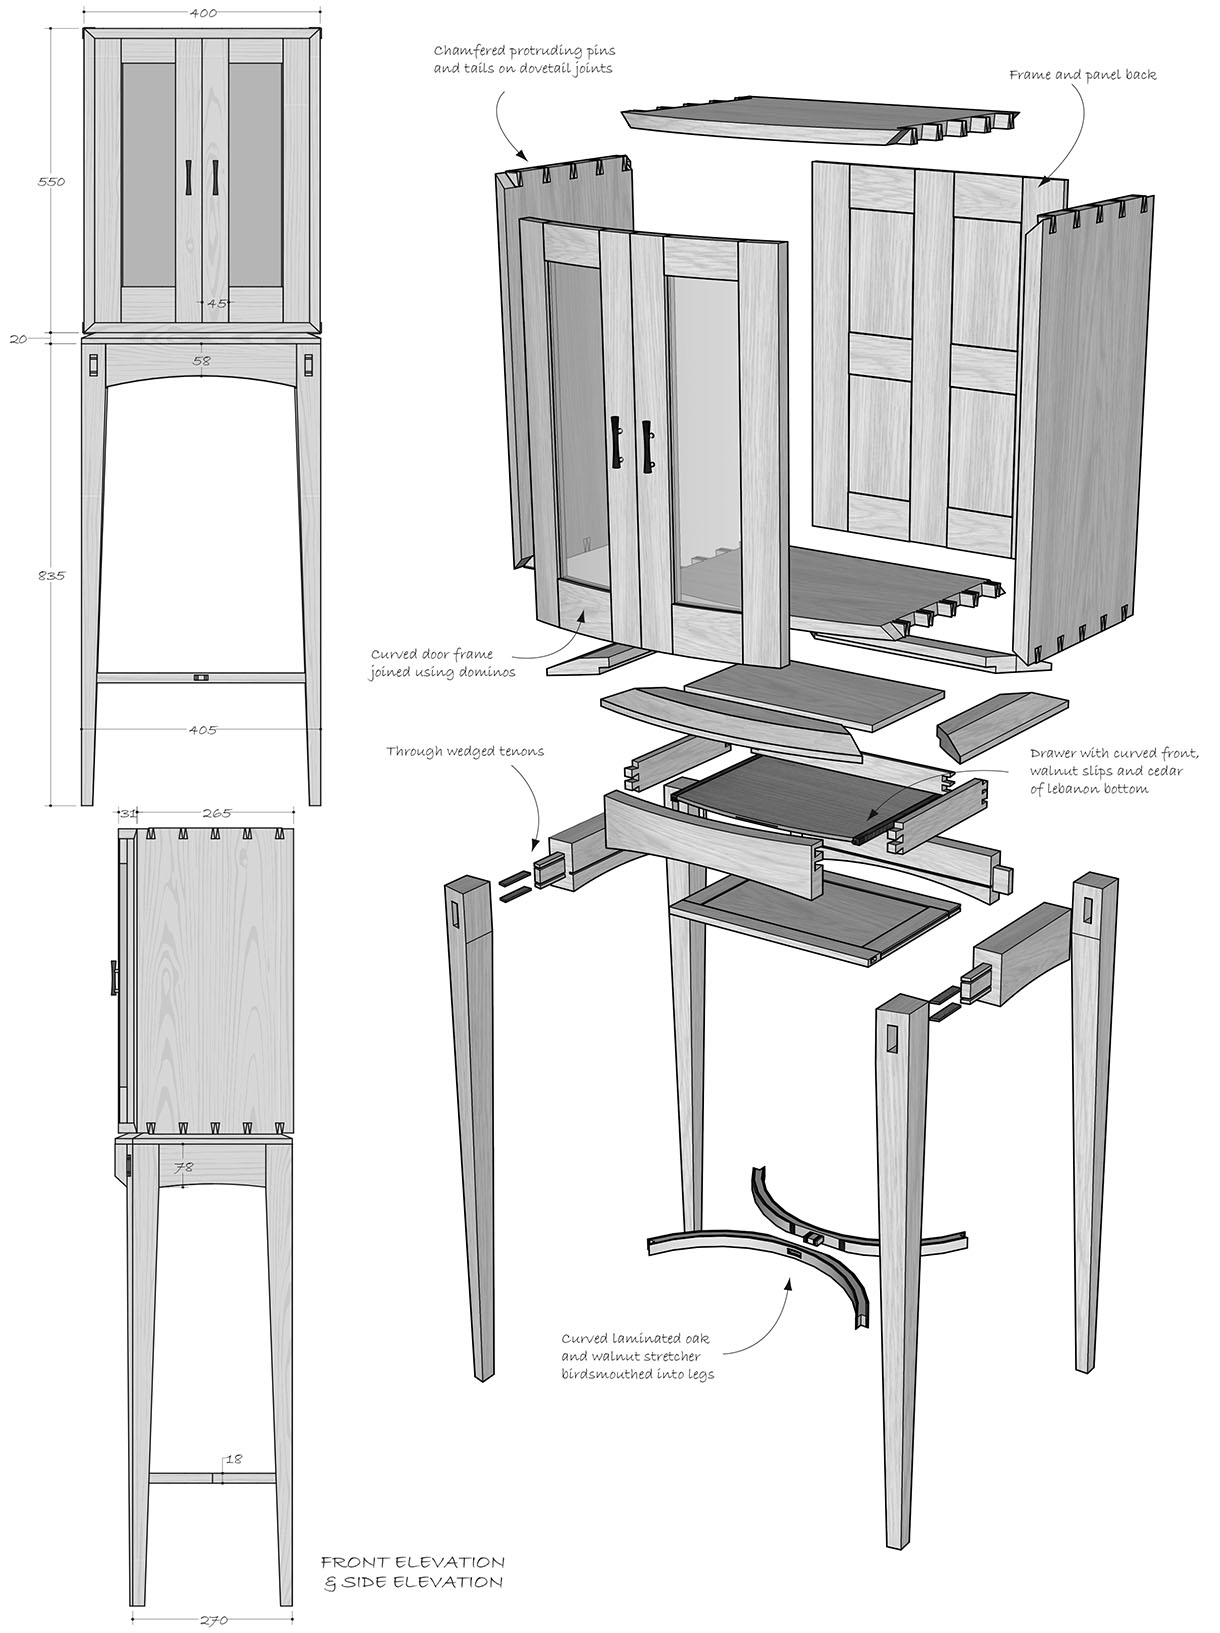
Having completed our formal training in hand tool techniques and wood machining, my fellow students and I gained even more freedom to express ourselves by taking on more complex self-design projects. I decided that my next piece would be a cabinet on a stand that would demonstrate the skills and craftsmanship I had developed at the school to potential clients. This project was also an unashamed celebration of the Arts & Crafts movement that I had so fallen in love with during my time in Lakeland.
Design considerations
Early consideration of the function and form of the cabinet was an important aspect of its design. My long-standing appreciation of single malt whisky inspired me to create a small display cabinet that would hold up to six bottles of fine malt accompanied by a set of beautiful crystal whisky tumblers I had been given as a birthday present by my family. During early design discussions at the school, Oliver Waters suggested I consider making the cabinet bow fronted with traditional curved frame and panel doors to provide elegance and refinement as well as allowing me to explore another cabinetmaking technique. I liked the idea and decided to extend it by using curved textured glass for the door panels, which would provide an interesting feature when illuminated from within and hint at the cabinet’s contents.
Careful consideration was given to the size and proportions of the cabinet to ensure it was tall enough to incorporate six whisky bottles of varying heights with room above to accommodate two glass shelves for the tumblers. Another important consideration was to ensure the correct size of the stand in relation to the cabinet. I found it difficult to judge these proportions using the computer alone and instead opted to build a full-scale model using good, old-fashioned cardboard and sellotape. This is a surprisingly quick process and allowed endless tweaks in the proportions to be made. It was also helpful
in revealing the potential for the long, tapered legs of the stand to rack under the weight of the cabinet and the need therefore for some sort of stretcher to be incorporated. Taking into consideration the possibility of racking when designing furniture and incorporating elements to combat has been a real learning point for me during my time at the school and something I would have previously paid little attention to.
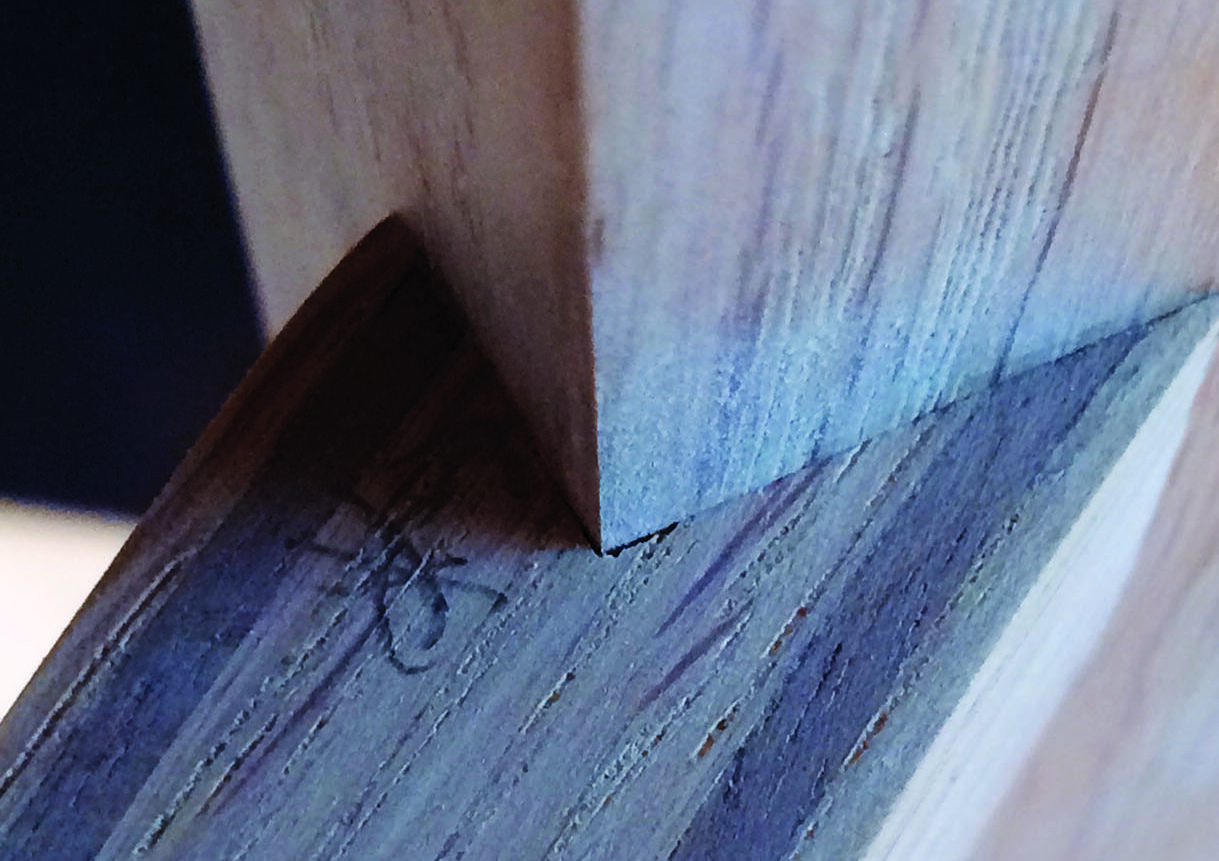
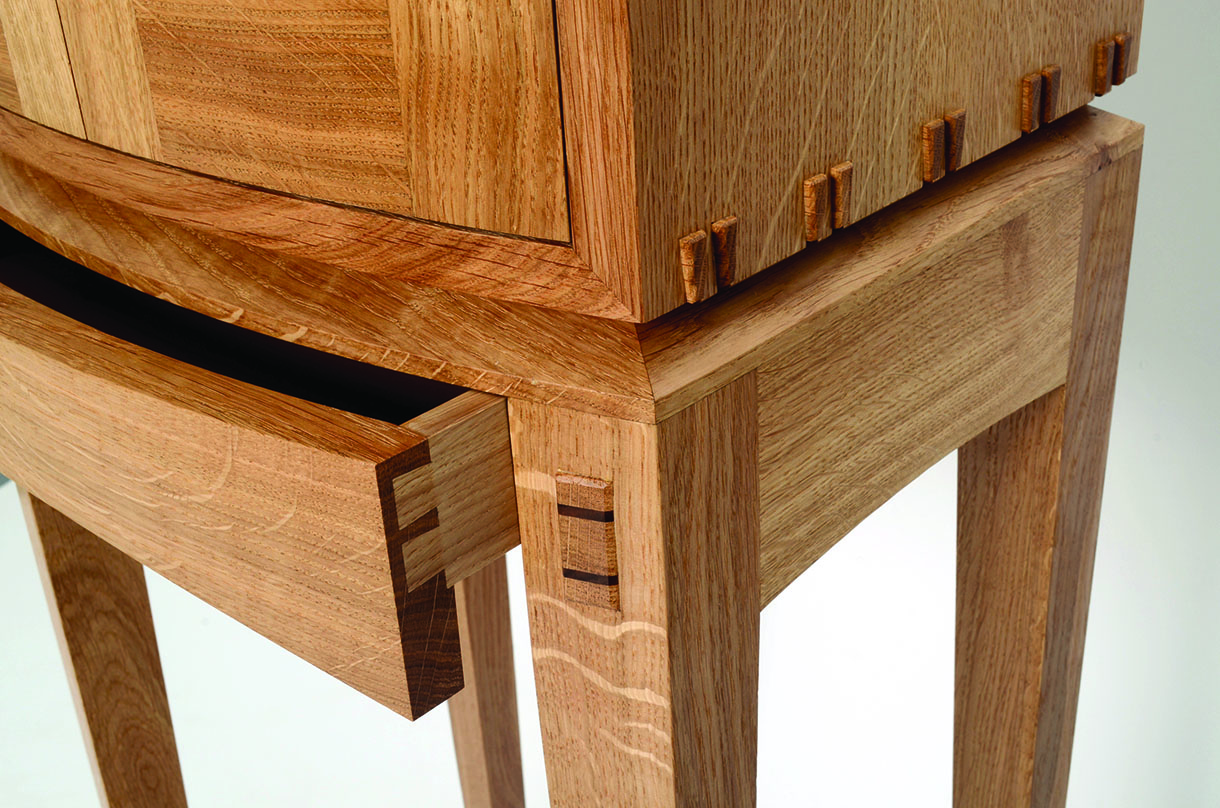
Given my desire to celebrate the Arts & Crafts style in the piece, I opted for English oak (Quercus robur) as the main timber of choice with any detailing to be done using a fine piece of English walnut (Juglans regia) I had manged to source. Hand-cut show joinery, in the shape of protruding dovetails with chamfered edges and protruding wedged mortice and tenons, would be the other prominent design feature of the cabinet in celebration of the fine work of local Kendal craftsman Arthur Simpson.
My final design included curved, intersecting laminated stretchers in oak and walnut, meeting the four tapered legs with bird’s mouth joinery. The stand also incorporated a chamfered plinth and hidden drawer all curved with radii to match that of the bow front of the cabinet above it.
Cabinet construction
Components for the cabinet’s carcase were carefully selected and dimensioned from quartersawn 40mm English oak. The protruding through dovetail double pin pattern to be used to join the carcase was carefully laid out full size on a piece of card and this was then used as a template to mark the tail board sides of the carcase. Dovetails were cut in the usual manner by hand, with the cut tail boards being used to mark all the pins’ positions on the top and bottom components of the carcase. To achieve a uniform 45° chamfer on the 2mm protruding pins and tails, a simple 45° saddle jig was prepared from ply that fitted snugly across the ends of the cut tails and pins and allowed paring of the cross-grain chamfers with a sharp chisel. It was far easier and more accurate to complete all this pairing before the joints were assembled. A 10mm rebate was also cut into the back edge of each carcase component to house the frame and panel back. The curved bow front was cut on the front edge of the top and bottom components using a template guided router cutter
ahead of carcase glue-up.

Hand-cut protruding through dovetails with chamfered edges: a key feature of the cabinet’s design
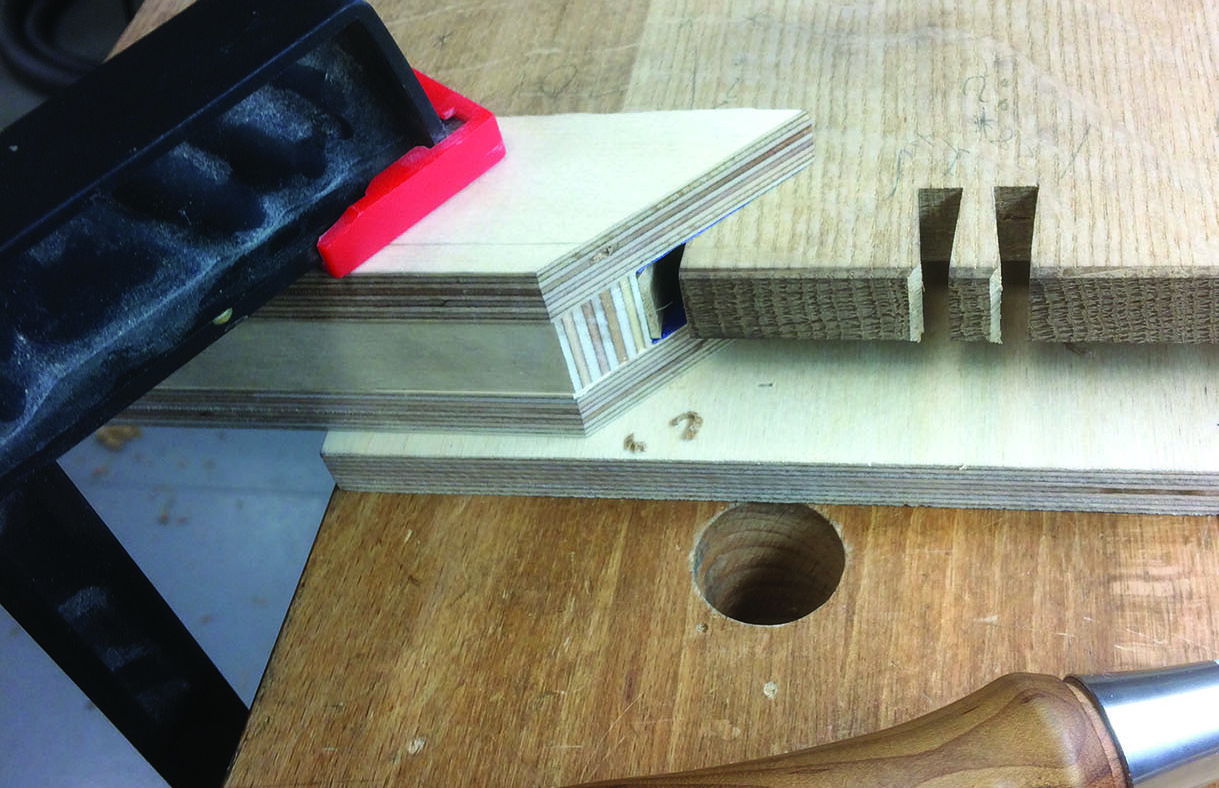
Paring jig used to cut the chamfers on dovetail pins and tails before assembly
Frame and panel curved doors
My approach to door construction was to joint the stiles and rails together first, to form two flat doors, and then to shape the curve on each. The doors were modelled on the computer which allowed component thicknesses and all necessary angles and radii to be determined. The stiles and rails were cut to dimension and then joined with the Domino jointer. Two jigs, one convex and one concave, were then prepared to hold each assembled door vertically and the spindle moulder was used with a rebate cutter and ring fence guide to shape the top and bottom sections of each door following the jigs curved base. This left a central unshaped section on each doors stile which was easily blended to the same curve using a block plane and cabinet scraper. Before glue-up, a 10mm rebate was cut into the back of each door frame component for the curved glass using a bearing guided rebate cutter. Some 5mm beading was cut and shaped to fit the rebates with the glass in place and brass panel pins used to fix everything securely.
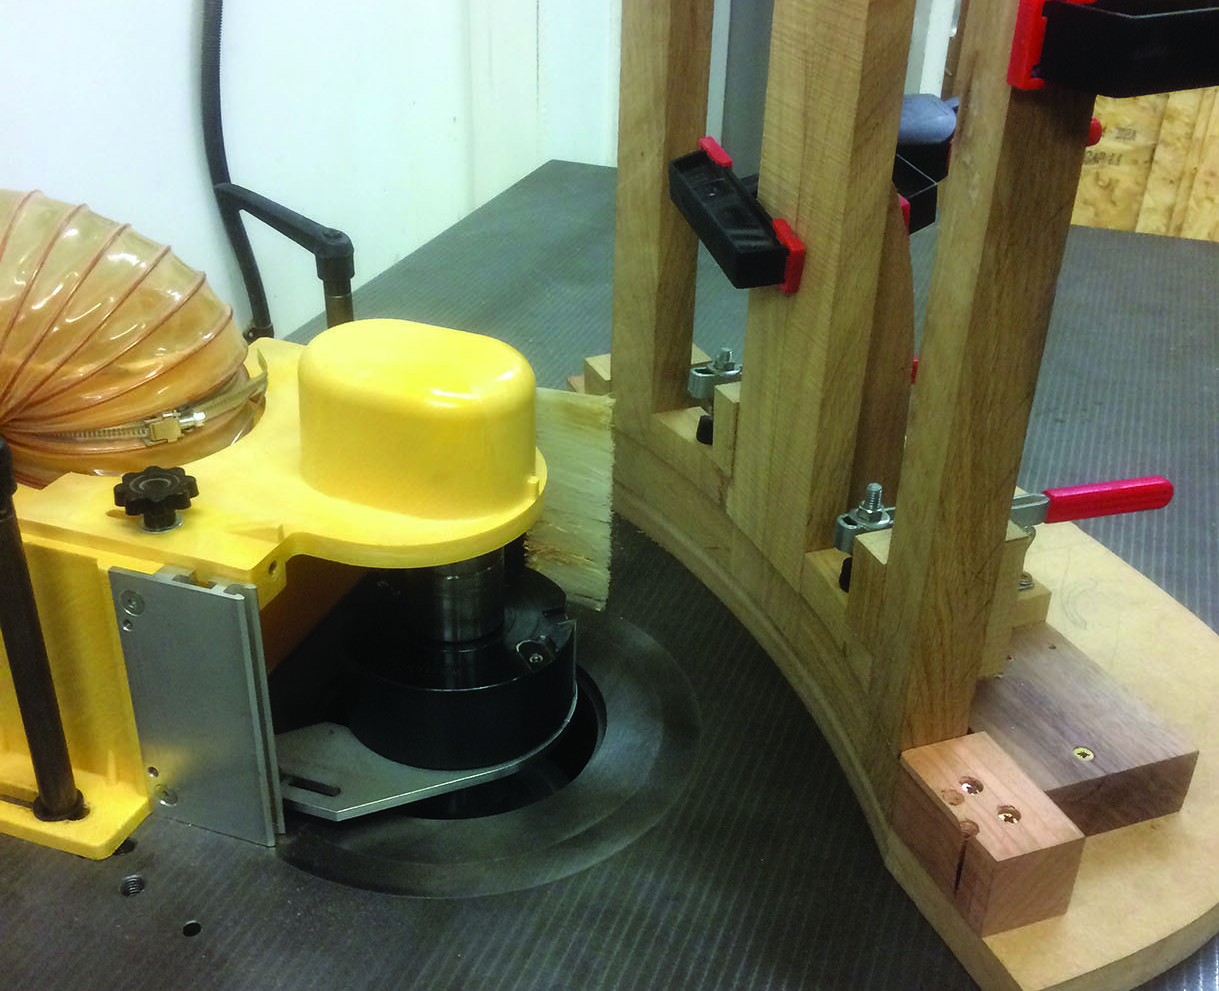
Jig holding doors ready to be shaped on the spindle moulder with rebate block and ring fence
Completing the cabinet
A frame and panel back were constructed for the cabinet with a 1mm shadow gap around each of the four floating panels housed within the frame. A hidden channel was routed in the central stile to allow cables
for LED lighting to be run up from the cabinet base. The cabinet doors were carefully let in to the carcase sides with brass butt hinges and stops and rare earth magnets inset in the top of the cabinet and doors. Internally, the carcase was lined with a cedar of Lebanon (Cedrus libani) base to provide a fragrant smell to the interior.
An oak plinth with walnut string detailing was added to provide a raised platform for the whisky bottles at the back to stand on. 5mm holes were drilled in the sides of the carcase at the appropriate height for the shelf support pins and the two glass shelves of the same design as the door panels were fitted. To complete
the cabinet construction, two delicate handles and support pins were turned from walnut and oak.
Cabinet stand
I used 75mm-thick oak to make the stand. After dimensioning all components to size, the leg tapers were applied using the spindle moulder and a tapering jig and the curved side and back rails were shaped on the same machine. The electrical lighting power cable was hidden in a channel routed down the back-left leg with a small exit hole for the plug cable 200mm from floor level. Tapered through mortices were cut in the front legs and stub mortices on the back legs, and a groove was routed in the side rails and back ready to accept a framed dust panel. This frame was made from solid oak Domino jointed together with a veneered ply oak panel inset. The dust panel had a corresponding groove cut in its sides and back and plywood splines were used to join it to the stand. Finally, the through and stub tenons were cut on the side and back rails with allowance made for the walnut wedges on the front tenon joinery. The stand was then dry cramped together in readiness for fitting of the lower stretcher.
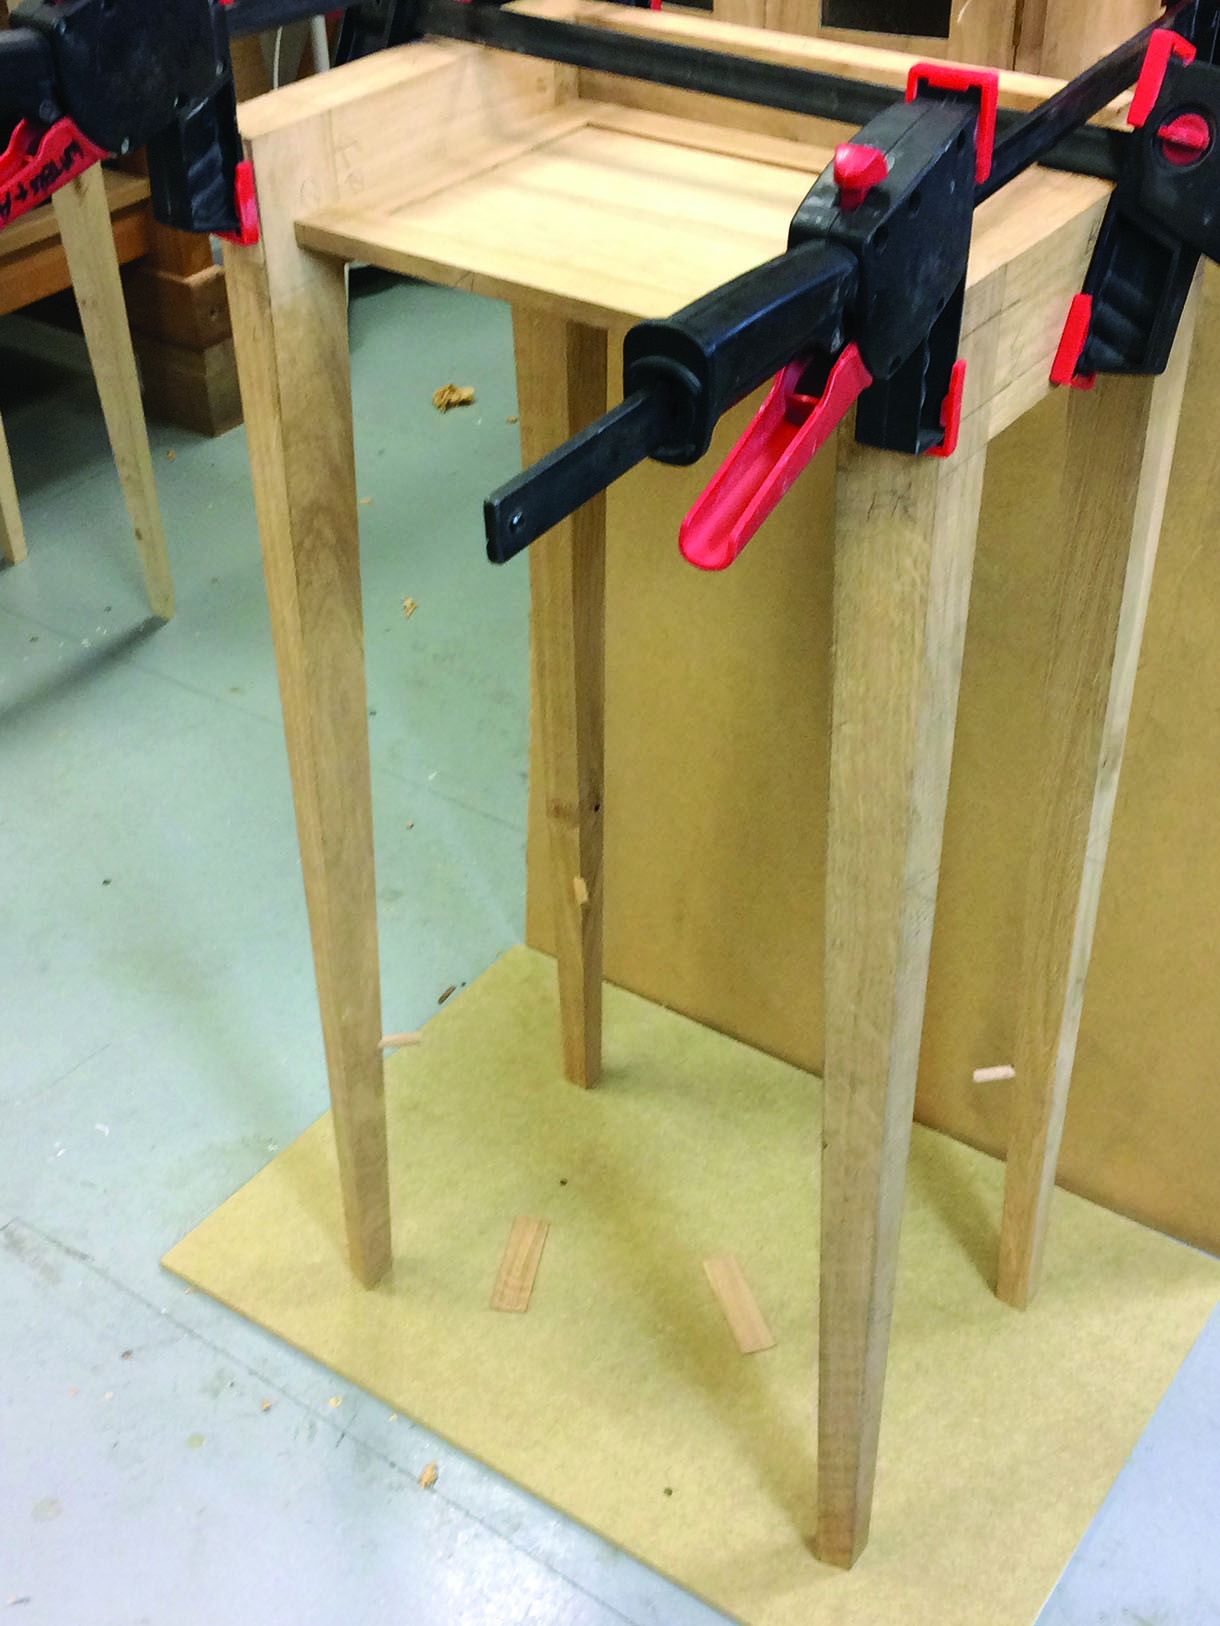
Tapered legs and dust panel dry clamped and awaiting the fitting of the stretcher
Laminated stretcher
A rectangular piece of plywood with notches cut at its corners was used to explore where to position the stretcher in order to achieve the correct proportions with the rest of the stand. Next, the computer was used to accurately model the stretcher’s dimensions at this height such that its bird’s mouth joinery would intersect perfectly with the stand’s tapering legs and so that the walnut inlays in the stretcher’s oak laminations would intersect crisply. Some 2mm oak and walnut lamination strips were then cut on the bandsaw and passed through the wide belt sander. These were coated with epoxy resin and bundled together and band clamped around a former of correct radius to form each of the two curved stretcher components. To join the two curved components to form the stretcher, each first had a flat created equally of fixed length about the curve’s centre point with a router and straightedge. A small mortice was then cut by hand through each component at the centre point of the flat and a matching tenon peg created in walnut and oak which, when inserted into the mortice holes, held the two components together. Finally, the joined stretcher was overlaid on the initial plywood template to allow the notches for the bird’s mouth joinery to be marked out and cut with a backsaw and sharp chisel. It was extremely pleasing to find that the completed stretcher’s bird’s mouth joinery met the stand’s legs crisply at the prescribed height. Holes for wooden dowels were then drilled at 45° in the legs and the notched stretcher and the stand were ready to be glued up.
Bird’s mouth joint between stretcher and tapered leg
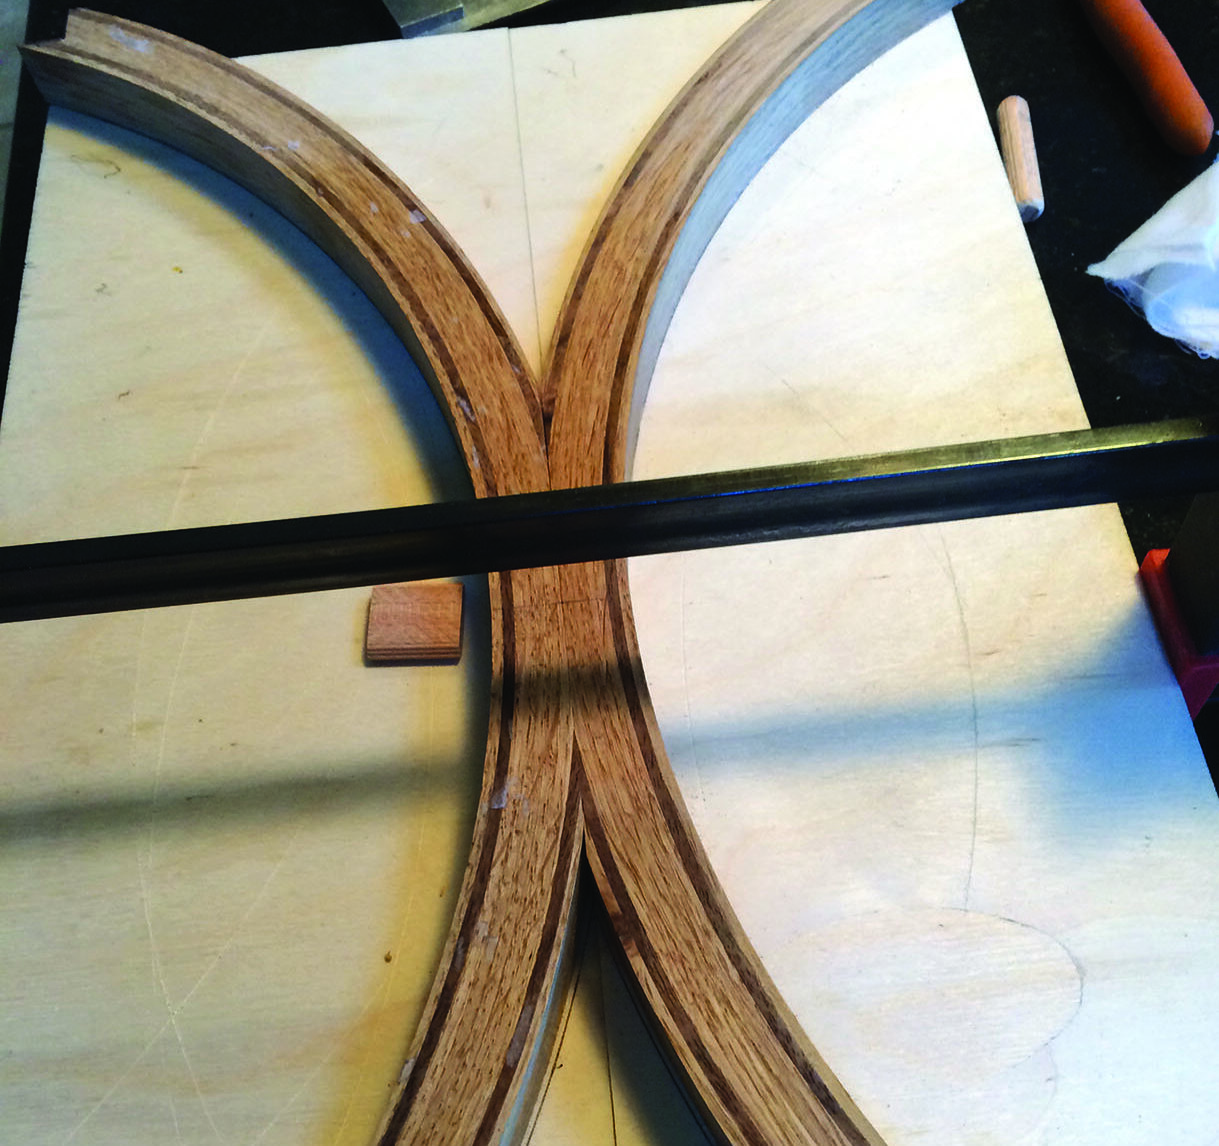
Completed curved stretcher in laminated oak and walnut on top of the plywood template
Curved drawer and plinth
To complete the cabinet stand, a chamfered curved top plinth was created onto which the cabinet would be seated. A mitred frame was first constructed in oak and jointed with Dominoes. This was then grooved for an oak-veneered internal panel, being careful to leave enough of a void to allow the LED lighting junction box and transformer to sit on the upper face of the panel without fouling the cabinet above. The curved front of the plinth was then applied with a template and bearing guided router cutter and finally the chamfer was applied. The plinth was then permanently attached to the side and back rails of the stand with Dominoes and glue.
The components for the drawer sides and back were dimensioned from quartersawn oak for stability. Walnut drawer slips were used for contrast and had grooves machined in them centrally using the spindle moulder to accept the base, which was made from cedar of Lebanon. A scratch stock bead detail was added to each of the slips by hand. The drawer front used 75mm stock to allow for the curves to be machined on its inner and outer faces. Two small flats were first routed onto the inside faces of the drawer front to ensure the flat drawer sides would intersect with the curved drawer front seamlessly. Dovetails were then cut by hand in the usual manner and the curves applied to the drawer’s front, back and lower faces using the spindle moulder. Finally, a groove was machined in the back of the drawer front to accept the drawer base and a finger pull routed into its bottom edge. Once glued up, the drawer was fitted into the stand to achieve a piston fit using a freshly sharpened plane to remove final single shavings.

Curved and chamfered plinth with recess for the LED lights’ electrical junction box and transformer
Completed stand with curved drawer
Finishing
The cabinet and stand were orbital and hand sanded to 240 grit with great care taken to ensure the crispness of the joinery on show was maintained. The grain was then raised with hot water before further sanding to 400 grit to complete the job. The external parts of the cabinet and stand had a hand-rubbed Danish oil applied while the internal surfaces were finished with a wax paste only, to allow the fragrance of the cedar linings to permeate throughout. LED strip lights were fitted to the top and bottom of the cabinet, hidden behind a simple oak beading, and a motion-activated sensor switch was inset into the lower face of one of the stand’s side rails. This allowed the lights to be switched on and off with a simple wave of a hand under the rail.

Internal view showing cabinet plinth, glass shelving and LED lighting
Artisan glass
I was delighted to find a local Kendal glass artist, Jo Vincent, close to the workshop. Jo specialises in creating handmade, fused glass and accepted my commission to make the curved door panels and internal shelves. She managed to produce the two door panels with striations in them that complemented the grain pattern
in the oak door frames beautifully.


