Ornamental Turning Made Easy:
Chris Hart explores the world of ornamental turning and shows how to decorate turned items in a unique way.
Chris Hart explores the world of ornamental turning and shows how to decorate turned items in a unique way
As woodturning has gathered momentum year on year since the 1980s, a plethora of equipment has
hit the market. Although some purely for commercial reasons, in the main, the drive has been by innovative turners pushing the boundaries with a desire to try something different and make their work stand out from the crowd. This, in turn, led to an explosion of methods of decorating work picked up by professional demonstrators with a desire to lead the field, and at the other end of the scale, newcomers to woodturning quickly obtain the skills to move through the various disciplines, which creates a push/pull effect. This seems to have taken a life all of its own and almost become fashion obsessed. A skim through back issues of Woodturning will highlight these fashions or trends and that’s probably how I arrived at ornamental turning.
Most of my turning is now devoted to making boxes and I began to explore the possibilities of decoration, being somewhat of a purest, loving the tactile nature and beauty of natural wood. However, I had come across ornamental turning in magazine articles, books, the internet and a demonstration of Rose Engine turning at one of my clubs, and so began pondering the possibility of adding this to my repertoire.
Will ornamental turning become the latest fashion, fad or trend in woodturning? It certainly has a lot going for it, being very different from anything that’s currently available, it’s relatively inexpensive to get started, making some of the kit adds interest, very quick to mount onto your lathe and no more effort than taking the tailstock on and off. The results are stunning, the possibilities endless and only limited by your imagination.
I must point out at this stage; I am not an authority or consider myself an expert on the subject, merely an enthusiast who in the best tradition of woodturners worldwide wishes to share my experience.
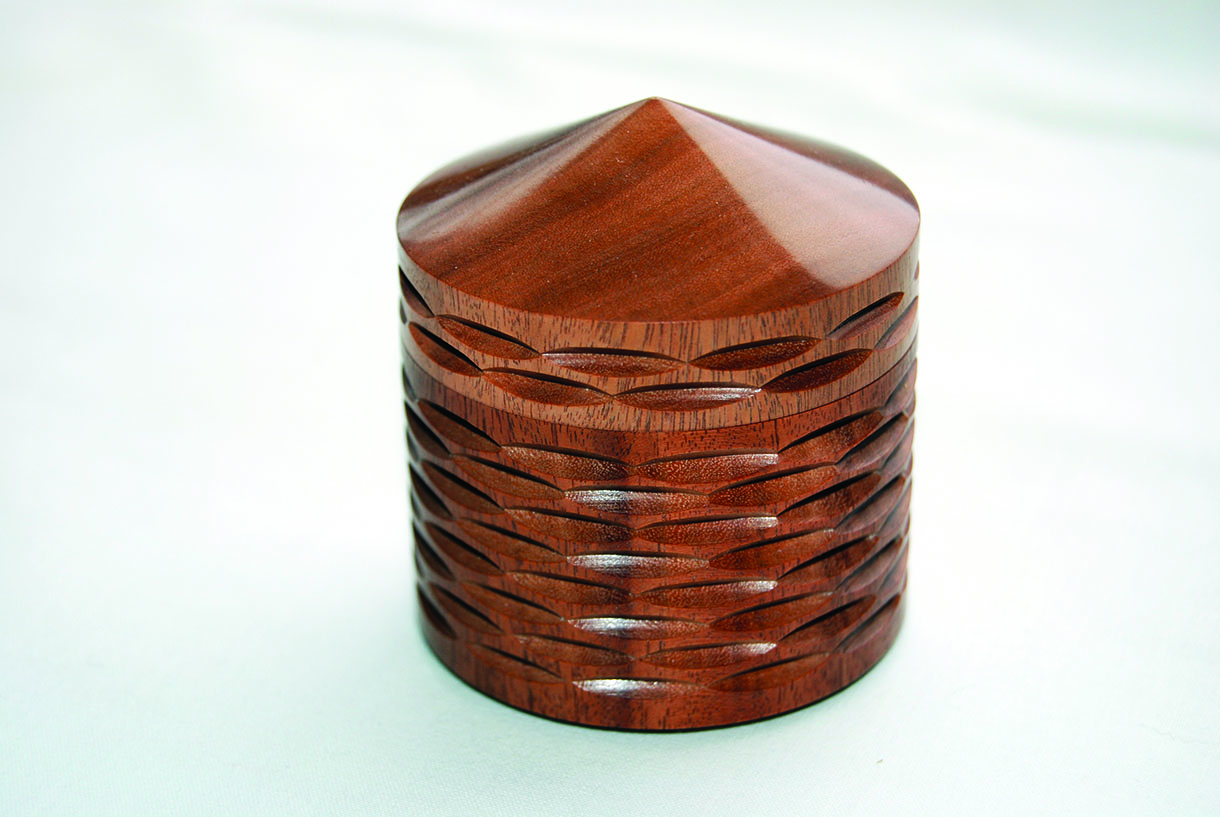
A threaded lid box in Quebracho (Schinnopsis) with decorated cylinder. 12 divisions of 30°, the first row is cut and the work advanced forward then moved around by 15° to give the offset, this is then alternated until the pattern is complete. The cutter was a straightforward point
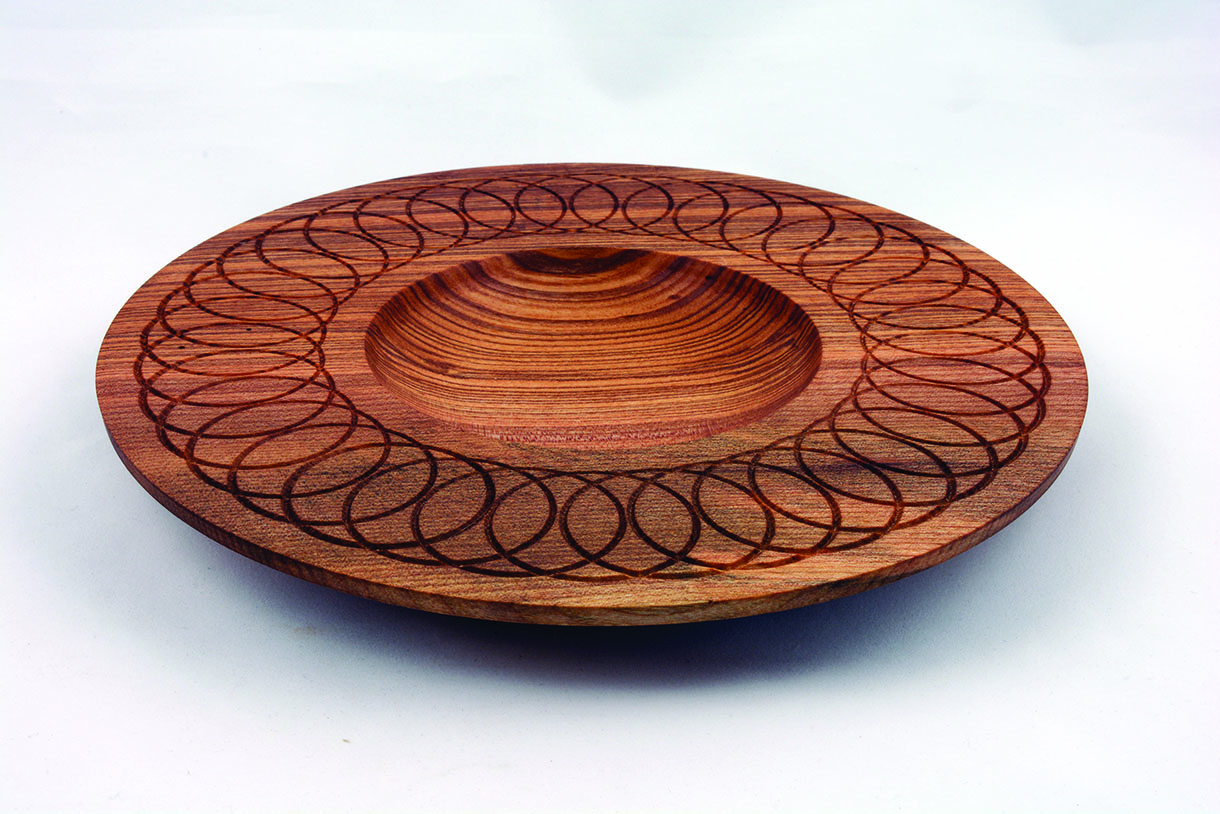
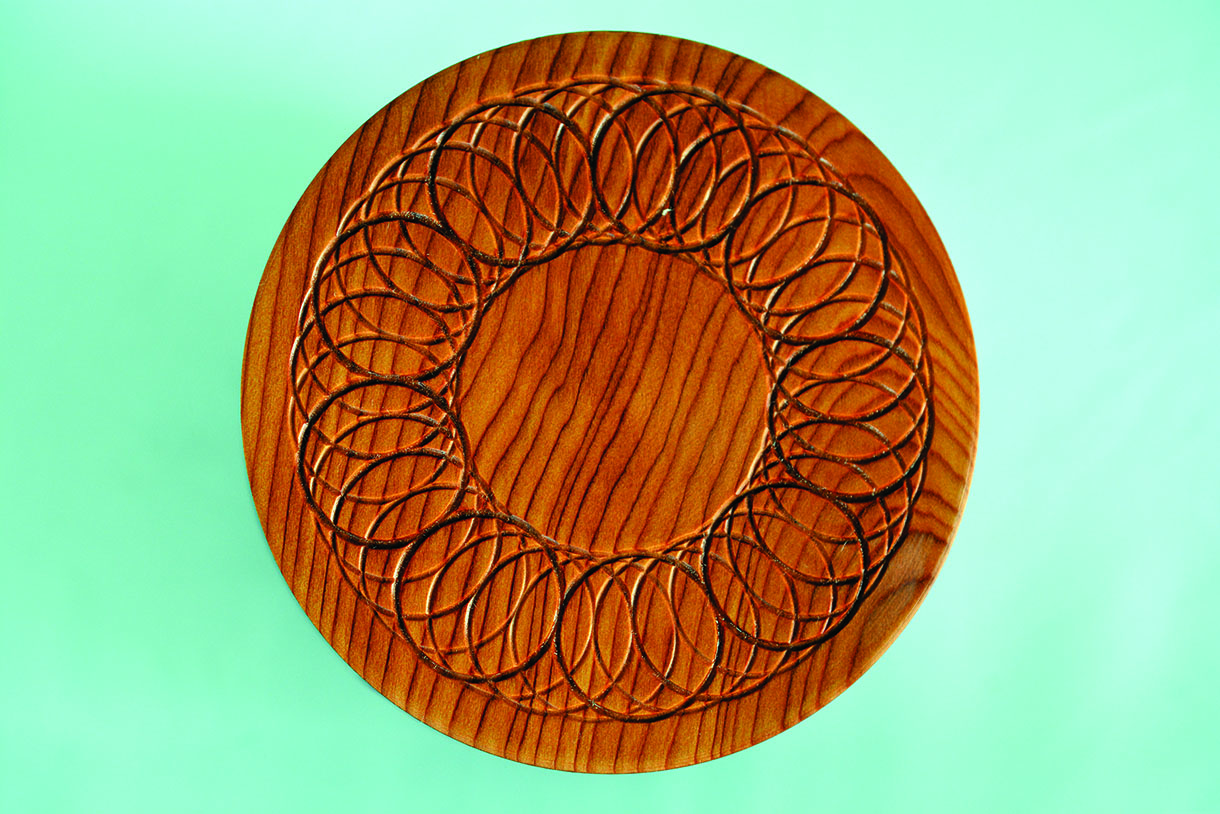
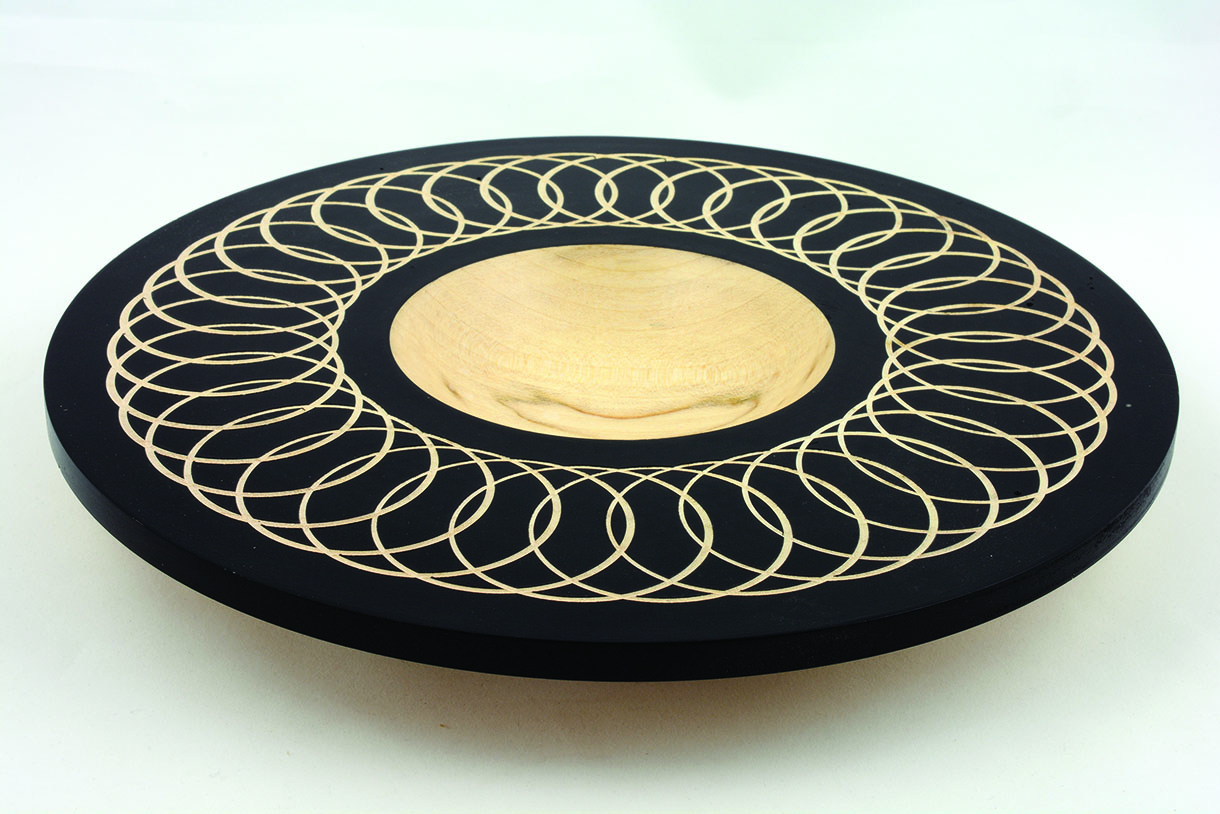
An olive ash (Fraxinus excelsior) platter with barleycorn pattern, 36 divisions of 10° finished with linseed oil
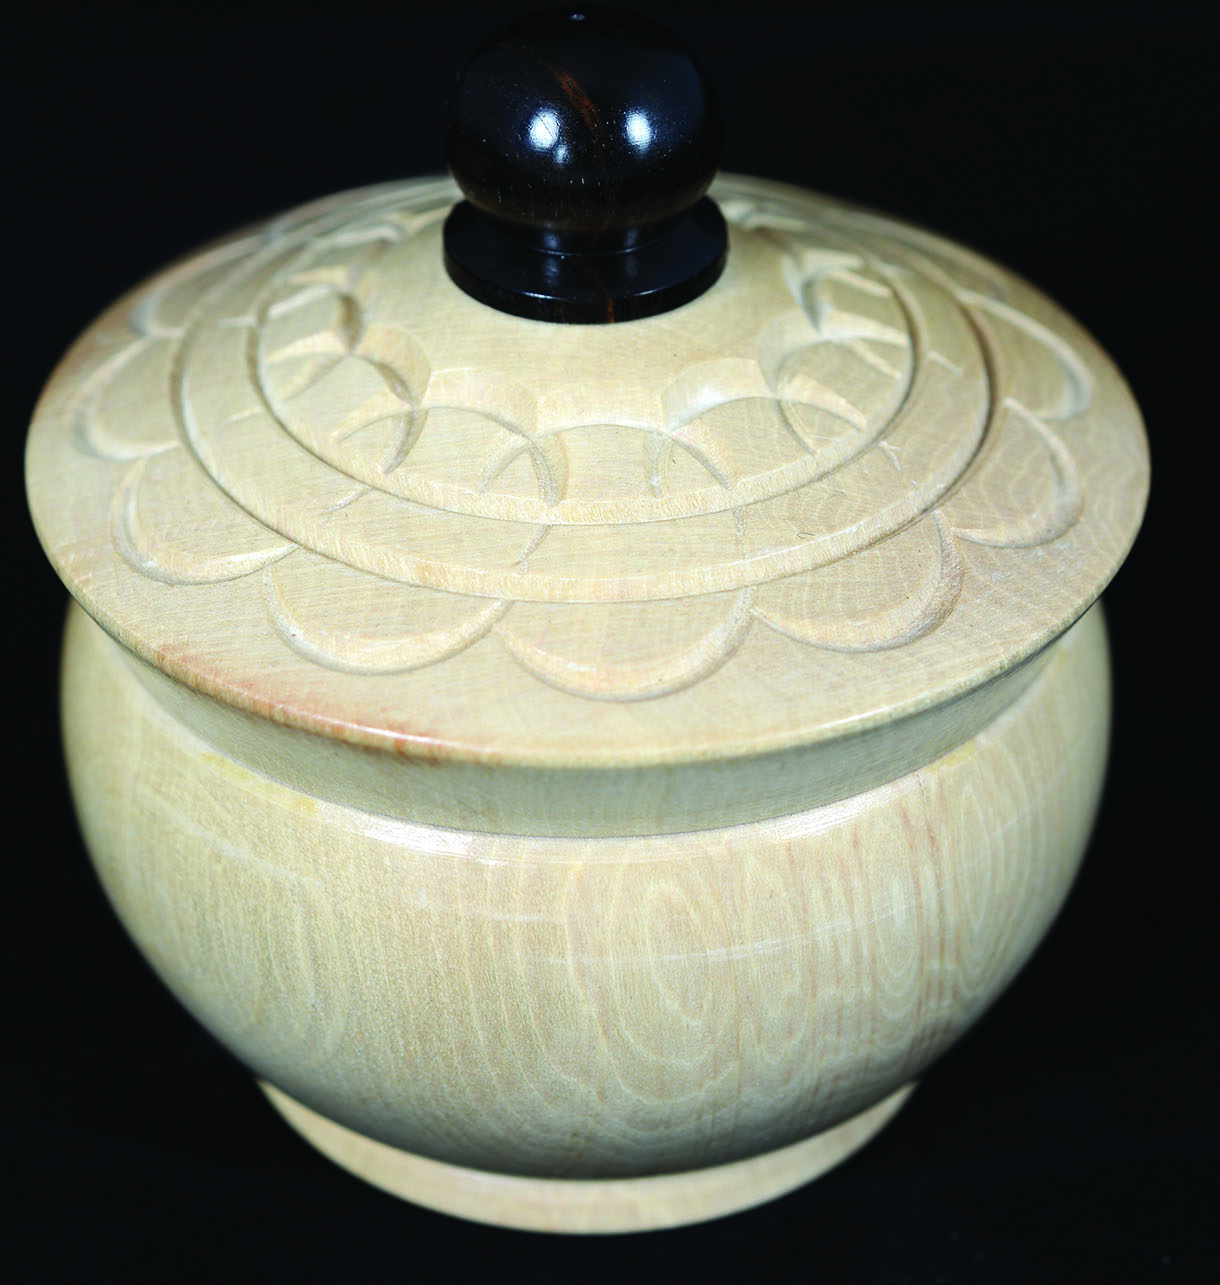
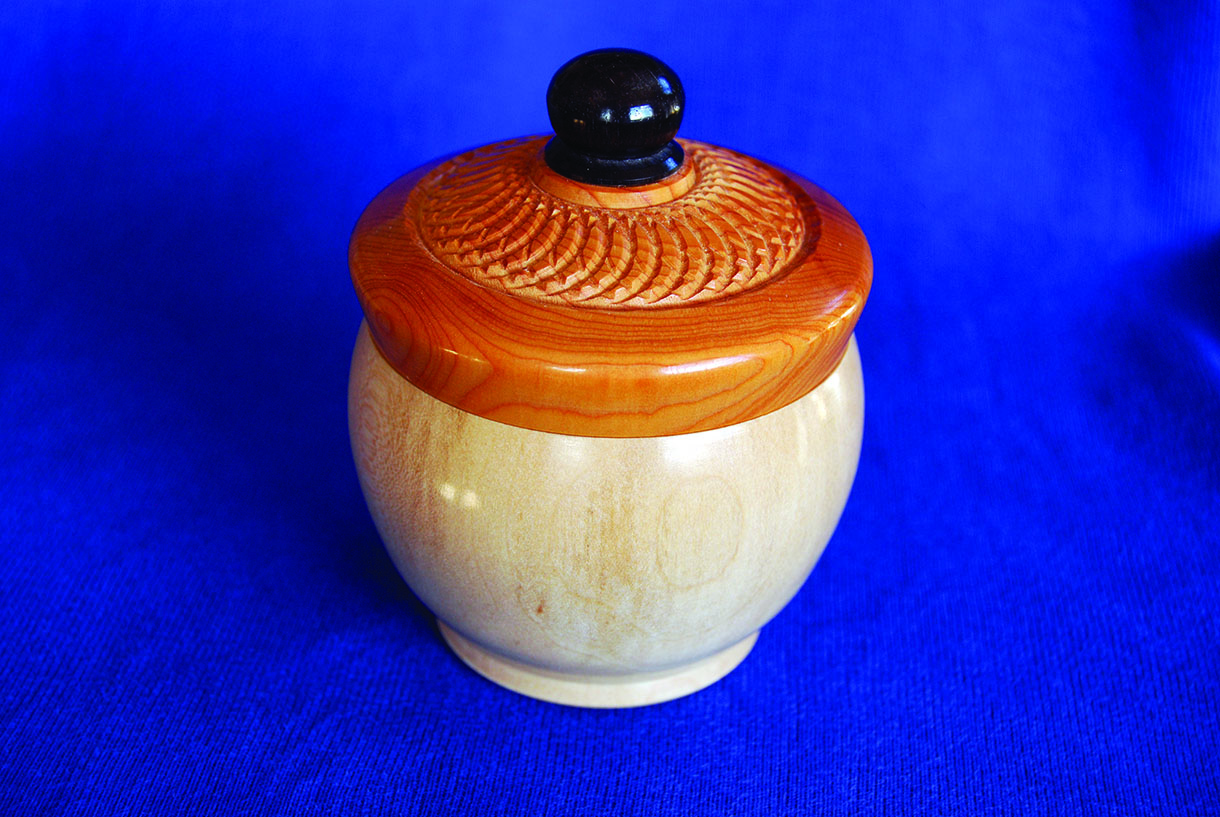
Hornbeam (Carpinus betulus) and ebony box (Diospyros crassiflora), crescent decoration, outer and rings 12 half circles, 30° divisions
Sycamore (Acer pseudoplantanus), yew (Taxus baccata) and ebony with a variation of the barleycorn pattern
Ornamental turning – a brief history
In its purest form ornamental turning is not a recent innovation, being developed as early as the 15th century in Europe, where it continued for the next 300 years under the patronage of royalty and nobility who employed or commissioned engineers to build complex machines. Together with craftspeople, they would produce artefacts from the finest wood or ivory. Following the French revolution the art form spread to England where the proliferation was largely due to the writings of John Jacob Holtzapffel.
Prior to the formation of the Society of Ornamental Turners in 1948, post second World War, the art or craft was also referred to as complex or sometimes eccentric turning. Indeed either of these terms do describe the processes very well when looking at the complex nature of the work involved, among them are genuine works of art, some of the very best are on display at the Victoria and Albert museum in London.
All of which is beyond the scope of this article and its author, one very good reason for this is that ornamental turning lathes made in the 1800s change hands for many thousands of pounds.
As far the article is concerned ornamental turning made easy is about decorating turned items beyond the normal beads coves, etc. all will be within the skill set of most turners for a modest outlay. Therefore the objectives are to introduce the reader to simple, easy and economical ways to master the art which will certainly add a new dimension to ones work.
I am grateful to the Society of Ornamental Turners together with Richard Broughton and John Edwards for their help researching the history of ornamental turning, items from their website, and John for supplying the photographs of the lathe and blackwood (Dalbergia melanoxylon) box.

Holtzapffel No.2517 (dated 1913) which has a division plate for positioning the work and a slide-rest with two lead-screws to position the cutter
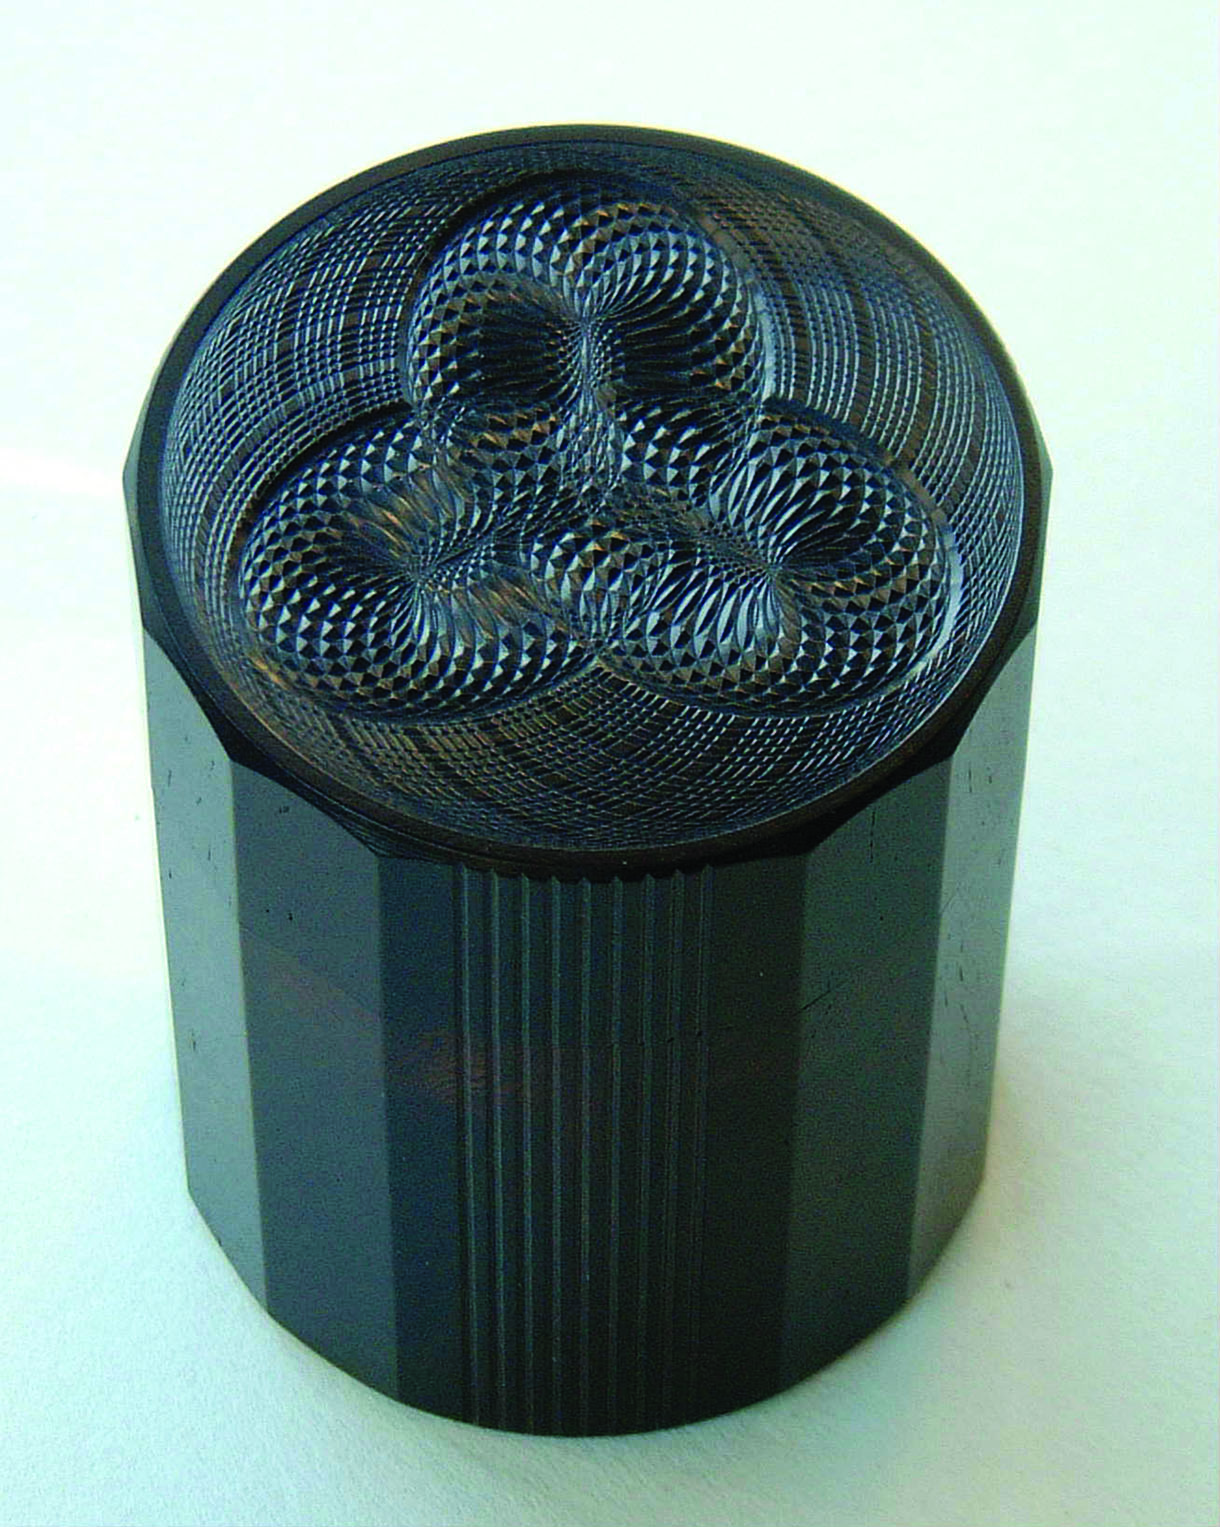
This is a screw-top box John made from African blackwood the patterns cut into the lid being an interrupted pattern and a ‘three-looped double-counted’ pattern. Cut with a 120° point cutter
What is ornamental turning on a woodturning lathe?
Looking at the patterns you will see what appear to be complex and intricate designs. However, they are in fact made up of a series of interlocked or overlapped concentric circles or part circles, arranged eccentrically around the perimeters of the work. If you are of a certain age you may well recall your kids having a toy called Spirograph which drew patterns by interlocking circles this works
on a similar principle.
Ornamental turning on a woodturning lathe is by definition somewhat limited and is unable to produce the very complex patterns produced by machines from Holzapffel, Fenn or Evans or indeed adapted Myford metal lathes. The main difference is, working on a woodturning lathe is restricted to surface decoration, whereas ornamental turning on a purpose built or modified metalworking lathe are able to produce very complex shapes, fine examples of this can be found in issue 293 of Woodturning which illustrates the work of Jean-Claude Charpignon and depicts the type of machinery required. Circle or part circle based patterns are the mainstay of the type of decoration in this series.
One of the best and probably one of the most attractive examples of interlocking circles is what is referred to as the barleycorn pattern; I think, it is so called because the centre of the decoration resembles the shape of a corn of barley. The photographs show how this pattern is built up, starting with nine, just touching circles, followed by nine more cuts between the first set, two further sets are then cut in the same sequence. This produces 36 circles in total which, in effect provides 10° spacings. Circle-based patterns are applied to the wood presented to the cutter anywhere between approximately 45 and 90° to the lathes axis, so is mainly used to decorate the lids of boxes or perimeter of platters or bowls.
The other application is along a cylinder on the same axis as the lathe, i.e. the body of a box or vessel, vase, etc. The pattern of cylinder decoration is determined by the size and shape of the cutter, depth of cut and the spacing around the circumference and between rows. In the pencil box, spacing is the same width as the cut and alternate rows are aligned offset by half the length of the cut.
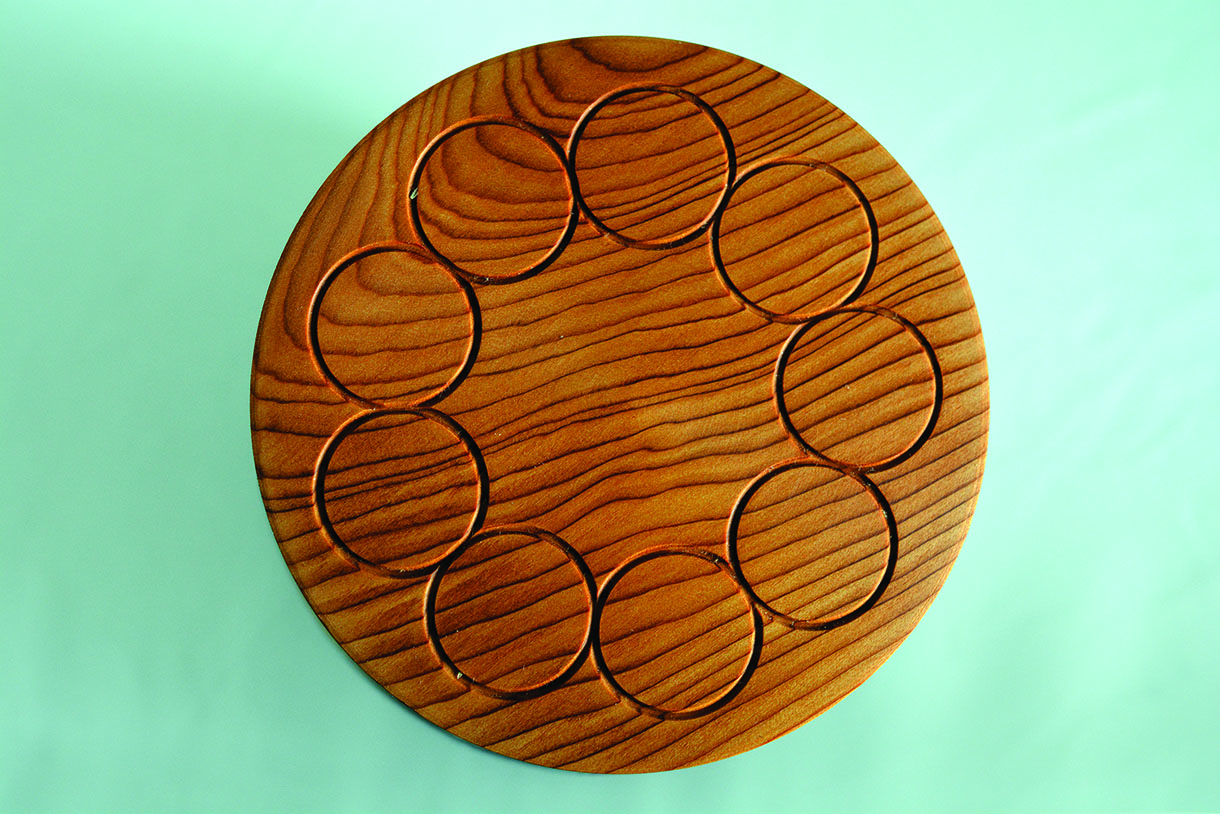
The first cut on a barleycorn pattern
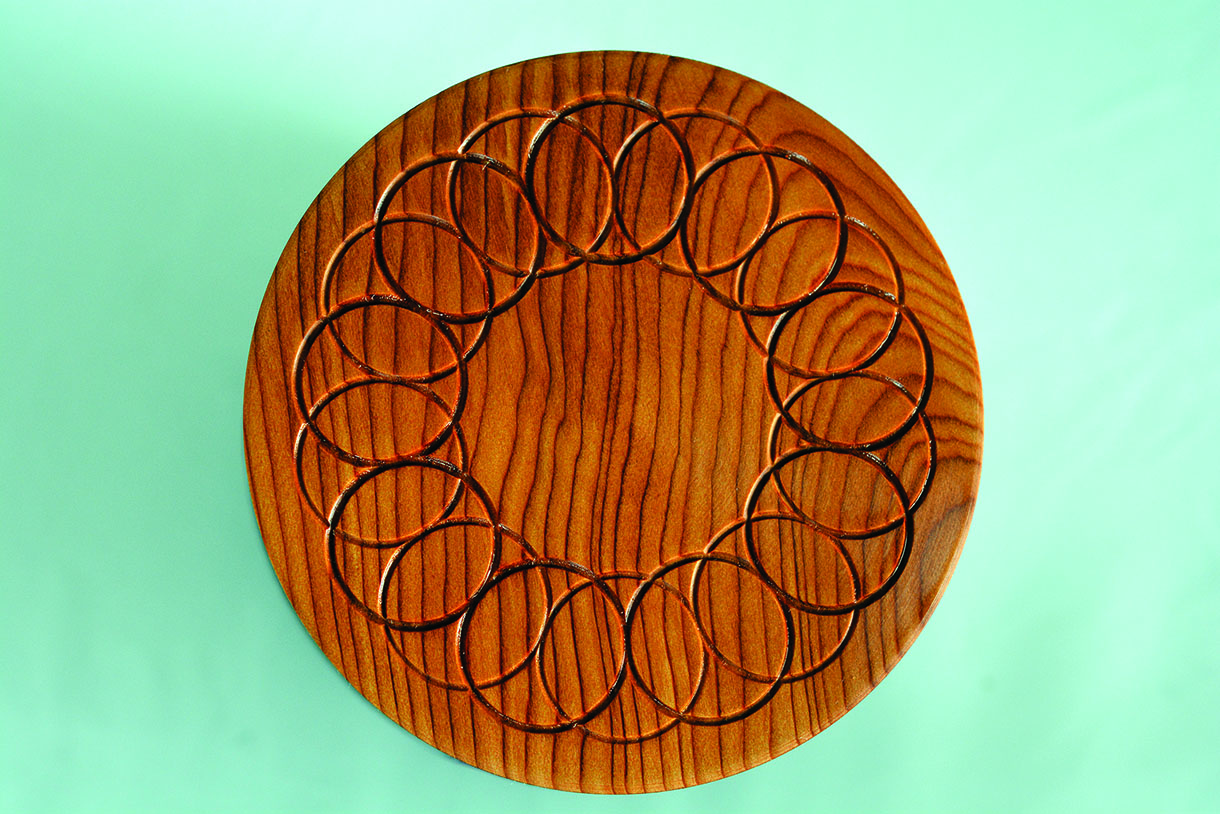
Second cut on a barleycorn pattern
Third cut on a barleycorn pattern
Final cut on a barleycorn pattern
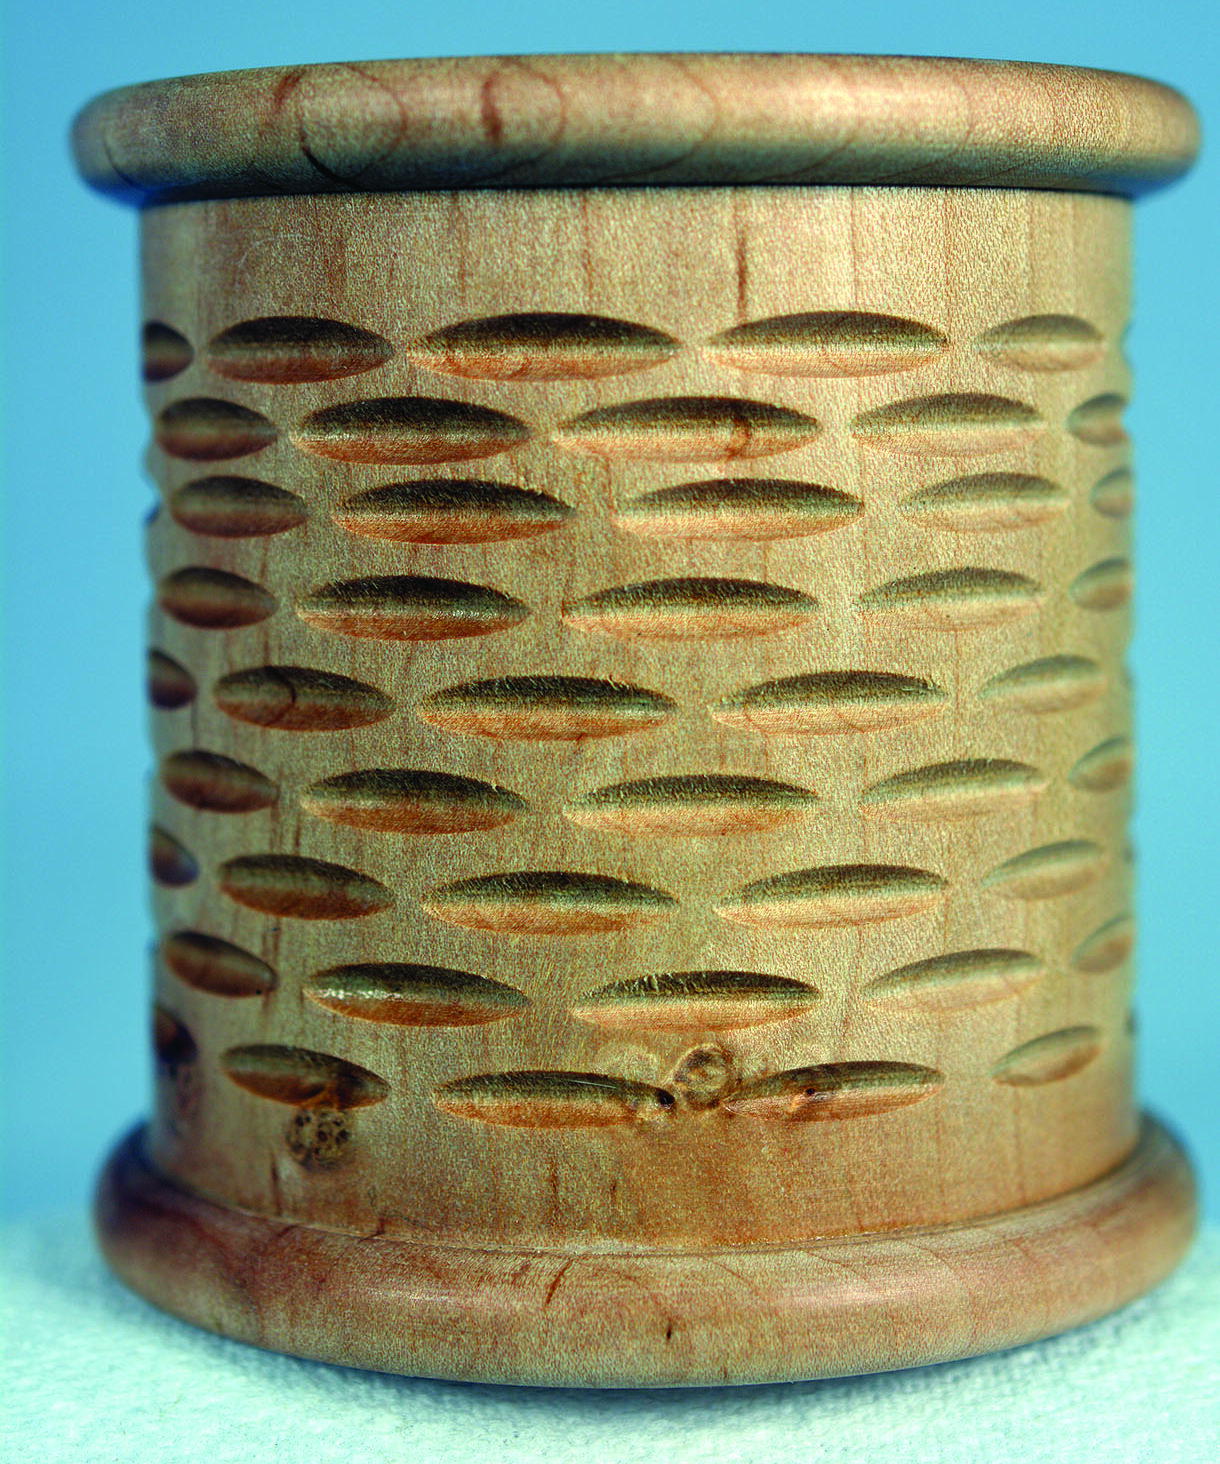
Field maple (Acer campestre) pencil pot with cylinder decoration 12 divisions of 30° each. Point cutter
The basic set up
A woodturning lathe and a four jaw scroll are a perquisite. To pursue the setup I am suggesting, the lathe must have a swing of at least 300mm. The reason for this is the lathe bed holds the base plate to, which is added a compound table and a rotary table allowing approximately a minimum 25mm for the base, 75mm for the compound table and half of the height of a rotary table at 50mm this amounts to 135mm, which is half of the swing (270mm). The thickness of the base plate is the adjustment to bring the set up to centre height, which will enable the cutter to cut on centre.
Ideally the lathe will have a two Morse taper in the headstock to accommodate a boring head (more robust than a one Morse taper).
Most lathes these days have variable speed which is critical in finding the optimum speed for the cutter; because the cutter is offset and extends beyond centreline it will introduce a certain amount of vibration, which can often be eliminated by increasing the speed.
A four jaw scroll chuck completes the set up. Ideally, it will be small (100mm or less), lightweight, which is preferable to heavy duty, as will become apparent.
How it works
A woodturning lathe is unique among woodworking machines because the work spins and the tool is applied to the work, whereas with saws, planners, etc., the work is fed into the spinning cutters. The set up to produce decorations is therefore somewhat of a role reversal for the lathe, in that the work remains static and the tools revolve at high speed and the work is fed into the cutter. Subsequent cuts are made by rotating the work and presenting the next area to be cut.
The basis of the set up is a machine boring bar with a cutter in the headstock via a Morse taper secured by threaded bar, which prevents the boring bar working loose. The cutter can be offset from the lathes axis, thereby cutting concentric circles or part circles offset from this axis. The work holding chuck is mounted on a vertical rotary table providing a method of revolving the work in 1° increments,
the compound slide on which the rotary table sits, feeds or positions the work in .05mm increments in both fore, aft and lateral directions commonly called the X and Y axis enabling the work to be fed into the cutter.
Here is a brief description of how it works; the workpiece to be decorated is turned and sanded as normal. At this stage a coat of sanding sealer can be applied, which will help keep the work clean when handling it. This is particularly important with light-coloured wood such as sycamore.
The chuck, with the work in situ is then mounted on the rotary table; this preserves the concentricity when applying the decoration. Having selected a pattern the cutter is adjusted to suit. The example in Fig. 1 (page 63) is a planned 36 interlaced circles (a full circle is 360°, therefore when divided by 36 gives increments of 10°), the work is then presented and fed into the cutter until the correct depth is achieved. ‘0’ is marked on the scale and the cutter reversed until clear of the work and the table rotated 10°, the process is repeated in 10° increments until the process is completed.
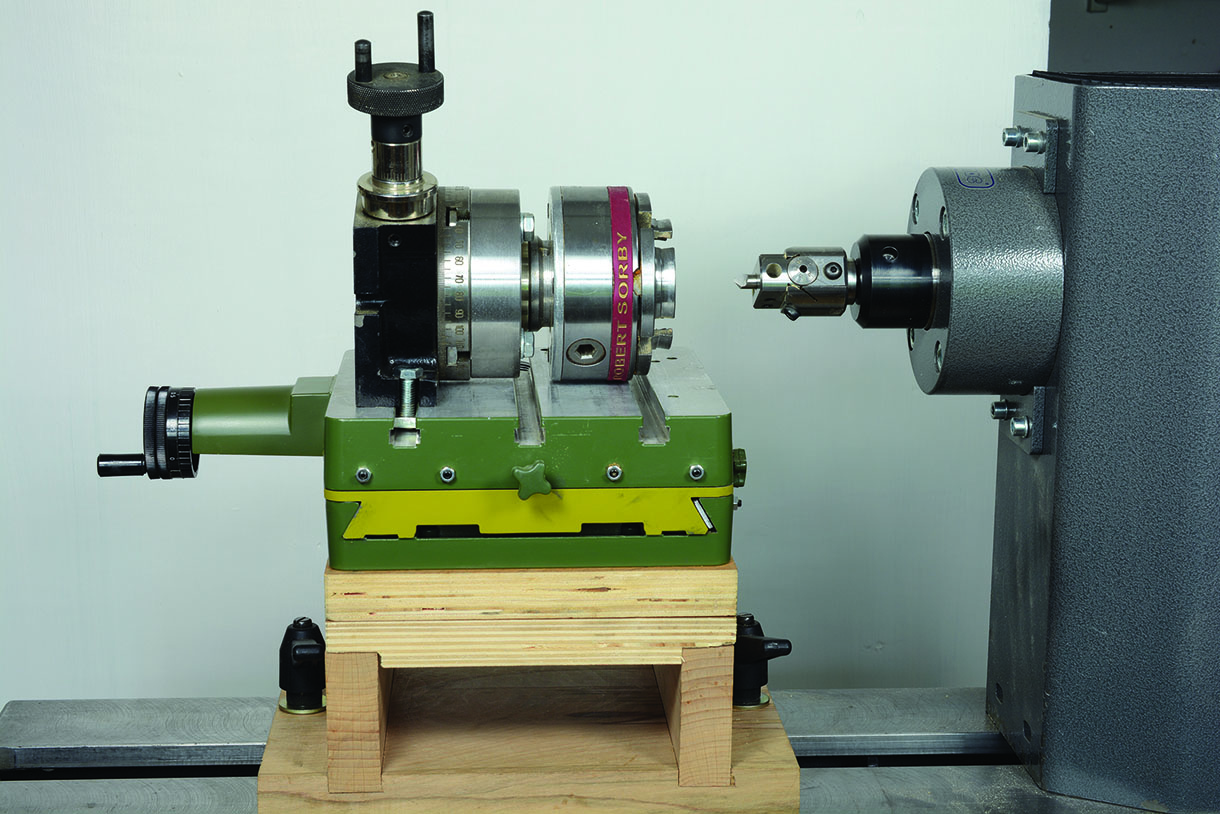
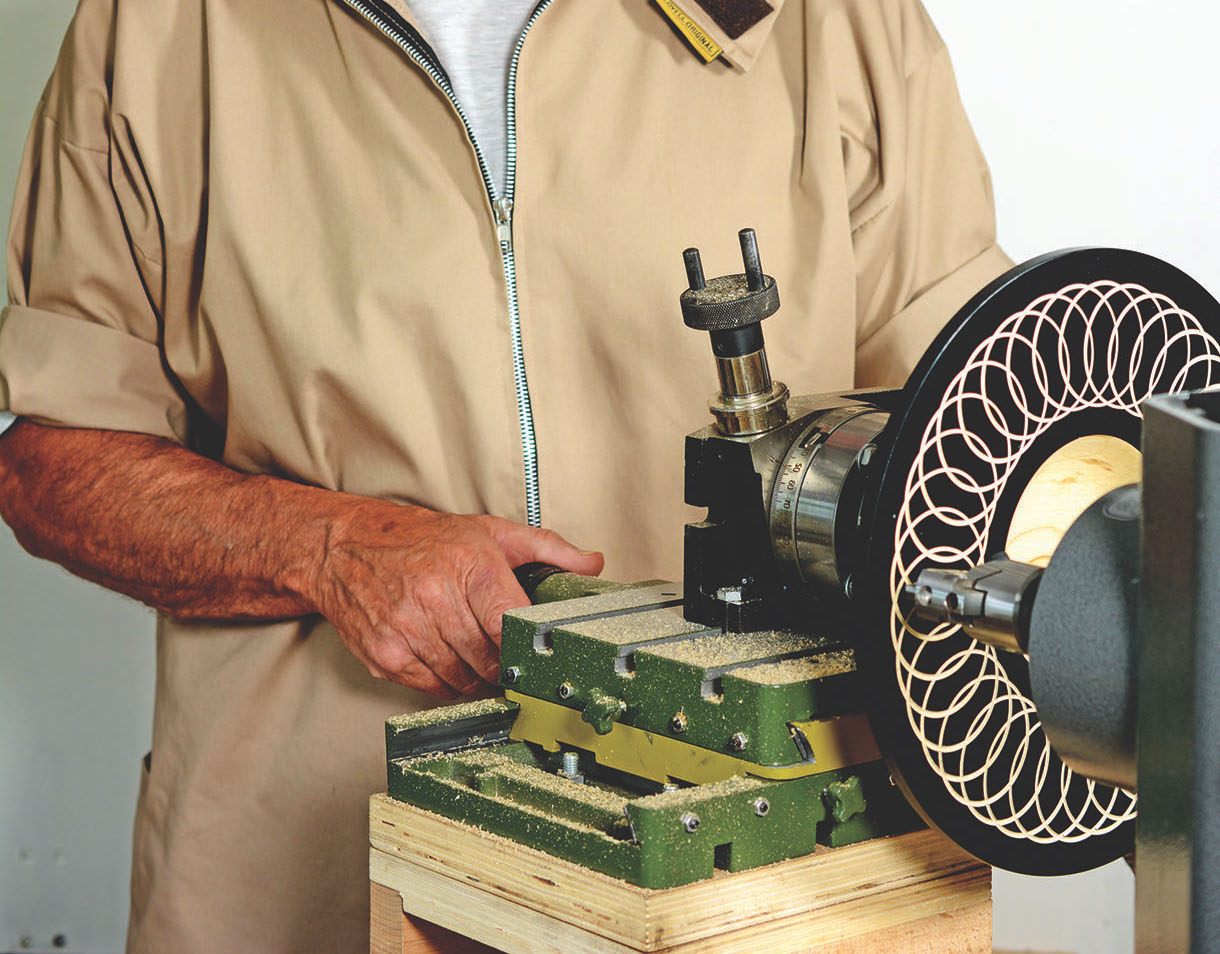
The basic set up. The baseboard dictates the height, compound table with the rotary table and chuck mount together with lightweight chuck
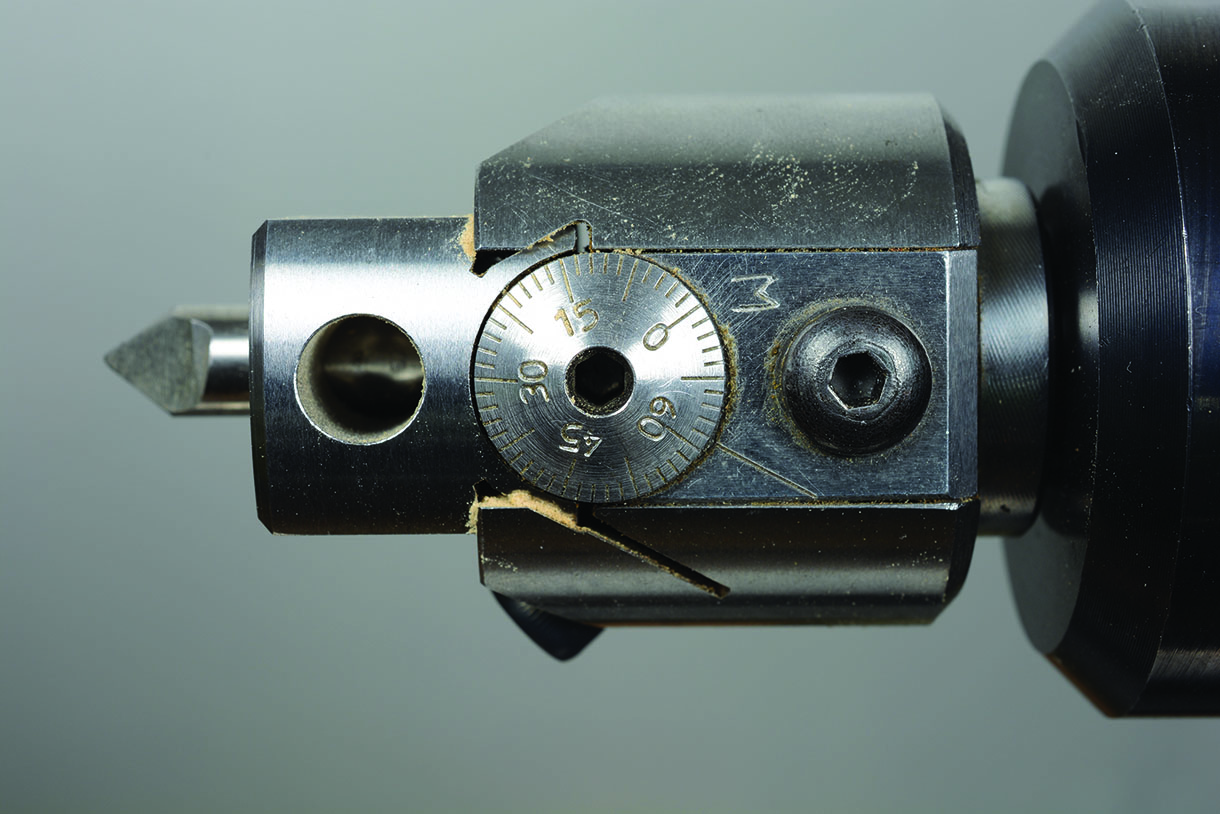
The boring bar is 2 MT and fits in the headstock, photograph shows Vernier scale for adjusting offset and a point tool in the front slot
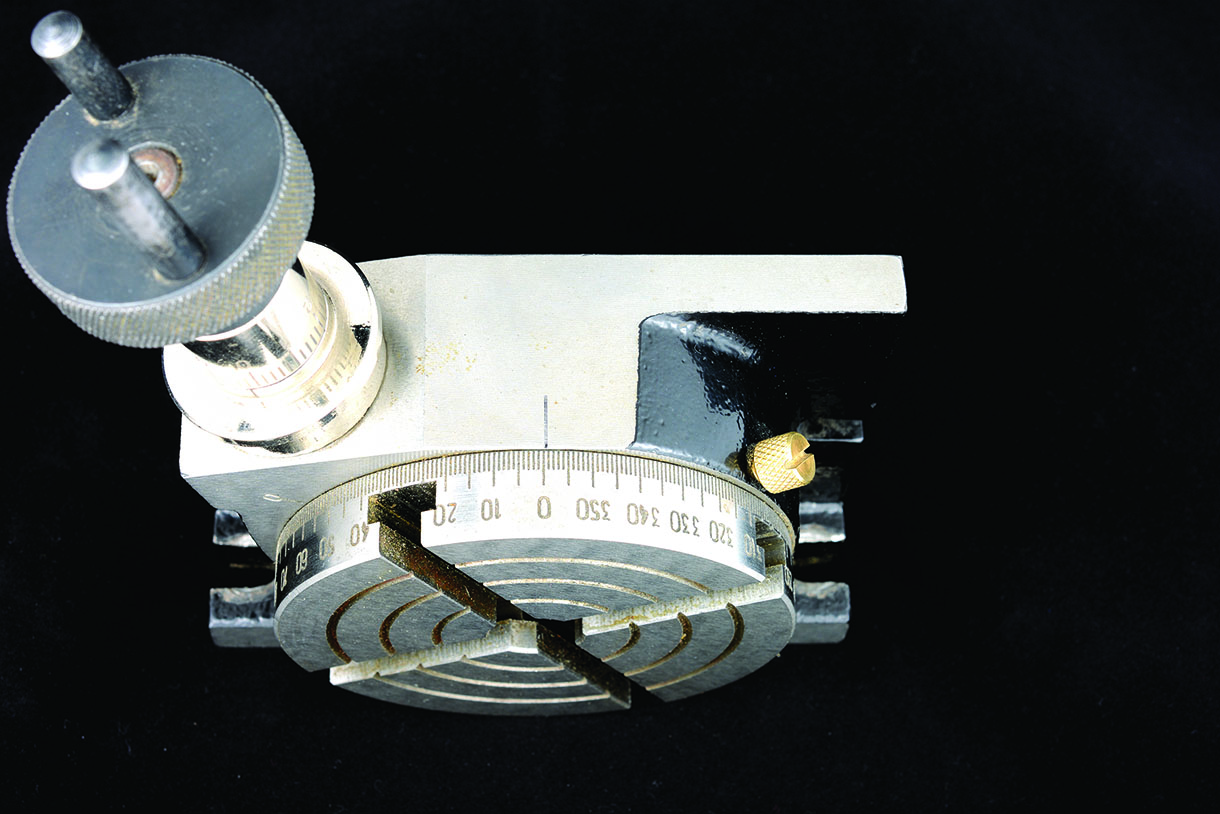
The key to the whole operation, can be likened to an indexing plate with infinite graduations
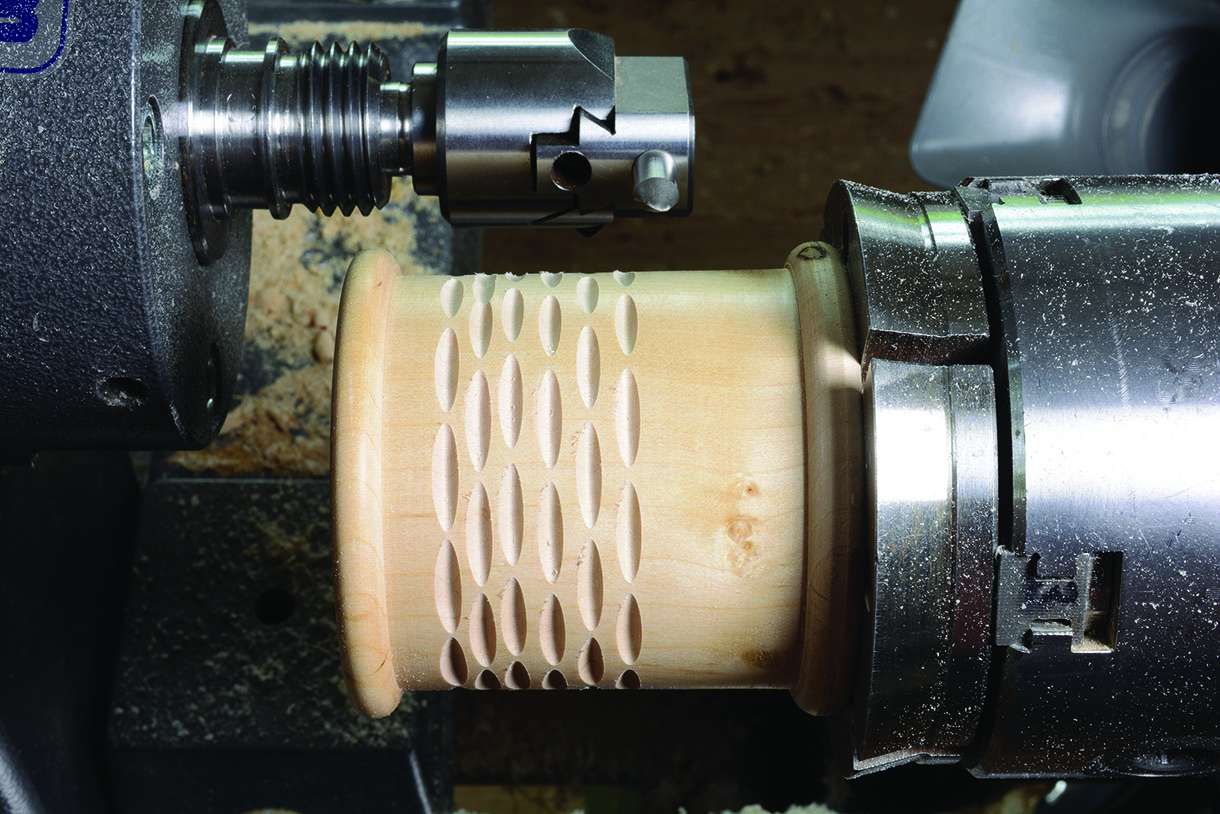
Cutting the cylinder of a pencil pot, the cylinder is parallel to the lathe bed and cutter
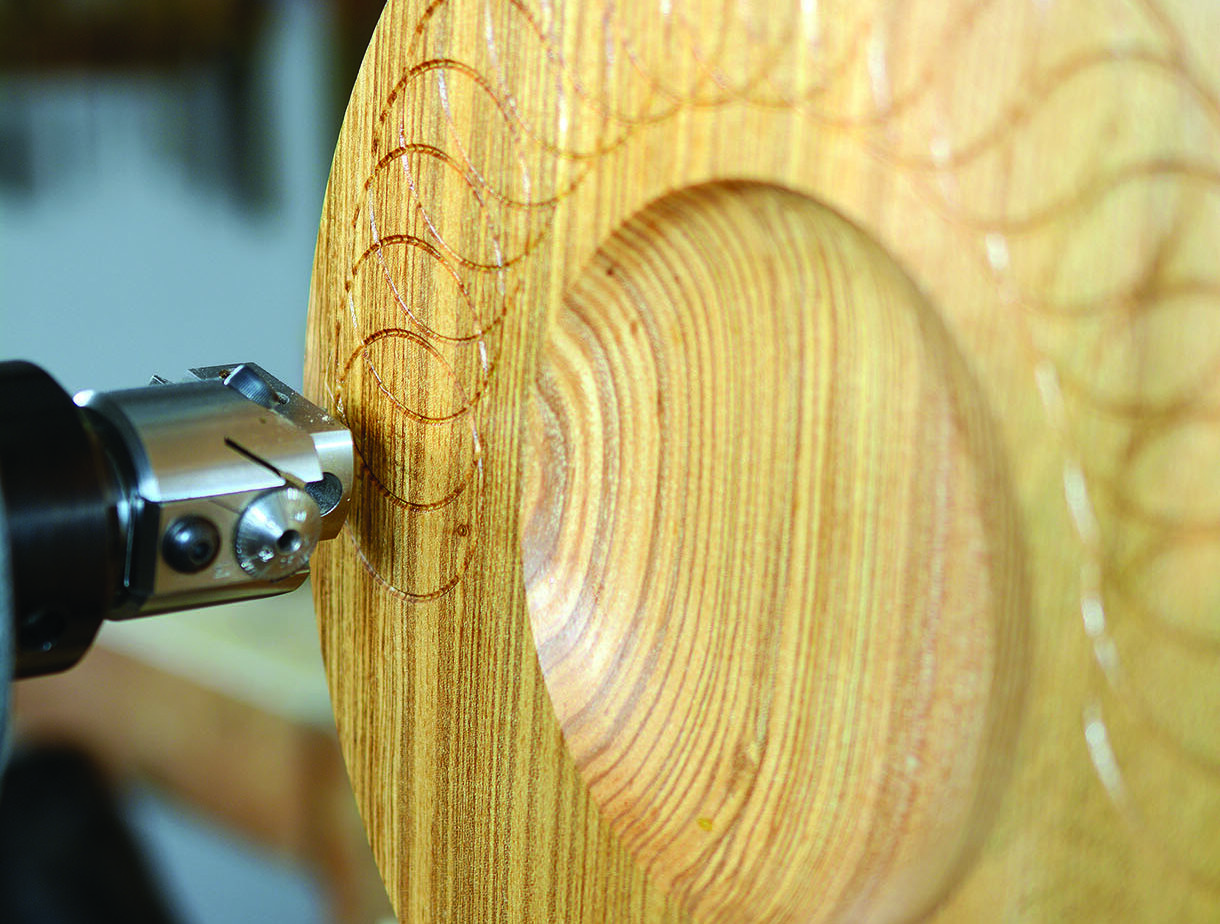
Fig. 1 – Cutting an olive ash (Fraxinus excelsior) platter is at right angle (90°) to the lathe bed/axis
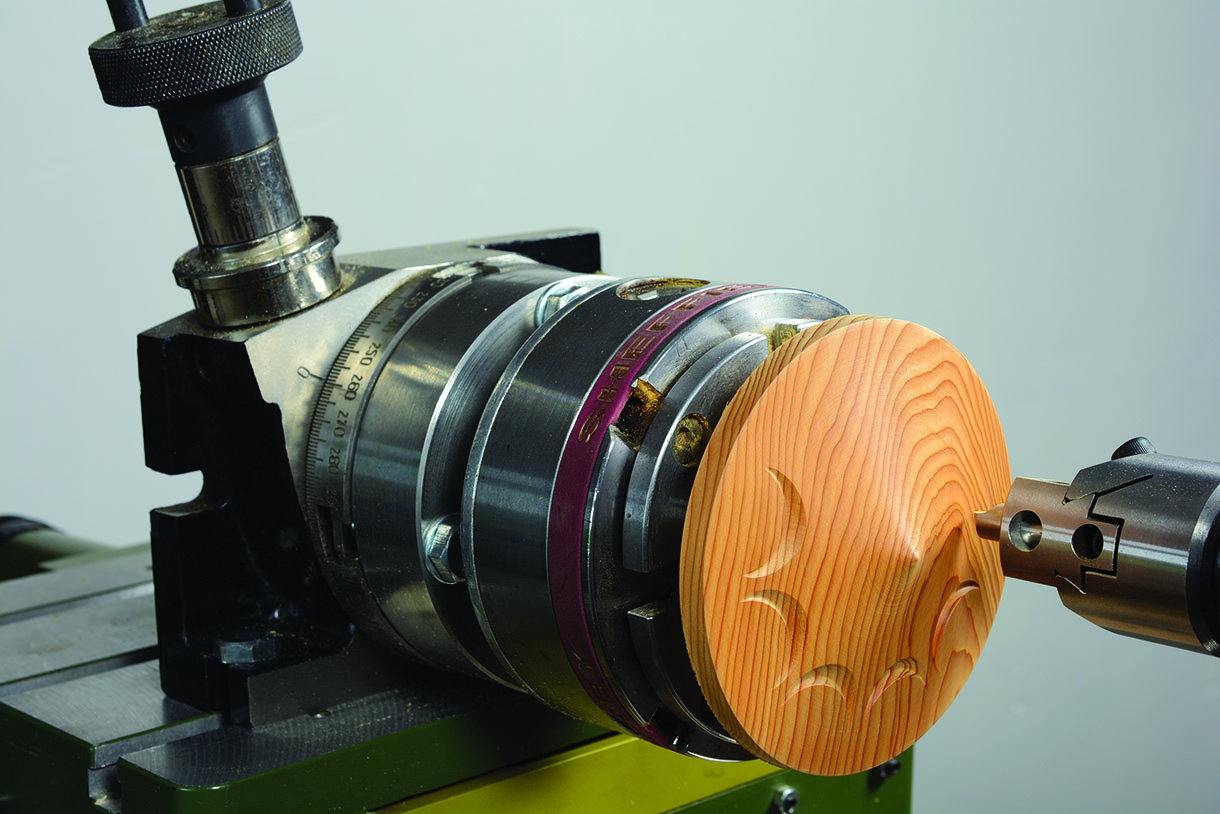
Workpiece at 90° to the lathe axis, cutting part circle or crescent finished piece
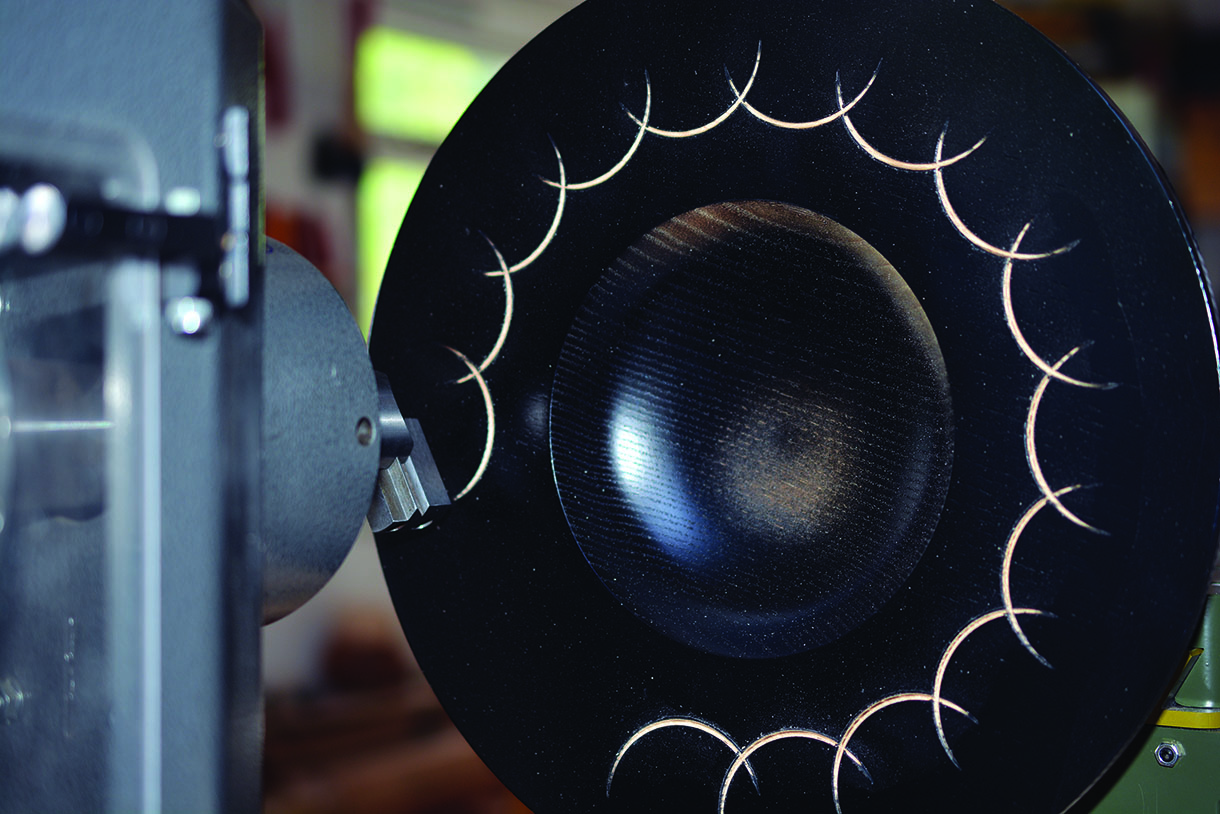
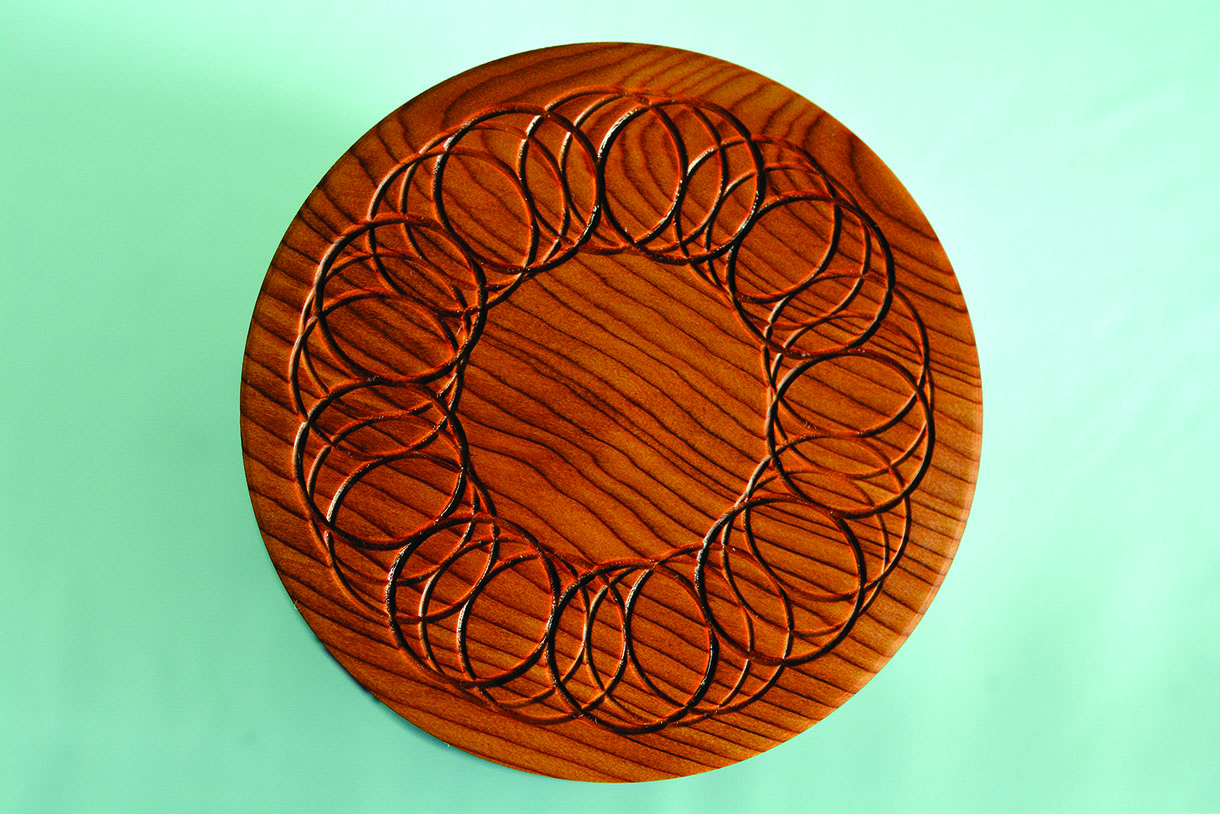
Cutting crescents on an ebonised platter, because I wanted to cut less than a full circle the work had to be rotated to present the less than half the face to the cutter
Applications
Almost all turned work is decorated in one form or another, beads, coves, etc., and can all be considered decoration, which is often referred to as plain turning by ornamental turners. However, simple or easy ornamental turning is the application of surface decoration during the turning process. Although the majority is carried out at or near to the end of the process and may be applied to almost any turned object, the most common use is the decoration of box lids, platters or bowls and it may also be applied to the cylindrical part of boxes, vase, vessel or goblets. The nut cracker bowl, the mechanism was a gift from a friend and the locally grown beech (Fagus sylvatica), the end of a board, the patterns are Barleycorn. This is not something I would normally make, however it lifts an otherwise plain piece of wood and perfectly illustrates an application.
I was invited to demonstrate the ornamental turning techniques at my local woodturning club. Concerned the fine detail of a small box lid would not show up on the cameras and provide the impact required, I ebonised a piece, sycamore (Acer pseudoplantanus), and applied the barleycorn pattern. The black and white contrast is quite stunning and had the desired effect, but again not something I would normally make. The yew (Taxus baccata) goblet illustrates simple rim or cylinder decoration. Holly (Llex aquifolium) is a great wood for boxes and holds fine detail well. The pattern is cut in two stages, first the crescents are cut, the dots are then cut with router bits either 45° ‘V’ groove or a small two-flute radius.

A beech nutcracker bowl isn’t something I’d normally use, however it lifts an otherwise plain piece of wood
I ebonised a piece sycamore and applied the Barleycorn pattern. The black and white contrast is quite stunning and had the desired effect. Again, it is not something I would normally make
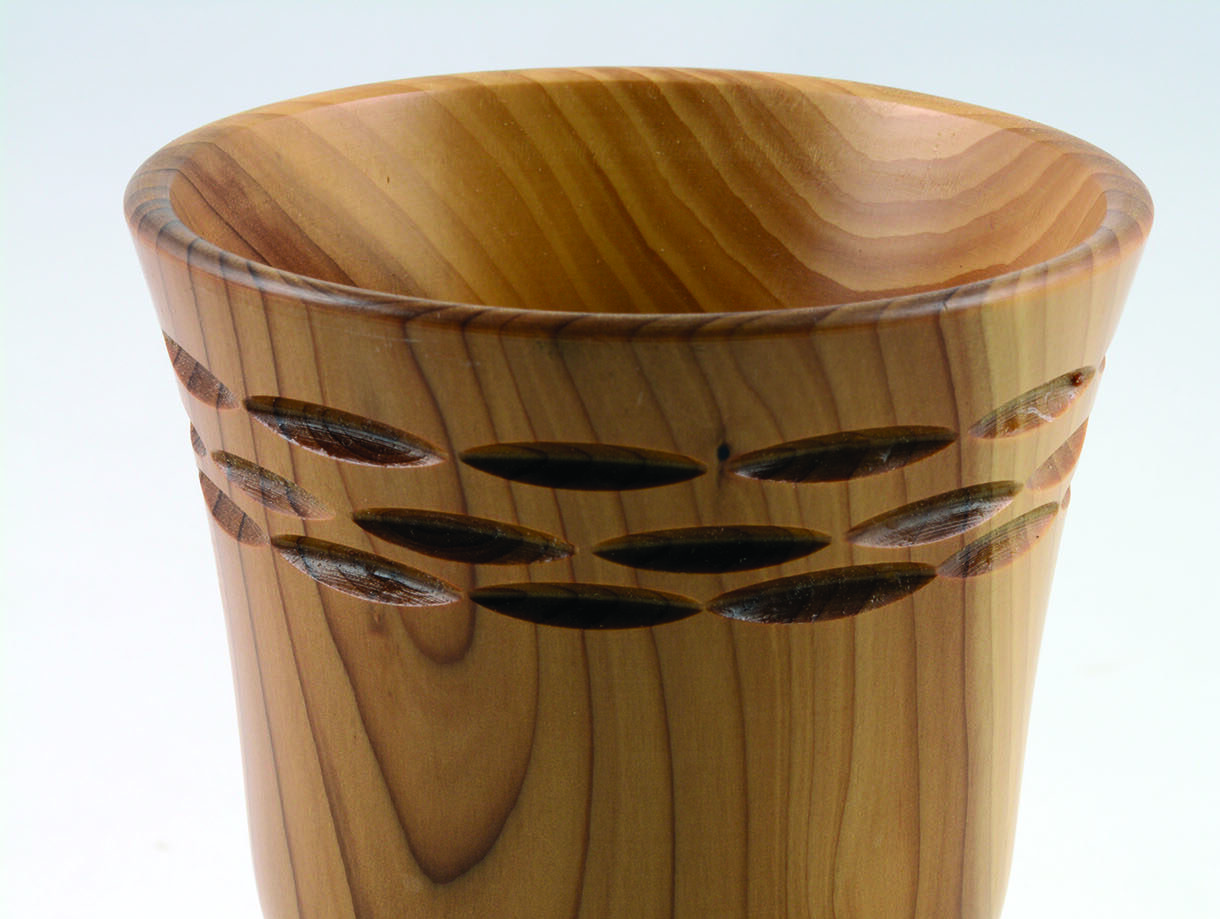
The yew goblet illustrates simple rim or cylinder decoration
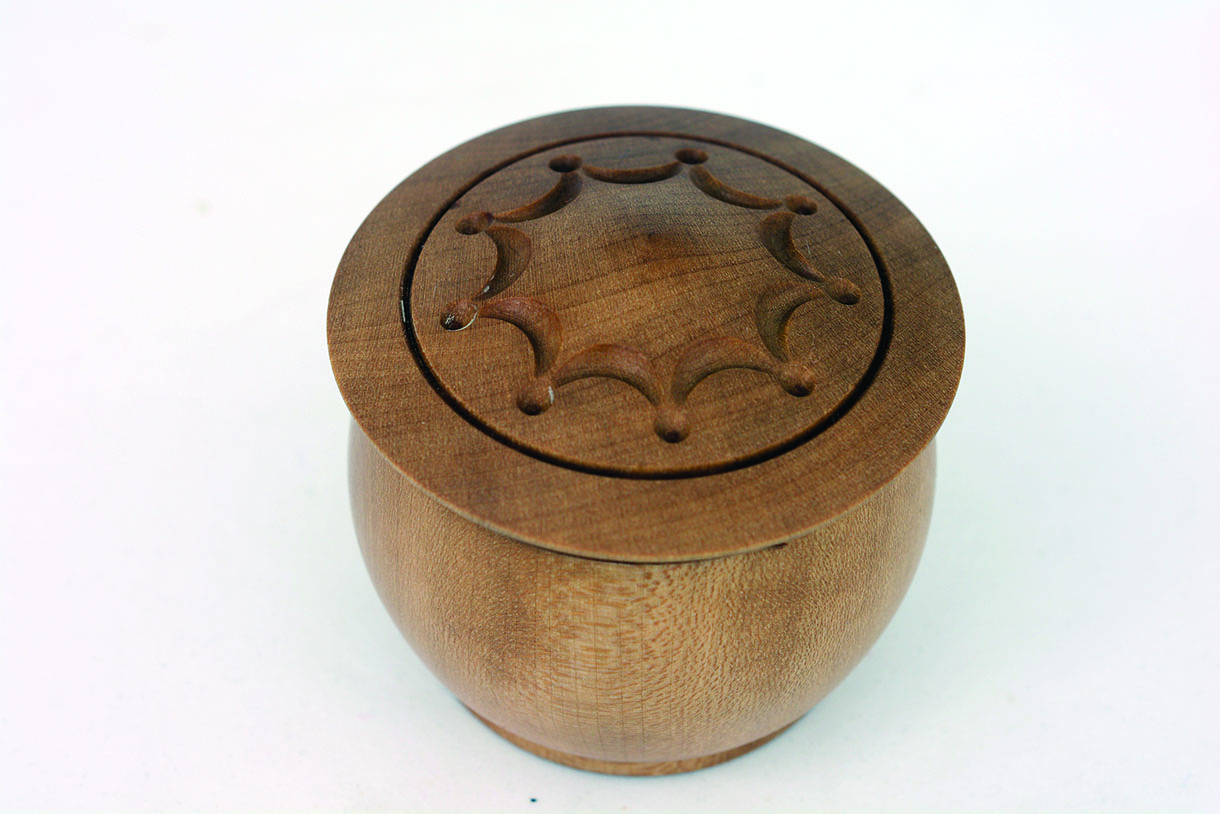
A holly box crown pattern
Here’s what you will need:
• Cutting tools
• Boring head
• Rotary table
• Compound table
• Four jaw scroll chuck
• Shop made jigs
• Turntable base
• Drawbar
• Alignment jig
• Chuck mount
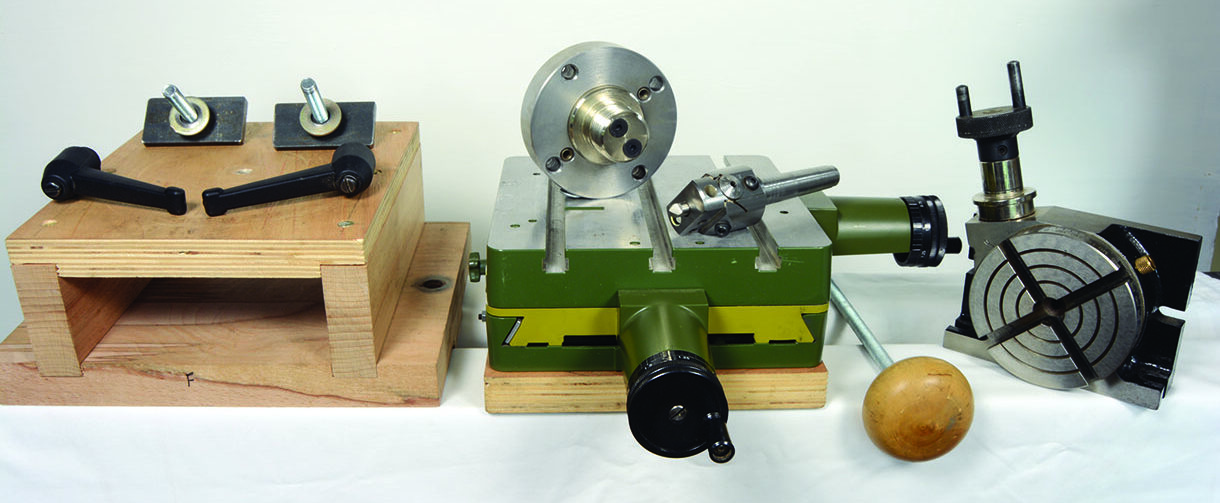
Main components left to right, baseboard with securing Bristol leavers, sitting on the compound table is boring bar, chuck mount. Draw bar and rotary table
What is required
The objective of these articles is to simplify and present an easy approach to ornamental turning, therefore all components are readily available, the skills required are basic woodworking, woodturning to a reasonable standard and no special skills are required to apply the decorations. No special knowledge of geometry is required as patterns are determined by eye and experimentation and in some cases by trial and error, so I think that the processes are well within the capabilities of most readers.
The components required are listed together with a list of bespoke items you will need to make, all of the components are readily available from engineering suppliers, most of which can be bought online and they are also available from online auction sites such as eBay. The shop made elements require basic woodworking skills and the chances are you will have sufficient timber in the scrap bin or the ‘I will save that just in case’ pile. My setup cost just less than £300.
Health and safety
Now seems an ideal time to mention Health and Safety. As I am sure we are all aware woodturning is an inherently dangerous pursuit, ornamental turning is no more or less dangerous than any other turning operation. However, please be aware that the cutter is revolving at high speed and should be shielded and also the cutting action produces fine dust and not shavings, therefore dust extraction at source is a must, together with personal protection in the form of a mask and, of course, air filtration systems are a real boon. The other consideration is the direction of travel of the cutter which should always be the same direction as the chuck screws onto the mount so that cuts will tighten the chuck there is a remote possibility that the chuck may unscrew if the cutter revolves in the opposite direction. If for any reason a change in direction is required, then a chuck with grub screw in the collar to lock onto the spindle will prevent the chuck unscrewing.
Here are the components required:
• 100mm Soba rotary table
• 40mm Soba boring head
• 8mm HSS toolsteel
• Proxxon 20150 KT 150 Compound table
The Compound Table was sourced from eBay and came from Germany, prices on this
item vary wildly.
• Axminster Chuck Hub
As far as I am aware Axminster are the only source for this product, part numbers
vary according to spindle size the four most popular sizes are available.
All of the materials for shop made parts are standard items obtainable from wood suppliers
and hardware shops.

")
