Tusked Ocean Wonder – more:
In the final part of the bull walrus project Andrew Thomas explains how to finish this wonderful animal.
In the final part of the bull walrus project Andrew Thomas explains how to finish this wonderful animal
In the last article I described the techniques of how to carve the details of the Walrus head, including the tusks and surface anatomy of the skull. We continue now with part two of the project, how to carve the flippers and body. The objective of the project is to produce a lifelike representation of the Bull Walrus, which will require the reader to make an independent study of these details. Google images, Pinterest and Instagram are all very good websites to carry out this research, which will also link the reader to other websites of specific in-depth information. Just like humans, there seems to be no end of variations between each animal, their colour, skin texture, wrinkles, size and posture. It is therefore good practice to take one’s own research information and apply that to the carving, especially the size and shape of the flippers, and the wrinkles around the body.
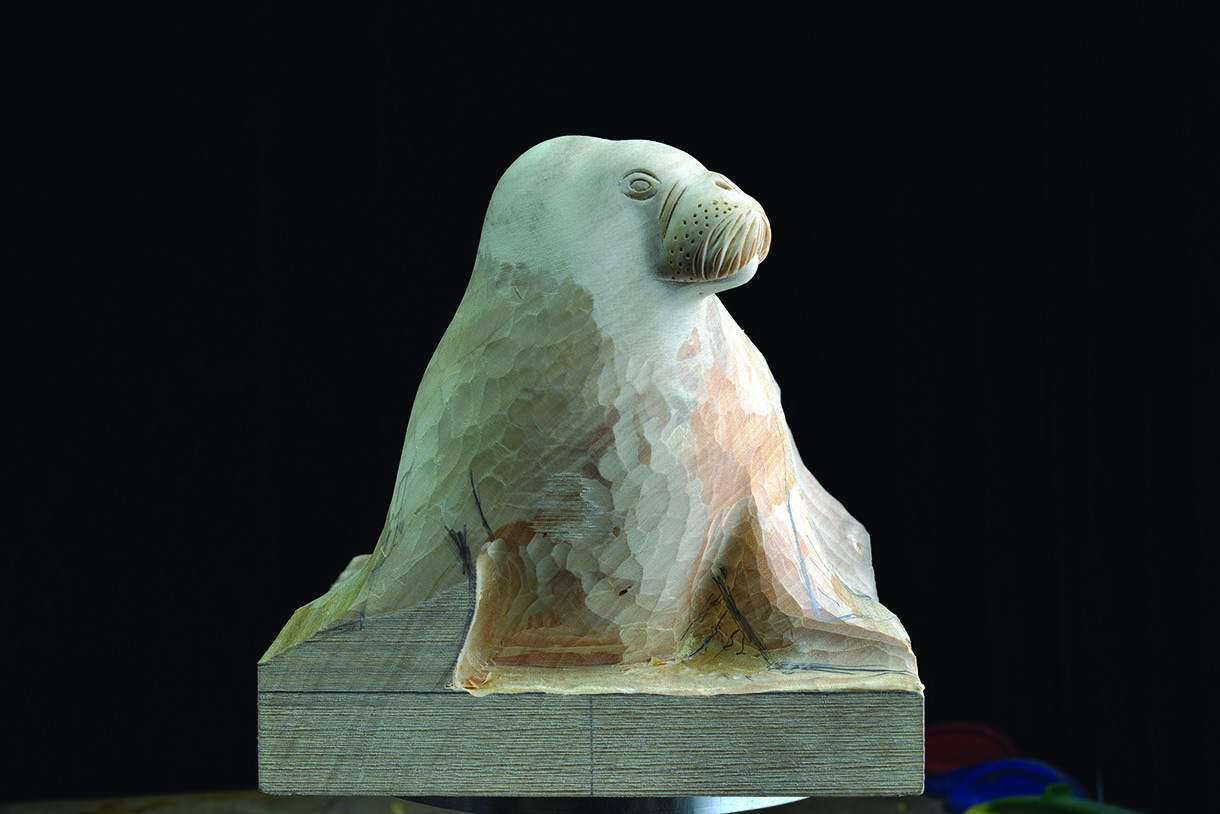
Before you start working on the project, read through the complete step guide and study the stage and finished images to see how the carving develops.
Things you will need
Tools:
• No.2, 2mm – Flippers
• No.2, 5mm – General shaping
• No.2, 10mm – General shaping
• No.2, 20mm – General shaping
• No.2, 40mm – Body
• No.7, 4mm – Flippers
• No.7, 6mm – General shaping
• No.7, 20mm – Rear of body
• No.8, 4mm – Digit tips
• No.8, 18 – Roughing out, body
• No.9, 7mm – Lower edge work
• No.9, 10mm – Flippers
• No.11, 1mm – Flippers, creases
• No.11, 2mm – Flippers, creases
• No.12, 6mm – Lower body edge
• No.15, 3mm – Flippers, creases
• Knife – Creases, flippers,
• Rotary Burr – 6mm bullnose or conical TCT burr
• Rotary Burr – 1mm diamond smoothing burr
Materials:
• Walrus: English lime (Tilia vulgaris) 200 x 130 x 150mm
• Tusks: English lime 42 x 15 x 5mm
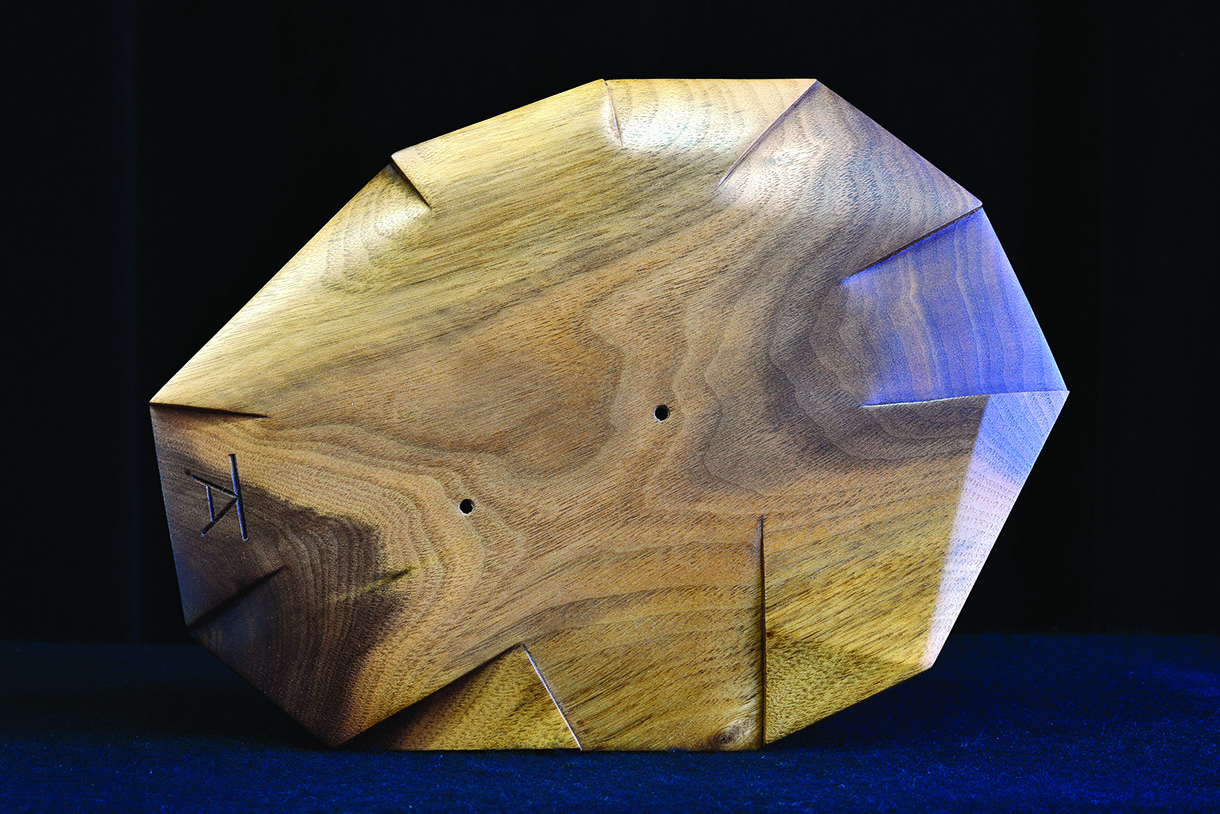
• Base: American black walnut (Juglans nigra) 250 x 190 x 20mm
• Wood bleach
• Danish oil
• Clear wax
• Briwax medium brown
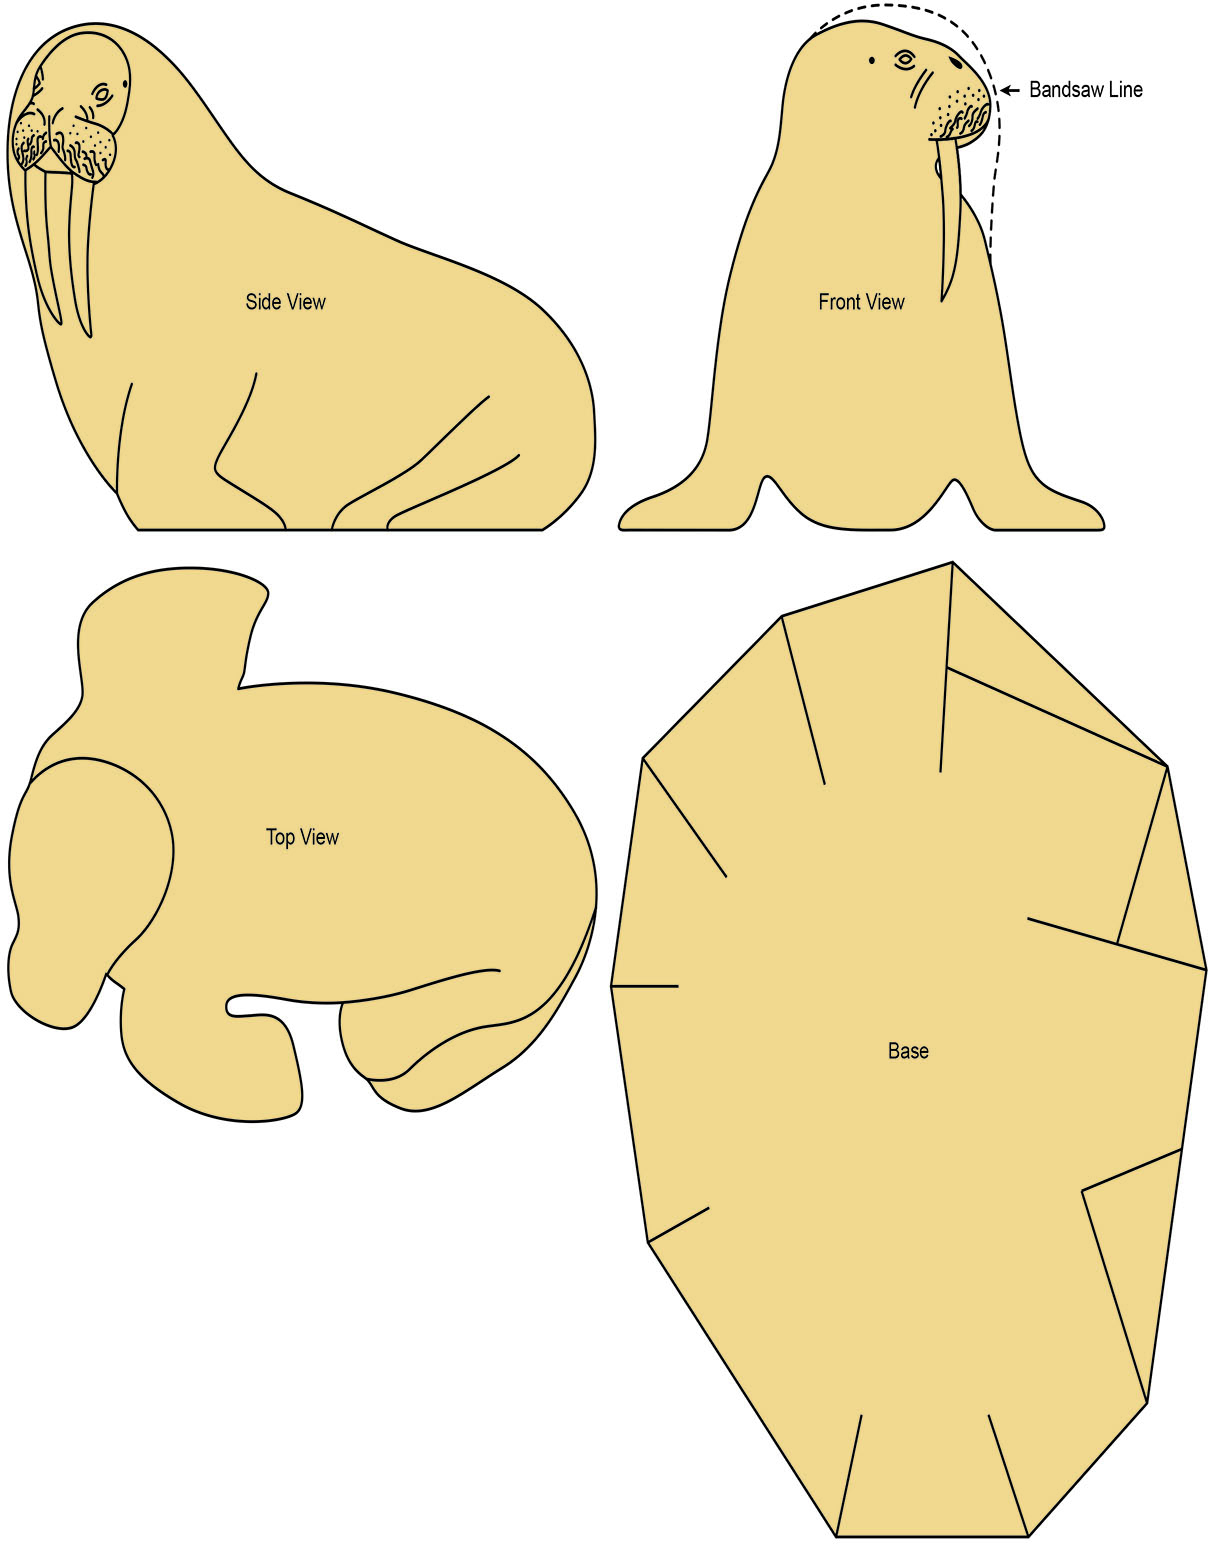
Drawings and how to resize them
To enlarge or reduce the size of drawings right click on the image to download it and then go HERE to watch a video on how to use paper with a grid to do exactly that.
1. The first job is to curve the square body, down over the shoulders, back and rear end towards the base, but do not attempt to achieve the realistic finished shape at this stage. Then, measure and mark in position the chest, legs and flippers from the front and side views. Pare the wood back to these lines but, again, do not attempt to shape them yet
2. The hind flippers of the walrus are often seen turned forwards when they are resting on land, which is how the example is being represented in this article. This adds life and movement to the composition and should be studied carefully before attempting to carve them. At this early stage of work on the body, they only need to be marked in position. Do this then remove the area of waste wood between the front and hind flippers
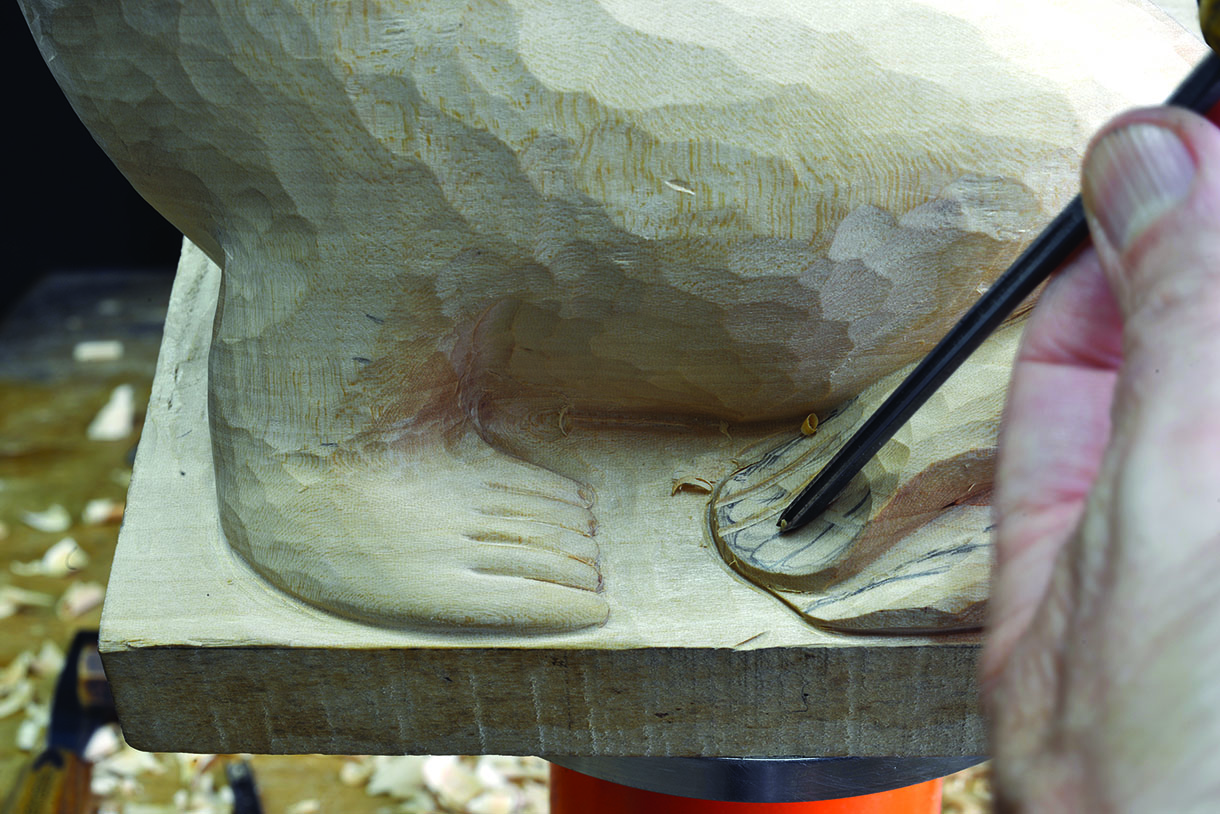
3. The front flippers of the walrus are very large and have five digits, which expand massively and contract to a cluster of wrinkles and creases. They can therefore be represented anywhere within this range of expansion, but do not strive to produce them all at the same width and symmetry as this will subtract from the real-life appearance that is trying to be achieved. Using your reference material to help you, draw the left flipper in position
4. Remove the waste wood around the edge of the flipper and then form its sleek, natural shape, from the base up to the body
5. Use a small veiner or knife to separate the digits, then curve each one into these creases or knife slits. The end tips of the digits can be shaped rounded in appearance, which is achieved with a No.8, 4mm. All the details are then smoothed naturally together with grit 150
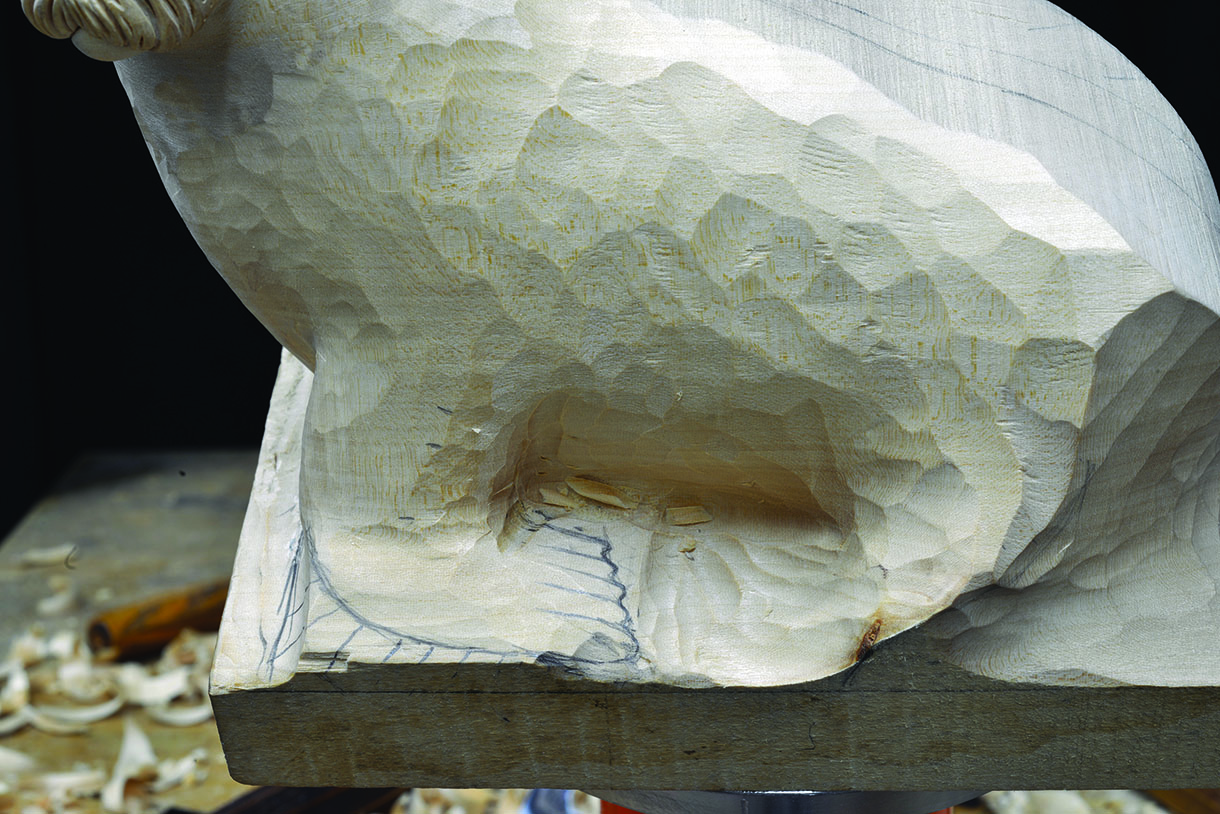
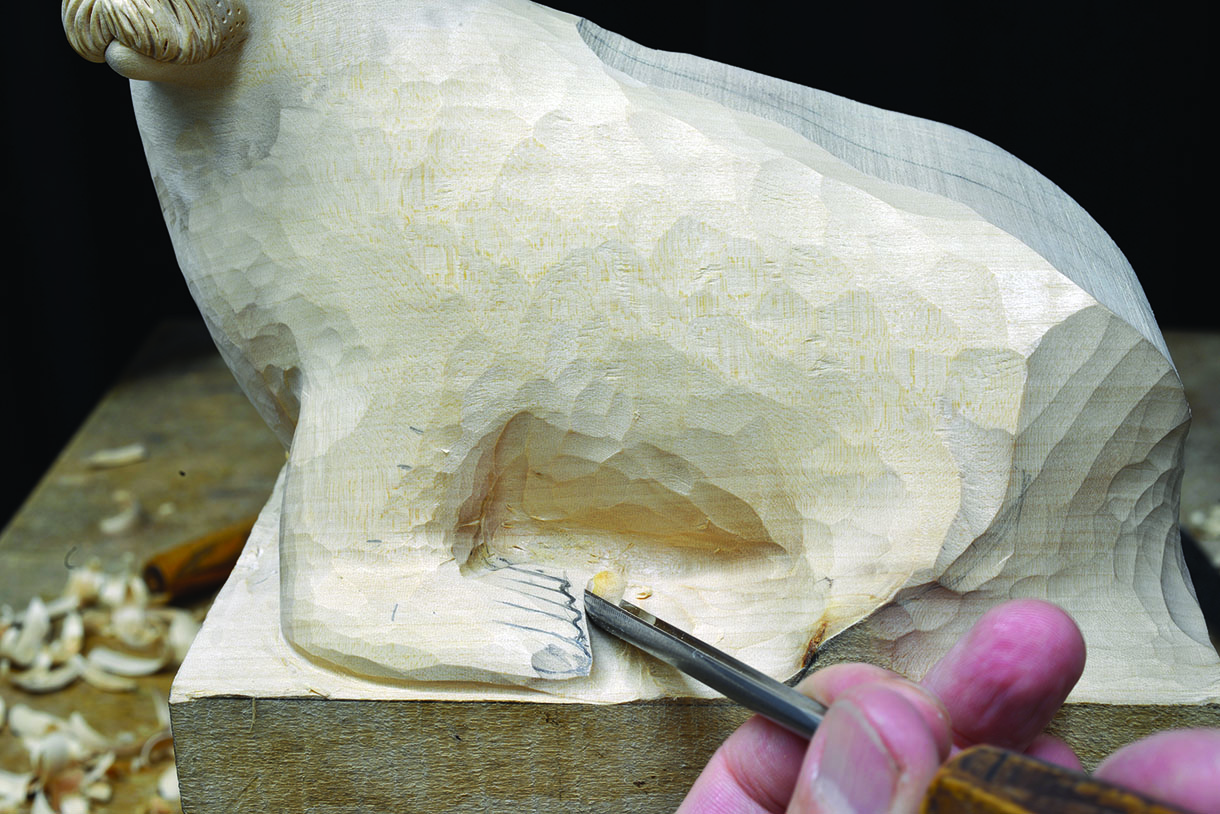
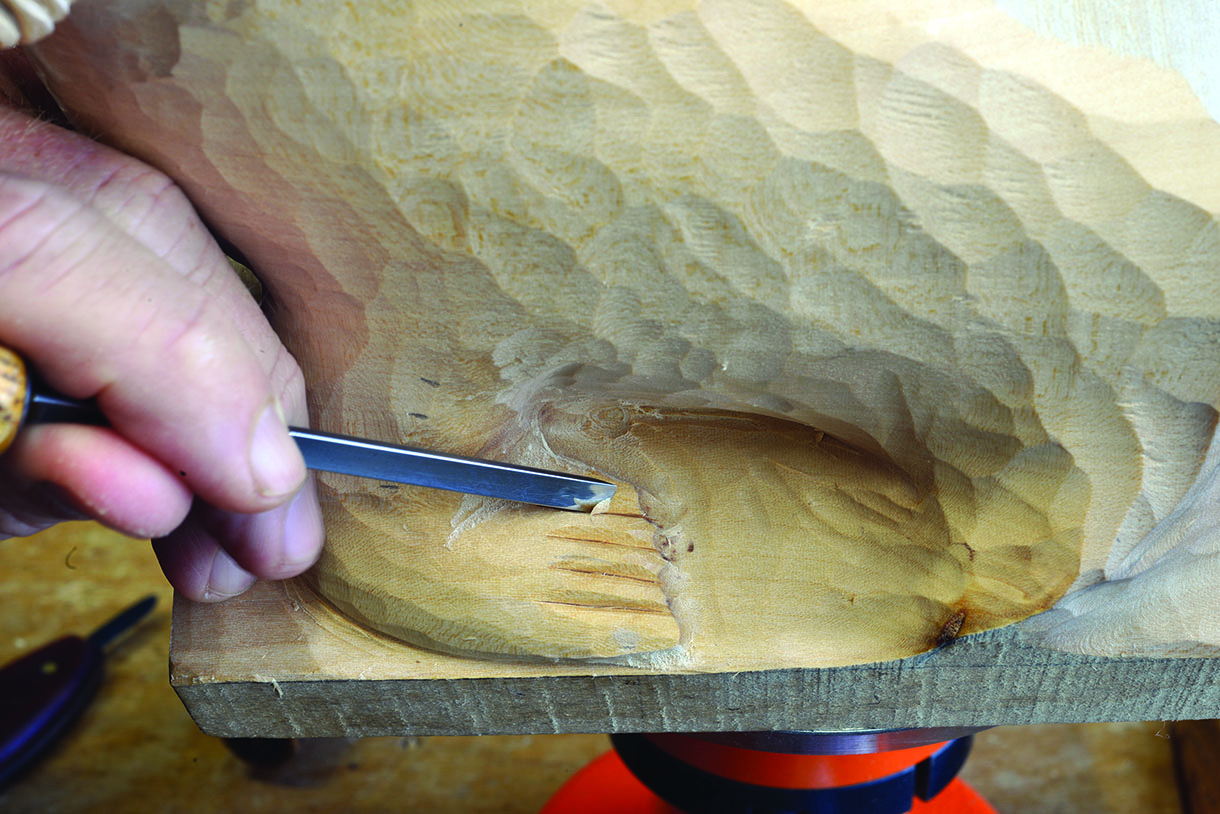
6. The front inner side edge of the flipper can now be carved in position. Use a 6mm bullnose or conical burr to create the space between the body and flipper, naturally separating and refining them to their correct size and angle. Do not attempt to pierce all the way through to the opposite side of the flipper at this stage, as this can be completed easily from the underside when the form is cut off the base
7. The front right flipper is produced in the same way as the left side, but is positioned slightly more forward and with the flipper expanded slightly wider than the opposite side
8. Next, we move back to the body and continue to develop its shape, from the central highest position, down to the base. Do this with a large No.2 gouge
Top tip: When working on any areas such as the walrus body, where the aim is to produce a natural flowing curve over the surface, there is no other tool more efficient than a No.2, 40mm. This can be used upside down so that its shallow sweep lends itself to the contour being created. Every carver should have one of these in their toolkit.
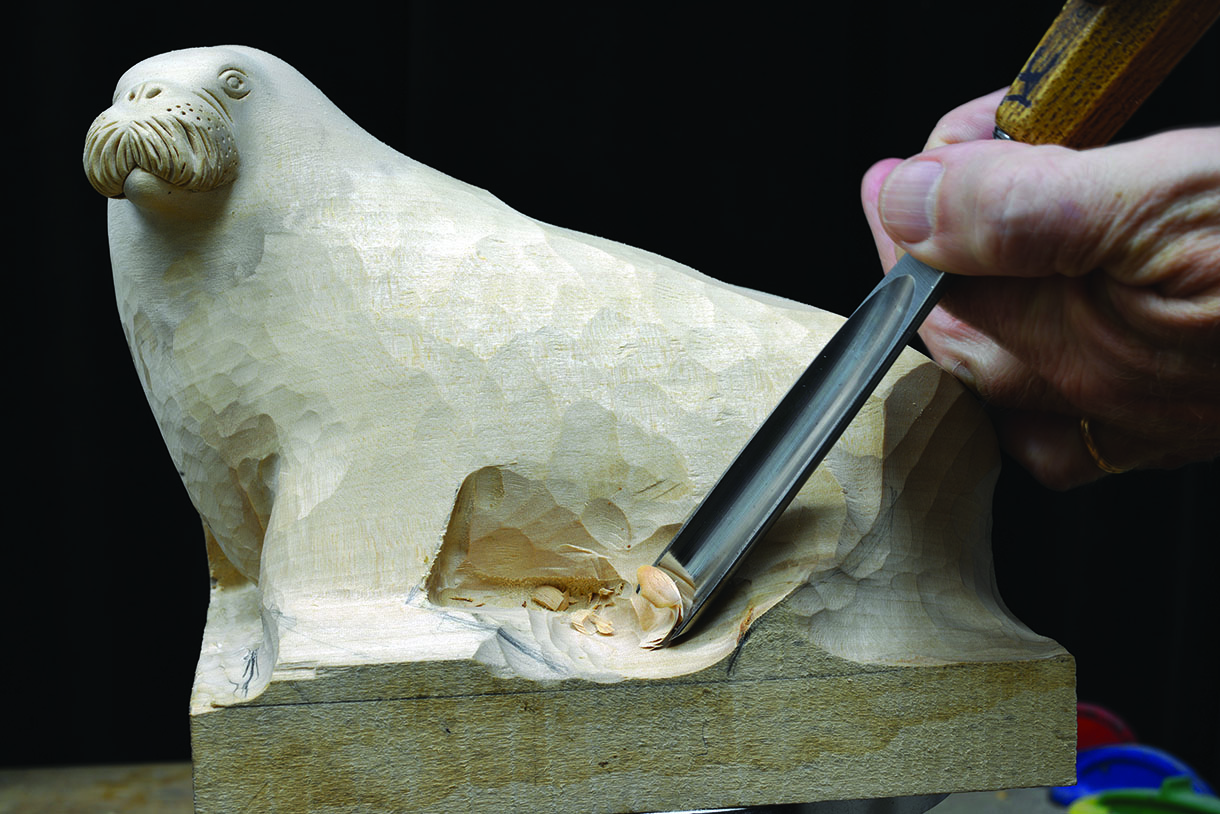
9. The position where the body meets the base is next to be addressed. This lower edge should roll inwards, slightly underneath the mass of the body above it. Use a V-tool held on its side, cutting inwards towards the body at the level of the base. Then, curve the body down into the V-tool cut. Repeat this procedure until the lower edge flows underneath the body at a natural angle. The V-tool cut can then be extended around the rear end and forward to the side of the hind flippers
10. The angle of the back and rear end must now be shaped in relation to the hind flippers, which are positioned to the left side of the body. This posture naturally raises the left hip and drops the right one, creating an angle down the lower half of the back to the rear end. The hatching shows the area to be worked upon, preferably with a large No.2 gouge
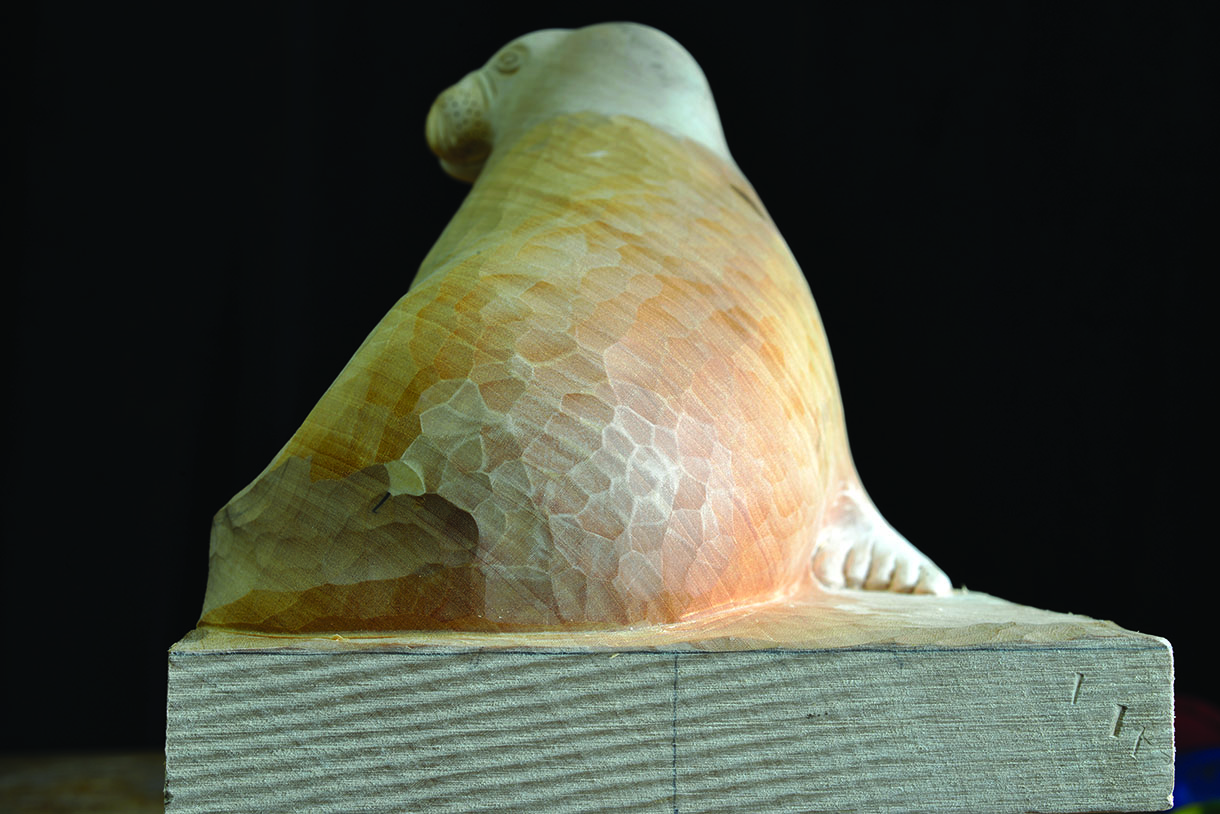
11. The angle of the body when completed should look like this
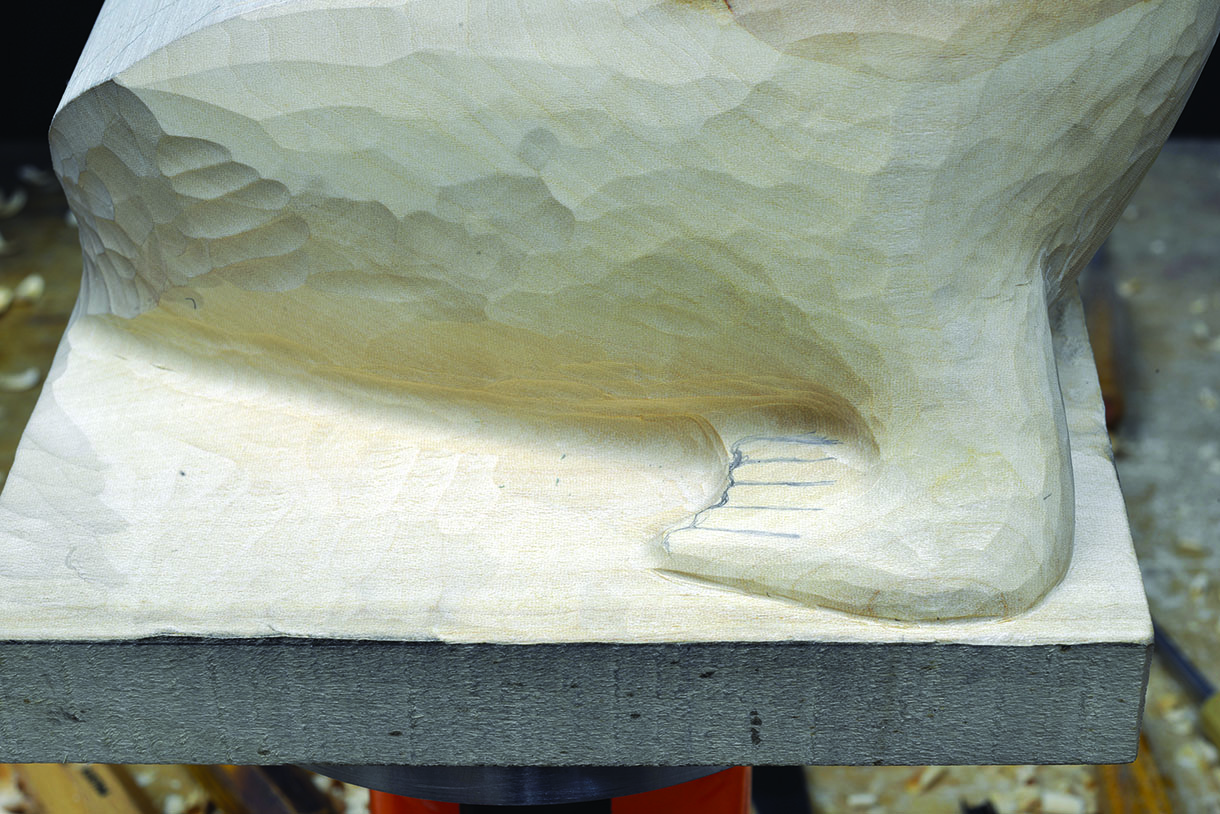
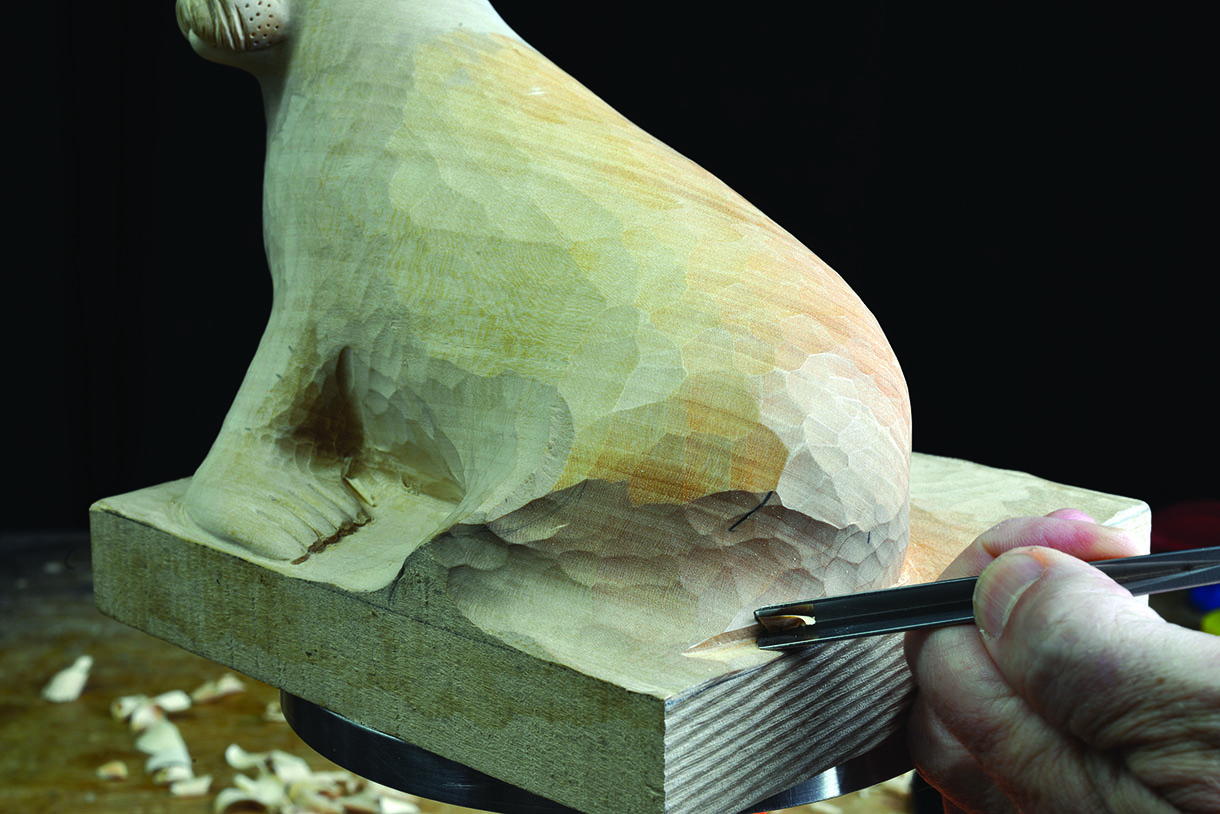
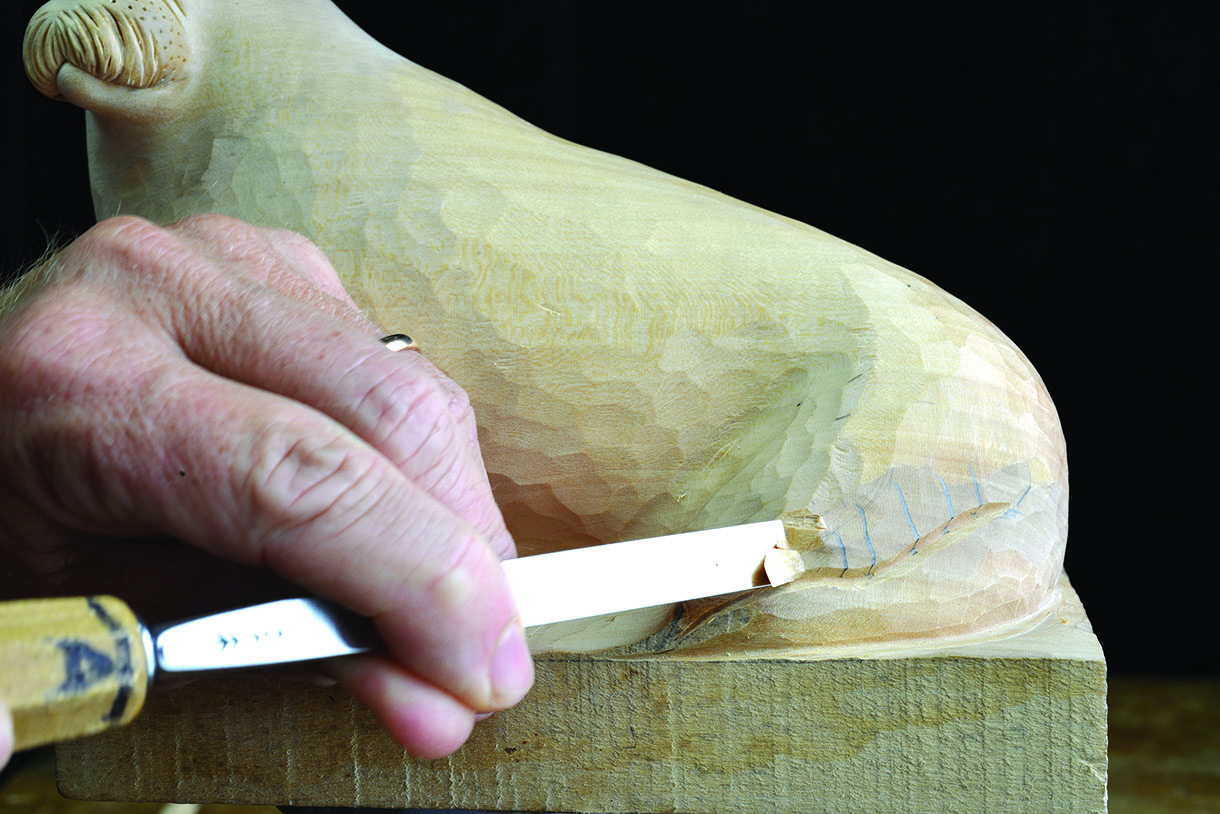
12. We now turn our attention to the hind flippers, their positioning and detail. The first job is to pare away the corner of the body where the flippers emerge and curve around. Make the first cuts with a No.7, 20mm to remove the bulk of the mass, then swap to a No.9/10mm to create a tighter curve into the corner where the flippers rest against the body
13. Blend the depth of the back evenly down over the hips onto the hind flipper area. Then draw the line of separation between them
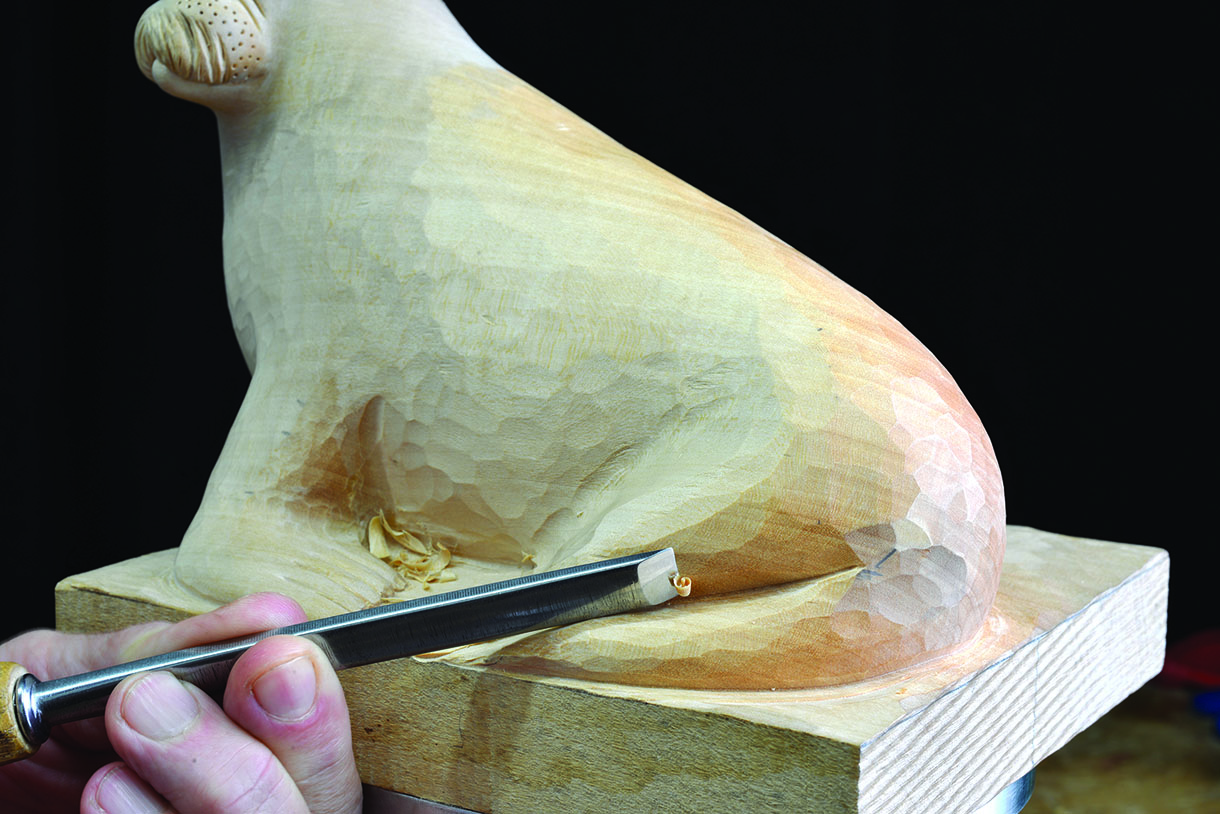
14. There are many variations of how the hind flippers can be positioned to the side of the body, which should be carefully researched if desired. The technique to produce them should be similar. Use a V-tool initially to make a deep groove separating the two volumes of the flippers
15. Pare back the wood on the upper volume to the depth of the V-tool cut. Repeat steps 14 and 15 until the lower flipper is approximately half exposed, creating the appearance of the upper hind section resting naturally on top of the lower one
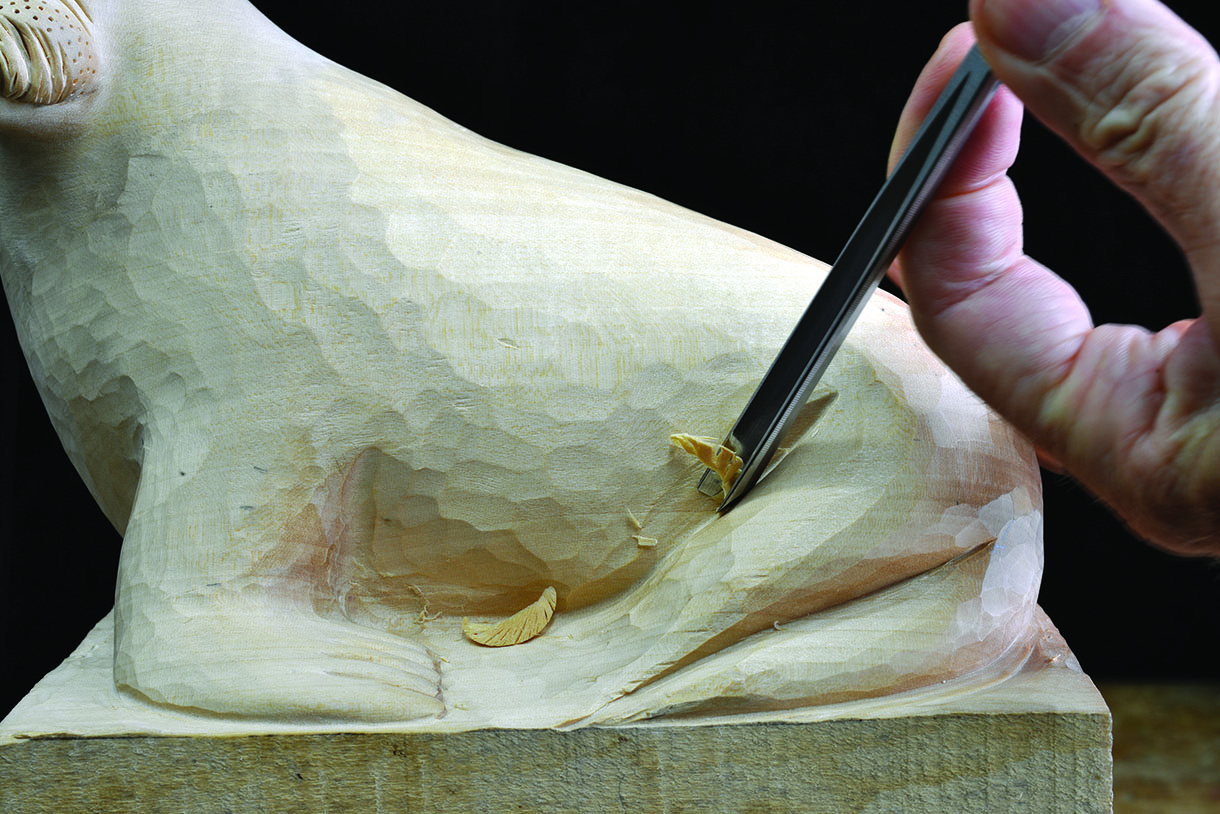
16. When you are satisfied with the overall separation and arrangement of the hind flippers, swap the V-tool for a razor-sharp knife and carve a deep slit along the line where the upper one rests on the lower one. Then, pare the lower edge of the upper section into the knife slit to create the realistic crease between these two sections. Repeat the procedure if necessary
Top tip: The carvers knife is an extremely versatile tool, which can create very realistic details that V-Tools and Veiners simply can’t achieve. It isn’t the easiest of tools to master but with safe practice and perseverance, one can apply its use very effectively for many jobs. I personally recommend the shorter bladed ones, which offer a better degree of directional control.
17. Now apply the same technique again, using the V-tool and knife, to create a realistic crease between the upper hind flipper and the body
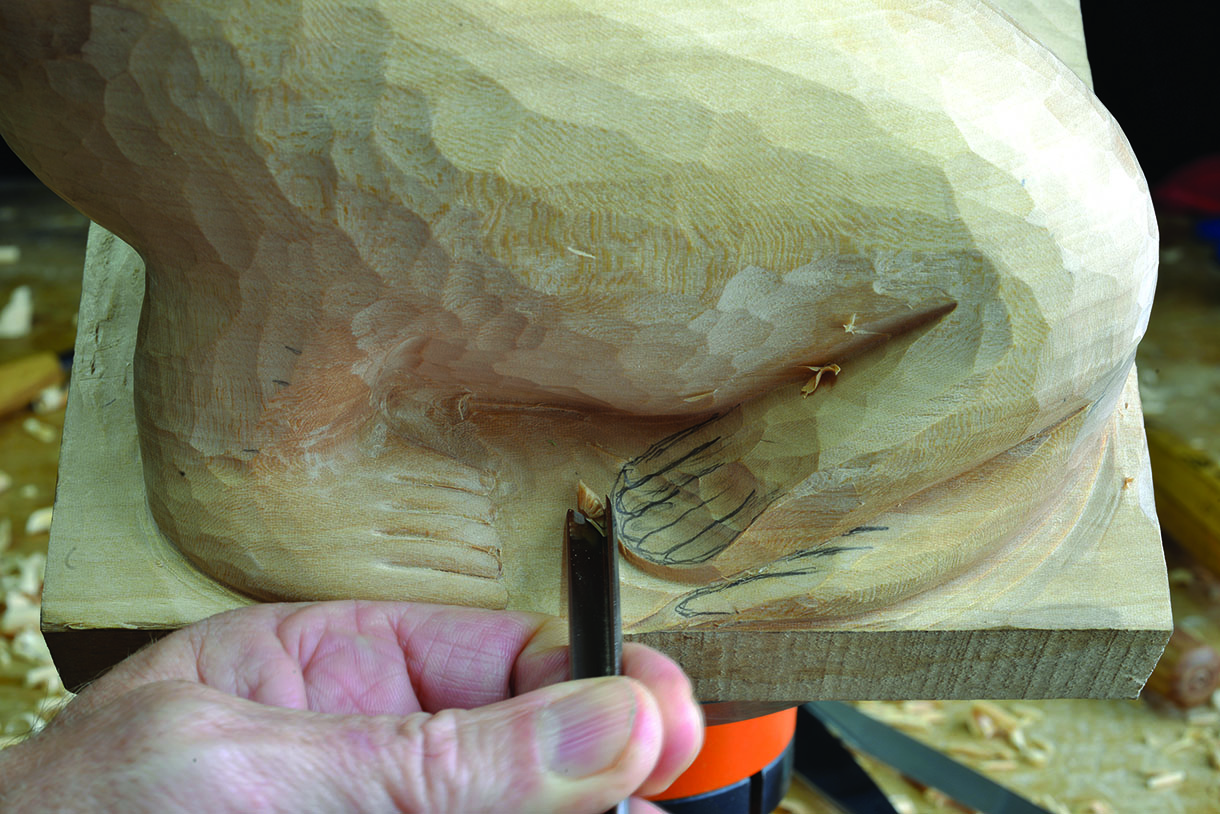
18. The arrangement of the flippers in the example have been created with the upper section’s five digits overlaying and eclipsing the lower one, which only exposes the two outer digits. Draw these details carefully in position and then remove all of the waste wood around them, down to the surface of the base, leaving them blocked out ready for their detail
19. Use the small veiner to separate each of the digits and a No.8, 4mm to produce the rounded tips. Curve each digit into the grooves in the same way as you did for the front flippers. Repeat this procedure if necessary and then smooth them naturally together with grit 150 abrasive
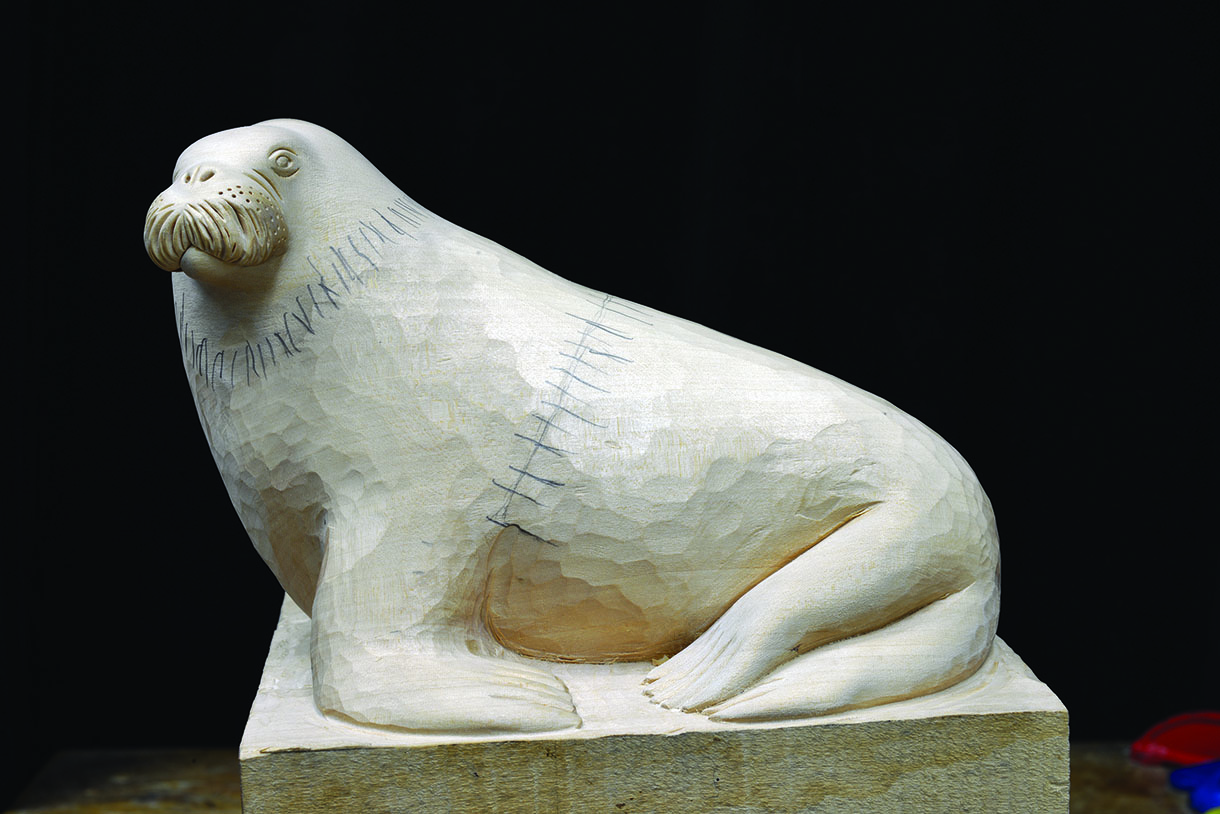
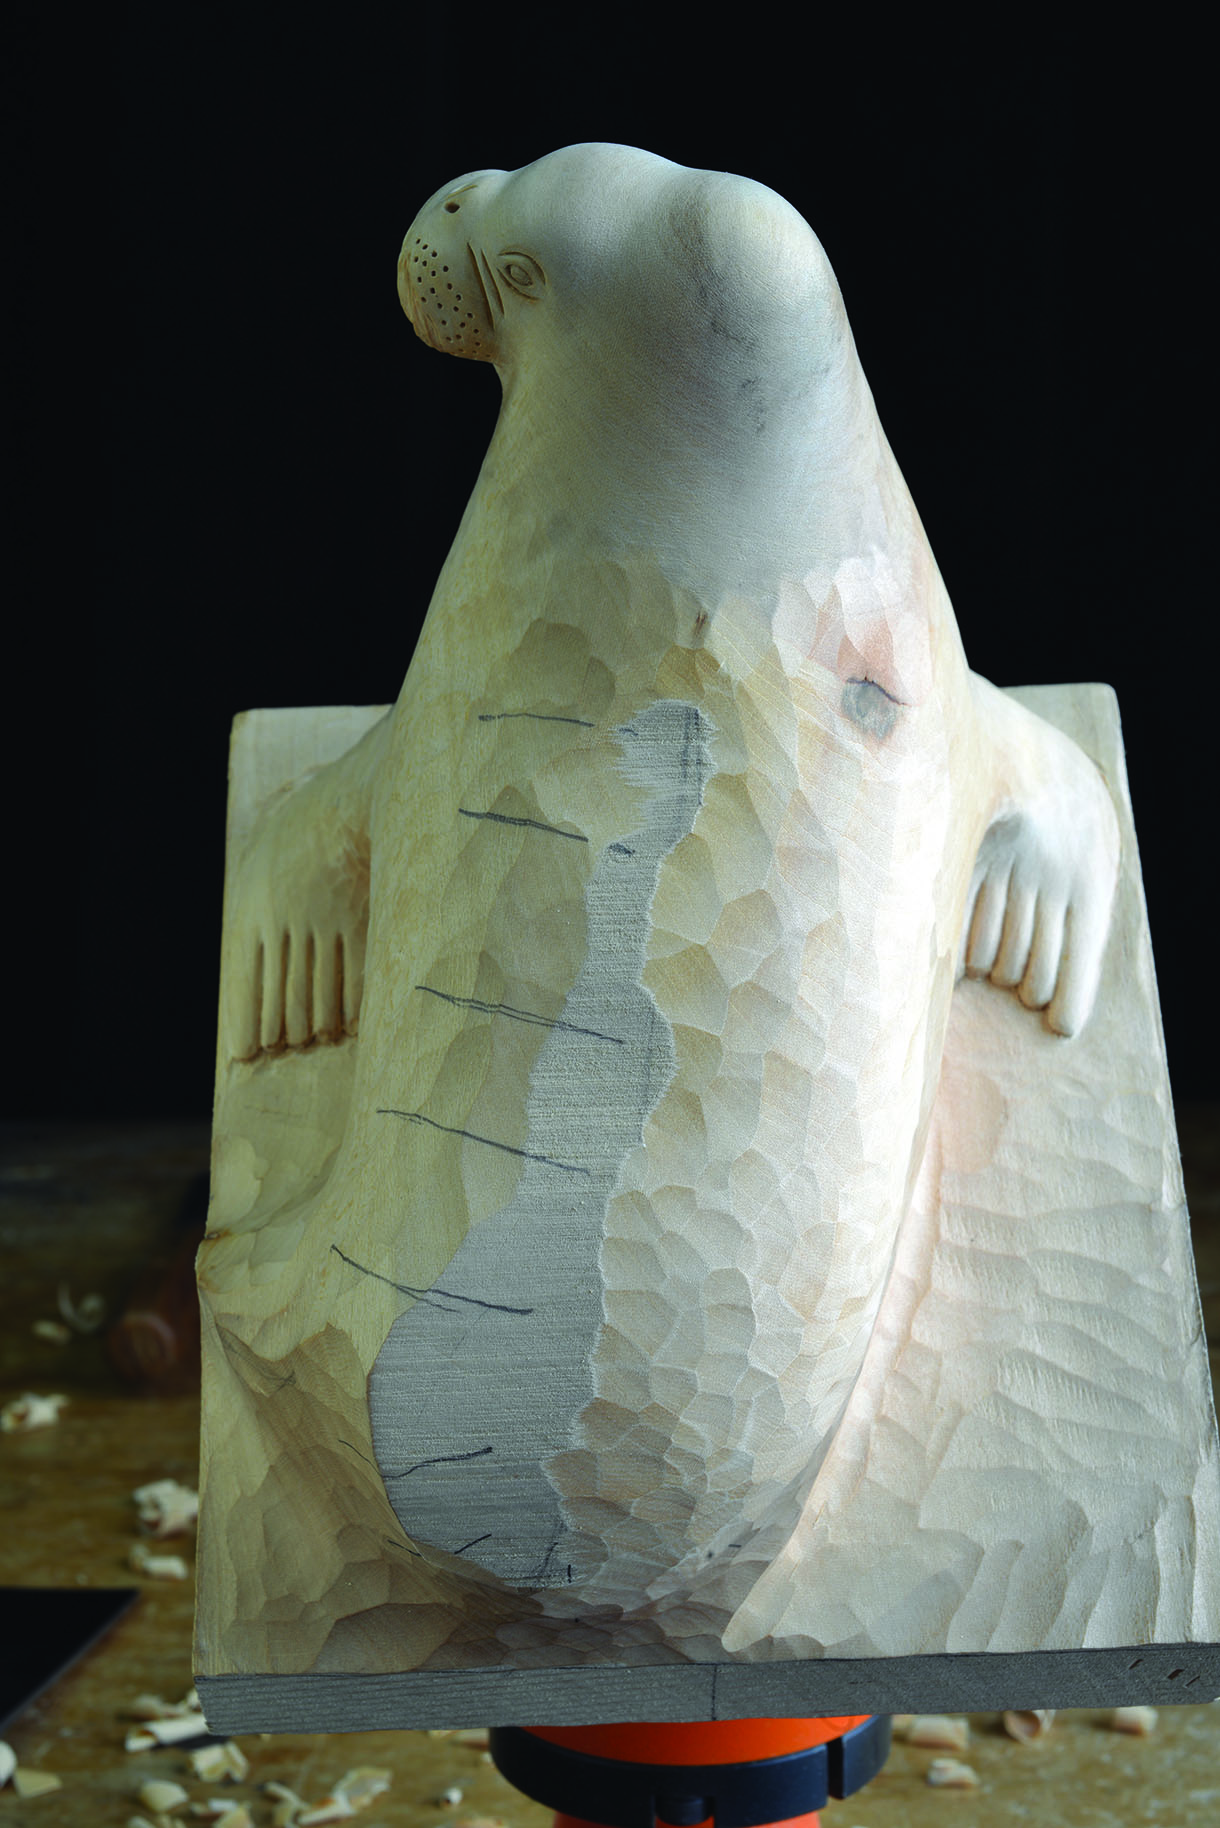
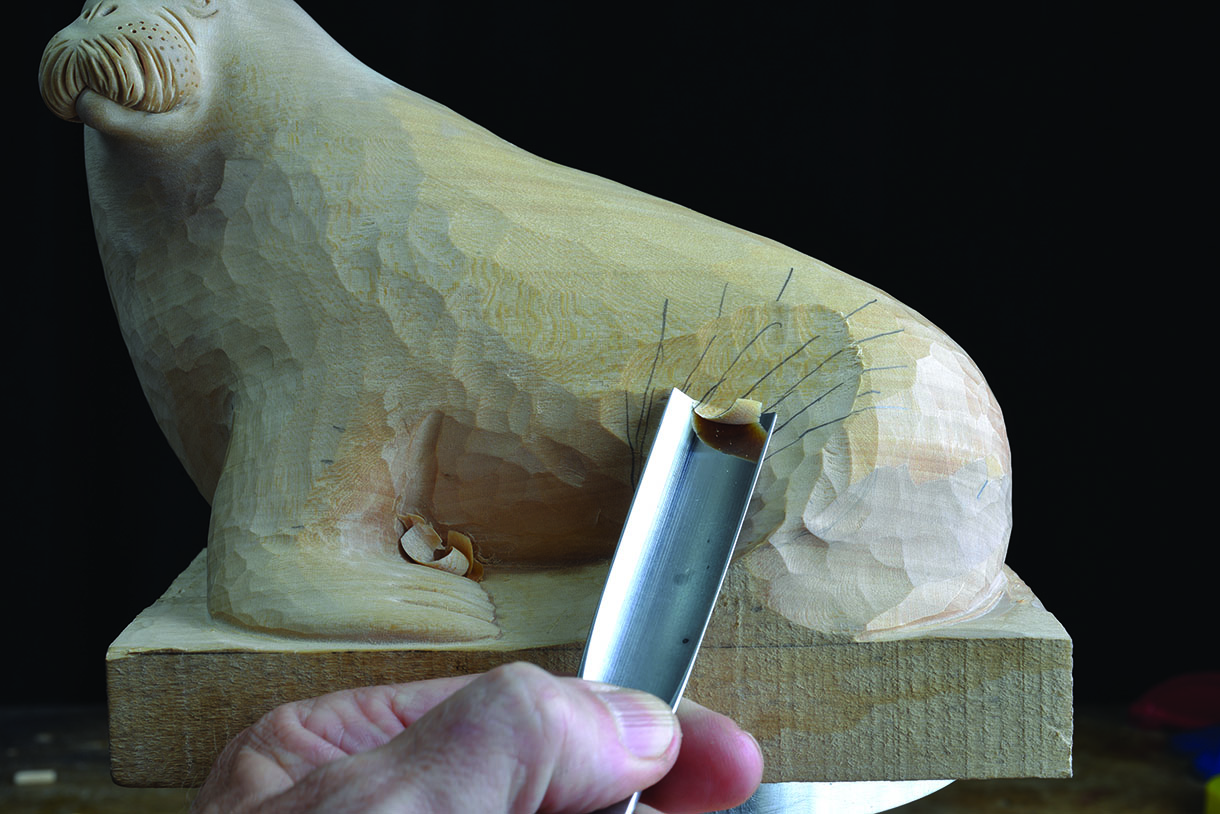
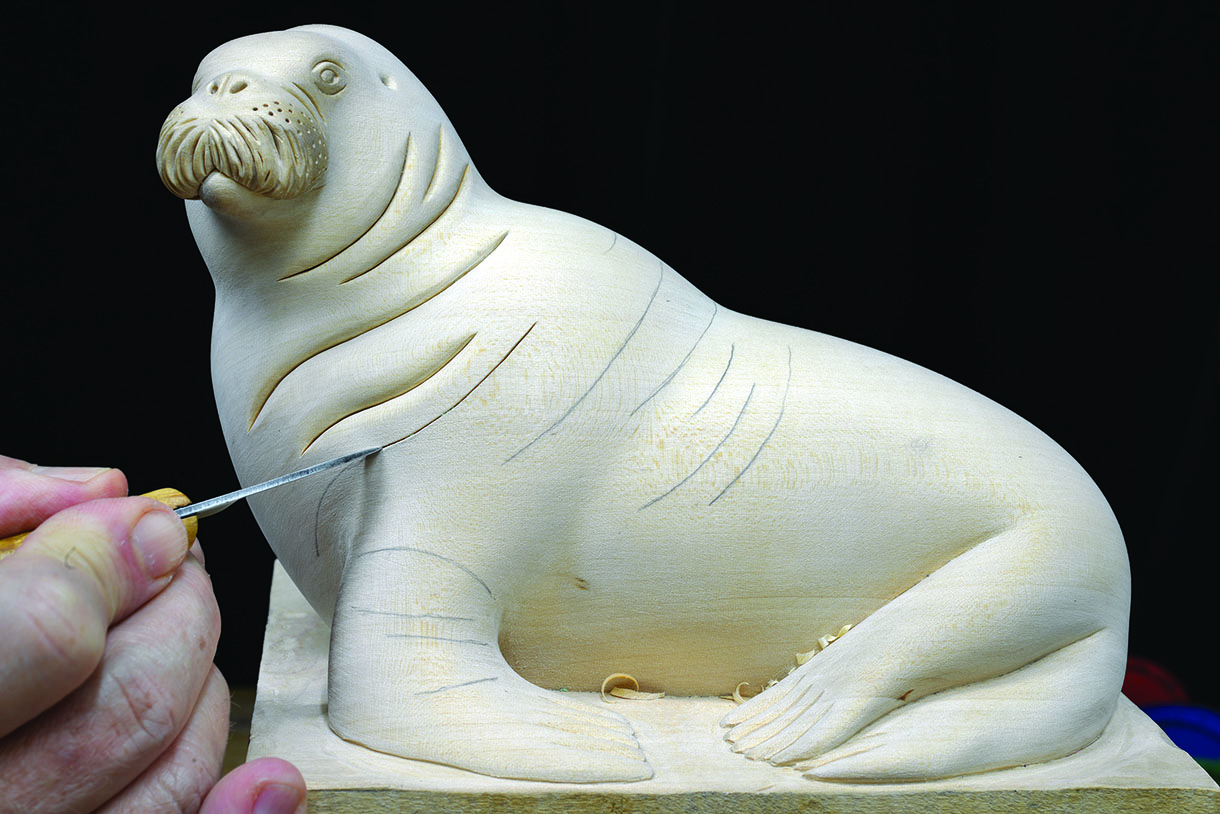
20. We now move on to the surface anatomy of the body. The front section of a real-life bull walrus shows immense body volume, which protrudes between the shoulders and neckline in the form of a bulging mass. This detail adds dynamic life to the composition and is very simple to produce. First, measure and mark these hatched lines on to your form. They travel around the neckline and between the rear edge of the front flippers, upwards and over the back
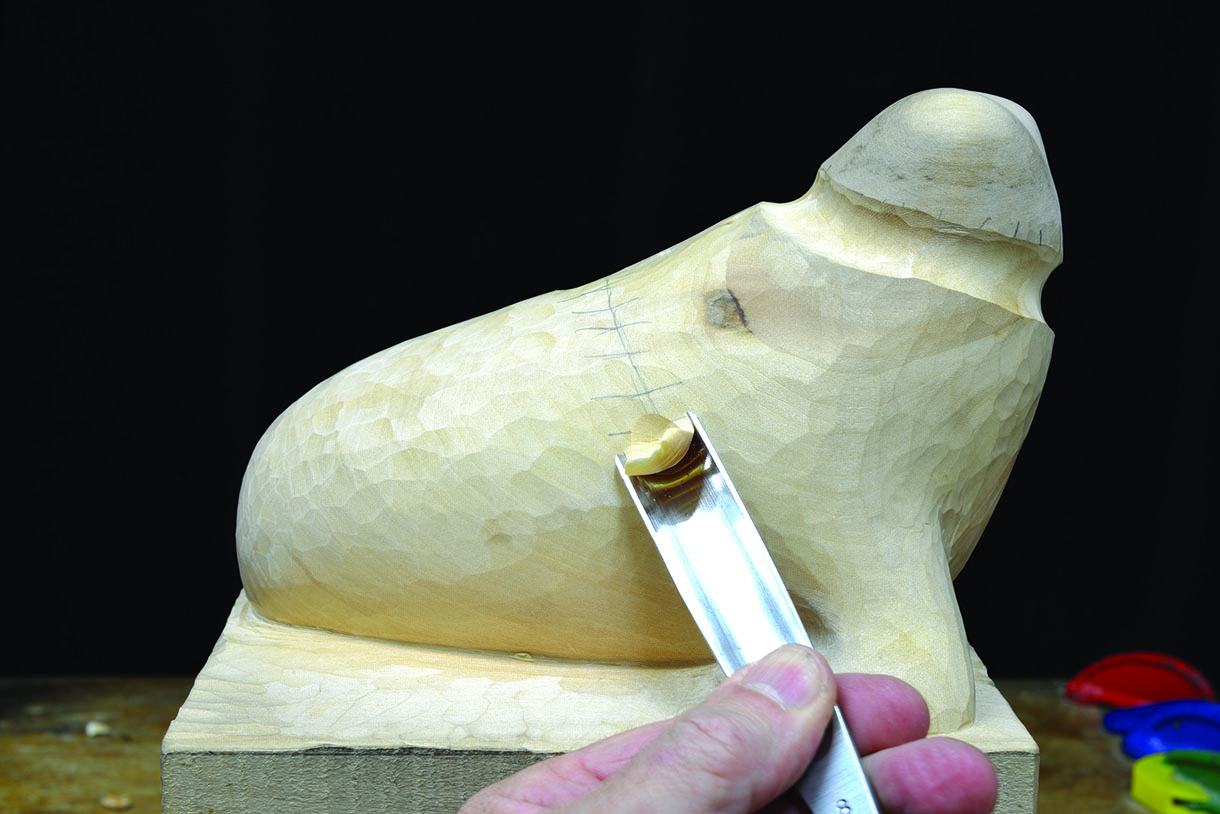
21. Use a No.8, 18mm to carve a deep channel along the hatching, around the neckline and shoulders
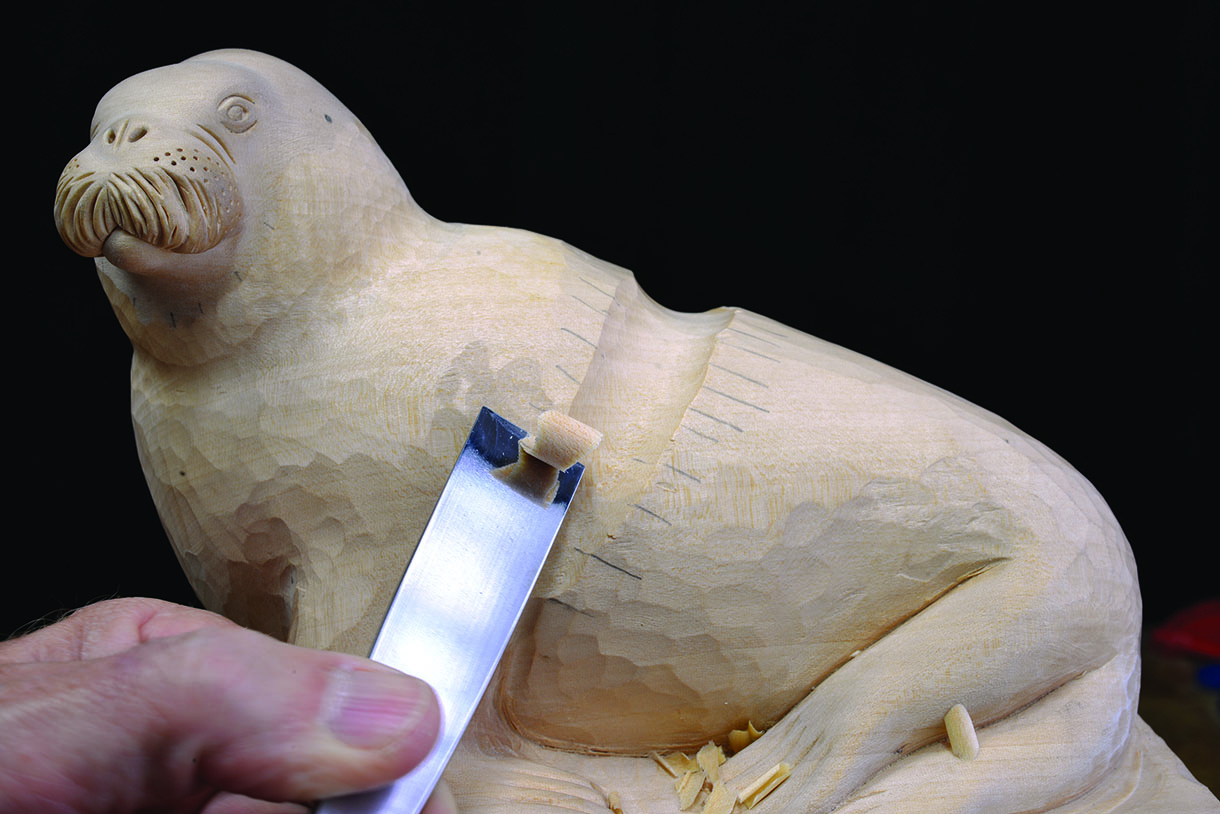
22. This deep channel is then merged naturally into the surrounding areas of the head, neck, shoulders and body. Repeat steps 21 and 22 until the body mass appears lifelike. Then skim carefully over the complete form to tidy up any uneven depths, which will prepare the surface for sanding
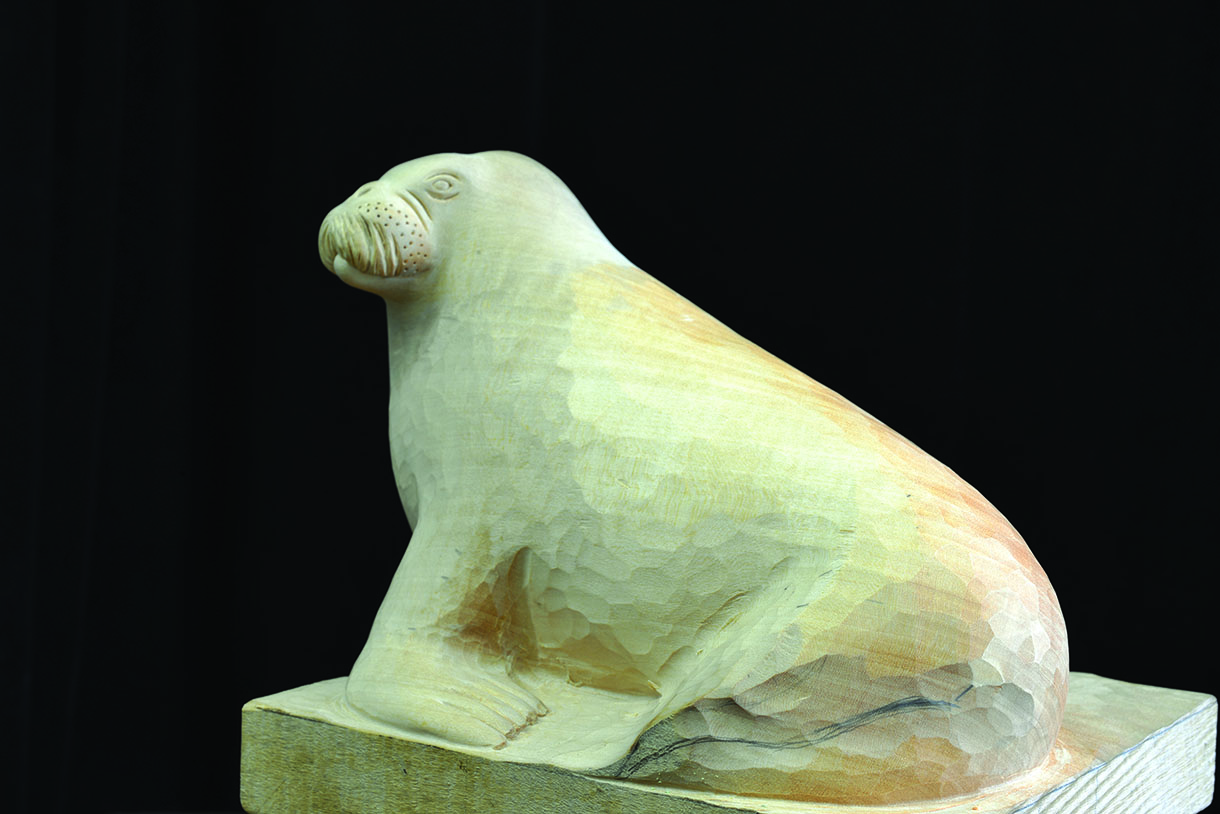
23. Before the next stages of creating the surface anatomy, it is important to sand over the complete form to produce a smooth and flush surface for the detail to be applied to. Use grit 100 to completely remove all of the tool marks, followed by grit 150 to further smooth the surface

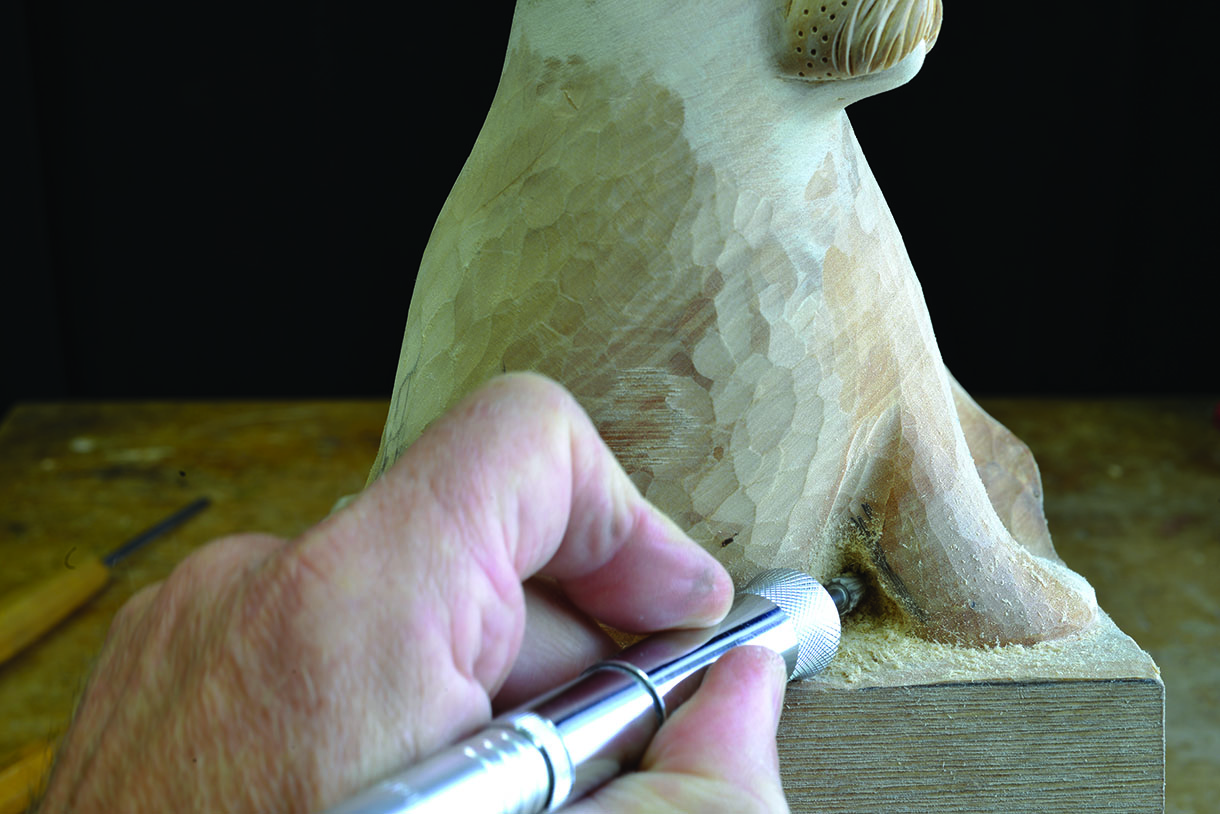
24. The walrus ears are small, spherical openings with no external flaps, barely visible in real life, and are located just behind the eyes. Draw these in position and check for symmetry. Use a 1.5mm rotary diamond burr to make these tiny apertures by pushing the burr gently into the ear positions, down to a depth of 2mm. Use a piece of grit 240 abrasive to smooth the surrounding areas into the holes, naturally bringing them to life
Top tip: Bull walrus are often seen with a heavily textured skin, especially from the shoulders to the head. These appear as crisscross wrinkles and little bumps, which seem to be orderly but do not have any
regular pattern. If you wish to create this texture, study these real-life details and
use the tools listed to produce them
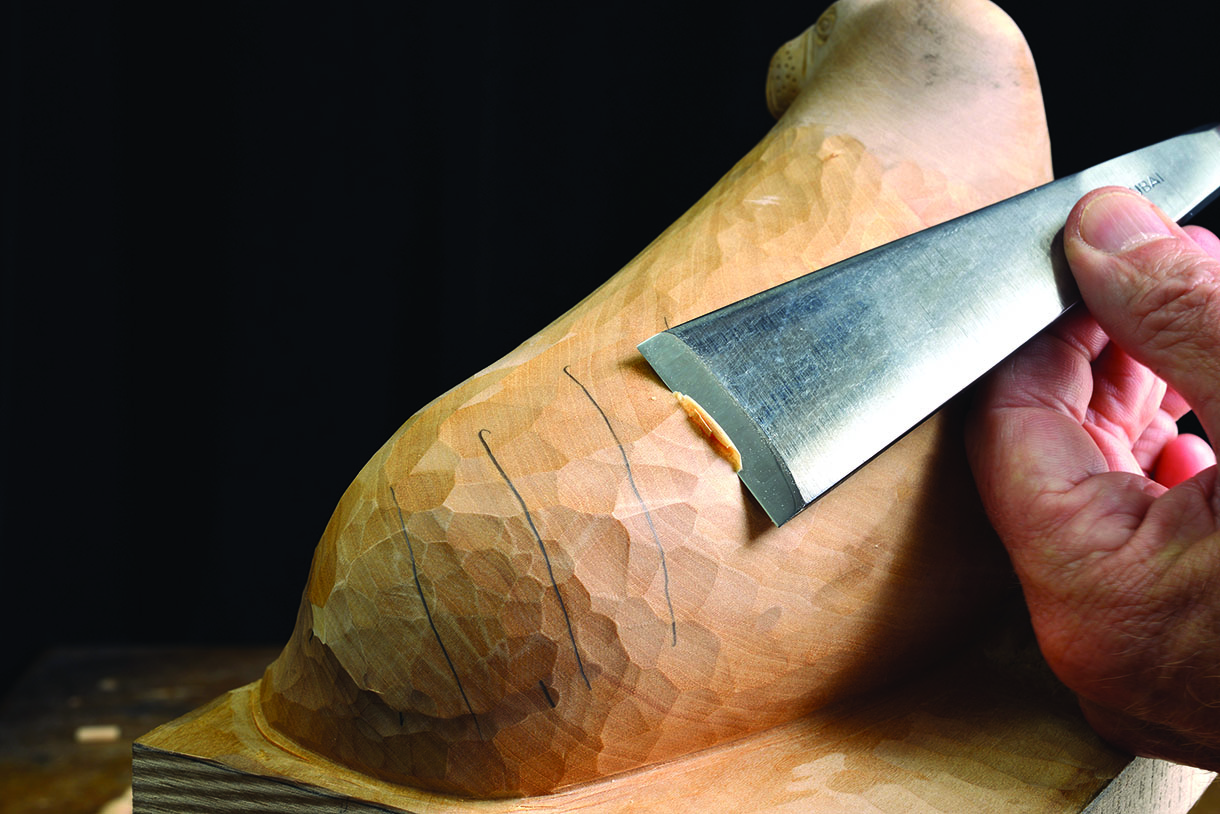
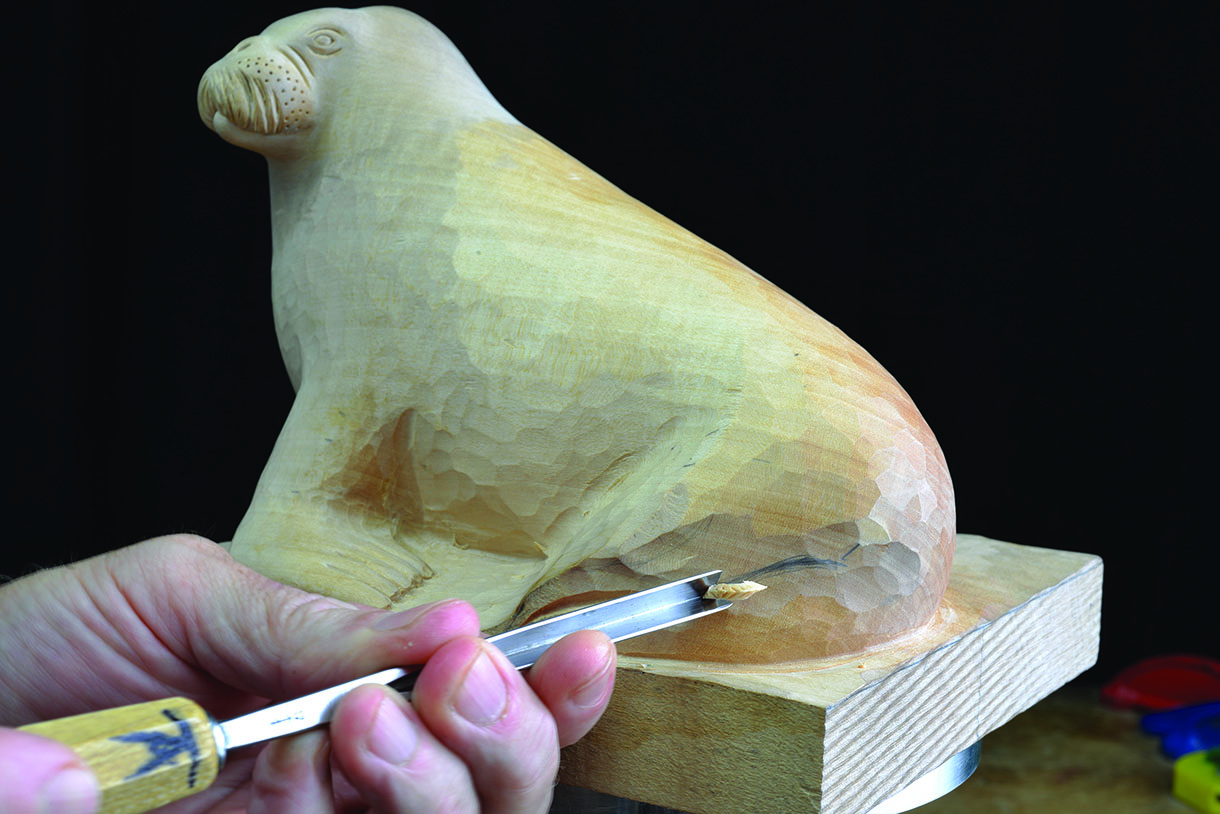
25. The creases on the real-life walrus vary enormously, depending on the size, sex, age and posture. The reader can make as many or few as they wish, and either copy the example or modify it. Study your reference material to understand how they flow around the flippers, neck and body and then draw these lines on to the form. Several tools can be used here to create slightly different effects across the surface. Shallow creases are made by using a combination of small veiners and V-tools, followed by grit 240 to naturally smooth the edges into the channels. The deeper ones are produced by using a knife to slice along the line
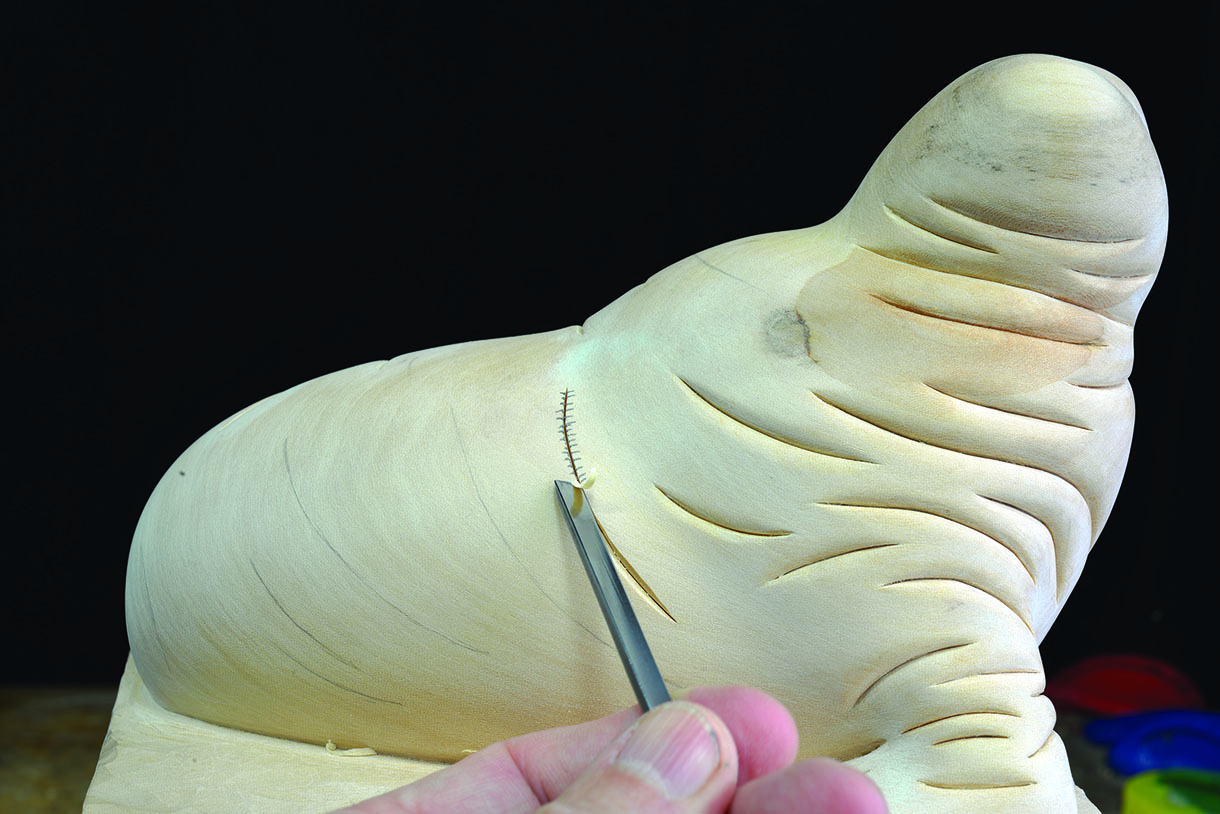
26. The edge next to the knife slit is then carved at a steep angle into the slit. This is smoothed naturally into the body with grit 240, before a final slice is made again with the knife to deepen the crease and add more shadow to the visual effect of the natural crease. If more depth is required, simply repeat the process. When you are satisfied with the balance of the creases over the body, sand the complete form with grit 240 and 400
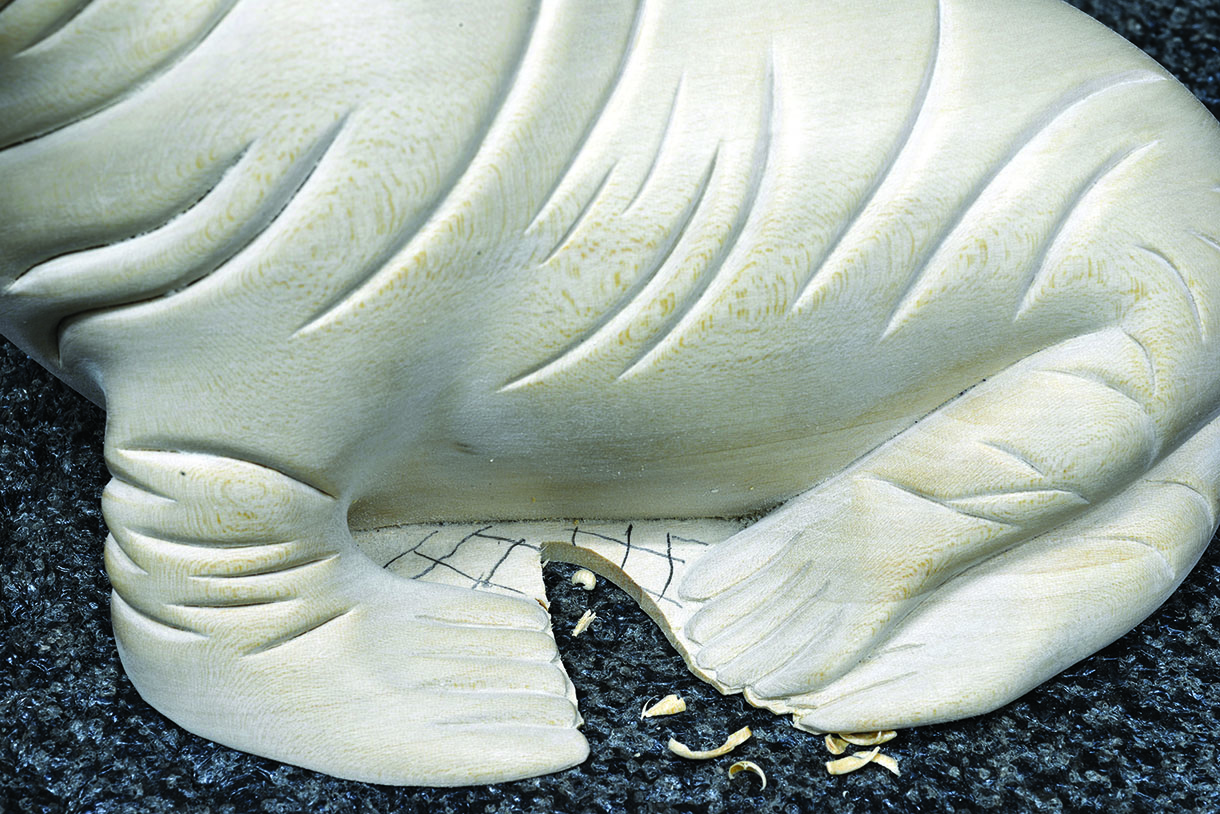
27. The carving is now complete and can be cut off the base. Ensure that you leave a little extra depth of approximately 2mm underneath the form, so that no damage occurs to the fine edges of the flippers. Do this, and then use a knife and gouges to carefully cut around the footprint of the form and to curve these lower edges realistically underneath. The gap between the body and the front flippers can now also be easily resolved. Check all details and sand through all grits

28. The example was finished with boiled linseed oil, and then a week later with medium brown Briwax. The tusks were finished with Rustins two-part wood bleach and clear wax, which produced an effective and realistic contrast to the main body
28. The example was finished with boiled linseed oil, and then a week later with medium brown Briwax. The tusks were finished with Rustins two-part wood bleach and clear wax, which produced an effective and realistic contrast to the main body
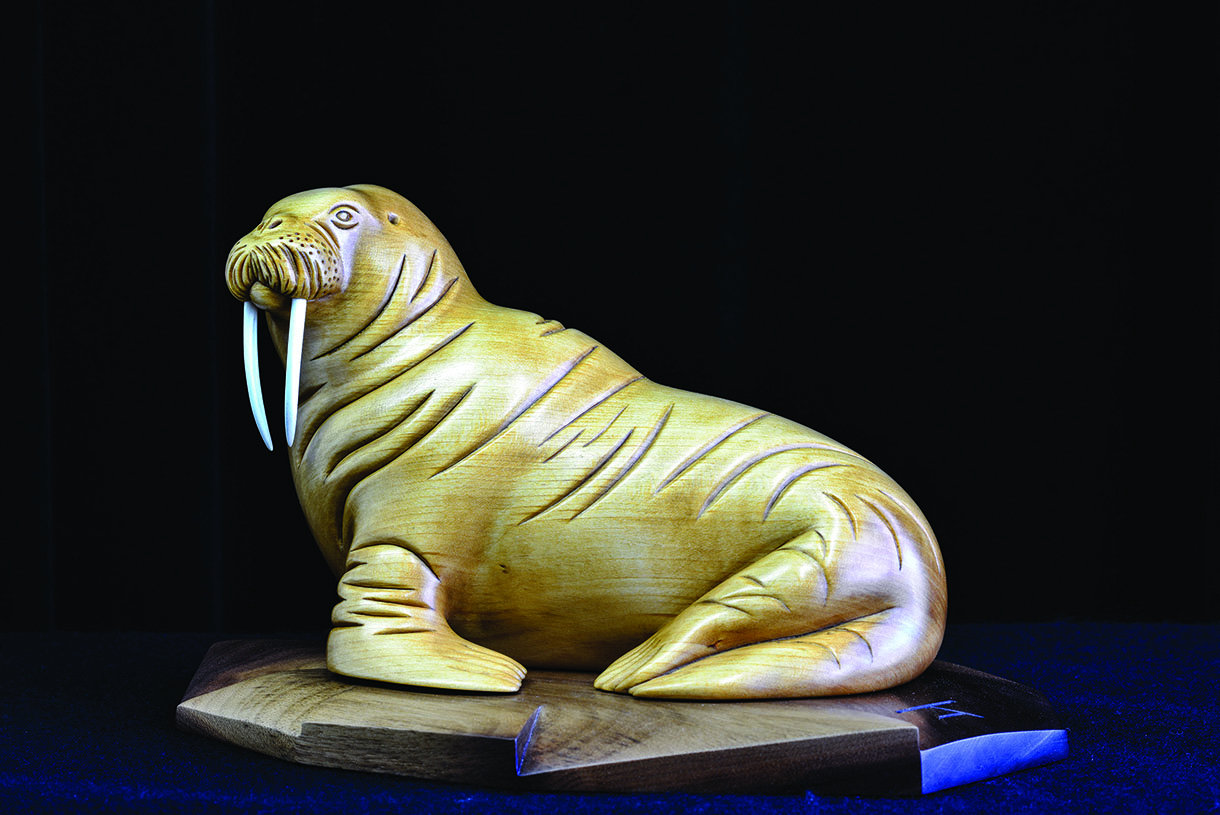
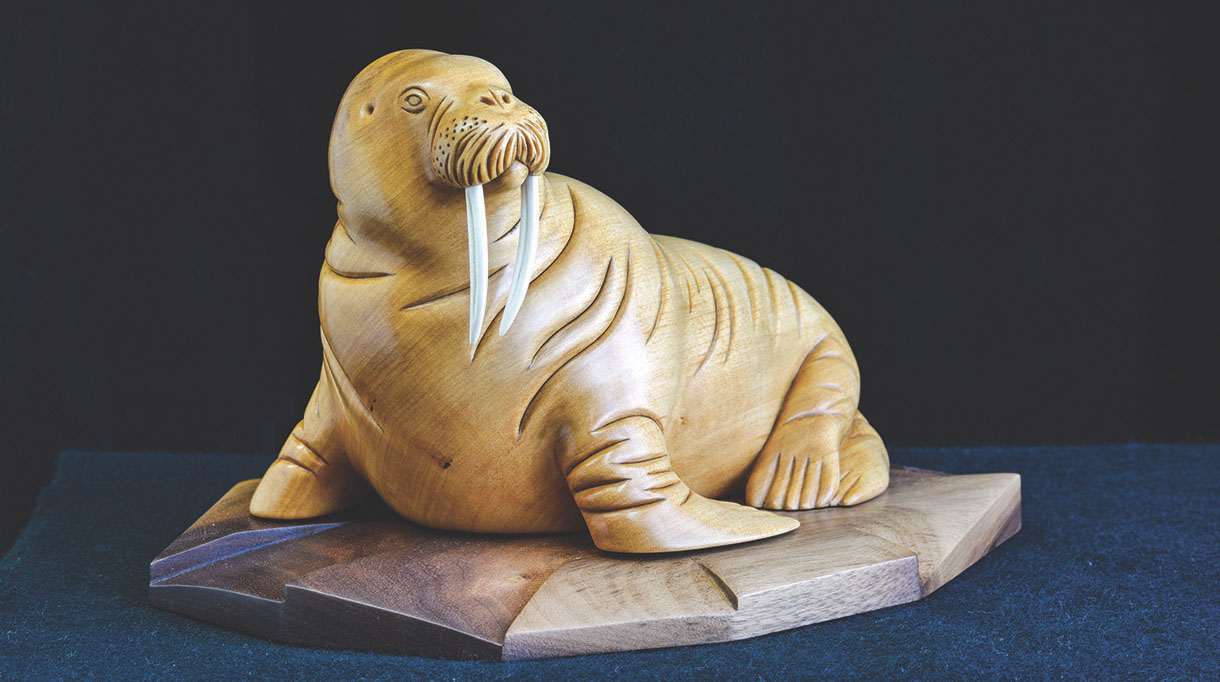
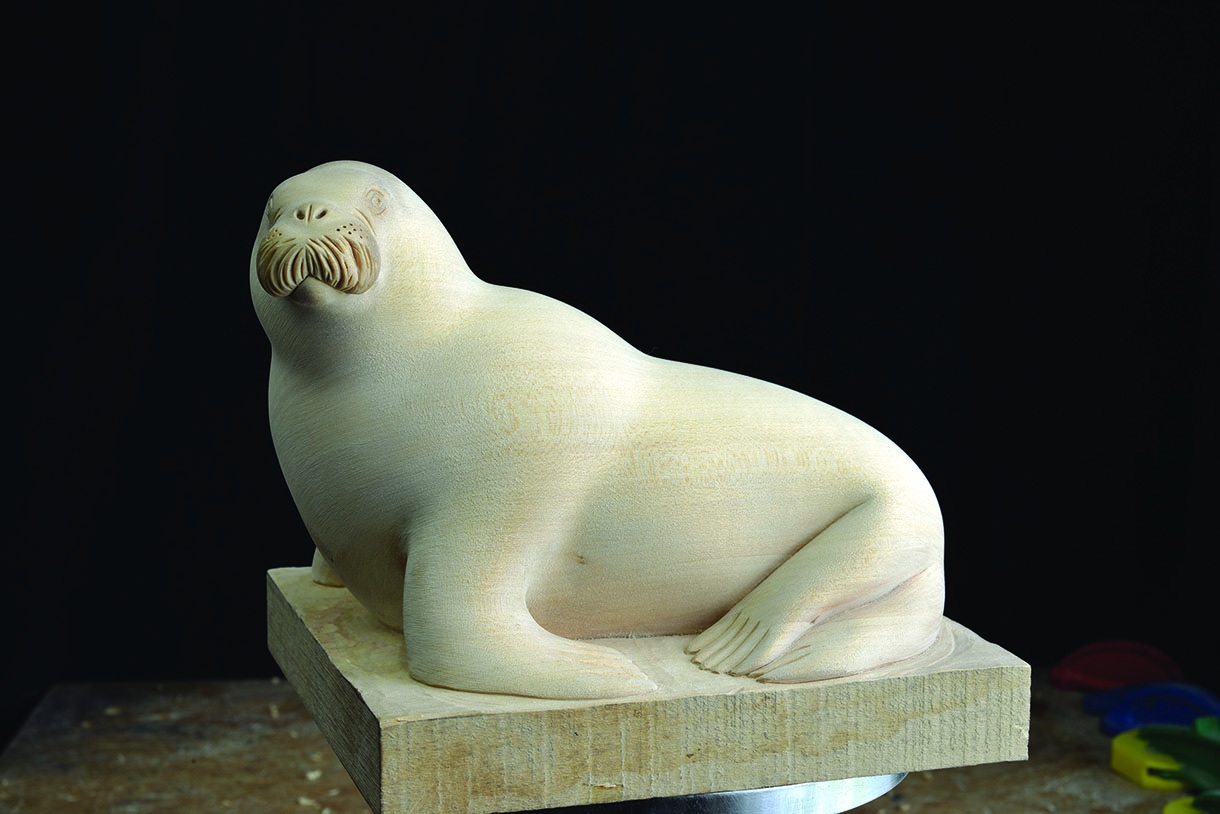
The finished Walrus
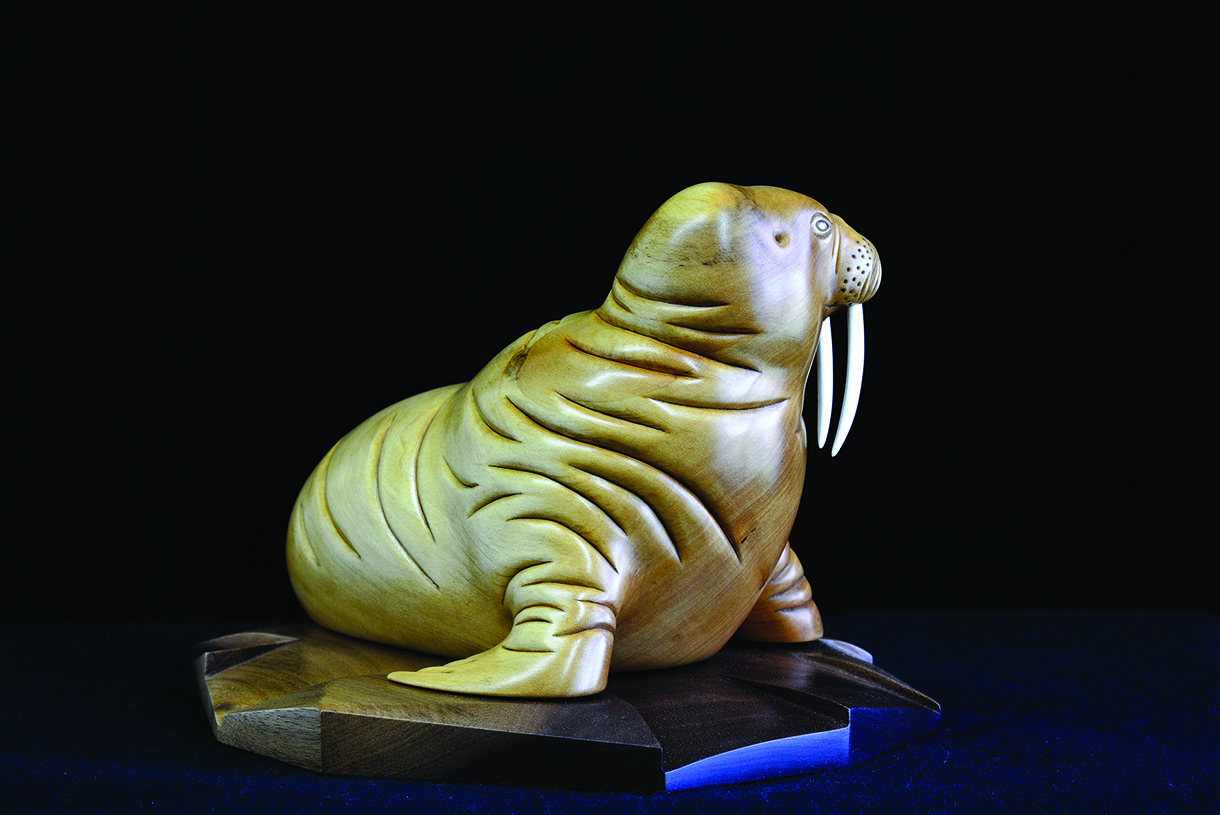
The finished Walrus


