Tusked Ocean Wonder:
Andrew Thomas demonstrates how to carve a bull walrus.
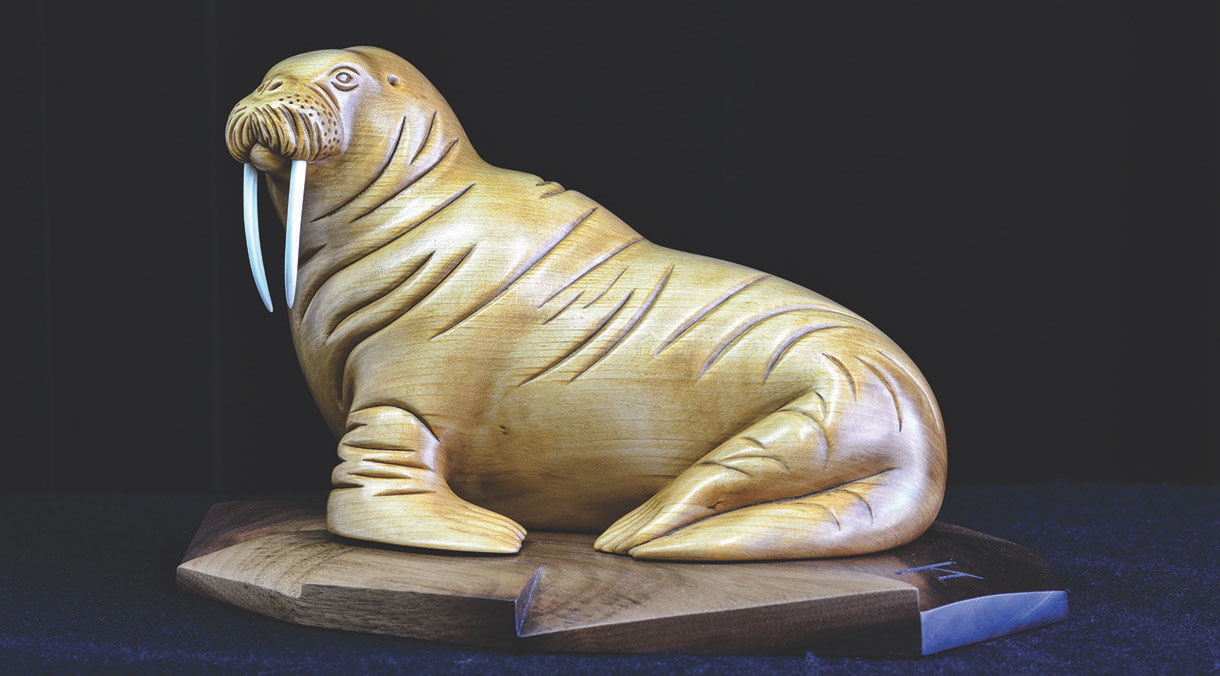
Andrew Thomas demonstrates how to carve a bull walrus
Carving a realistic bull walrus is somewhat complex in its detail and composition, and therefore aimed at readers of an intermediate level of ability. The fundamental rule when working with a real-life subject is to carry out in-depth research into all the anatomical details and the natural posture or movement of the creature, to gain a good understanding of what you are trying to re-create. This involves gathering as much reference material as possible to study the exact details that you are trying to reproduce. I have supplied as many stage images as I can within the limitations of the publication, but even with this two-part article, the readers will still need to do their own research and resolve quite a few areas of the form independently.
I shall describe how to carve the details of the head and tusks, in the next issue, how to create the body. Please read through the complete article and study each stage image carefully before starting the project.
Things you will need
Tools:
• No.2, 2 – for eyes
• No.2, 5mm – general shaping
• No.2, 10mm – general shaping
• No.2, 20mm – general shaping
• No.2, 40mm – body
• No.7, 4mm – eyes
• No.7, 6mm – head, muzzle, chin, flippers
• No.8, 4mm – muzzle
• No.8, 18mm – roughing out
• No.9, 10mm – head, chin, flippers
• No.15, 3mm – mouth, flippers, creases
• Knife – creases, moustache, eyes, flippers, tusks
• 0.5mm, 1mm & 2mm spherical diamond burrs for holes for tusks, whiskers and nose
Materials:
• Walrus: English lime (Tilia vulgaris) 200 x 130 x 150mm
• Tusks: English lime 42 x 15 x 5mm
• Base: American black walnut (Junglans nigra) 250 x 190 x 20mm
• Wood bleach
• Danish oil
• Clear wax
• Briwax medium brown
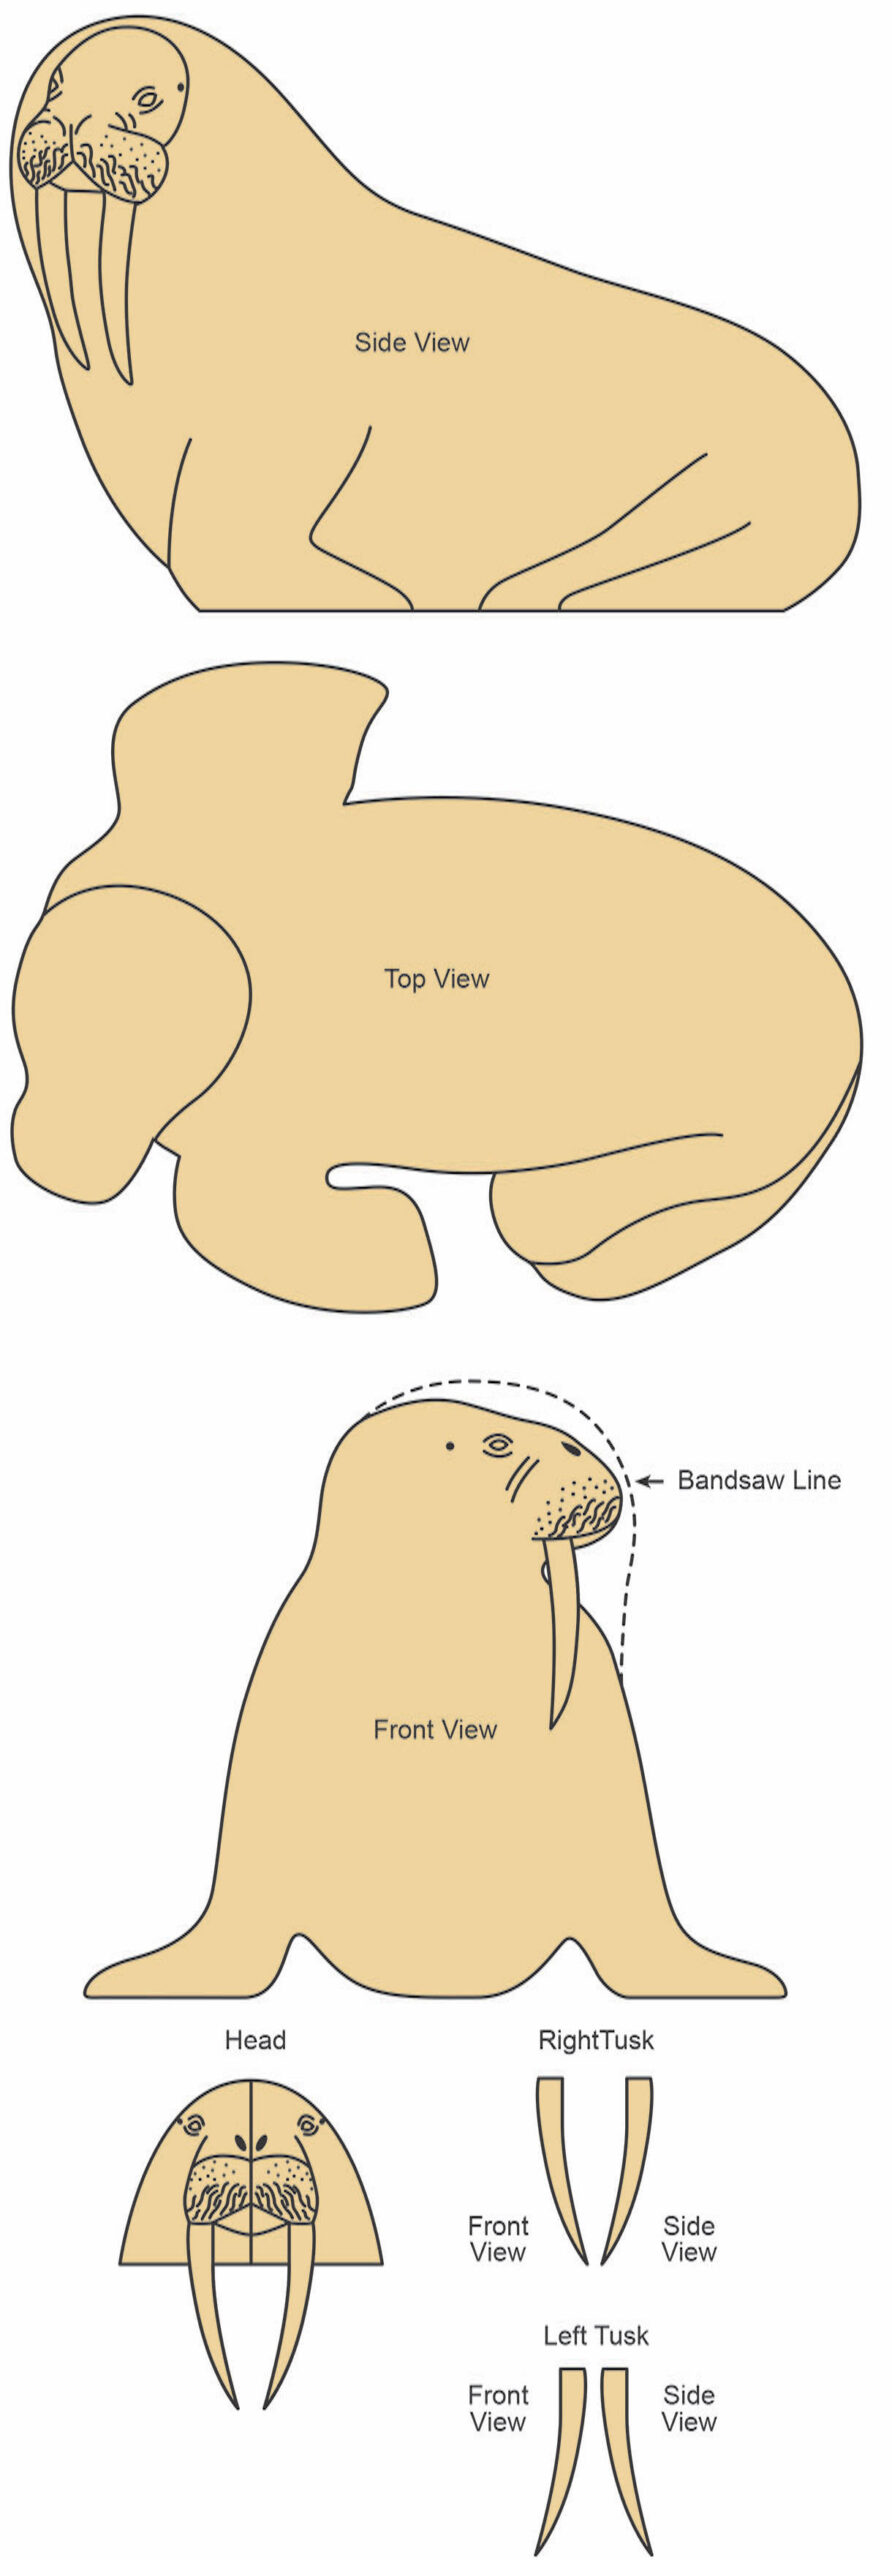
Drawings and how to resize them
To enlarge or reduce the size of drawings right click on the image to download it and then go HERE to watch a video on how to use paper with a grid to do exactly that.
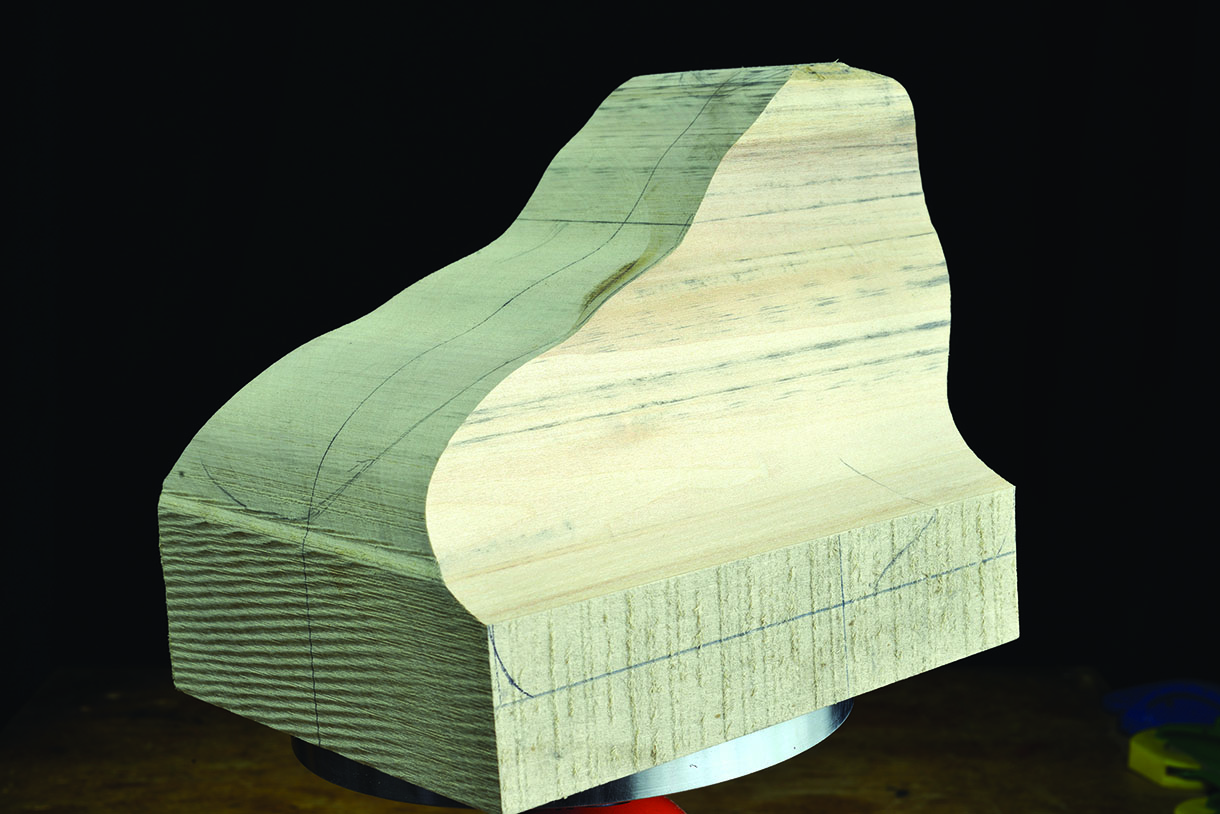
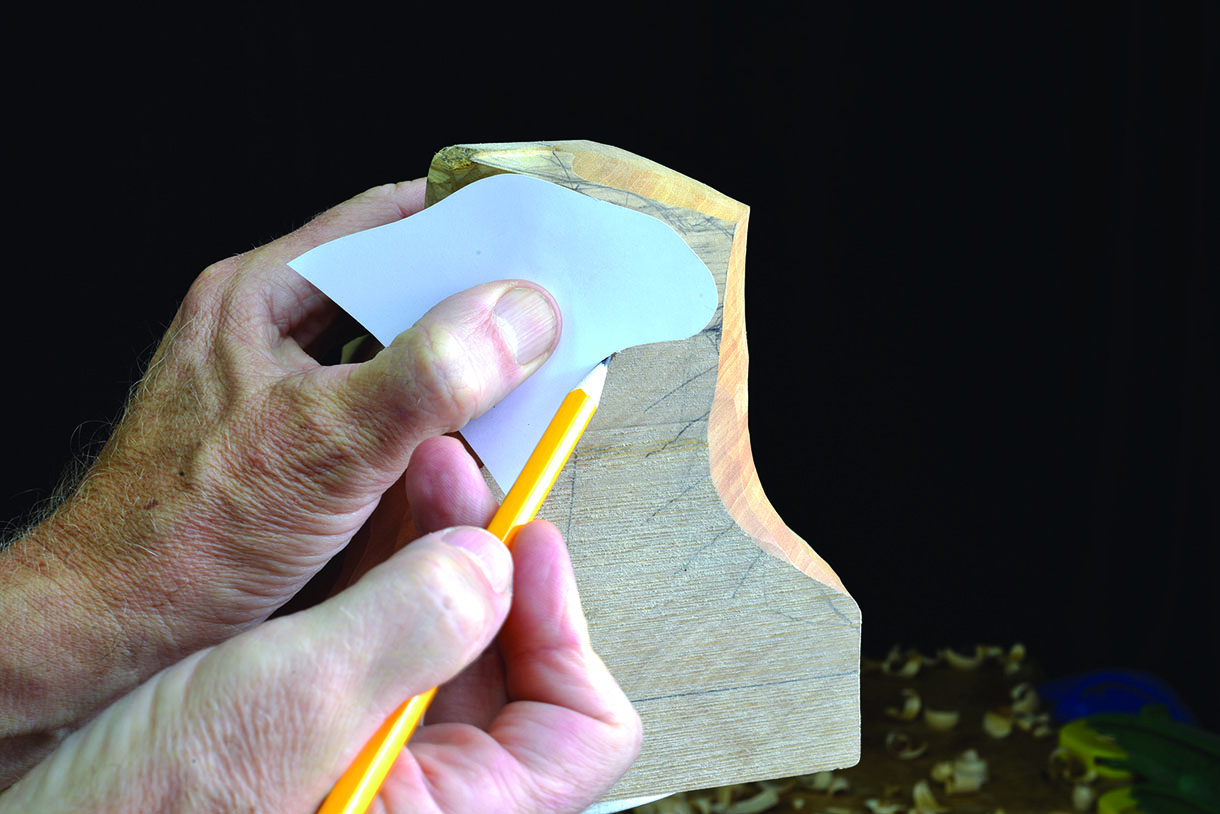
1. Scan or photocopy the scale drawings provided, enlarging them to the correct size for your wood, and print them out on card to use as templates. Transfer the side and front views to your block of wood, ensuring they are in perfect alignment with each other and that the grain direction is running horizontally through the block. Leave an area of 30mm depth at the base to attach to your faceplate. Cut this shape out and secure it safely on to your vice
2. Transfer the top view on to the block, with the head turned to its approximate angle. Remove all of the waste wood from the edge of the front and rear flippers, along the bodyline down to the base. Carve the head to its basic position of angle, leaving it square for now
Top tip: When creating real-life projects, one must always take the more difficult route of asymmetry, which adds far more interest and dynamic life all of the way around the composition, inspiring the viewer to fully explore the piece in 360 degrees. For example, always ensure that the head is turned to one side, that the legs are either in motion or not in alignment, and that the complete anatomical posture is related to gravity and motion.
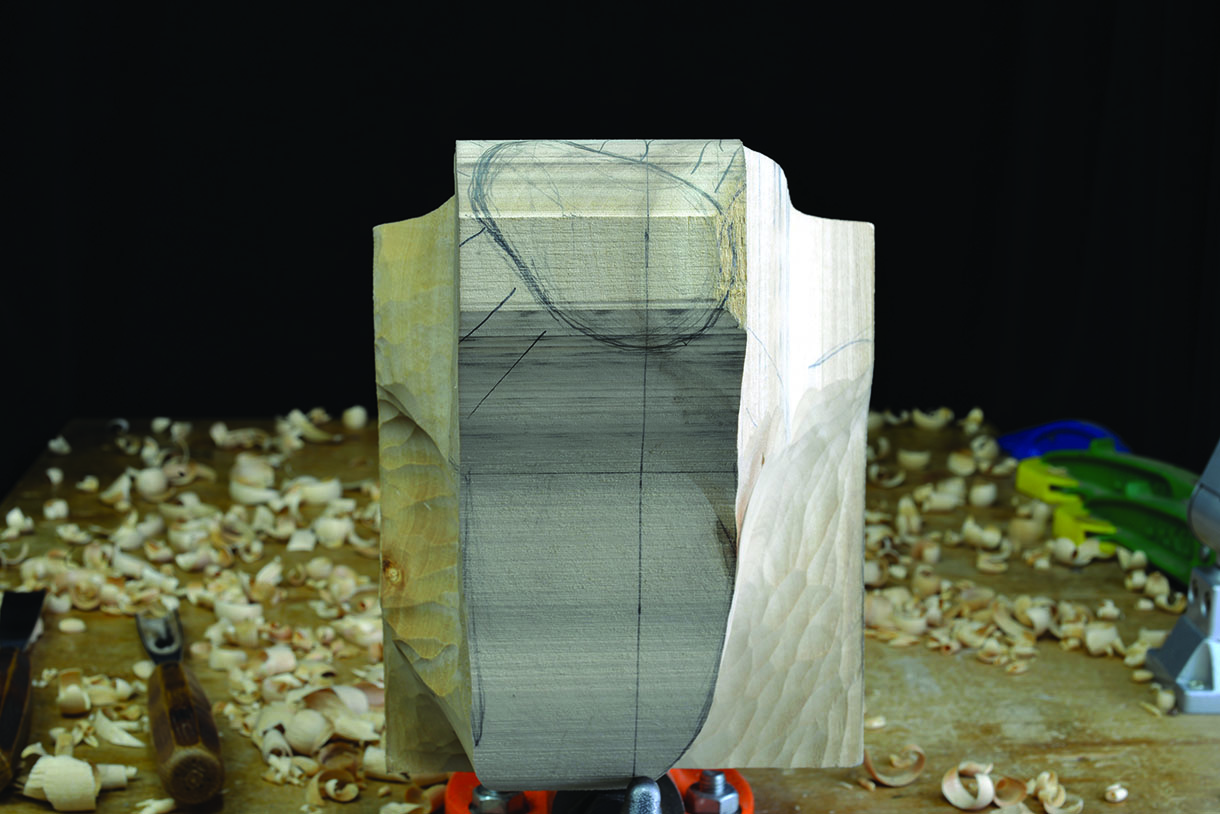
3. Use the side-view template of the head to transfer its outline precisely on to the wood, then carve it neatly down to the profile line
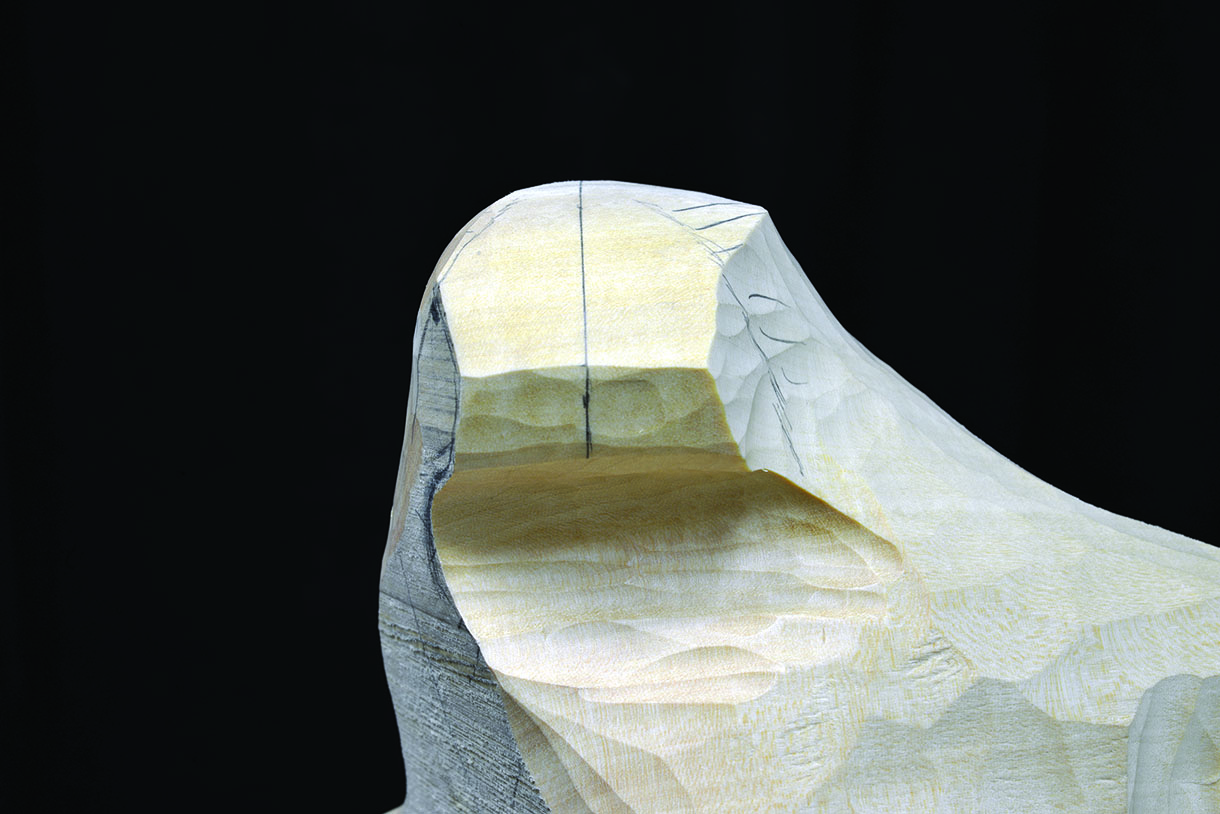
4. Now hold the front-view template of the head in position and ‘sight in’ the outer profile line of the head from this view. Check for symmetry and then carve this view accurately down to the profile line
5. The area of the head that projects out from the large skull is the next detail of the form to carve in position. Using the scale designs provided to help you, measure and mark this on to your wood. Pare the wood away flat and square to the head, working inwards until you reach the line on both sides of the head
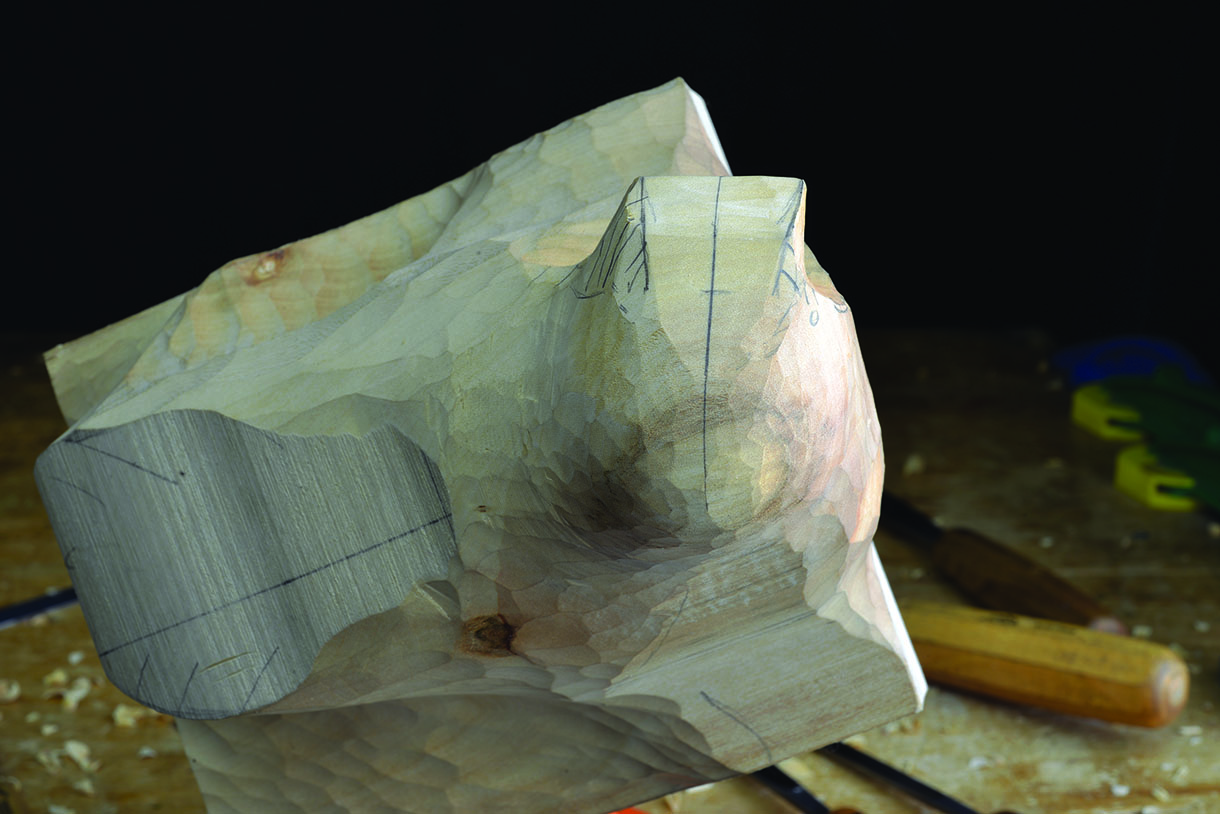
6. The surface around the head and shoulders can now be shaped back evenly into their surrounding areas

7. The facial details need to be worked through in a methodical sequence to ensure that they do not need to be revisited and altered at a later stage. The first job is to prepare the surface where the eyes will be carved in step 24. Use the front and side-view scale drawings of the head as a reference to measure from, and draw the eyes in their correct positions on the head. Pare the wood away until you reach the correct depth, which should look like the eye on the left in the picture
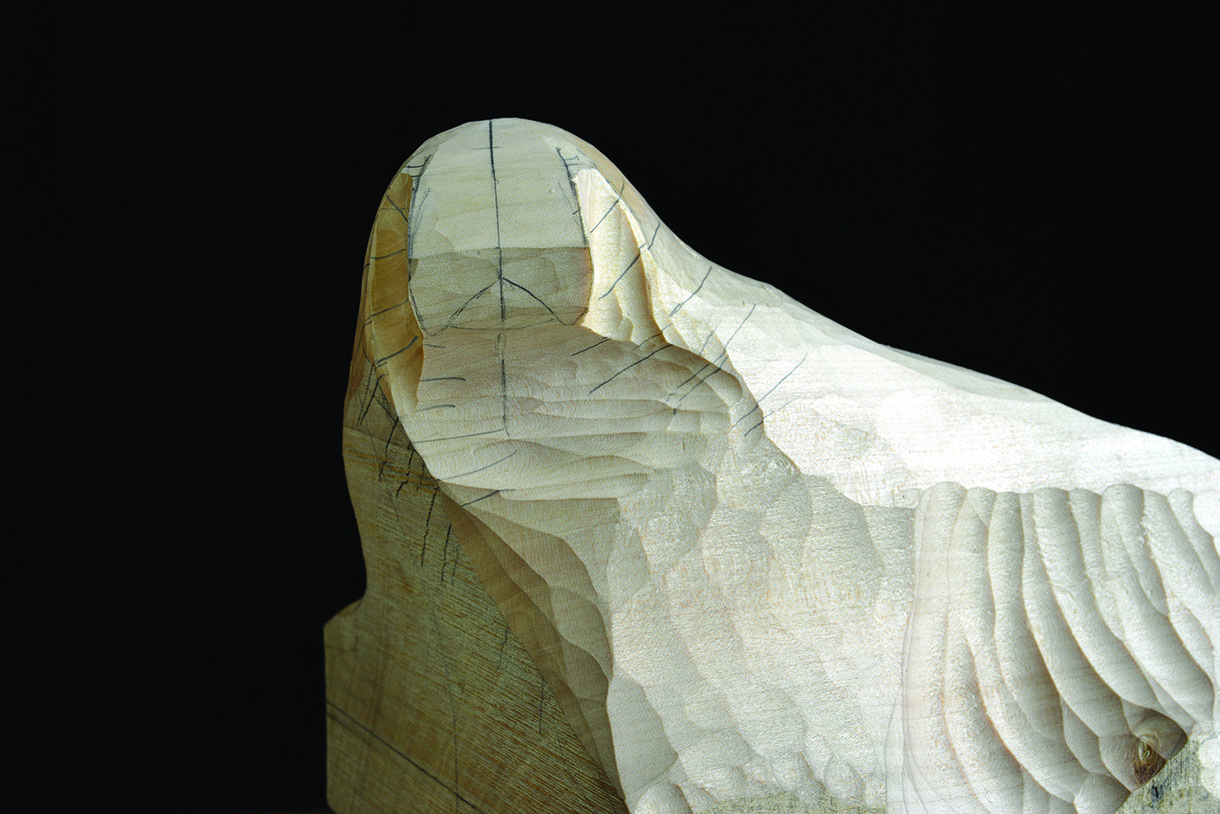
8. The area from the eye forwards can now be carved to its basic shape. Pare the wood away along the square edge of the muzzle, creating a gentle curve up to the centre position on top, and down to the centre position under the chin. Sand the complete area with grit 100 abrasive

9. The hatching here delineates the subtle surface anatomy around the muzzle and eyes. Study your reference material to gain a visual understanding of what this looks like in real life, then carve and sand these areas on both sides of the head
10. The mouth and chin area needs to be shaped and prepared for the tusks. Measure and draw these details onto your wood
11. Use a small V-tool, carving along the line of the mouth, producing a flat surface from the side of the muzzle to the line of the chin
Top tip:
When working on realistic details such as the walrus head, it is sometimes helpful to practise using modelling materials such as clay or putty. The ‘maquette’ can then be a useful visual aid to help one understand the form in three dimensions, which can then be applied to the project in wood.
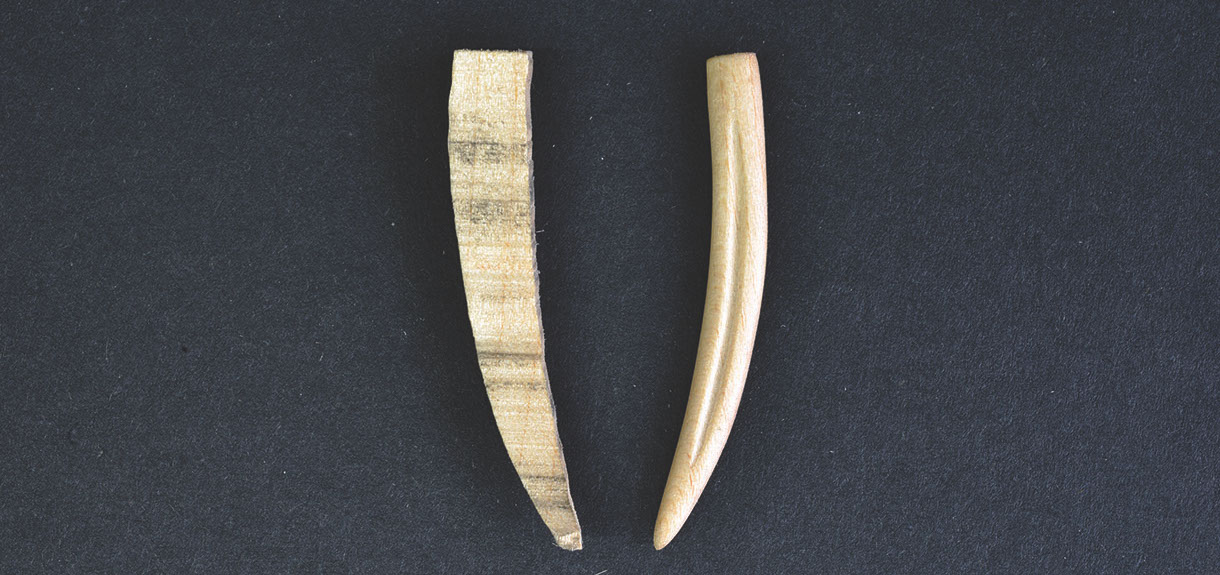
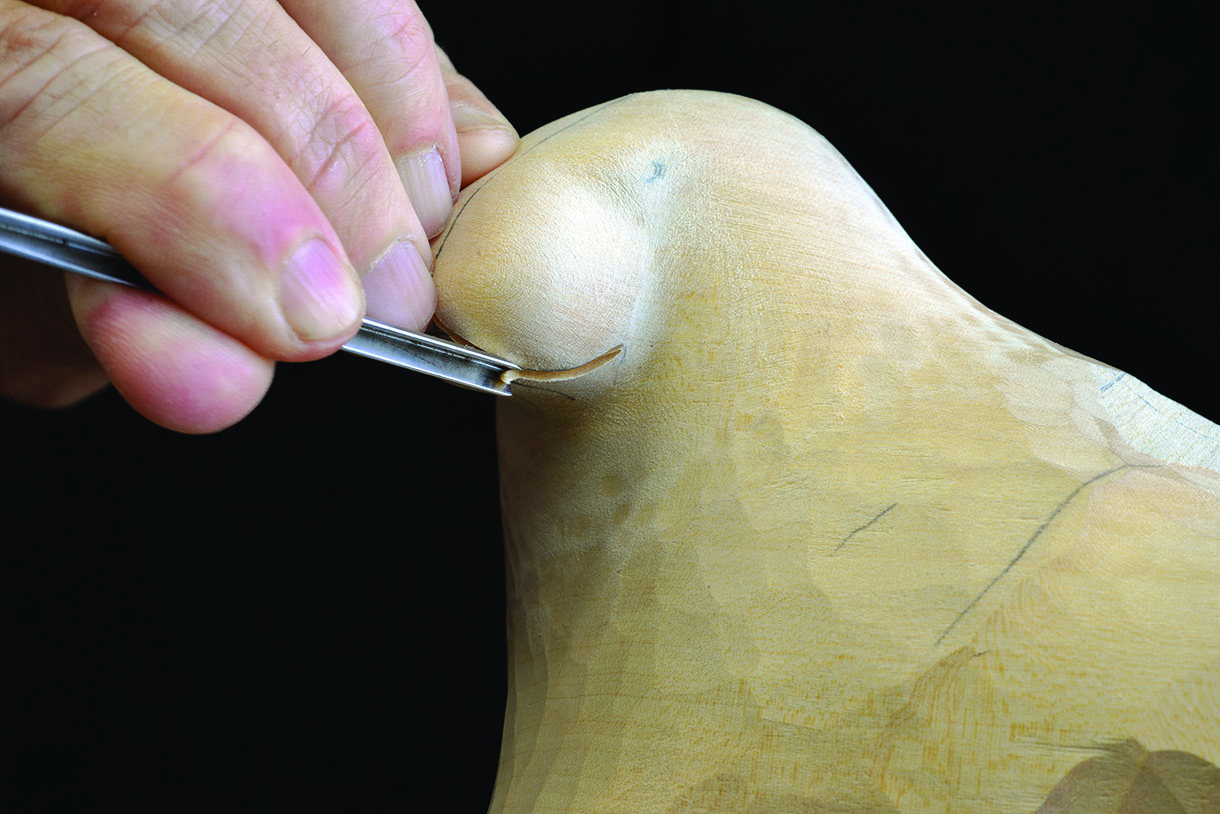
12. At this stage, the tusks need to be made so they can be fitted to the muzzle before the shaping and detail of the head continues. Using the templates, cut out both tusks and use a knife to round over the square edges. The top 4mm at the end that will be inserted into the jawline should be circular-shaped. From this position down to the tip it should be elliptical, the widest side being from front to back. Use grit 100 to produce this subtle shape, then sand through grits 150, 240 and 400. Finally, make a strong groove right down through the centre of the tusk
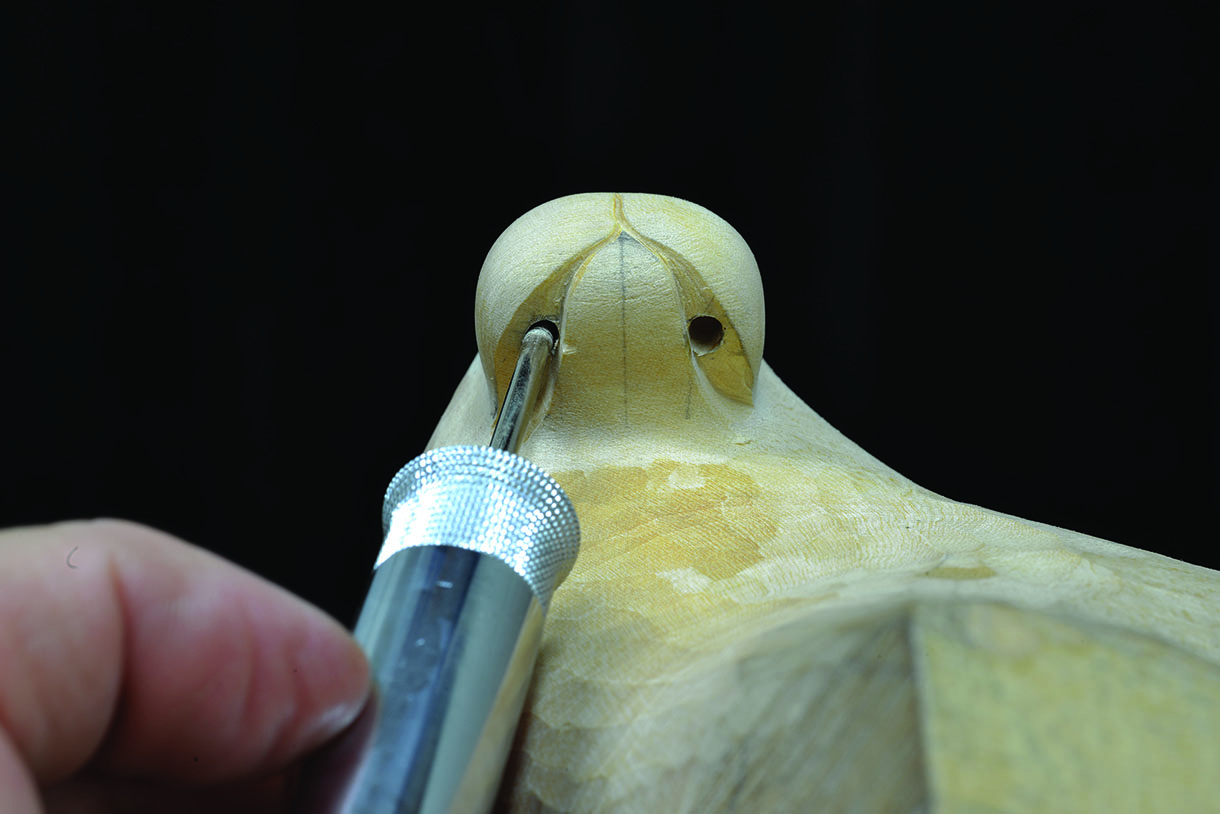
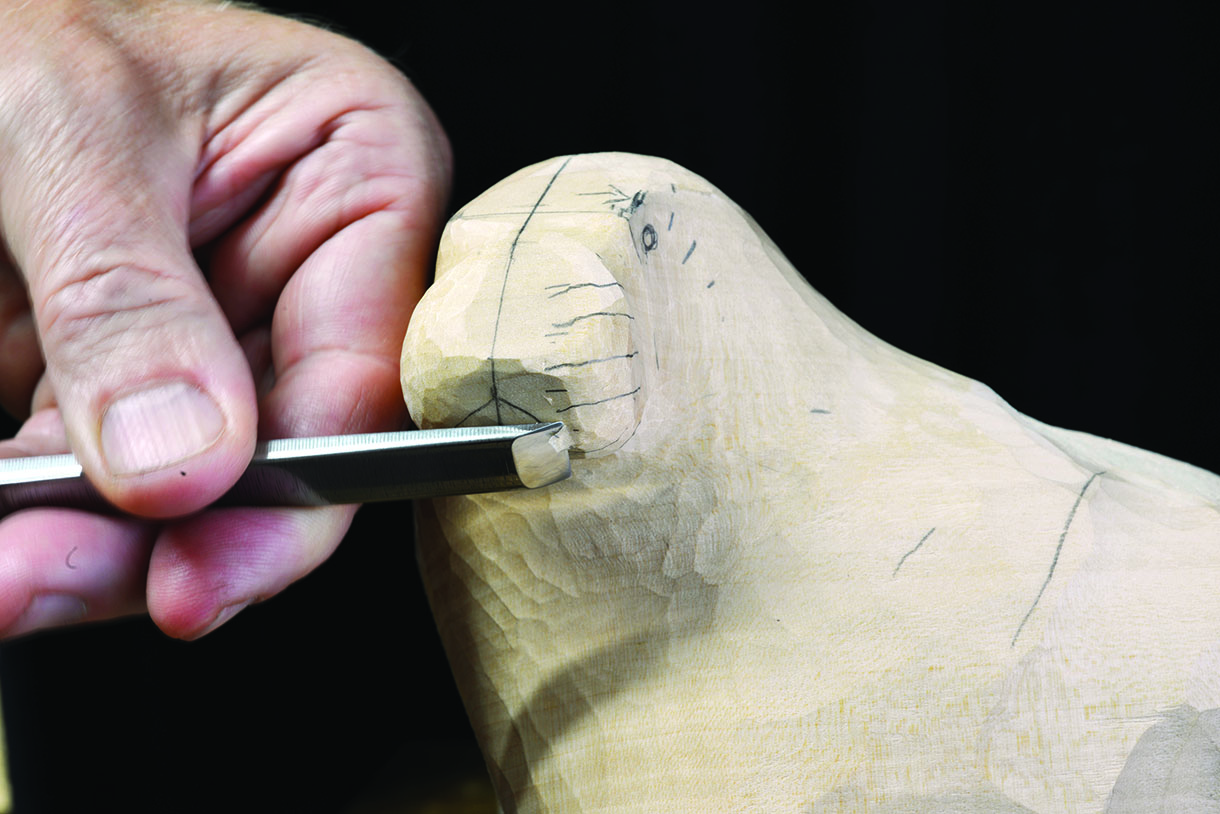
13. The fixing of the tusks to the muzzle needs to be accomplished precisely so that there are no visible gaps, they are held tight, and project from the mouth at the same length and level. Hold them in position and draw around the circular end with a sharpened pencil. Then use a 2mm diamond sphere rotary burr, gently cutting into the centre of the mark until you reach a depth of approximately 5mm. Ensure that the angle of your hole is perpendicular to the jawline. Now, bit by bit, increase the aperture until you are near the edge of the pencil line. Offer the tusk to the hole to see where it needs to be further worked. Continue with the burr until the tusk can be inserted to a depth of 4mm
14. Repeat step 13 on the opposite side, insert both tusks and check for alignment
Top tip:
If the tusk apertures are made slightly too large or at the wrong angle, use a two-part epoxy resin to either make the aperture slightly smaller, or to fill the hole and start again. Alternatively, make a dowel of the same size and species, bond into the hole, and start again.
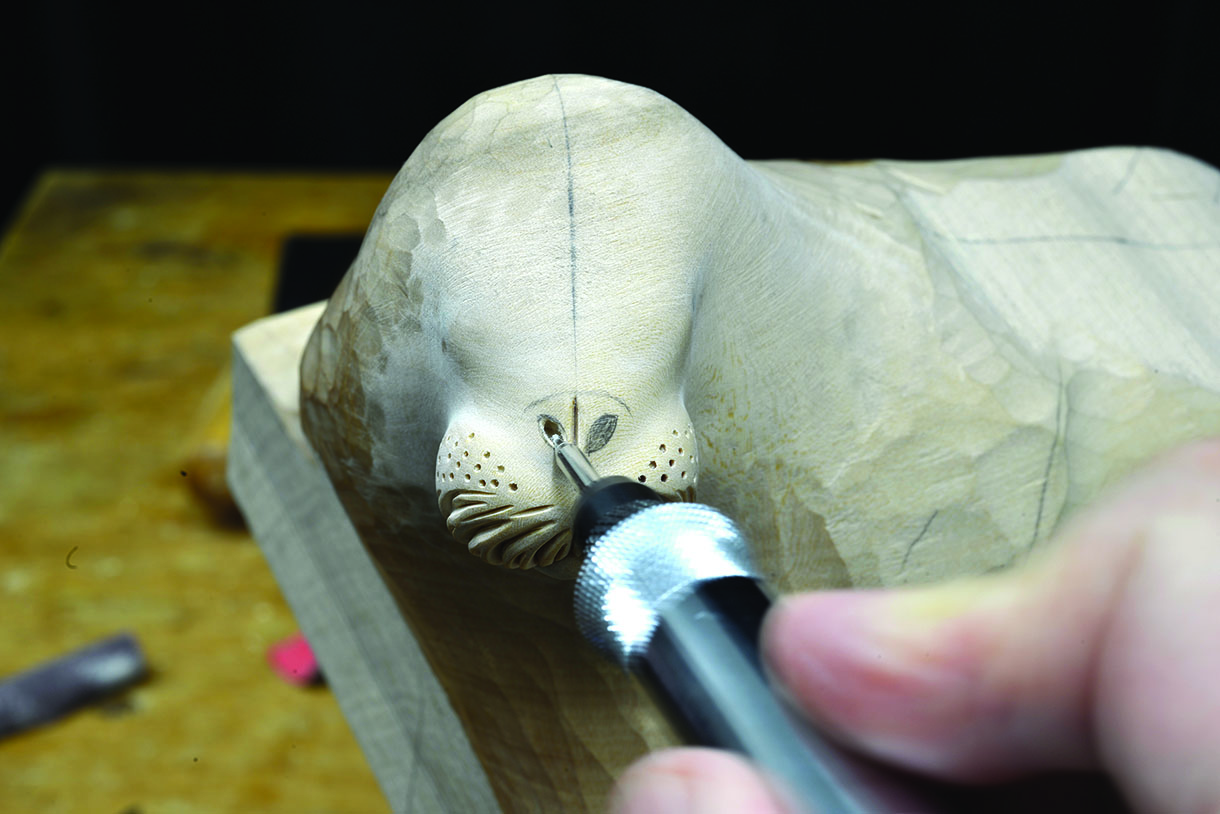
15. The muzzle and chin can now be gently shaped up to the position of the tusks. The complete area can then be sanded with grit 150
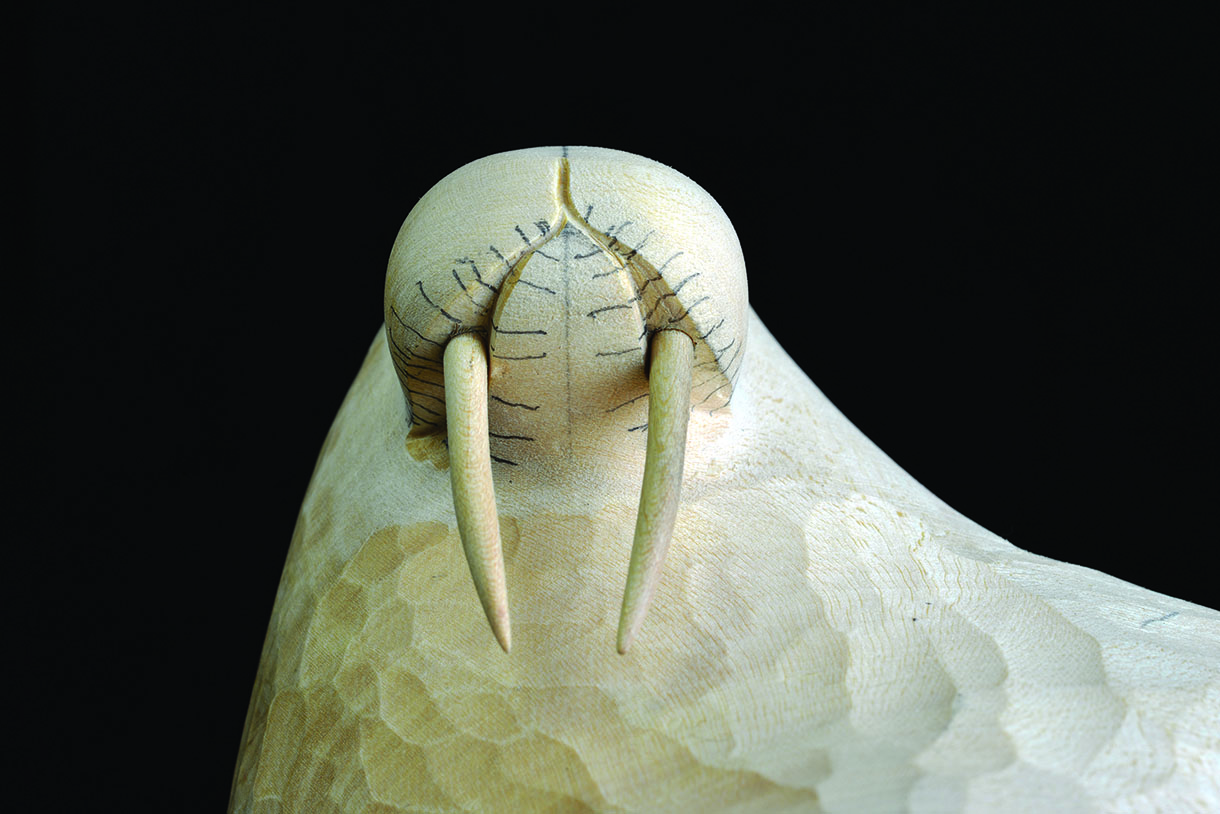
16. The next stage of the head is to produce the walrus’s whiskers, just above where the tusks were inserted. Measure and mark this area on to your wood
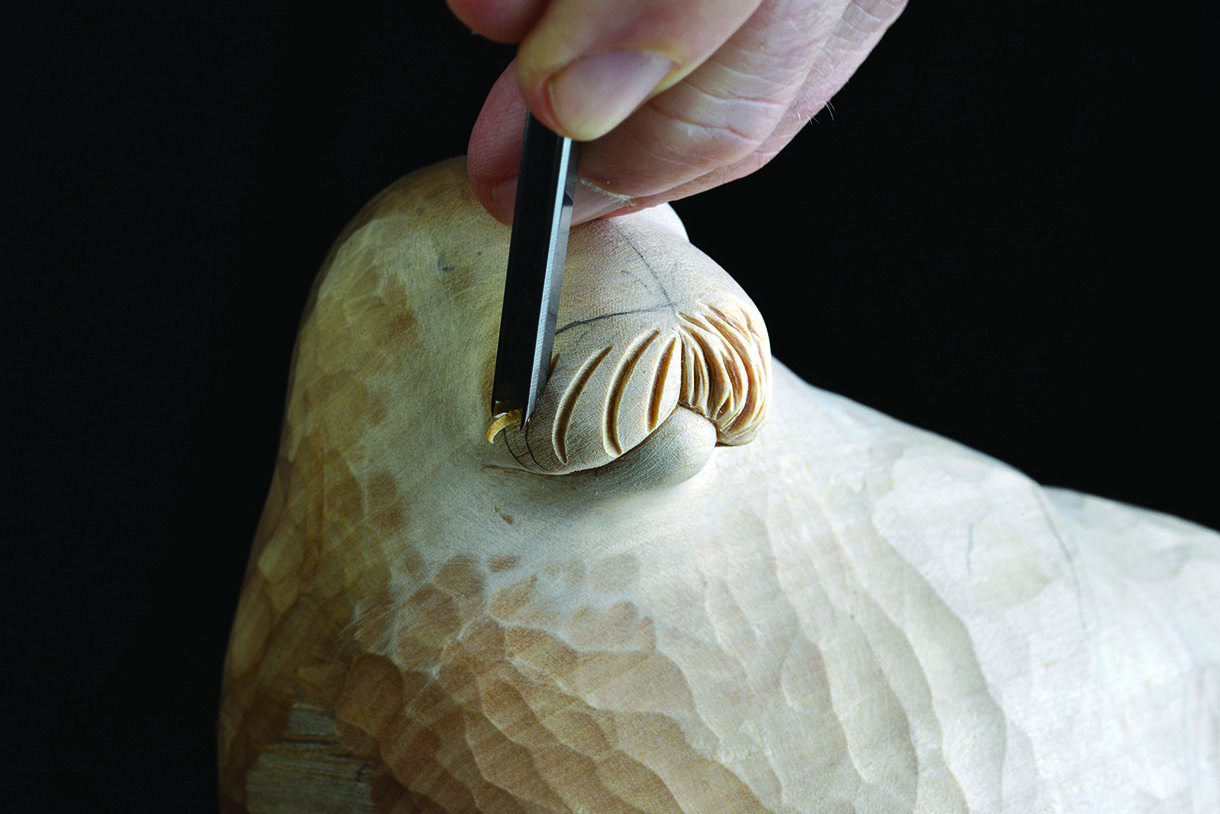
17. The technique to produce the whiskers is the same that would be used to carve hair. First, use a V-tool to outline the directional flow of the whiskers across the marked area. Then use a combination of 1mm and 2mm veiners to create uneven creases of random depth
Top tip:
Practise the hair/whisker technique on a spare piece of wood first to get an understanding of how to apply it to your project the most effective way.
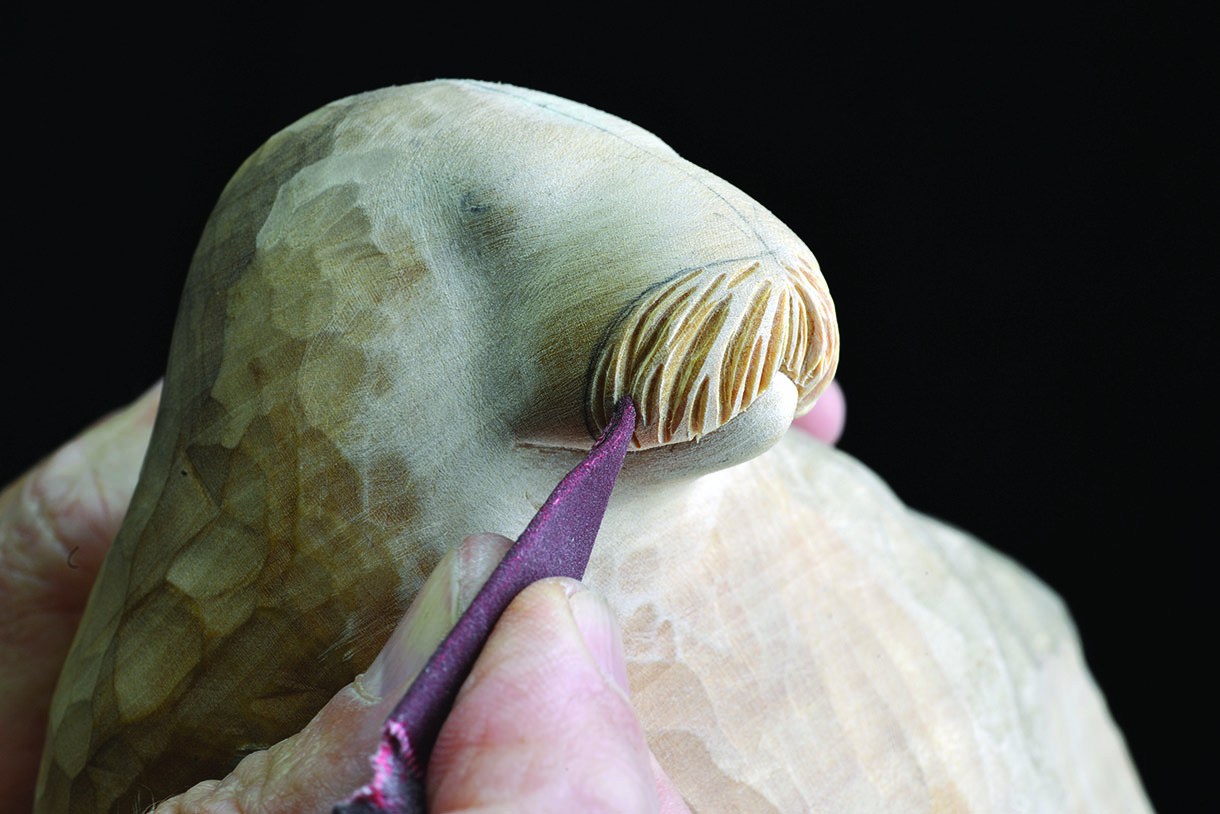
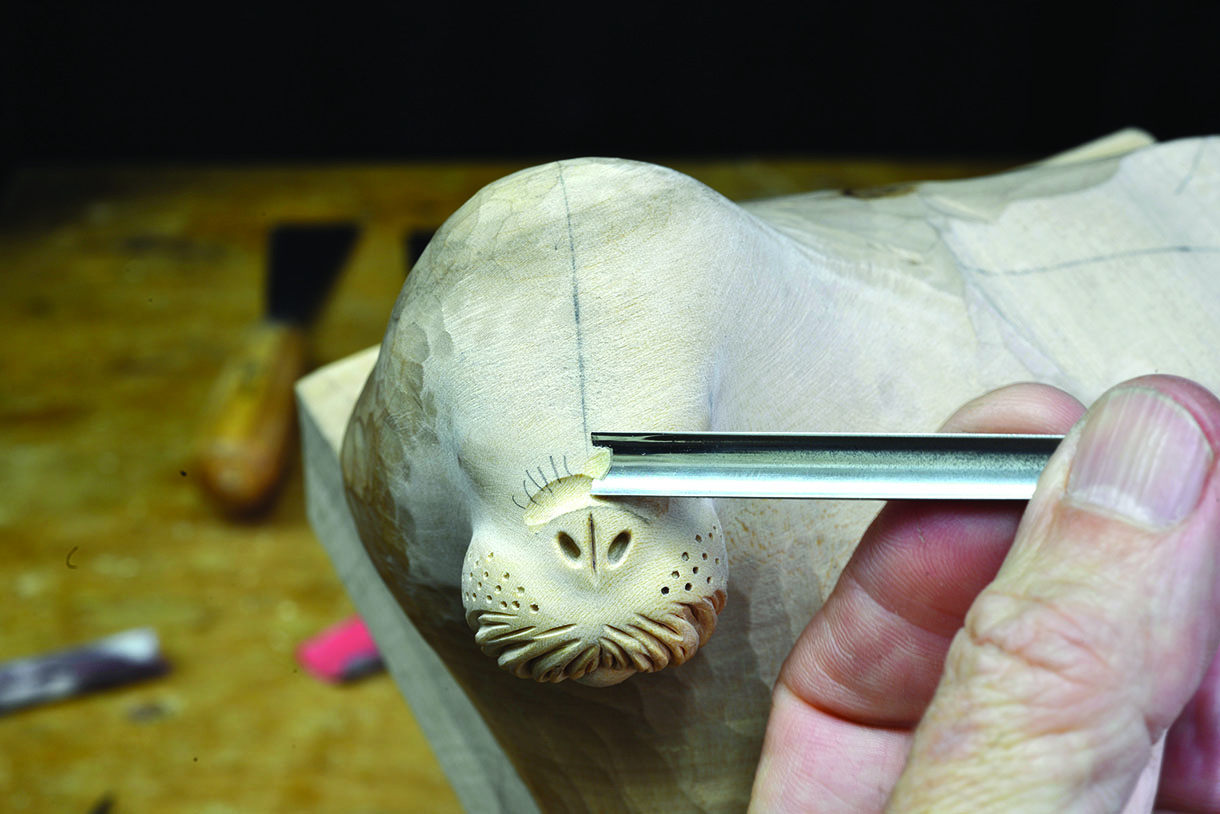
18. A piece of 240 grit abrasive is then used to soften each of the little creases, which naturally enhances the technical effect, bringing the detail to life
19. A knife is finally used to make deep slices randomly into several of the creases, adding further depth and shadow to the finished detail
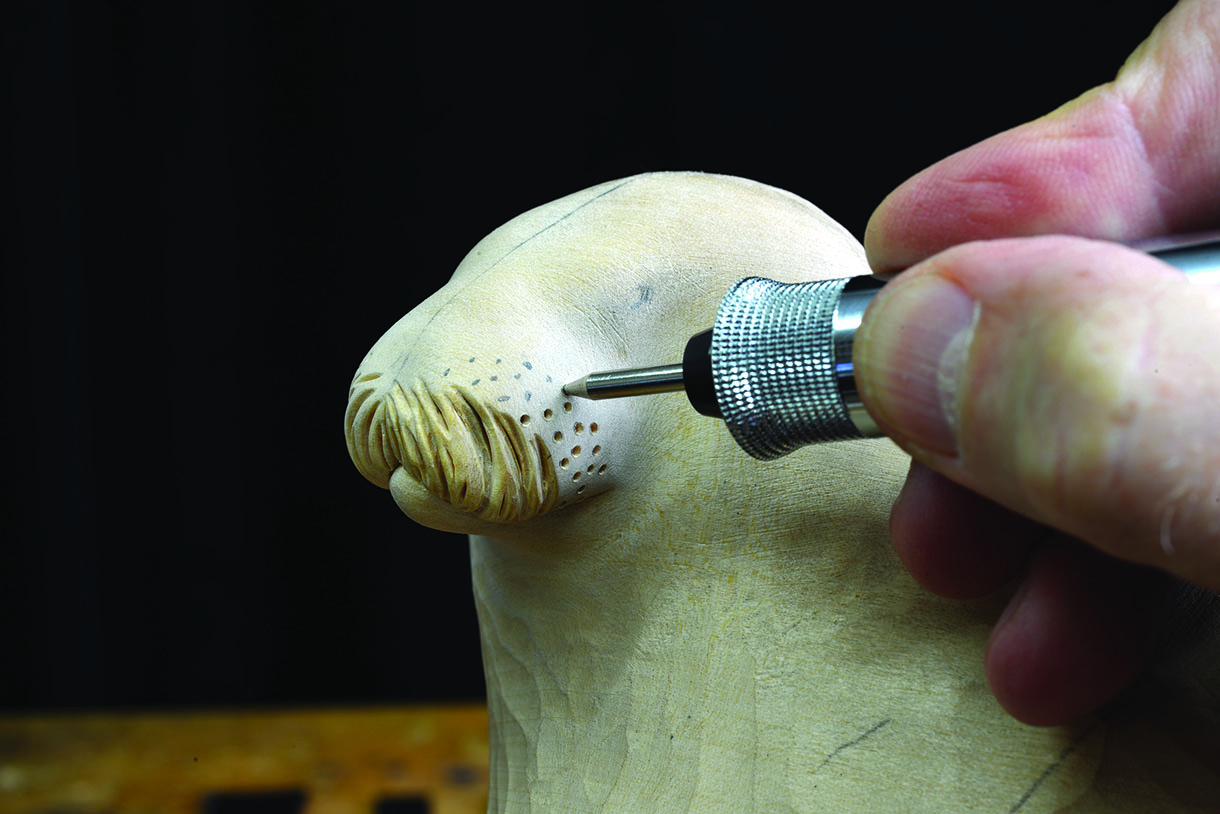
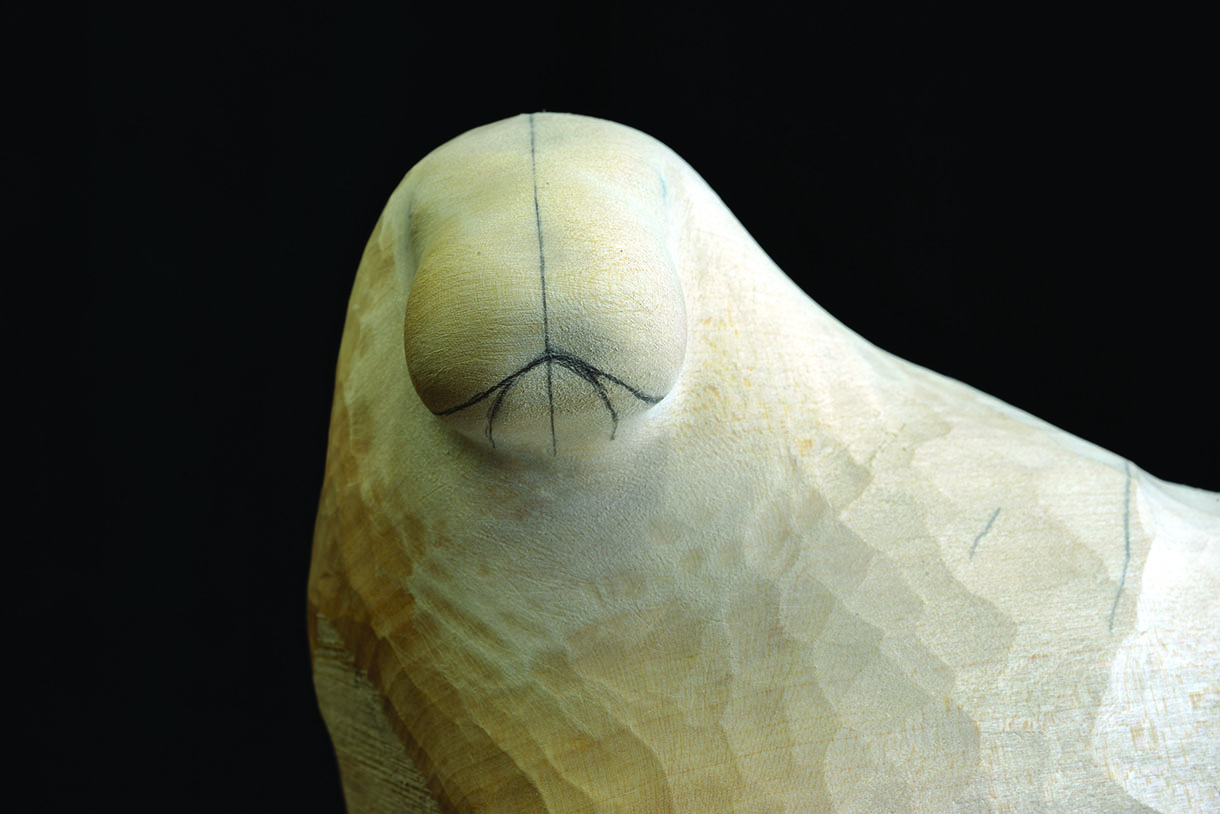
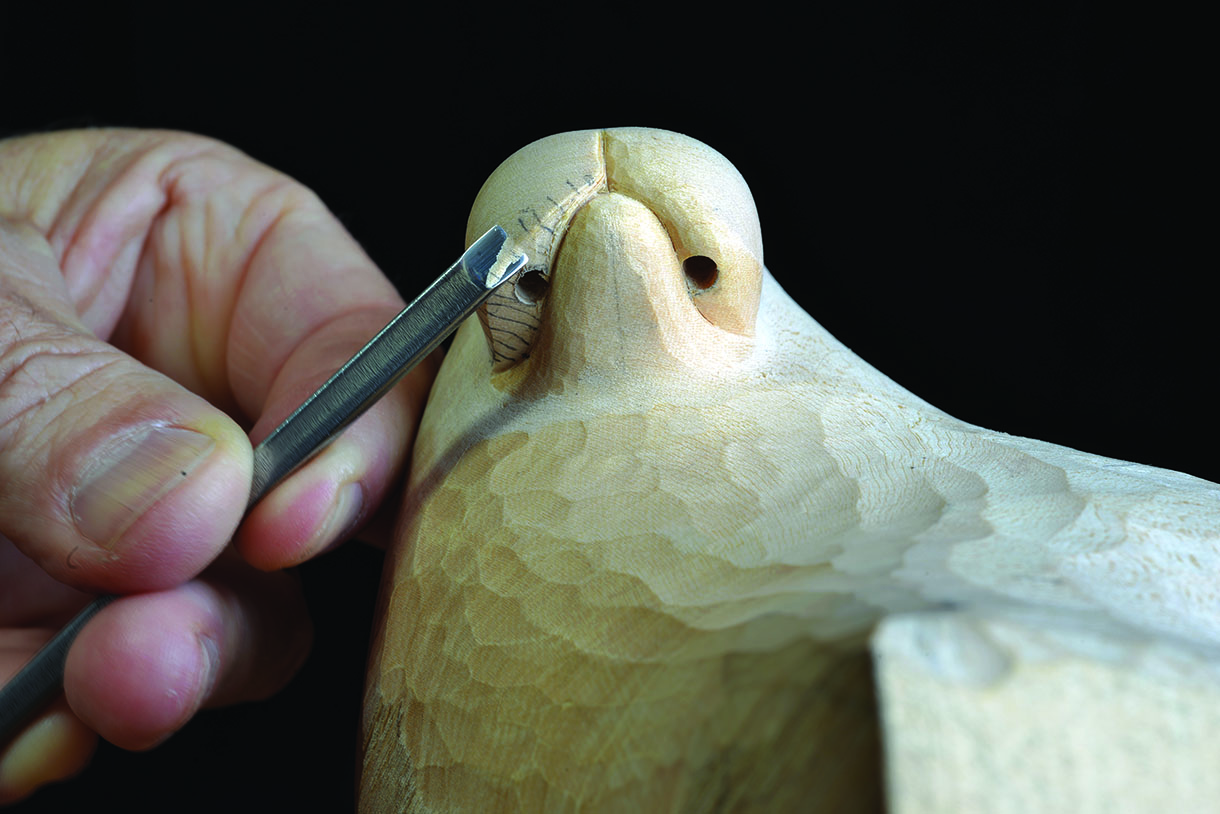
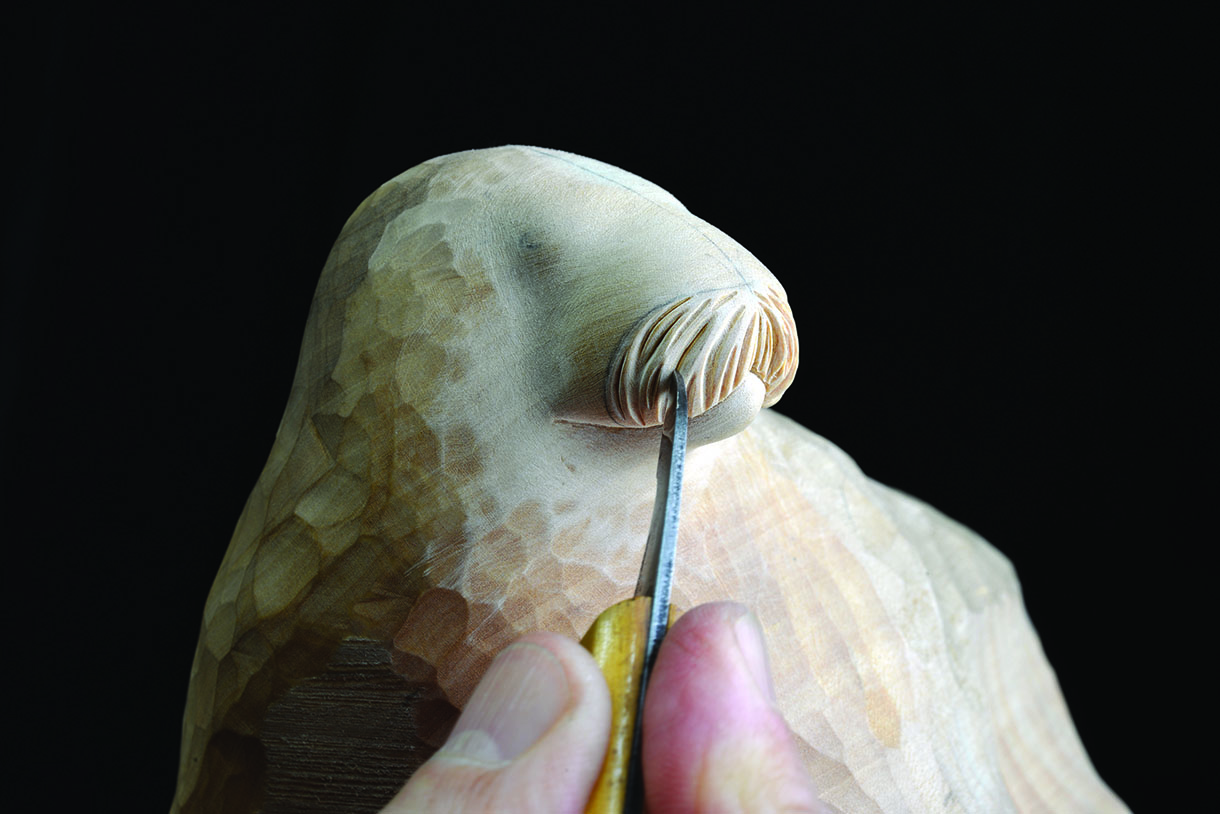
20. The area directly behind the whiskers has a series of little holes, which are made with a 0.5mm spherical rotary burr. Draw these holes in a random pattern on to the surface, then gently press the burr into each of them to a depth of approximately 1.5mm
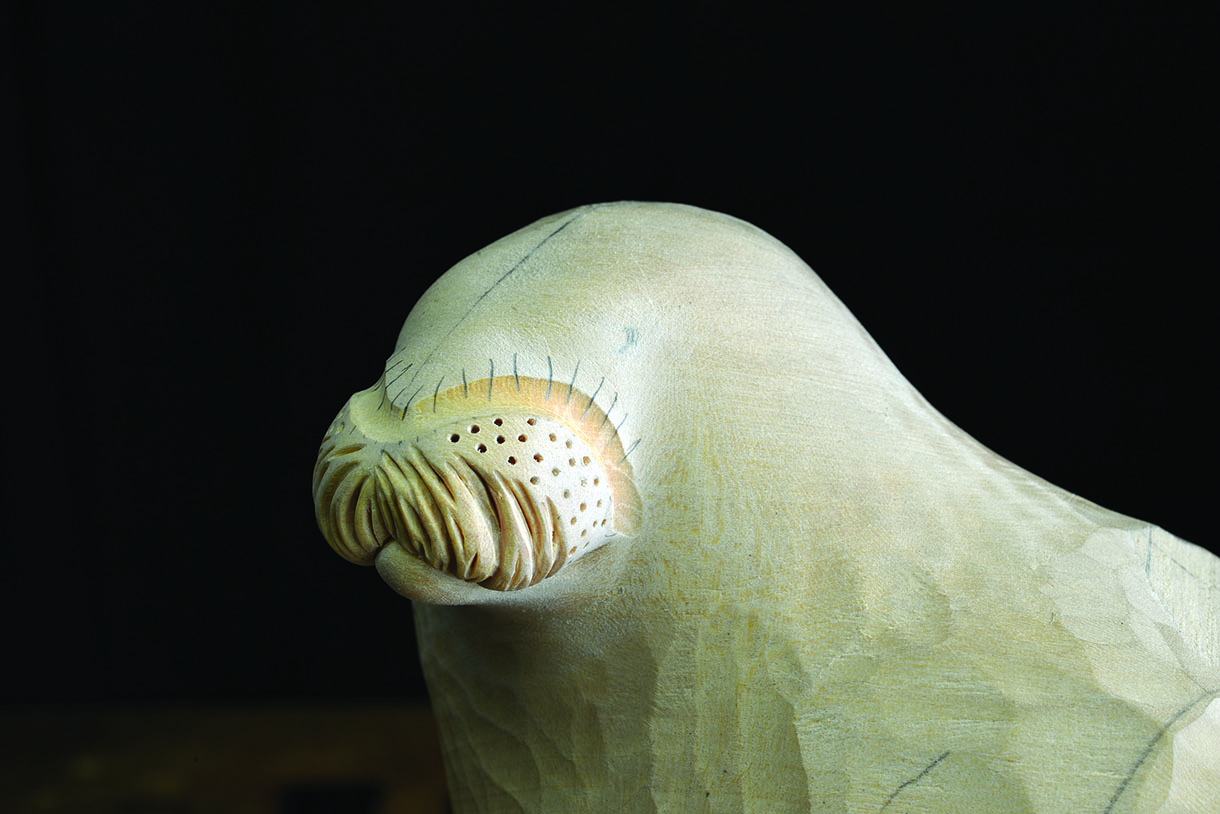
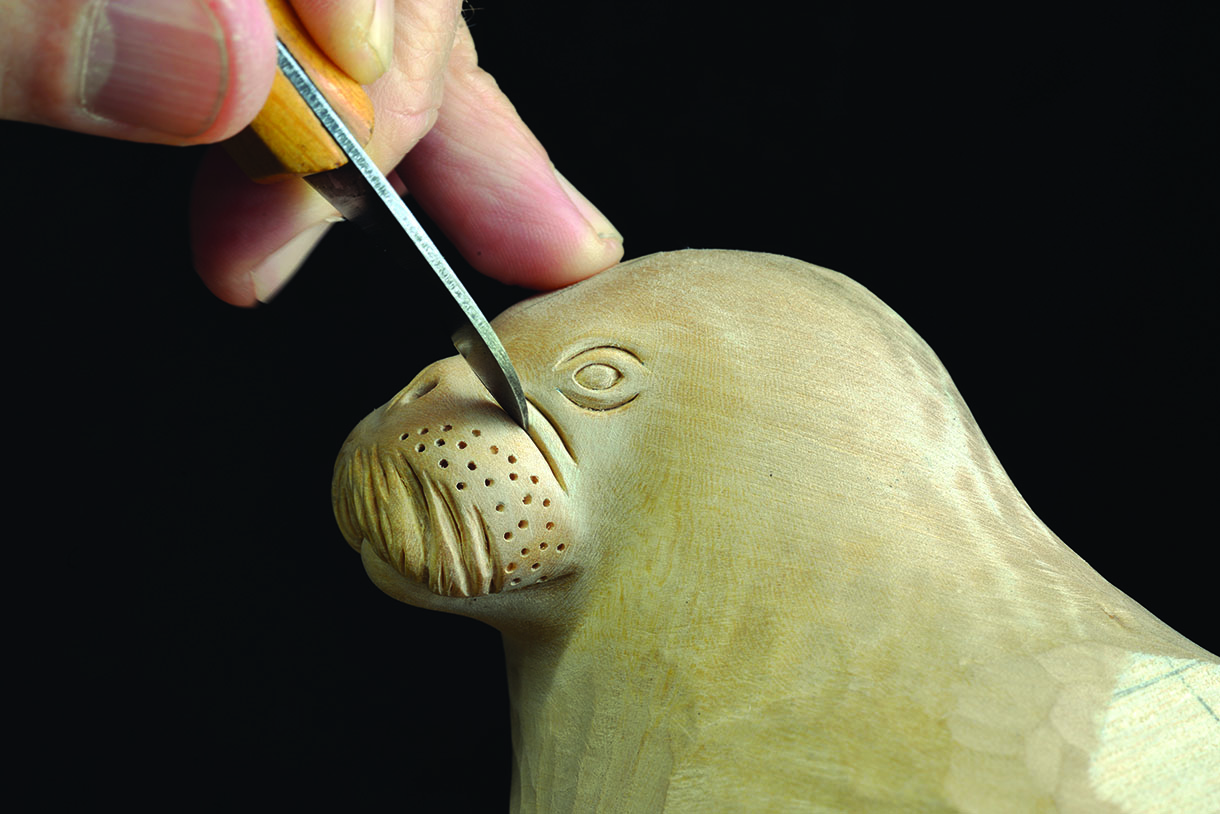
21. The next area of surface anatomy to observe is directly behind the whisker line and holes that were produced in the previous steps. Study your reference material to visually comprehend this detail, which is essentially a deep groove that starts at the corner of the mouth, moves around the whisker holes and forward in front of the nose. Carve this detail into the wood, blending the depth at the rear edge of the gouge cut back into the head. Sand with grit 150 abrasive
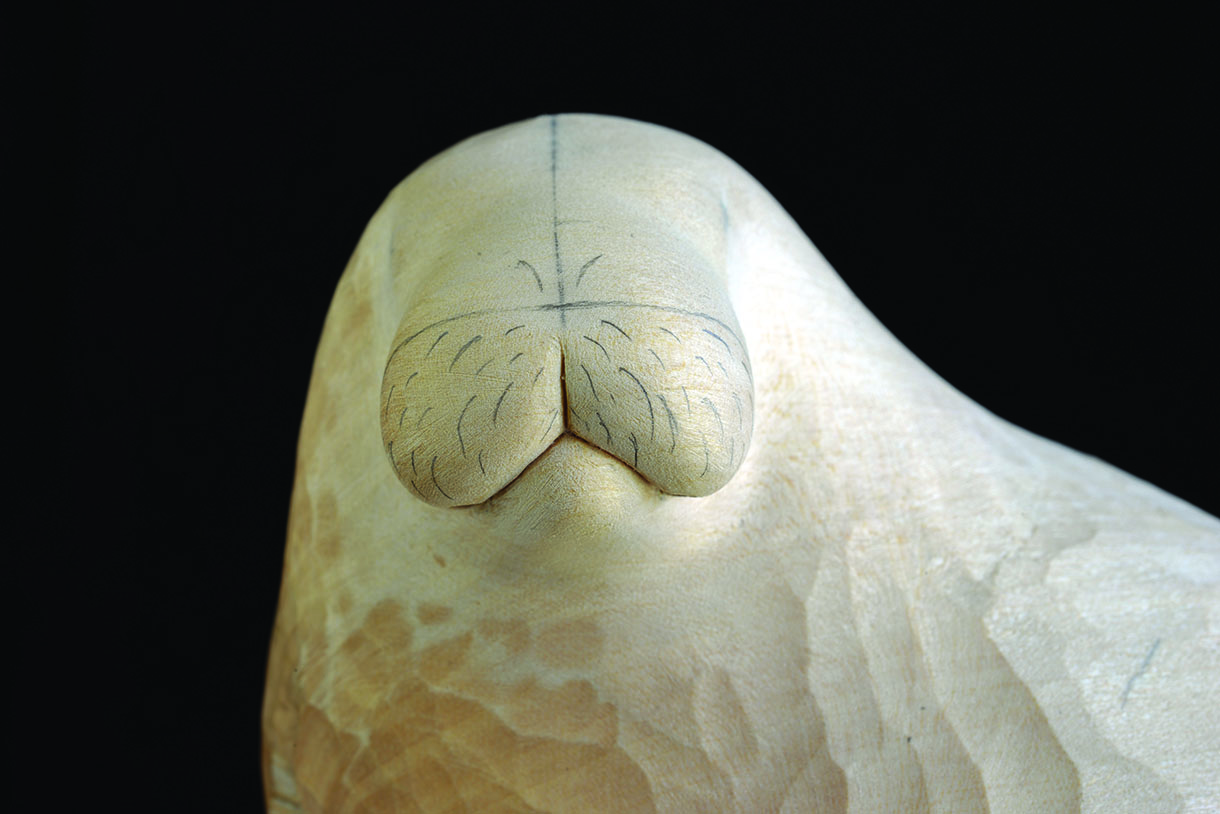
22. The walrus’s nose can be carved either open or closed, as it is commonly seen both ways; the example used in this article shows it open. Measure and draw the two nostrils in perfect symmetry on opposite sides of the muzzle. Use a 1mm spherical rotary burr to produce the apertures to a depth of approximately 2mm. Then make a little crease between them with a knife. Finally, soften the edges of these details with grit 240 abrasive
23. The nostrils appear to be somewhat raised in real life, which is a simple detail to produce but very effective in helping the facial expression come to life. This is created by merely carving a deep channel directly behind the nostrils, which is then blended back into the head and sanded with grit 150
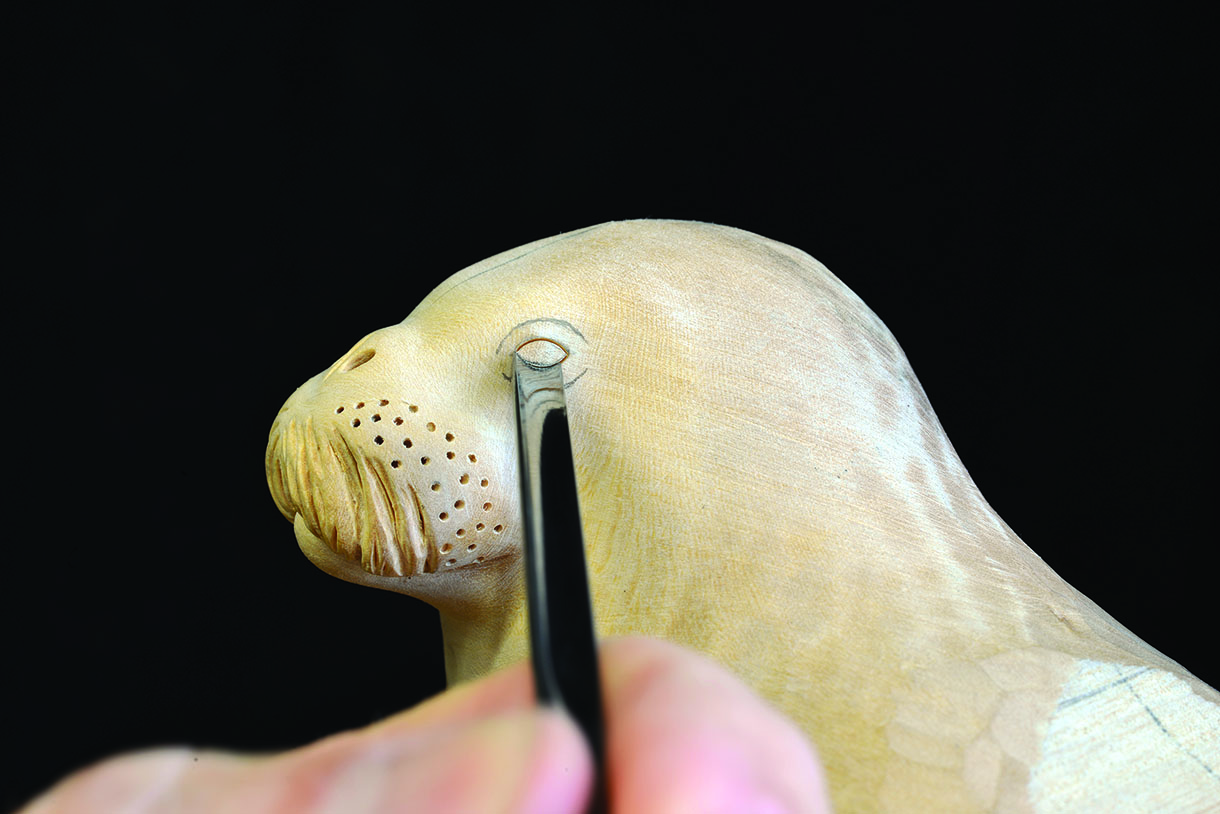
24. We now move back to the positioning of the eyes and their detail. Using the templates to help you again, draw the eyes and the little creases above and below them accurately in position. Check for symmetry from all angles. Use a No.7, 4mm to create the outer shape of the eye, and then a No.2, 2mm to cut the eyeball into the No.7 cut. Sand with grit 240 abrasive
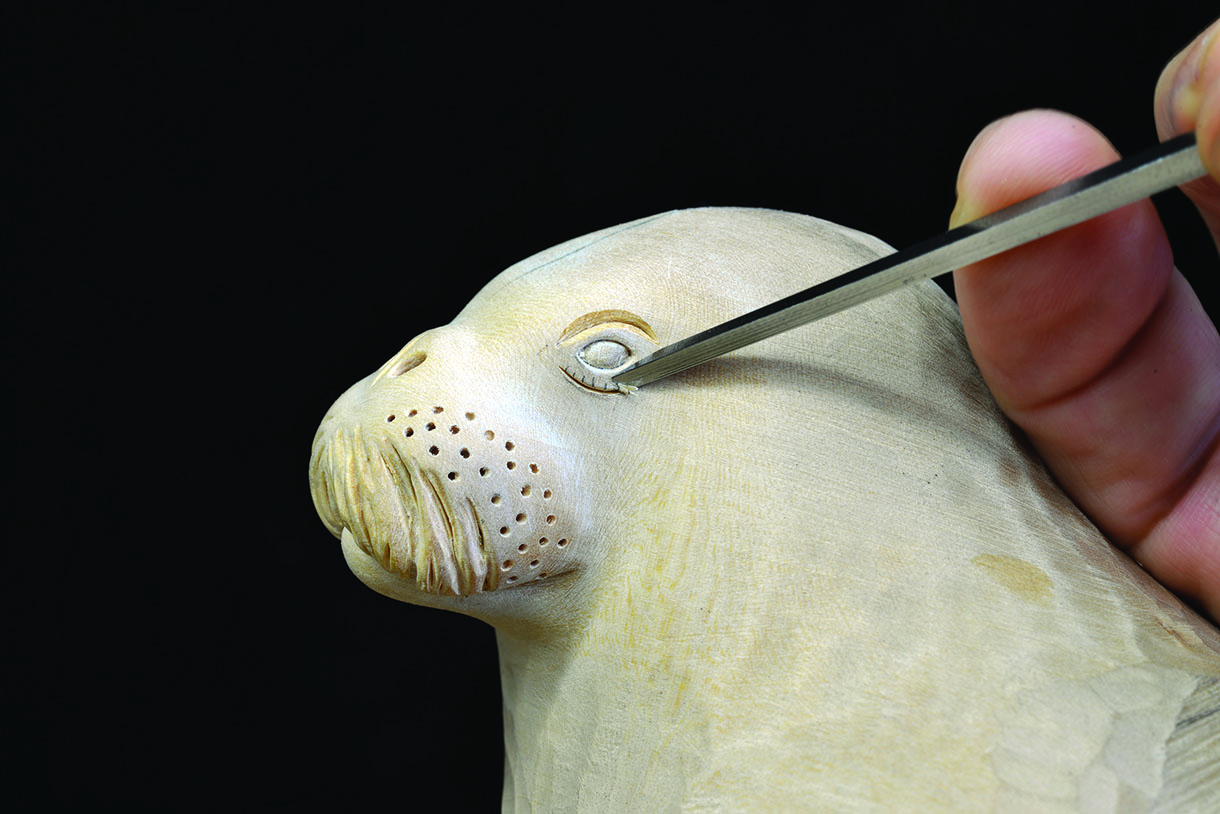
25. The creases are made with a razor-sharp knife to produce the slit, and then the small No.2, 2mm to pare the surface into the slit. Sand with grit 240
26. A study of the walrus head’s surface anatomy will show that there are many different variations of the little creases found around the muzzle and eye areas, so the reader can chose for themselves where they would like to apply these details. The technique is the same here as for the creases around they eyes; knife slits, gouge work and smoothing
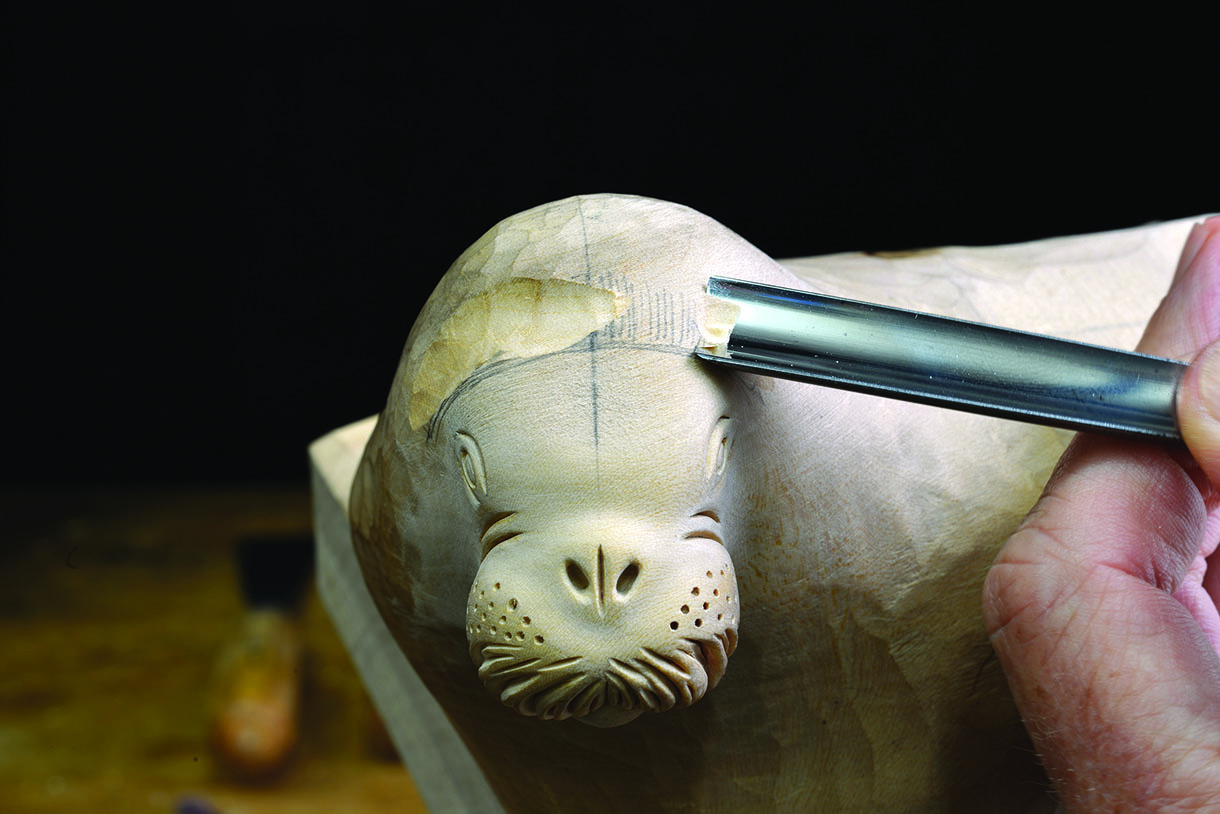
27. The final area of surface anatomy to be applied to the head is a deep groove, made from approximately 7mm behind the corner of the eye, up and over the skull, and back down behind the opposite eye. This separates the forehead from the larger mass at the rear of the skull and is, again, very simple to produce but visually effective in bringing life to the form. This is then smoothed into the surrounding areas with grit 100 abrasive

28. Your project should now look like this and is ready for the next stages of shaping the body, the flippers and applying the interesting surface anatomy, which will all feature in the next article
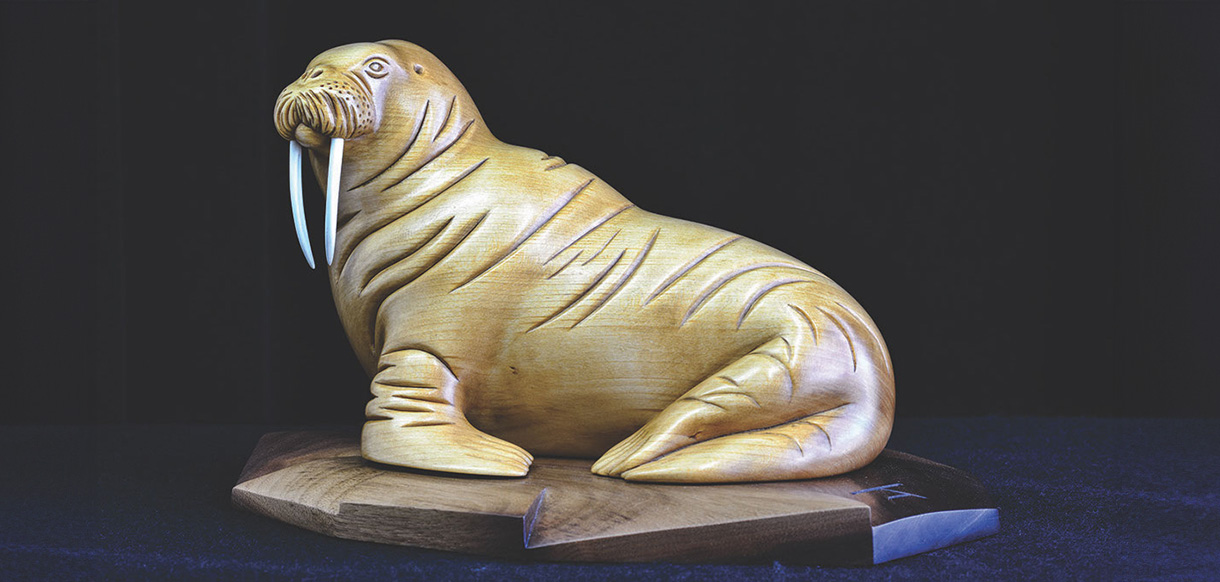
29. The finished carving


