Rope Making:
Colin Sullivan looks at making rope.
Colin Sullivan looks at making rope
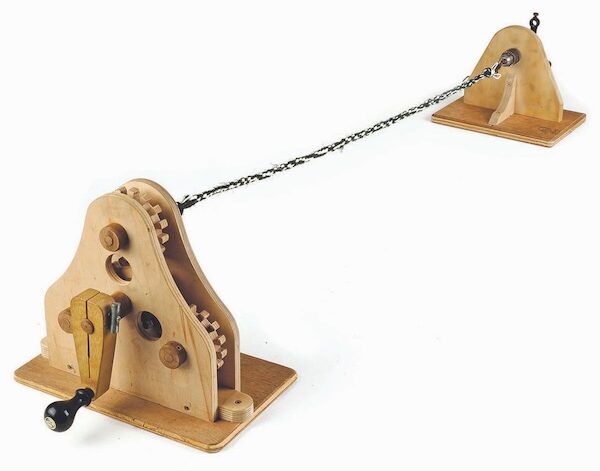
Both Chatham and Portsmouth dockyards have massive purpose built rope walks, showing how important rope was to the English Navy in the past centuries. The small rope-winding jig shown here was made for demonstrating to children how simple it is to make a rope.
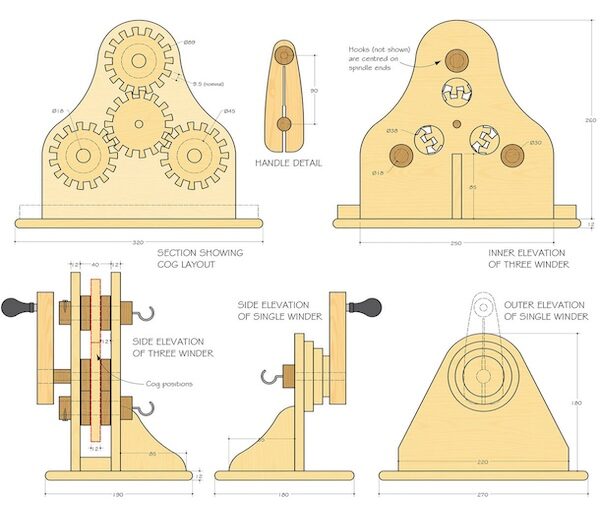
By winding a number of strands of string together a sort of spiral spring is formed, then if the operation is repeated from the opposite end a second spiral locks the strands together to form rope. The cogwheels were made from a drawing that I carefully made on paper using a compass and a pair of dividers. The 15 teeth are 9.5mm each which works out to a diameter of 89mm. Providing the teeth and the cut out are the same size, they should fit together after giving the edges a slight chamfer. Drill a hole in the centre of the cogwheel for a good fit on a panel pin, fix them down to a piece of scrap so they run against one another easily. This is the dimension to use for setting out the four cogwheels. Engagement needs only to be 5–6mm between the cogwheels.
Did you know? It is estimated that a typical man-o’-war sailing ship used 40 miles of rope, including spare rope stored below decks.
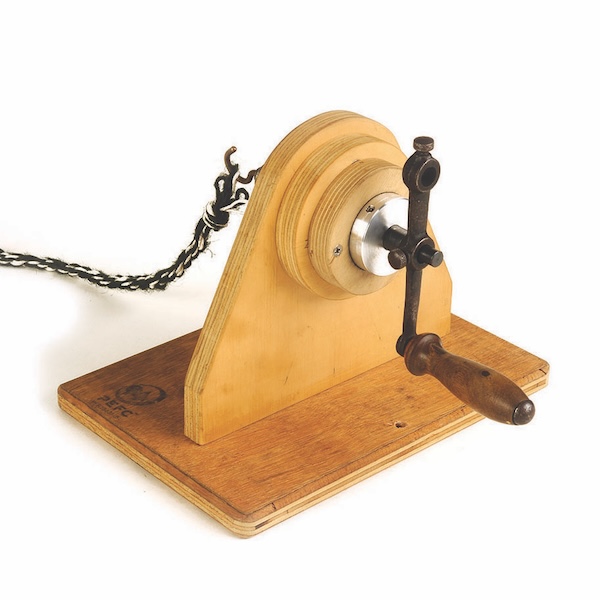
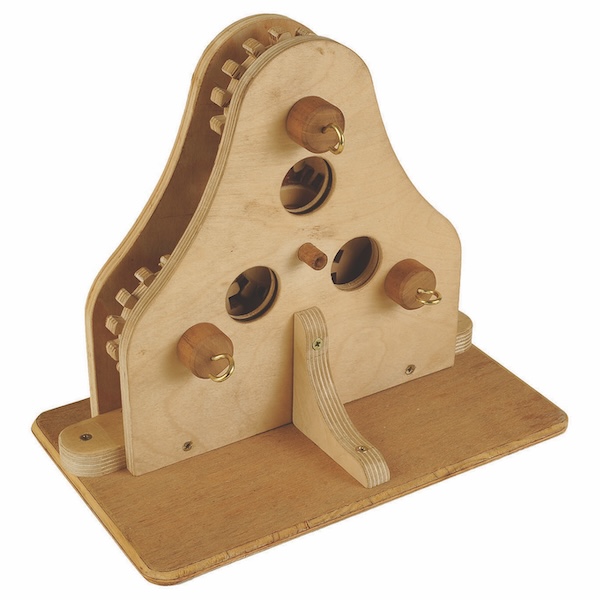
The four spindles are 18mm diameter, turned from hardwood with one end 30mm diameter to form a stop and shoulder for the screw hook to fix into. The spindle has to be fixed to the cogwheels once they are placed in one of the panels. The spacer bush and one cogwheel slide on and the second spacer is drilled and screwed to the spindle and the cogwheel, leaving enough clearance for it to turn easily. The centre cogwheel is treated the same way but uses the opposite side panel, this also has to be shaped to take the winding handle. The two panels can now be put together and fixed with a strip of ply at the base just wide enough to allow for clearance as before. The opposite single winder uses one spindle and a handle for turning and the panel is built up with two discs to make a good bearing.
Using the rope winder
A small traveller with three holes and slits is used on the second operation of making the rope. Set the two sections of the rope maker on a long table. Fix the 3-hook winder to the table with a cramp. Tie the string to the single hook end, run it along to the 3-hook end and hook it over one of the hooks. Run the string back to the single hook and hook it on, run it back to another one of the 3-hooks and repeat this operation once more, ending at the single hook end. Tie this bunch of strings together close to the hook. The appearance can be changed by adding a different coloured string and repeating the process. Wind the 3-hook end handle clockwise until all three strings are twisted, keeping the tension even by holding the two ends apart; there will be a slight shrinkage in length.
Place the traveller on the three strands of string close to the single hook end, holding it steady and winding the handle clock wise until the rope is formed. The traveller will be pushed along as the rope forms. Tie the rope by binding it with string up against the traveller and remove the rope completely.
By practising this a few times the rope will get better and better. Children love to help doing this by twisting
the handles.