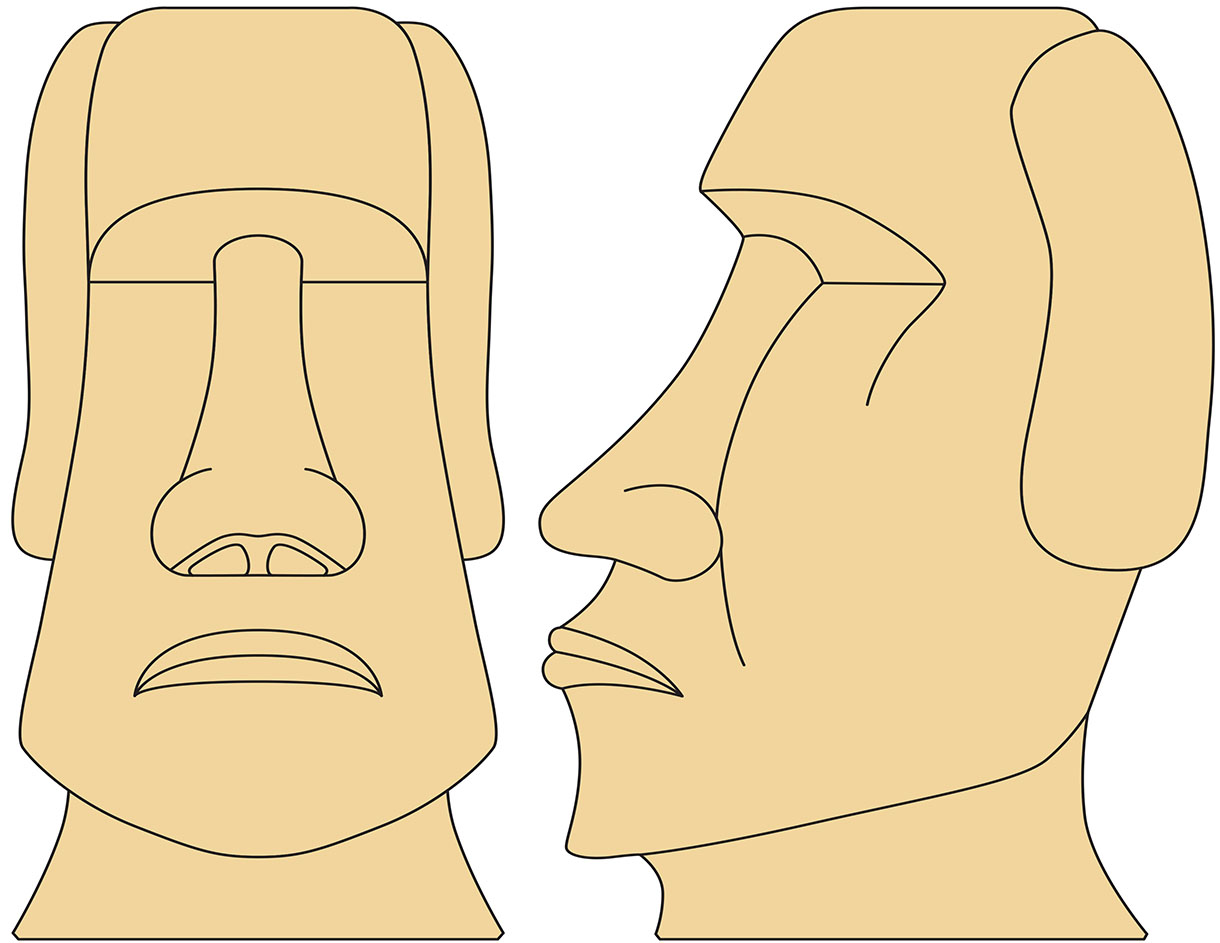
Easter Island Head
Steve Bisco carves an Easter Island Head in limestone
The giant heads of Easter Island in the South Pacific are among the most famous and iconic images of Polynesian art. Although generally referred to as Easter Island Heads, most of the statues do, in fact, have torsos buried below ground. There are 887 heads in all, the average size being about 4 metres high and weighing about 12 tonnes. Although primitive in style and created by a tribal civilisation, they are not as ancient as they look. They were carved from about 1250 to around 1500 and are contemporary with the great Gothic cathedrals of medieval Europe. They were made by the Polynesian tribes that colonised the island and it is believed the statues represented their ancestors.
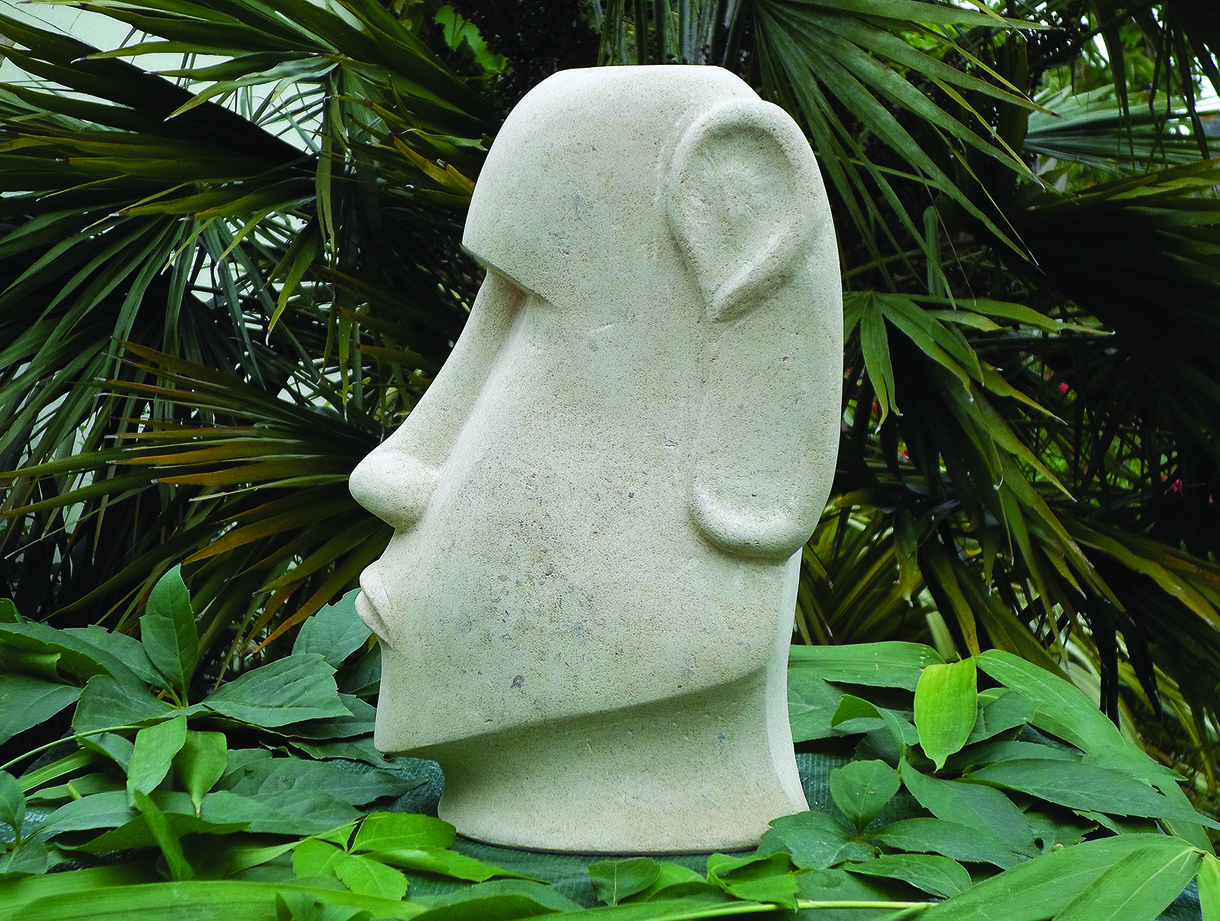
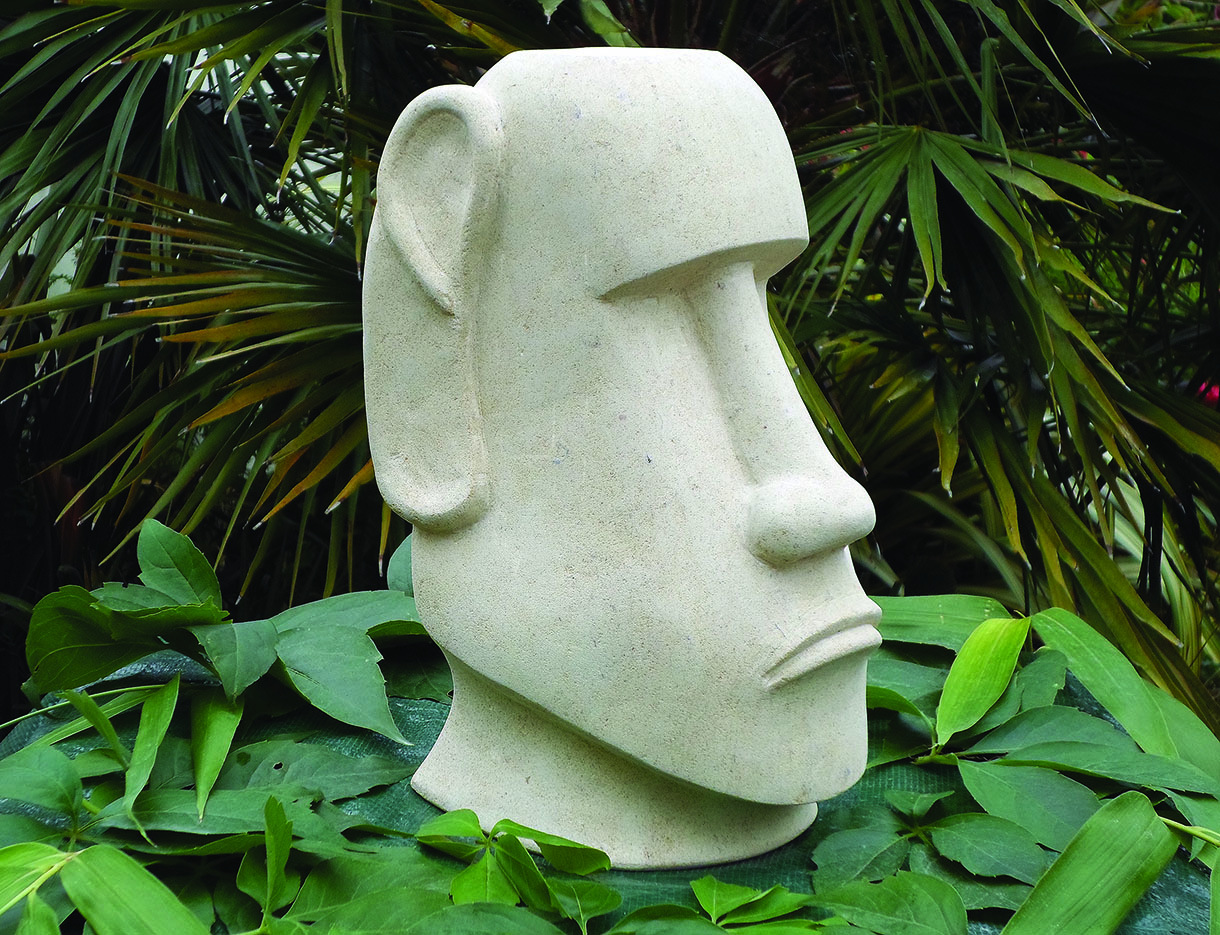
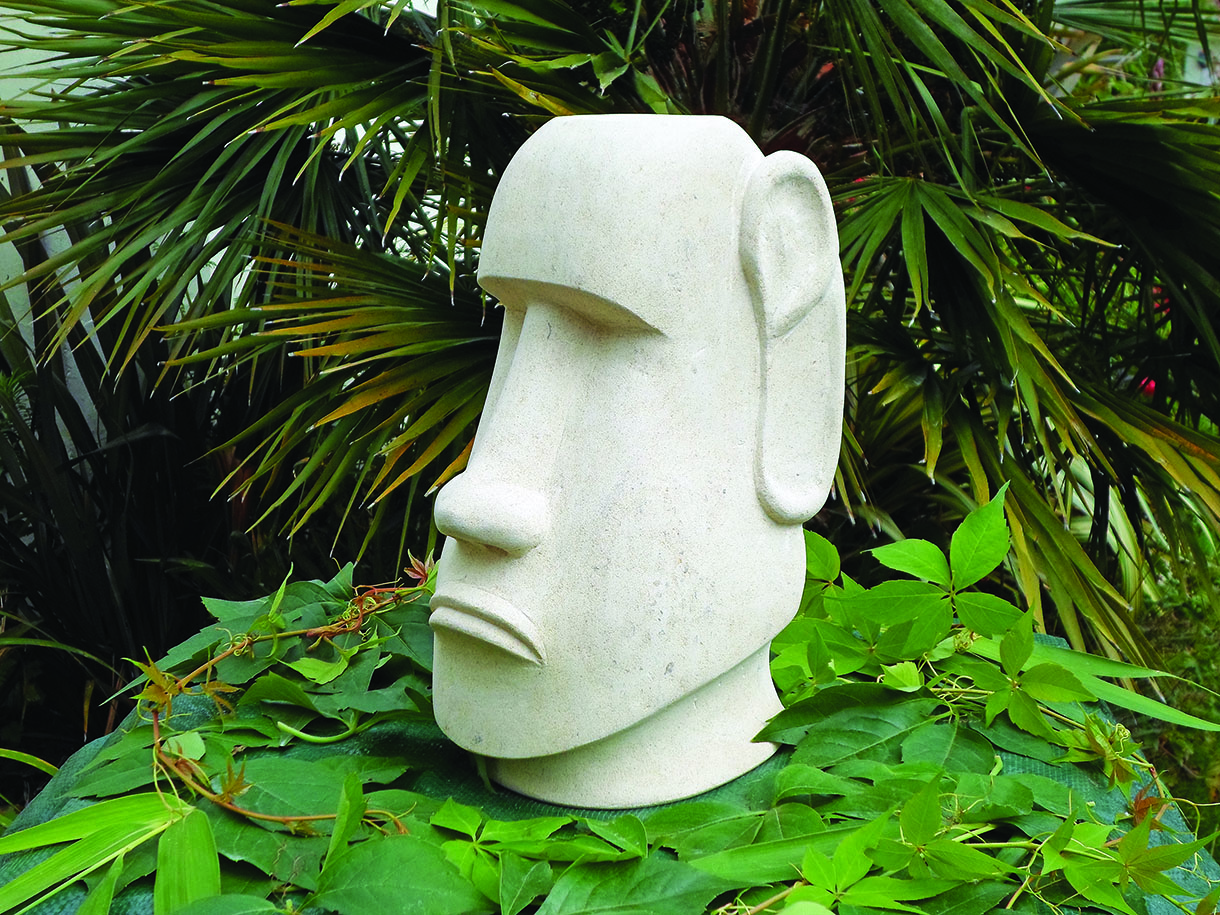
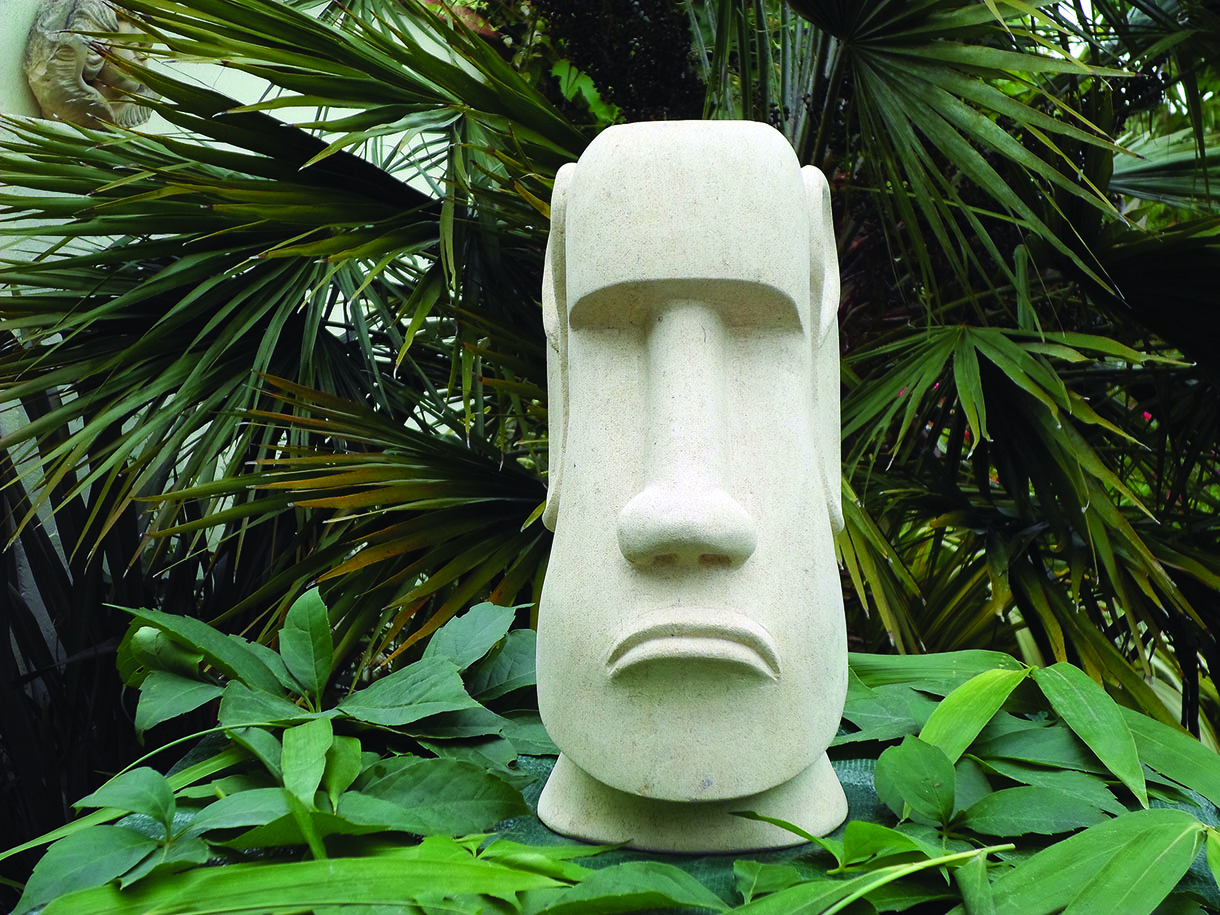
The heads, nearly all carved from volcanic tufa rock, are notable for their angular features with long noses, deep eye slits, heavy brows, sharp chins and long dog-like ears. There is evidence that they were polished smooth with pumice when first made, but the porous tufa rock has weathered to the rough surfaces we see today. Each one is different, so I have drawn up this design to incorporate the features typical of the style.
For new stone carvers, an Easter Island Head makes a good introduction to sculptural figure carving as the bold and primitive features enable you to experience the basics of sculpture before moving on to more detailed figures. Displayed in your home or garden, it will hopefully look more realistic than the cast concrete versions you see in garden centres.
Using the pattern
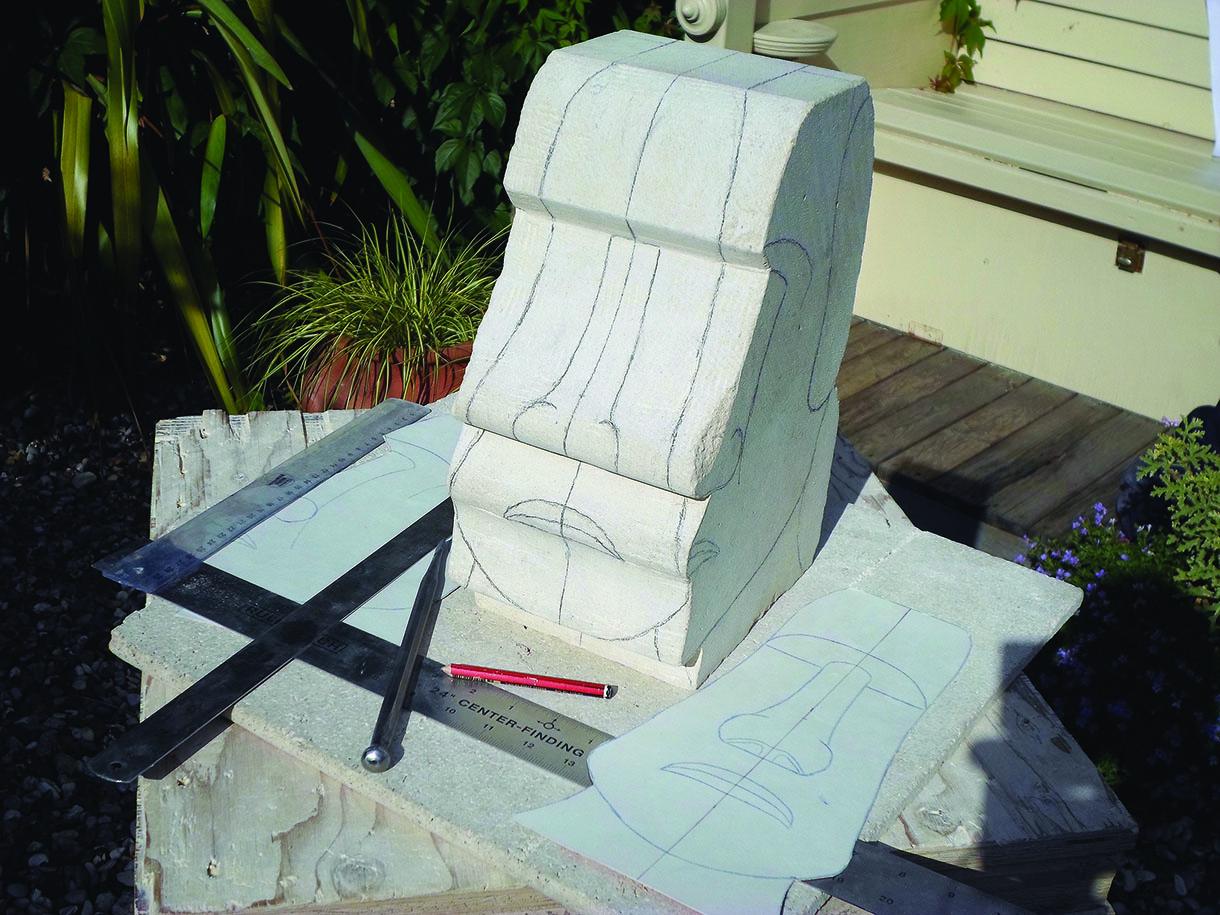
You can enlarge the pattern to any size which suits you, usually depending on the size of stone you can obtain economically (see ‘Buying your stone’). If you use a scanner or digital camera to copy it into a computer you can print the pattern out to the required size in parts on A4 sheets, taking care to ensure each part is at the same scale. Trace or paste the full-size pattern for the front and side profiles onto some stiff card, and cut round the edges to create templates. You can use the templates to transfer the pattern to the stone and check against while working.
Things you will need
Masonry tools
• 6mm chisel
• 13mm chisel
• 18mm chisel
• 6mm gouge
• 13mm gouge
• 18mm gouge
• Point tool
• Claw chisel
• 13mm bullnose chisel
• Rasp
• Mason’s dummy mallet
• Stone/concrete saw
Material
Limestone – I used Bath stone – at 150 x 220 x 320mm
Buying your stone
The best place to look for good quality carving stone is at the yard of an architectural stonemason. Look on the internet for your nearest supplier. Getting stone cut to size can be expensive, so it is generally best to
make your project fit the stone available. See what offcuts the stonemason can offer you at discount prices and choose one that is close to the size you want then work to that size. You can also get rough rocks very cheaply from garden centres and work these to shape, but they tend to be a bit smaller.
If you live in the UK, try to buy Caen stone, a beautiful creamy limestone from Normandy; Portland stone, a slightly greyer limestone from Dorset; or one of the honey-coloured stones from the central limestone belt that runs across England from Bath to Stamford, often referred to as Cotswold stone. For this project I bought a cheap offcut of Bath stone with one rough side, in the centre of the picture, and ‘dressed’ it to a squared block. You can also use sandstone if this is more easily obtainable in your area, but be aware that it will blunt your tools more quickly. Also, sandstone dust is mostly silica, which can accumulate in your lungs over time, whereas limestone dust is mostly calcium which dissolves.
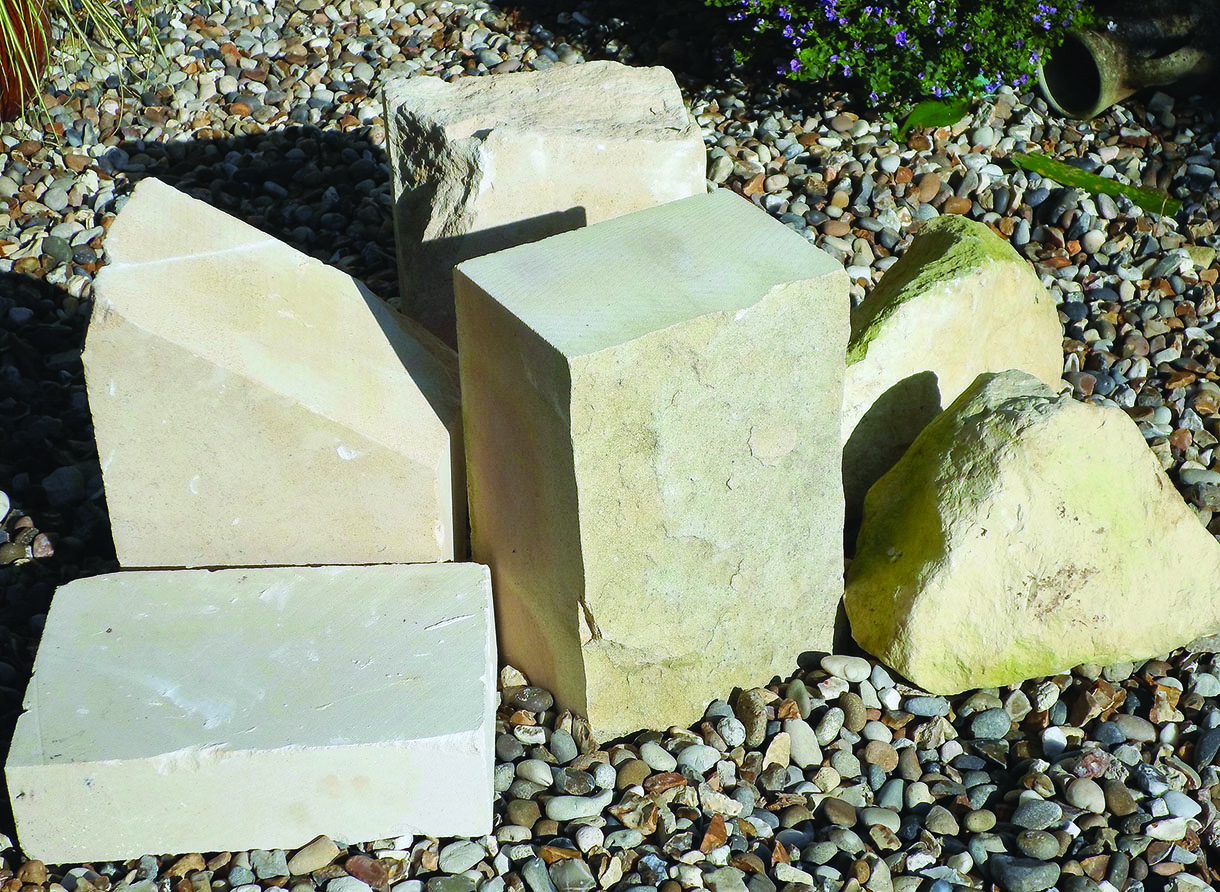
Buy offcuts from a stonemason or rough rocks from a garden centre to keep costs down
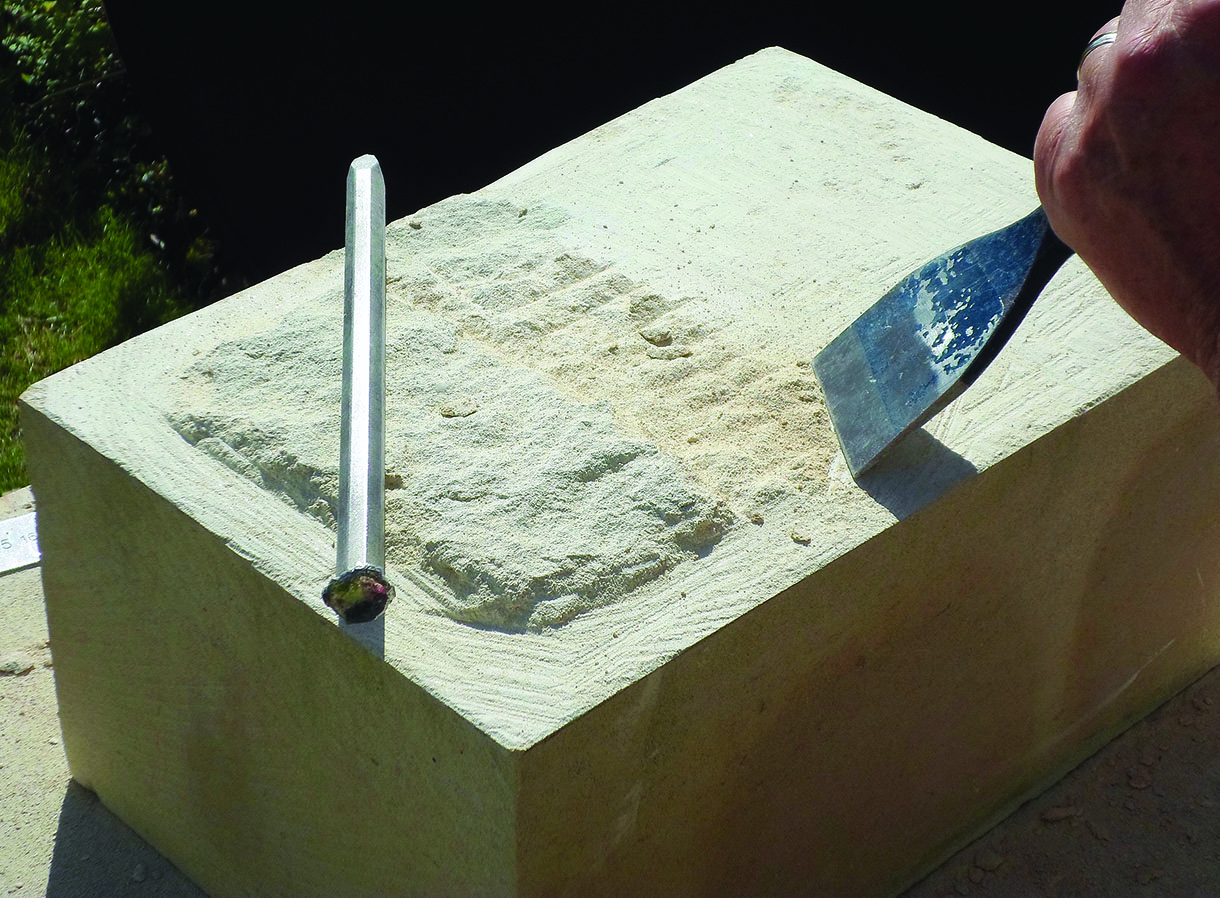
You can ‘dress’ your stone with a point tool and bolster to square off a rough face or cut it to size
Top tip
You can get a smooth finish on the broader areas of a stone carving by getting a broad woodworking chisel and grinding the cutting edge into a shallow curve. If your stone is fairly soft, you can push this along like a plane to smooth out all the tool marks and refine the shape.
Converting a wood chisel to a broad scraper
Carving stone safely
• Wear eye protection when carving stone – flying stone chips are sharp!
• Stone is very heavy. A cubic foot, or 300mm metric cube, of stone will weigh around 70 kilos, so take great care of your back and don’t drop it on your feet. Use lifting gear for heavy pieces.
• Stonecarving creates a lot of dust, so work outdoors if possible. Wear a dust mask if working indoors and take particular care if working with sandstone as silica dust can accumulate in the lungs. Always wear a mask if using power tools.
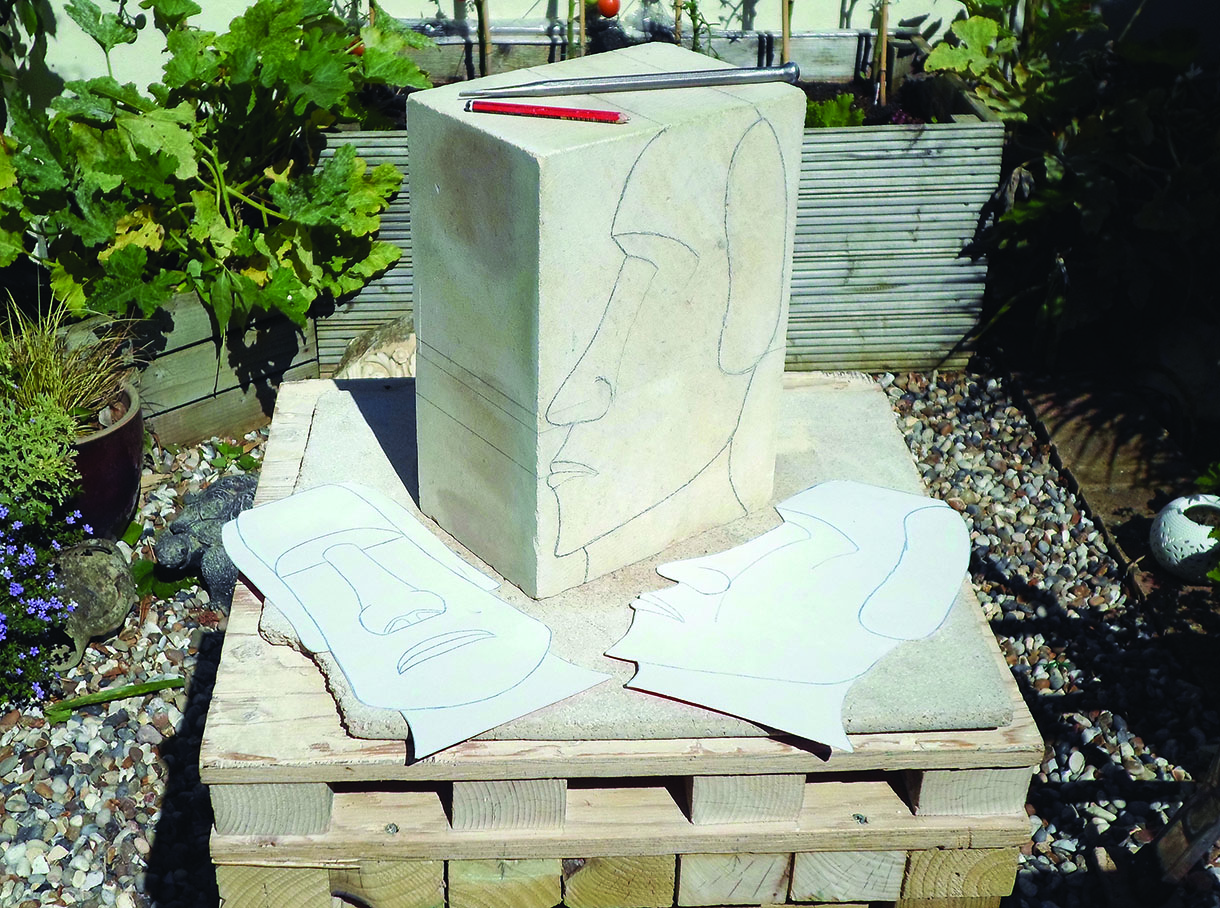
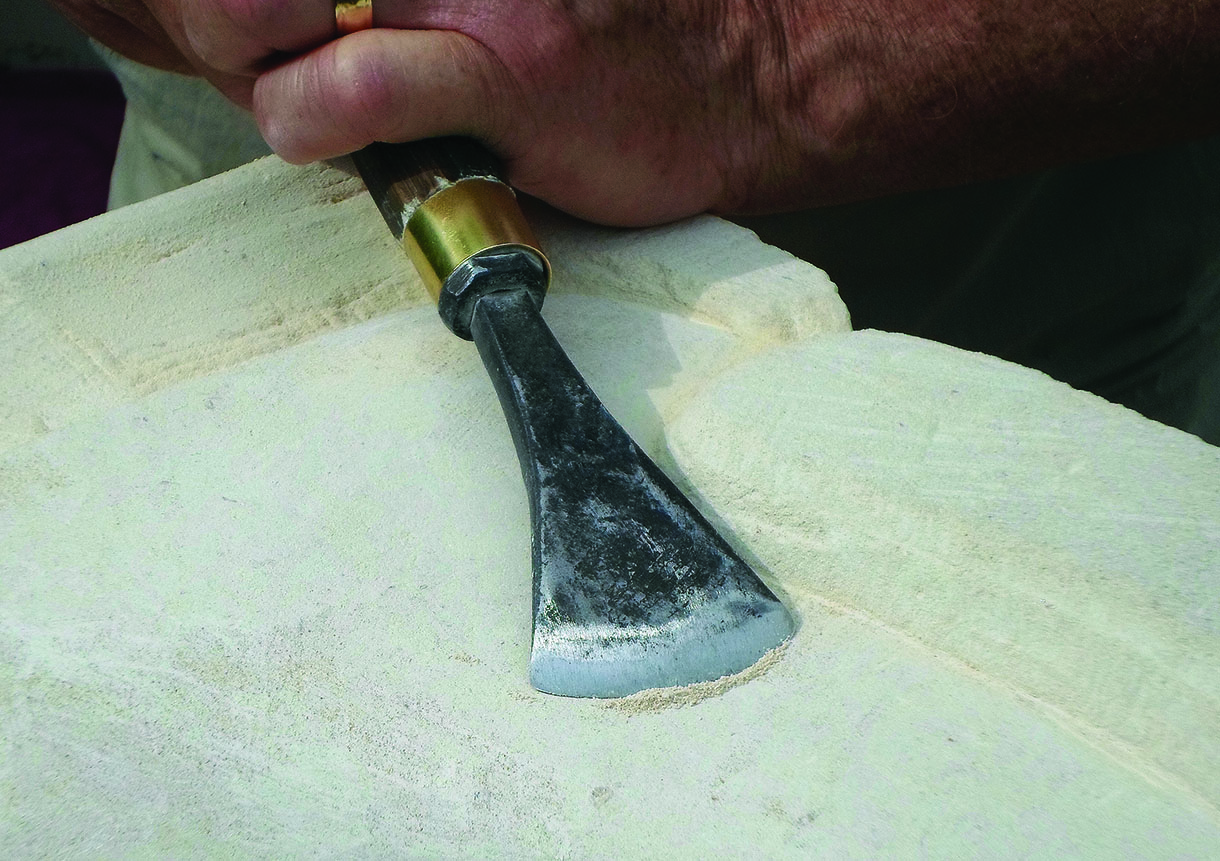
1. Get a block of limestone of suitable size. Take care lifting it, use a stout bench and work outdoors if possible because of dust. Make a full-size copy of the drawing to fit your stone and a card template. Draw round the side template onto the stone, making sure both sides are lined up, then scribe the lines with the point of a chisel
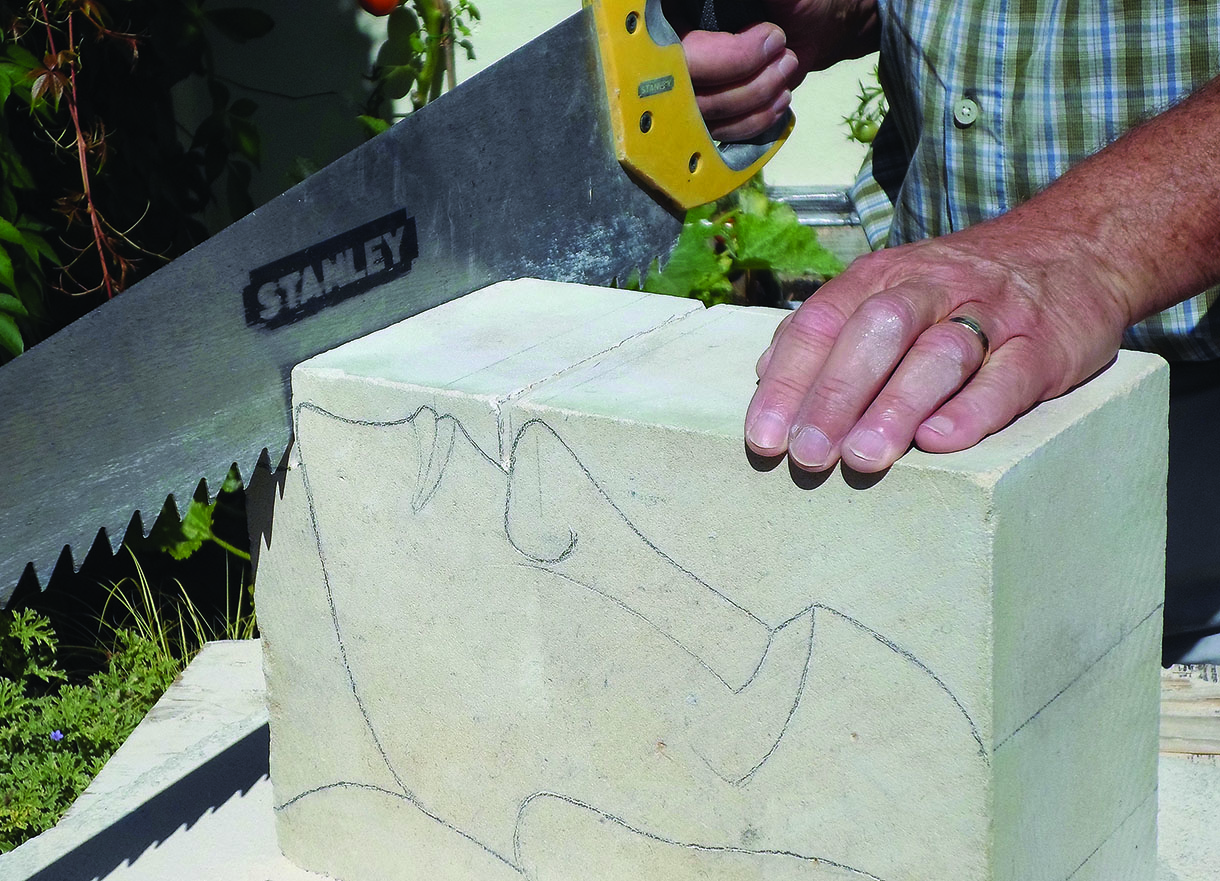
2. Now, lay the block on its back. To protect the points of the nose and chin make relieving cuts with
a stone/concrete saw before you start chiselling. Cut down to just below the nose and below the chin
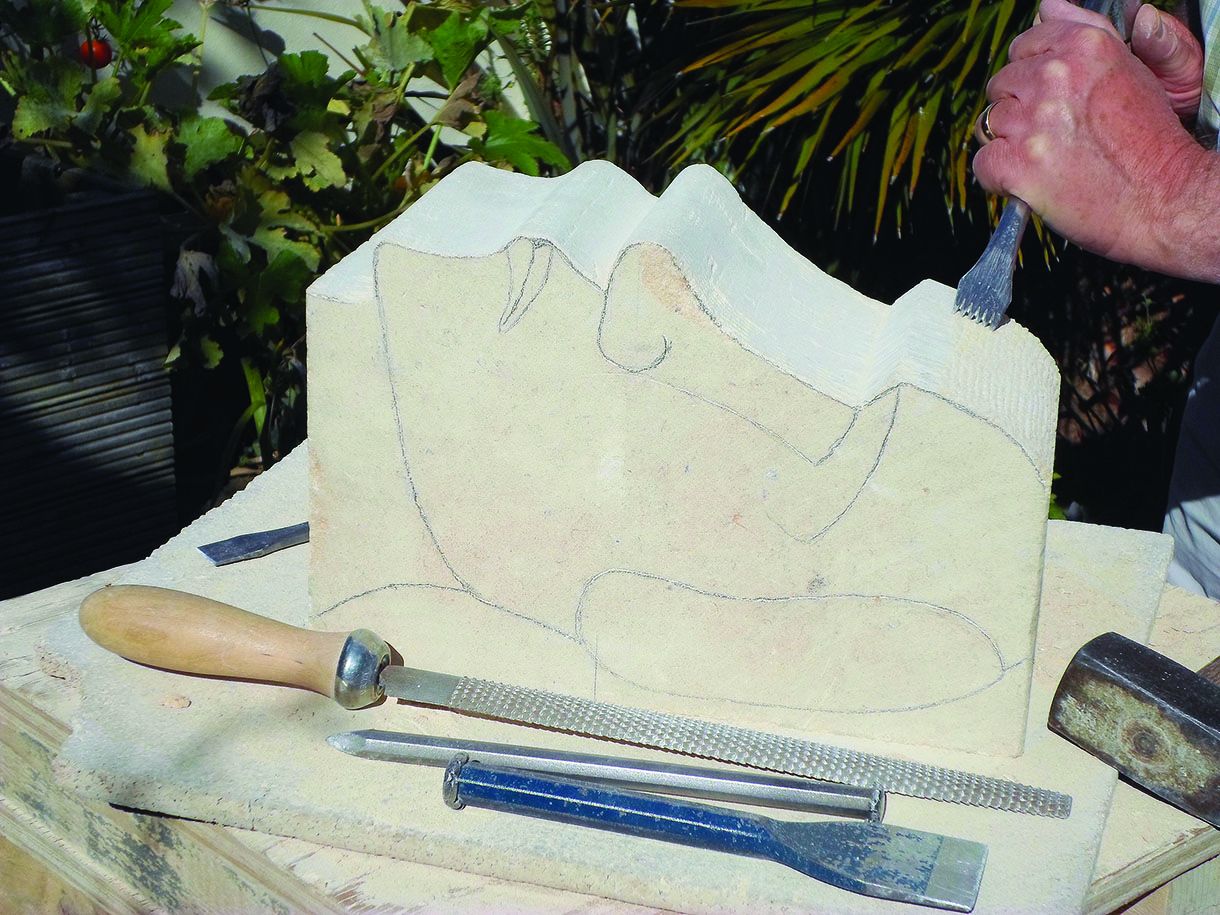
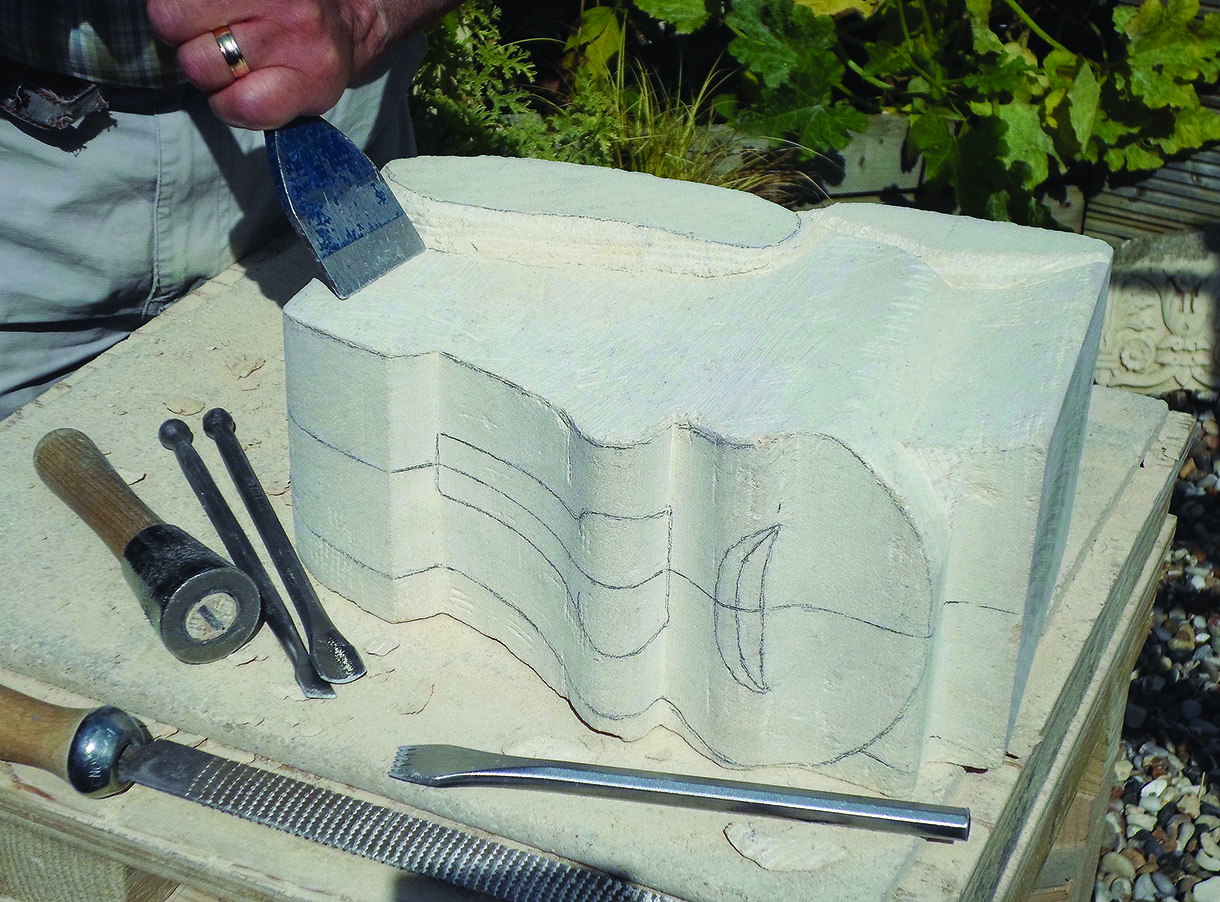
3. Use a point tool, bolster, claw chisel and rasp to form the front profile right across from the guidelines on one side to the other. Try to get it flat from side-to-side so the middle is at the same level as the guidelines
4. Shape the back profile down as far as the bottom of the ears, but leave the neck untouched for now as it will help to keep the piece stable while carving the upper head
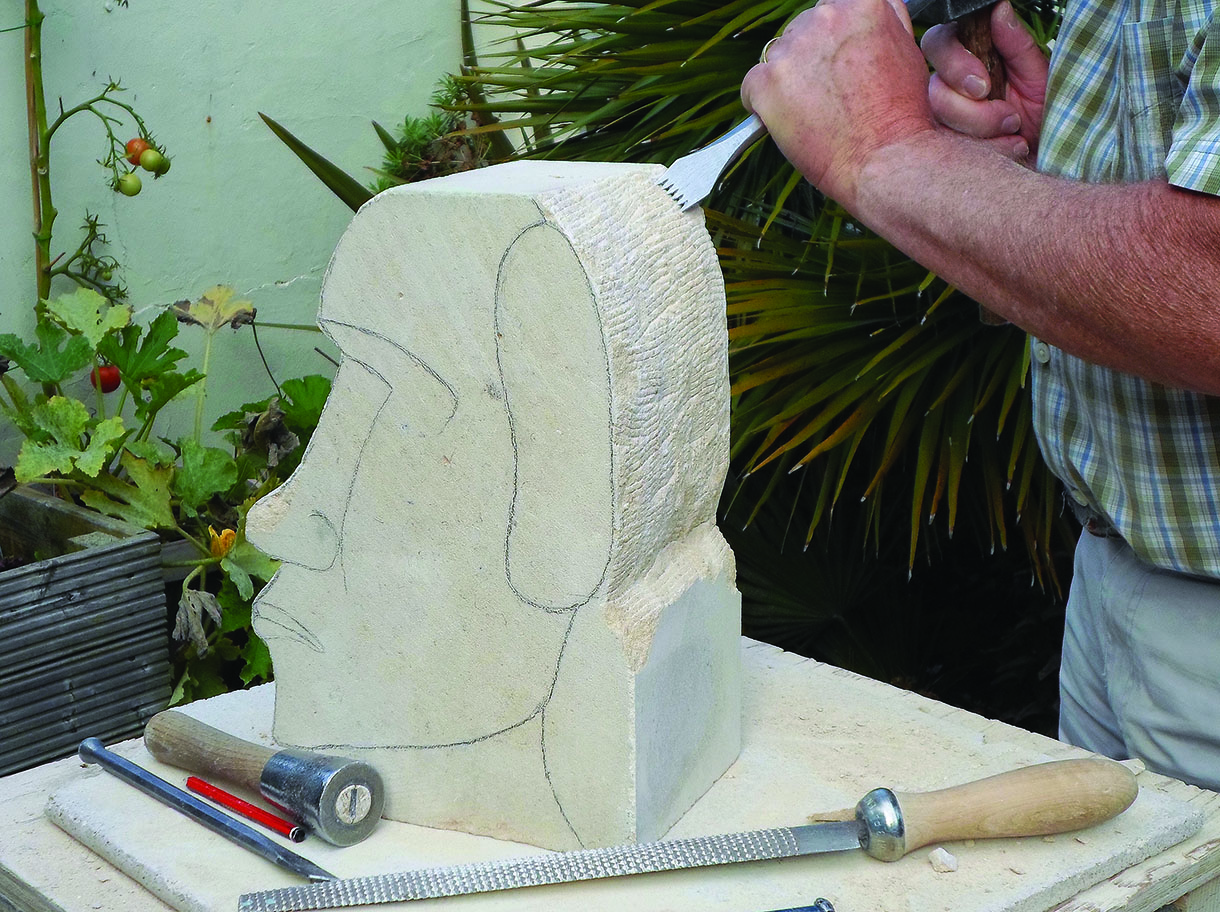
5. To form the side profiles, draw a centreline around the whole block, then use the front/back template to draw the shape on the back of the head. Next, cut the ears from the template so you can draw the outline of the face on the front of the block. Use the template as a guide, then measure from the centreline to check it’s symmetrical. Draw on the nose and lips by measuring off the drawing
6. Use a claw chisel and bolster to remove the surplus stone from the sides, working level from the face line back as far as the ears. Remove the stone under the chin, back to the neck. Leave the ears and stone behind the neck untouched
Shaping the face
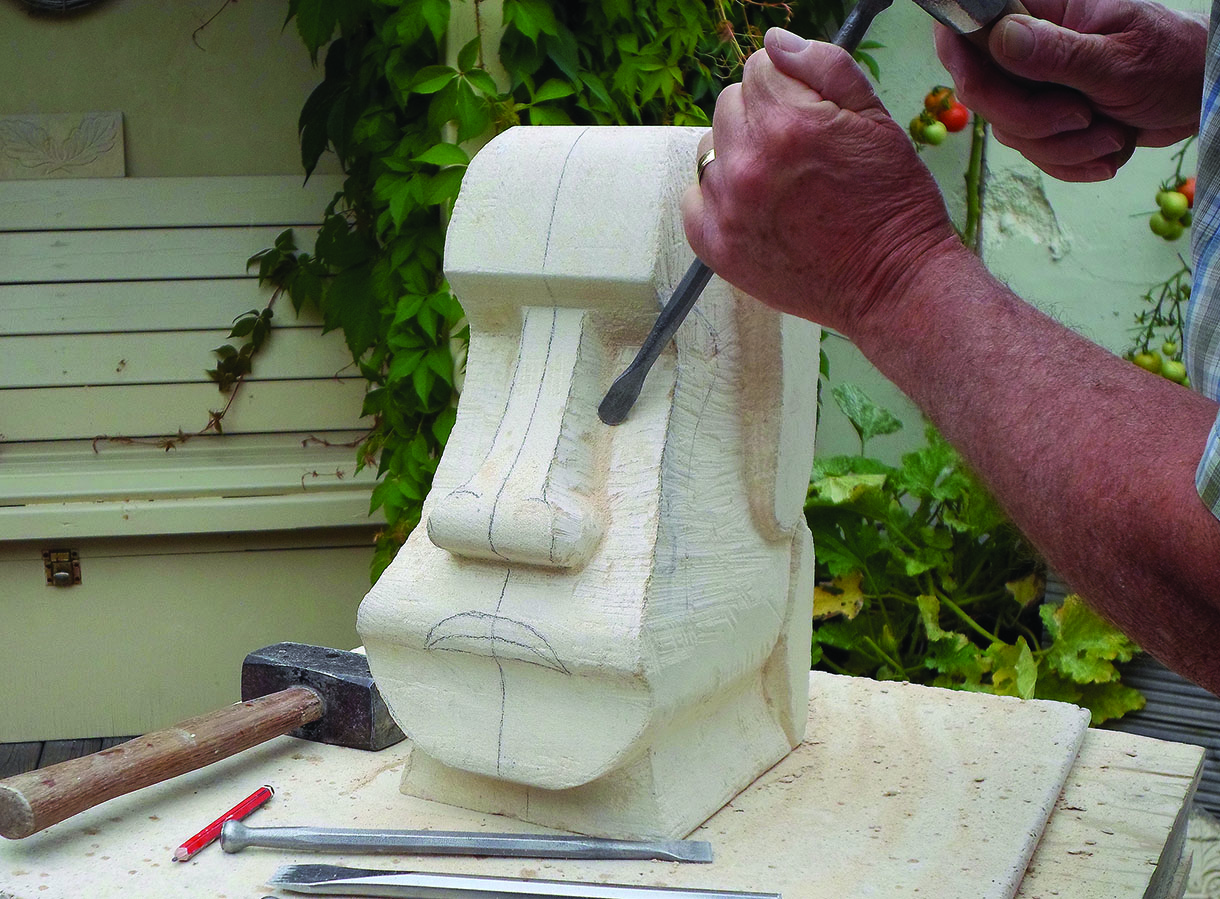
7. Outline the nose by drawing a line down each side of the face and cut back to the lines showing the width of the nose. Don’t cut too sharply into the corners as you will need some room for manoeuvre in the final shaping. A bullnose chisel or a small gouge is best for carving a ‘soft’ corner
8. Now start rounding off the square edges each side of the lips, around the neck, the jawline and the cheeks. Start with the claw chisel, then work the surface back with an 18mm chisel
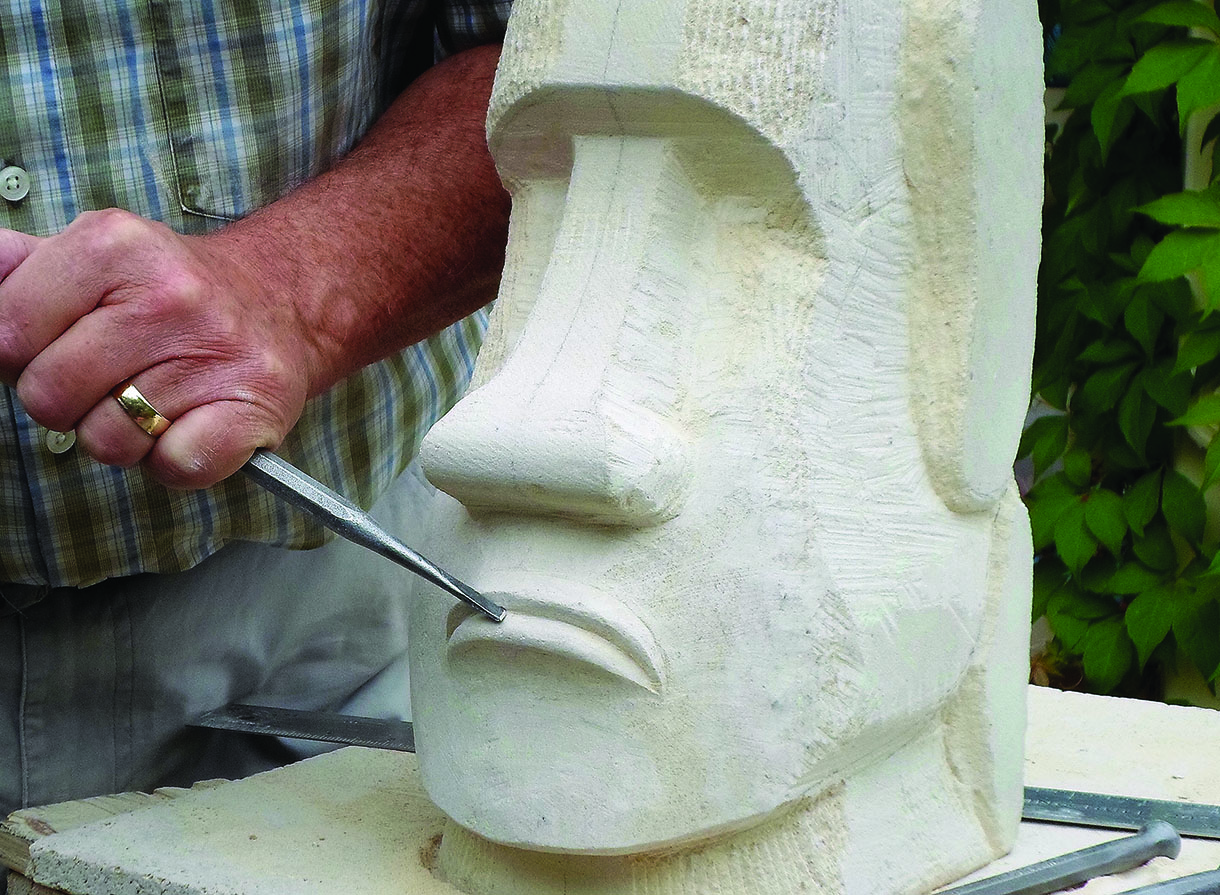
9. You can now carve the lips, the chin and the area around the mouth. The lips on Easter Island Heads have a noticeable pout and scowl. They curve back towards the cheeks, as well as downwards. Use 6mm and 13mm chisels to cut the join of the lips and form the convex shapes, then use 13mm and 18mm gouges to cut back the concave hollows above and below the lips
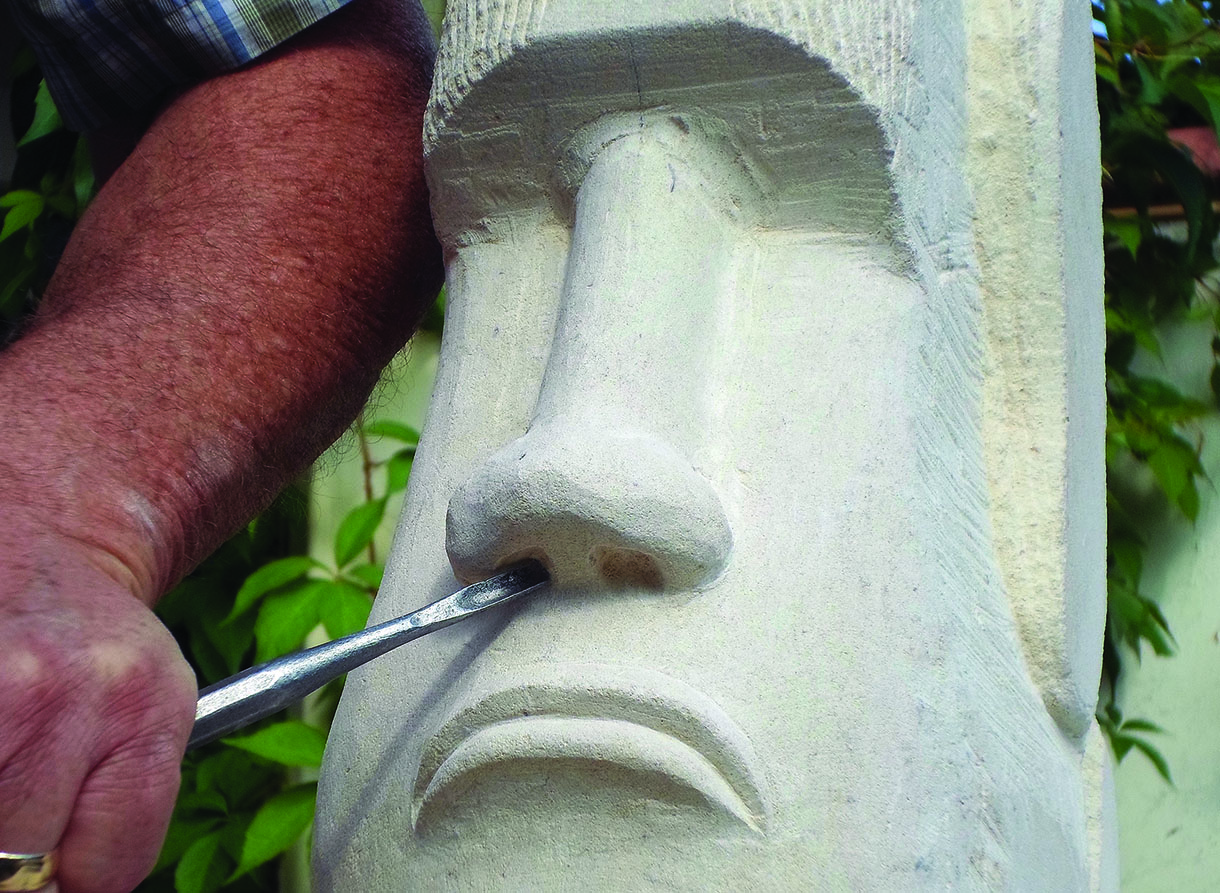
10. Now shape the nose and refine the front of the face. You will probably carve the nose too wide and flat at first, so keep going over and over it until it is narrower and slightly pointed. Hollow out the nostrils with a 13mm gouge
11. Continue to the top of the head and refine the domed forehead and the heavy brow. A stone rasp is a good tool for shaping broad convex areas. Easter Island Heads are generally flat on top, so I have kept to this style. There are no eyes as such – most of the heads just have a horizontal line where the cheeks meet the brow
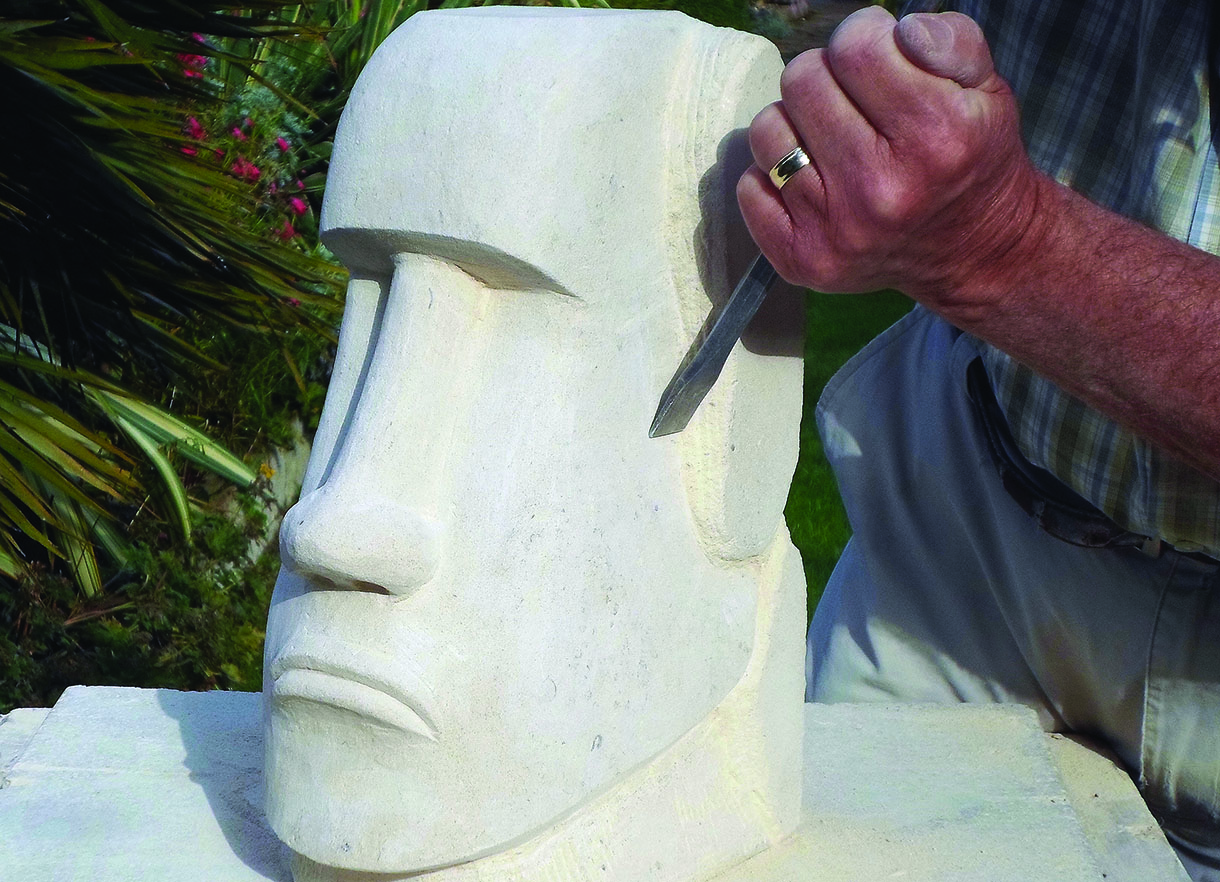
12. You can now finish the cheeks and jawline back as far as the ears, using an 18mm chisel. Make sure the face is balanced on each side and work it to a smooth finish
Finishing the head
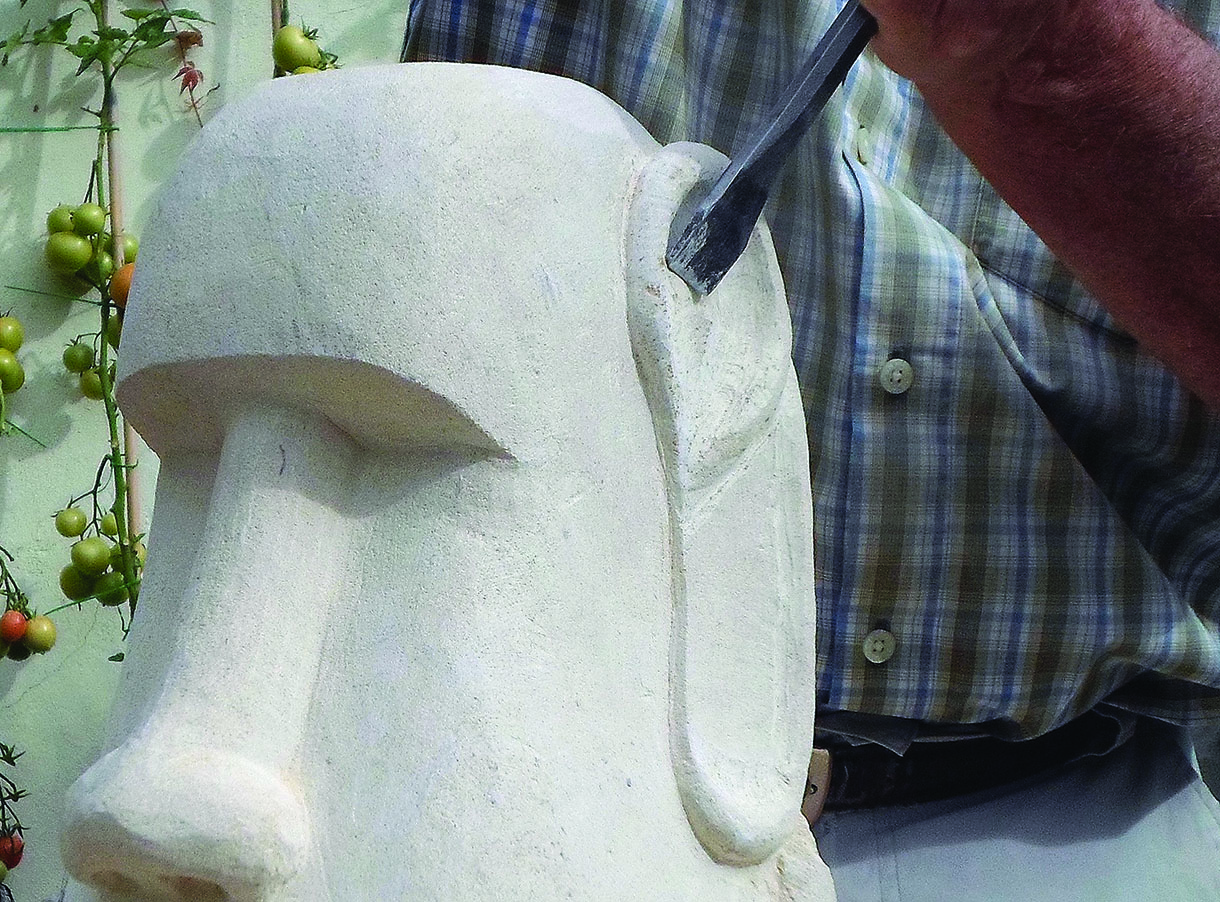
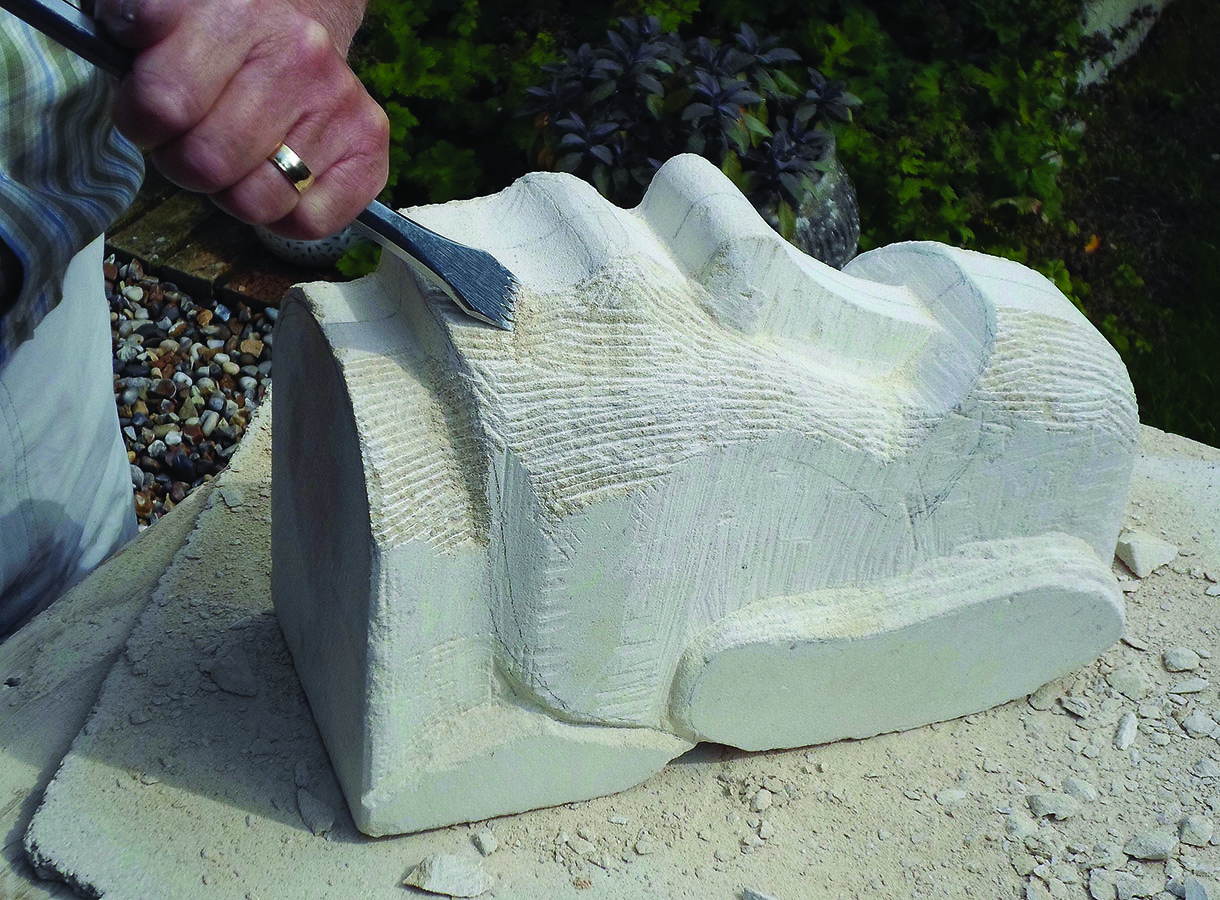
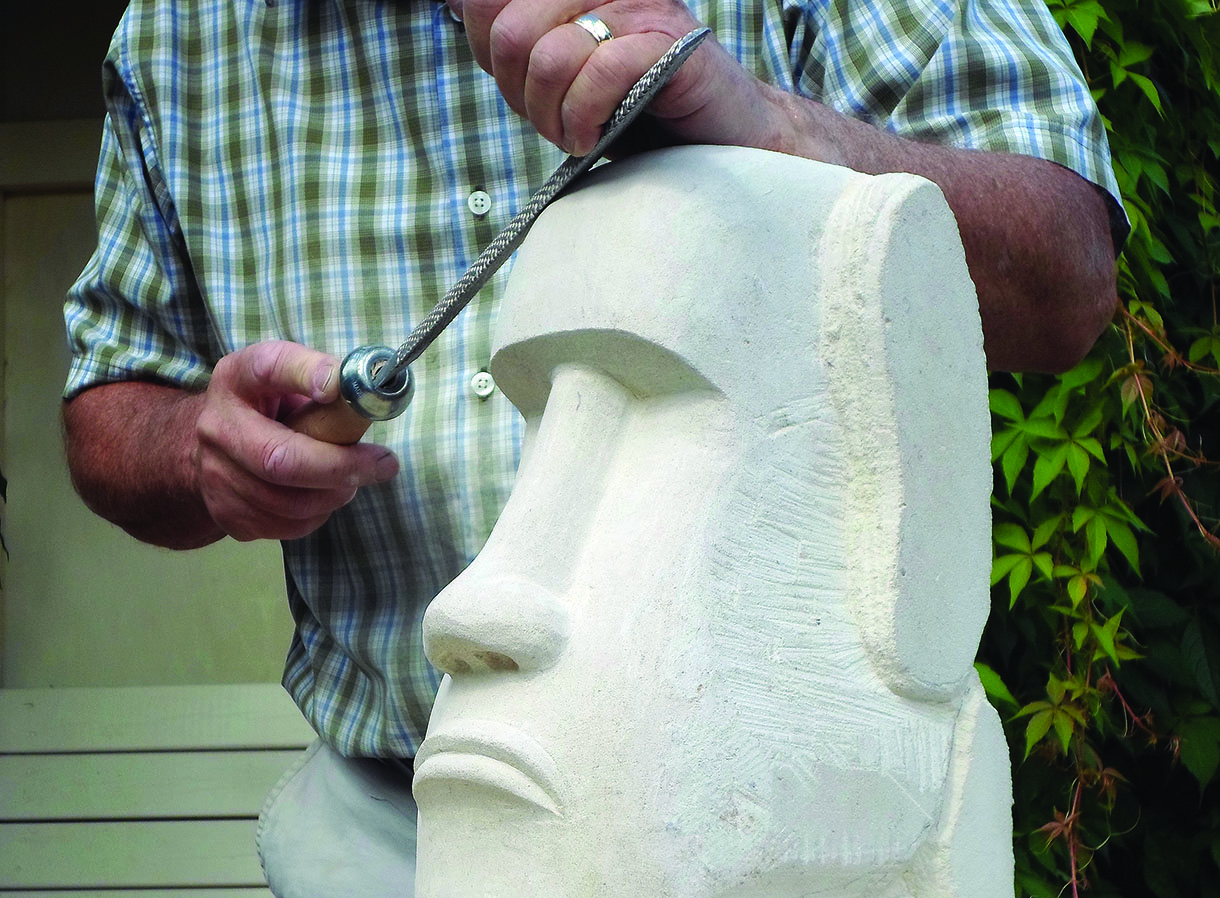
13. Form the long concave hollow of the ears, mostly using an 18mm gouge and shape the top of the ears into the top of the head

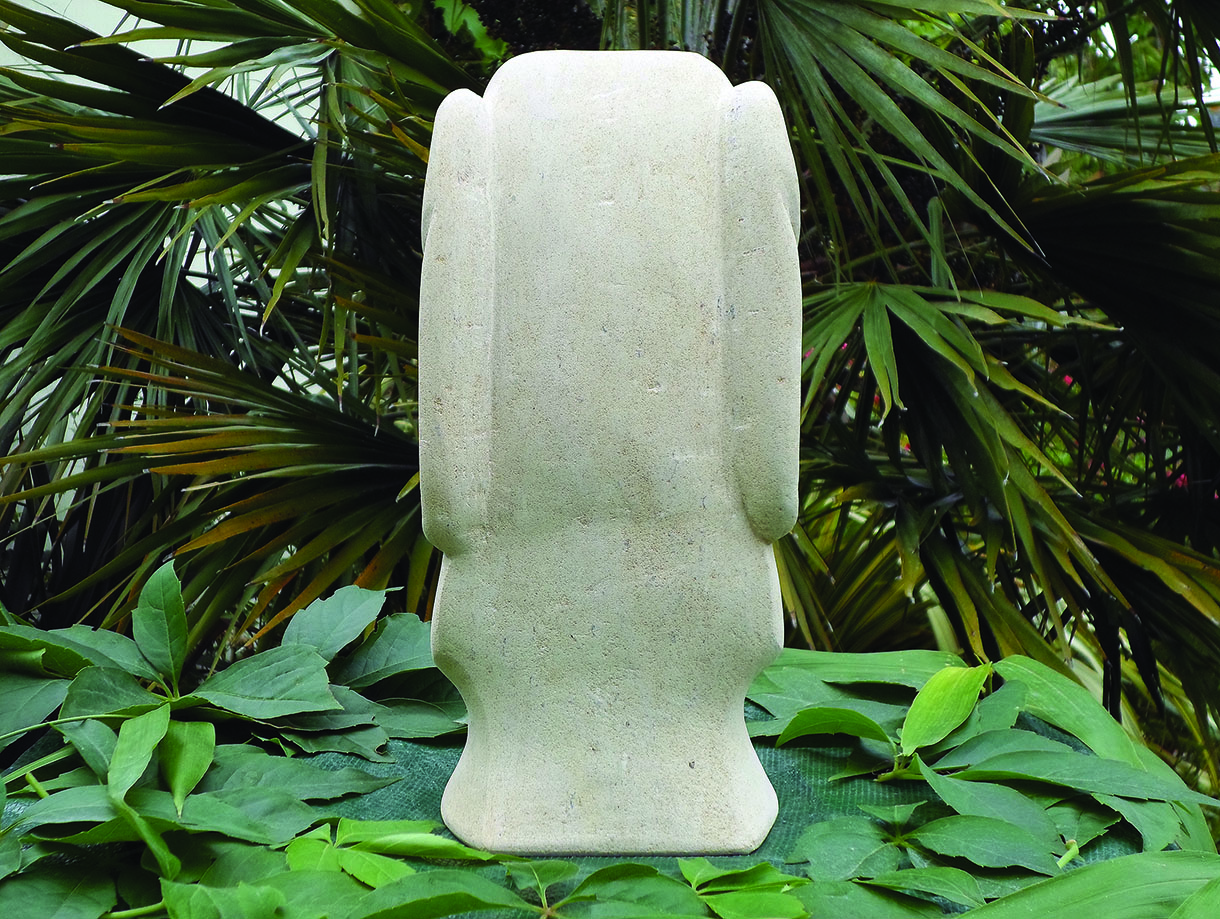
14. Round over the back of the head between the ears and start chiselling away the block of surplus stone we left behind the neck
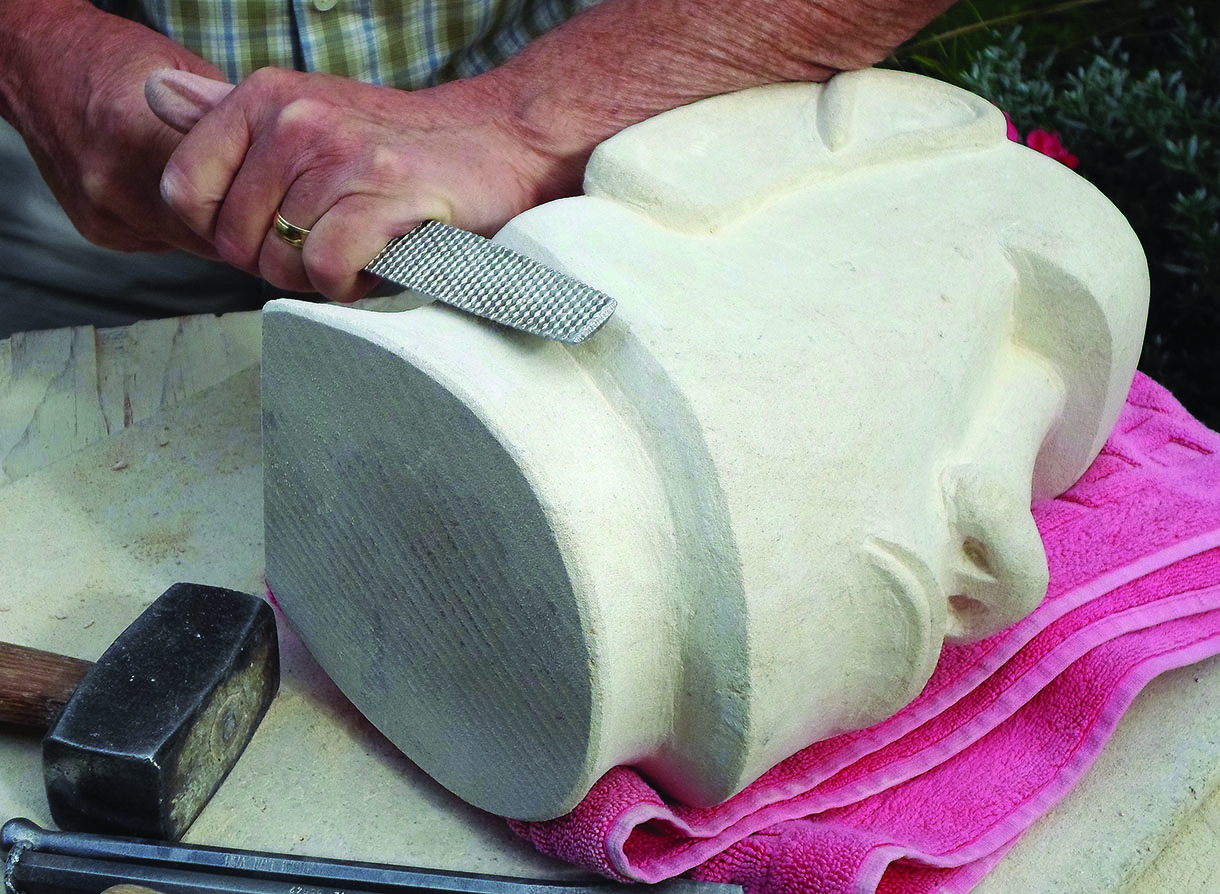
15. All that is left now is to shape the neck to form a base for the carving, using mainly the 18mm gouge and the rasp. Create a chamfer around the bottom as the edges of the base will be liable to crumble if the angle is too acute
16. You can either leave the carving with a tooled finish or, as I have done, you can make it smooth using 120-grit abrasive – we know the Polynesians polished them smooth. Hose off all the dust and your Easter Island Head is ready to face the world