Steve Bisco shows how to create a delicate display of leaves and flowers
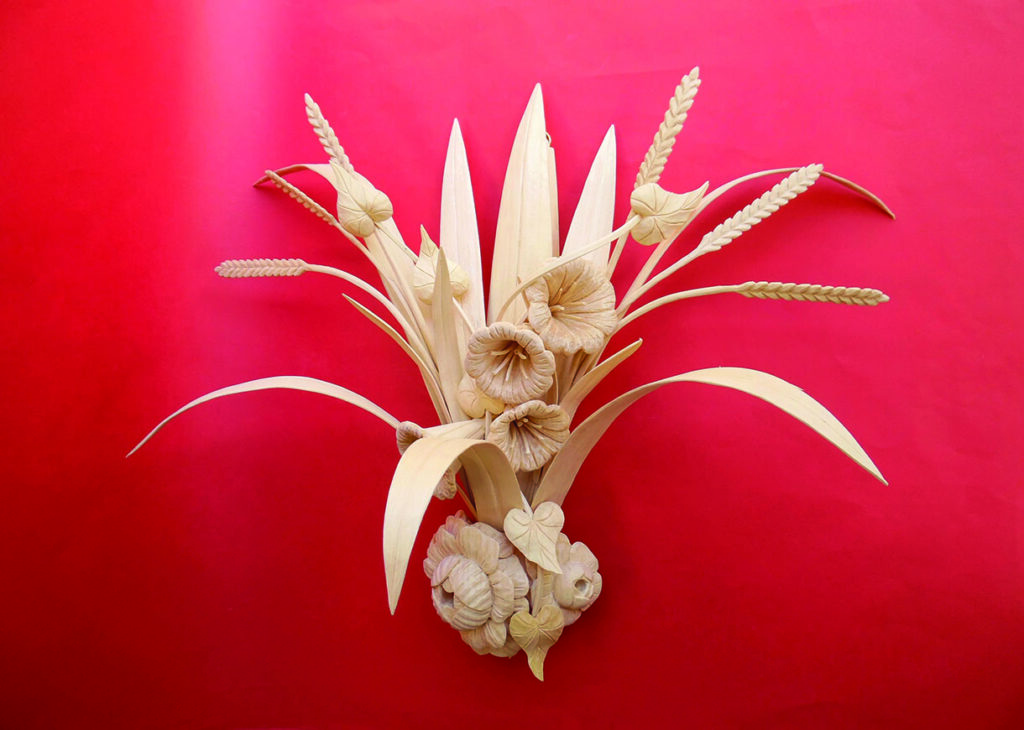
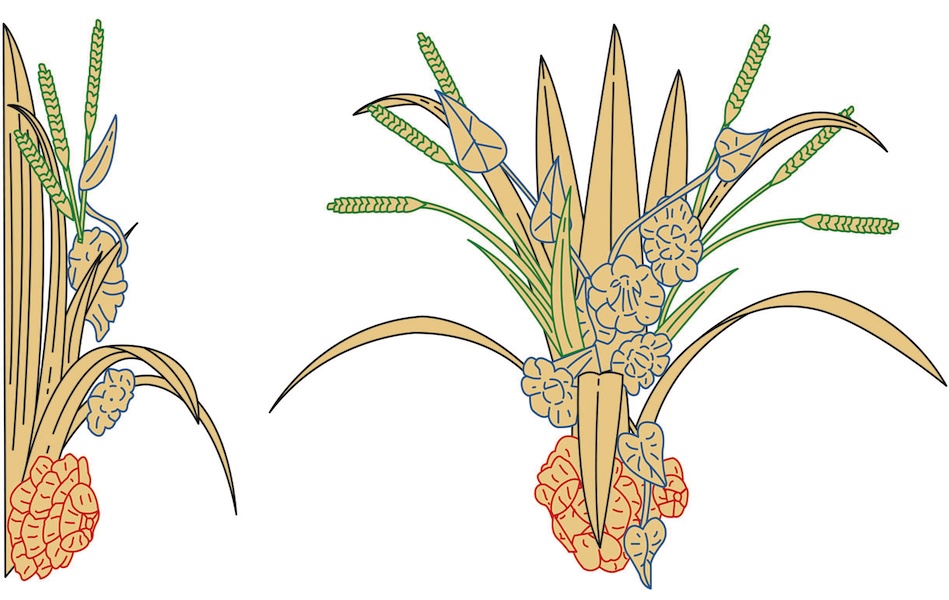
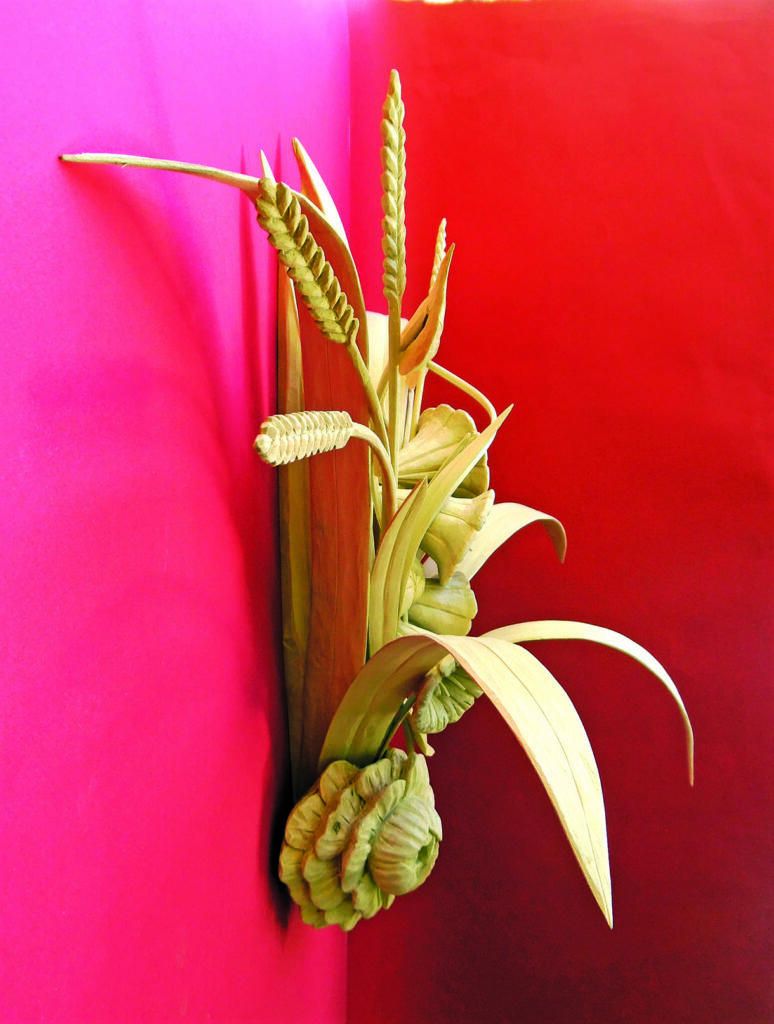
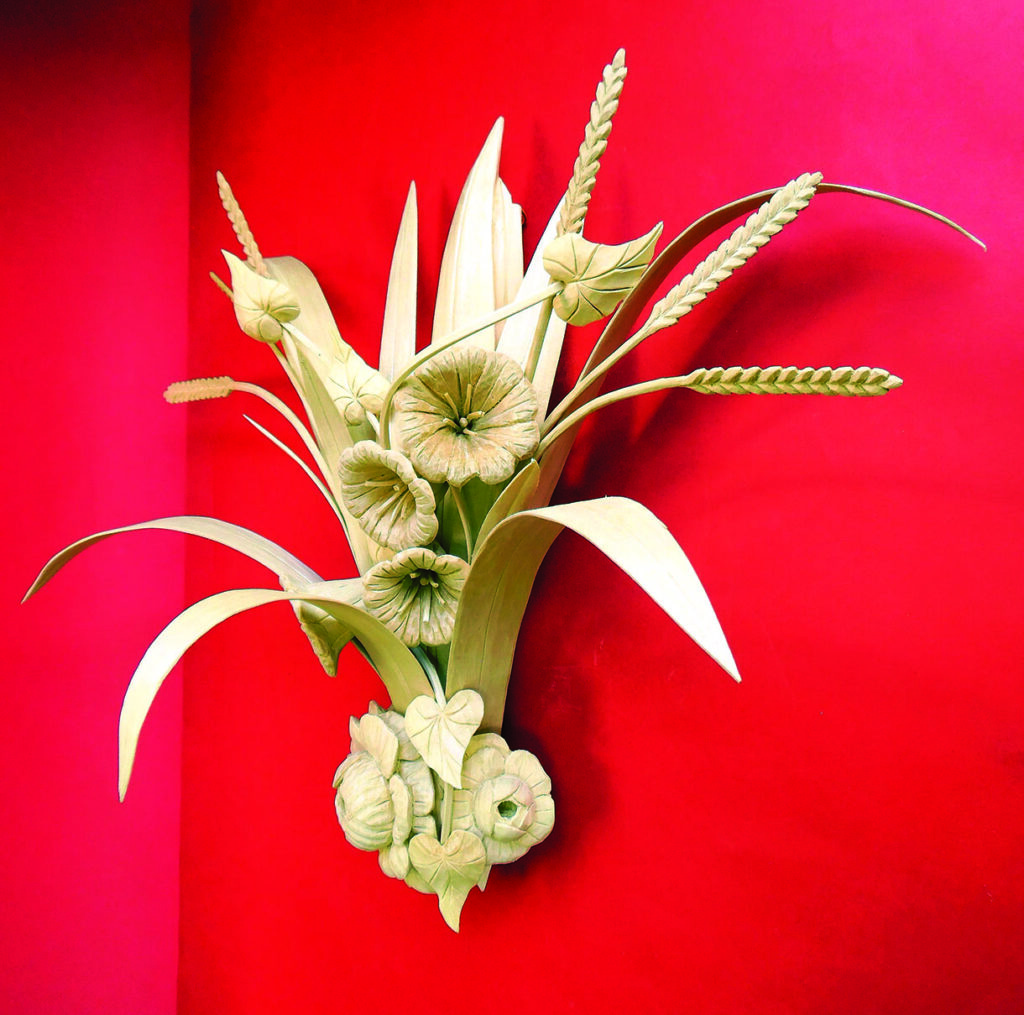
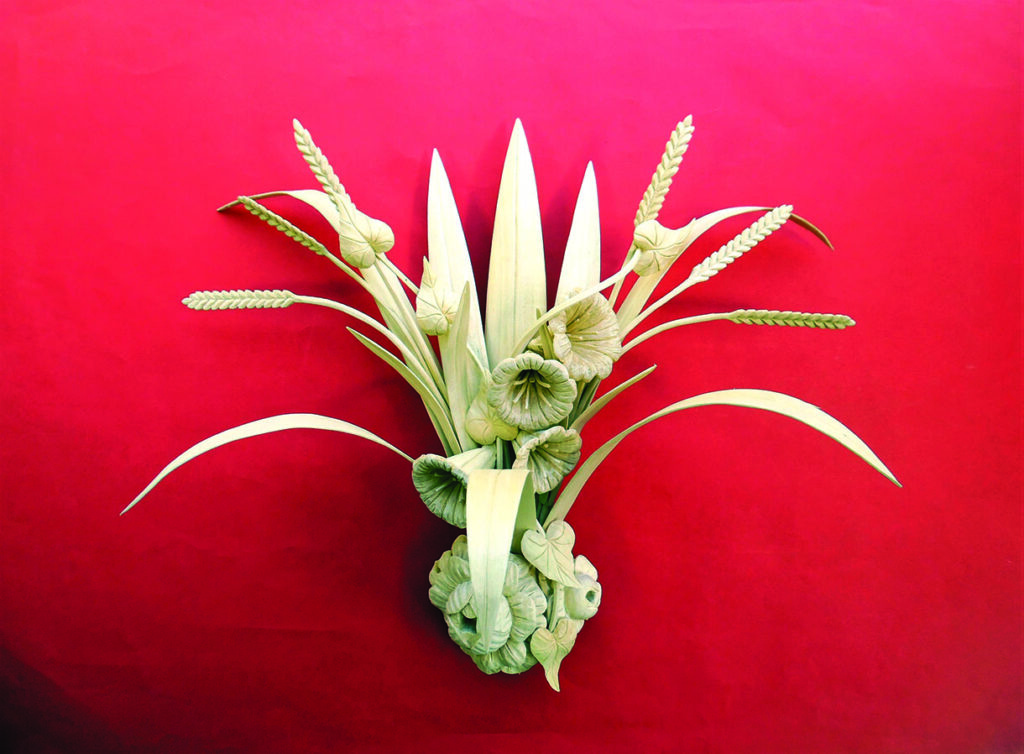
In a previous articleI experimented with steam bending to produce a limewood floral display with thin and delicate curved stems and leaves that would be strong enough to stand free in a vase. This time I have gone for a wall-mounted display with long and broad curving leaves, thin stems of wheat and bindweed, and a cluster of carved flowers. This display has a very free and open form containing more air than wood, which would be impractical to produce by conventional carving methods. The drawing overleaf sets out the shape and plan, but this project is more about the method than a specified shape, and the way you bend and shape your own pieces will make your display unique.
So why do we need steam? Thin, carved stems and leaves are naturally fragile unless they are straight and run directly along the grain. Wood fibres are quite strong along their length but they have a limited attachment to the fibres alongside them, which is why short-grain sections are fragile. Steam bending offers the option of producing a long curved, bent, or even twisted stem or leaf in which the grain runs from end to end through all the changes in direction. The penetrating heat and moisture of steam plasticises the lignin between the fibres, allowing them to ‘slide’ alongside each other. The fibres can then be bent into a different shape which, on cooling again, will become fixed.
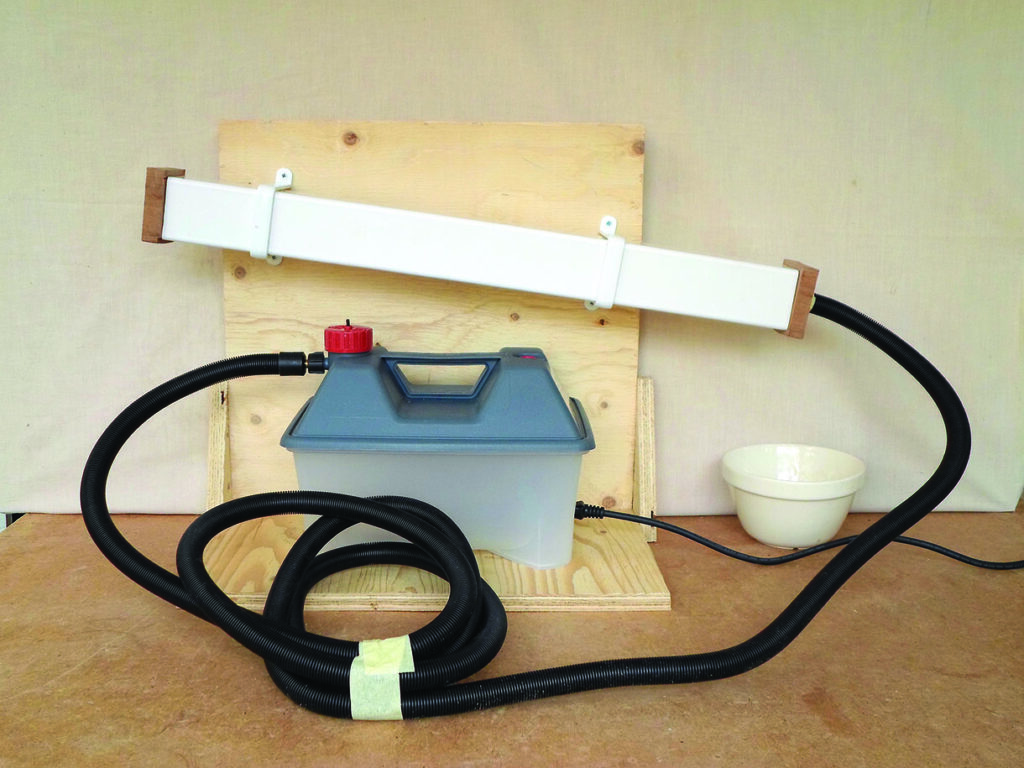
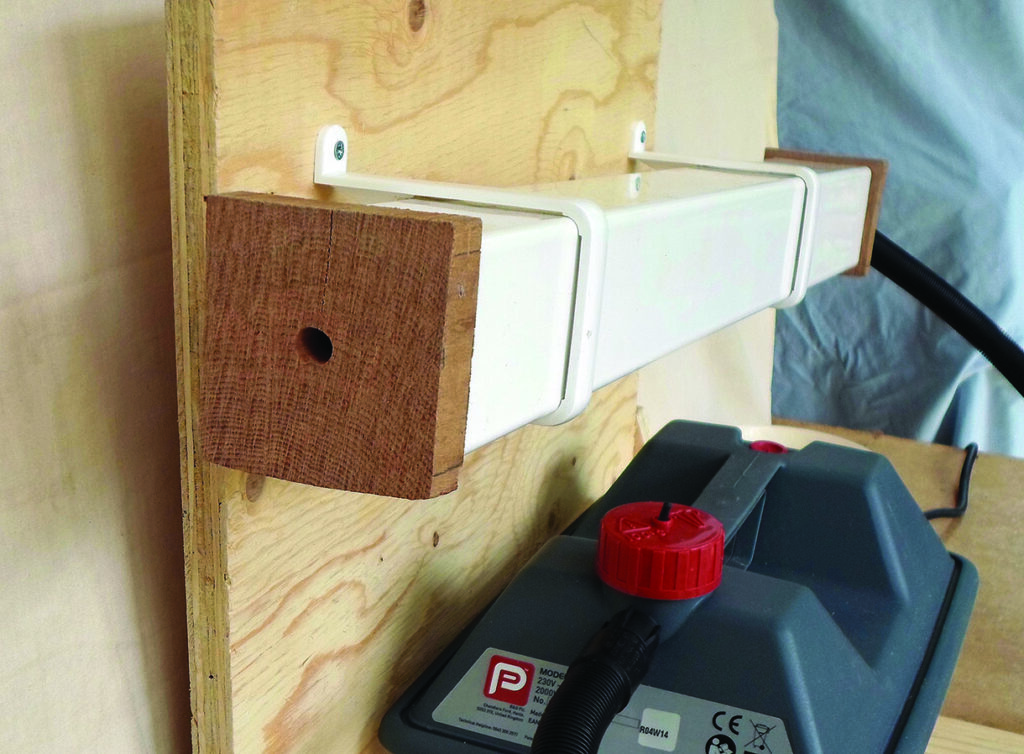
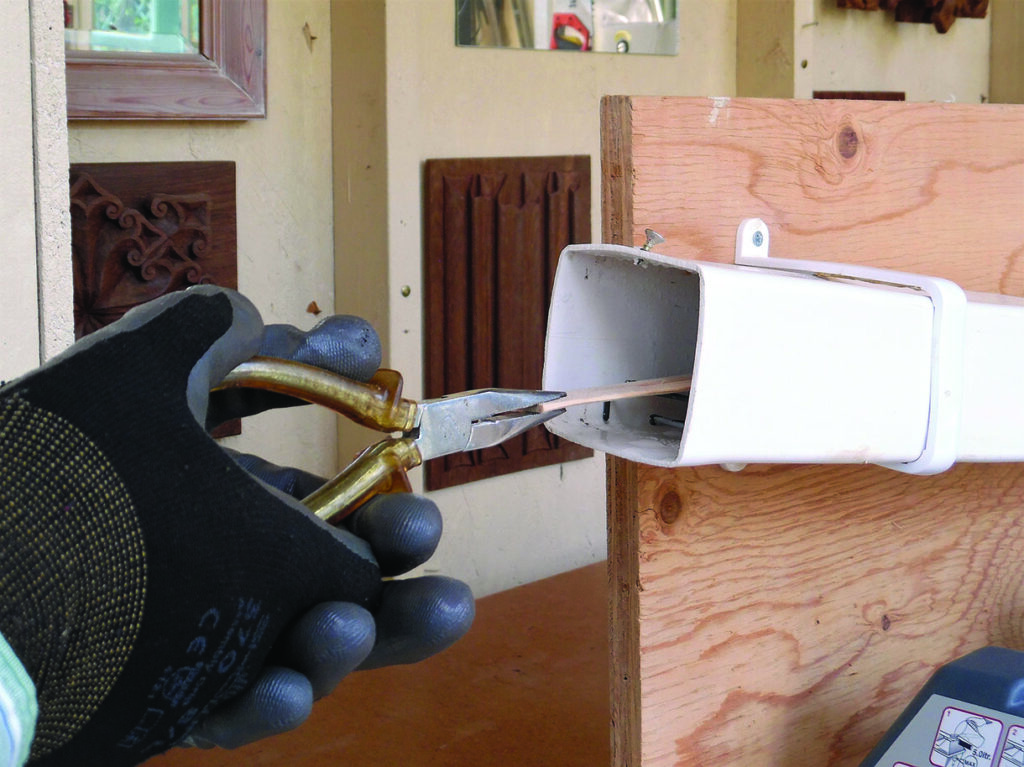
Steam bending on a small scale is quite a simple, ‘low-tech’ and low-cost process. You basically need two things – a source of steam and a ‘steam chamber’. A simple and reliable way of producing steam for a sustained period is to use an electric wallpaper steamer, which you can buy quite cheaply from home decorating stores. This has a water reservoir which holds enough water to boil for around an hour – plenty long enough for our purposes – and a length of tube which you can connect to the steam chamber. For this I have used a 600mm length of 65mm square rainwater downpipe, which I have fixed to a plywood stand. This is quite adequate for steaming flower stems and leaves.
There are quite a few woods which can be steam bent, but as the finer parts of a foliage carving will usually be made of limewood (Tilia x europaea) I have used this wood for the steamed parts as well.
Materials: • Lime (Tilia x europaea) • Stems, leaves & spine 450 x 120 x 45mm • Flowers 260 x 130 x 65mm
Cutting list • Spine section – 380 x 45 x 45mm • Long leaves – 7 strips @ 450 x 35 x 3mm • Wheat ears – 2 strips @ 380 x 45 x 4mm • Wheat leaves – 1 strip @ 450 x 35 x 3mm • Convolvulus stems – 1 strip @ 450 x 35 x 3mm • Convolvulus leaves – 1 strip @ 380 x 45 x 12mm • Convolvulus flowers – 4 blocks @ 65 x 65 x 65mm • Roses – 1 block @ 130 x 100 x 65mm
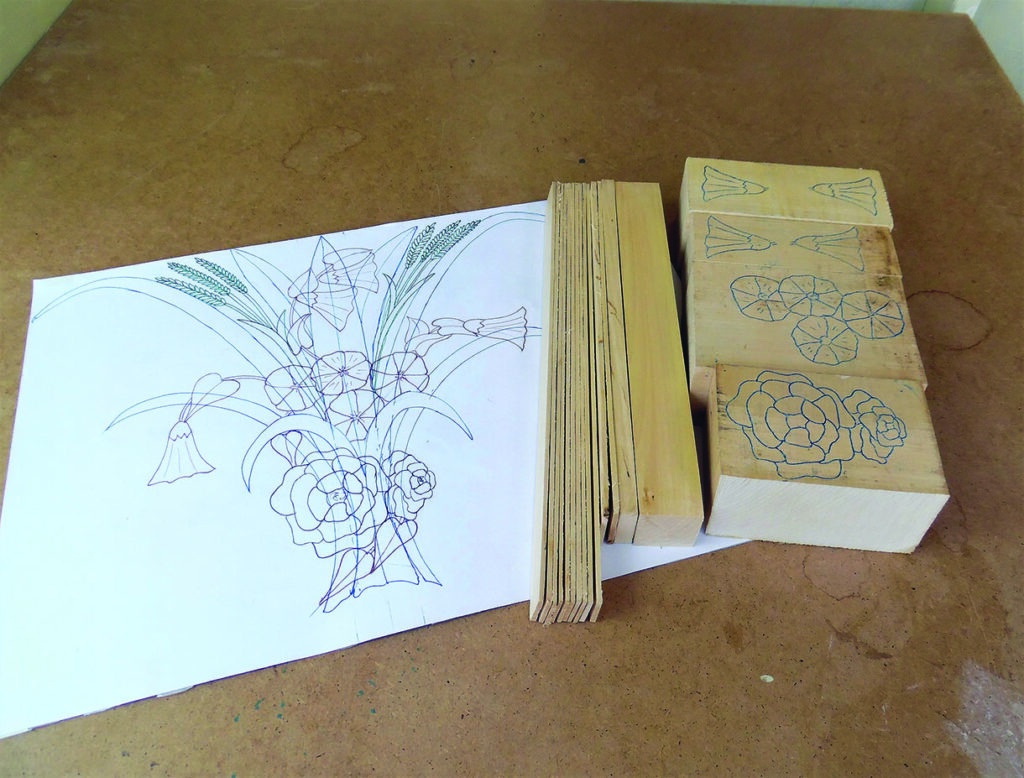
Drawing
USING THE DRAWING
In this project the drawing illustrates how the various elements can be made up and assembled. It shows the large iris leaves in black, the wheat sheaves in green, the convolvulus plant in blue, and the two roses in red. Because of its open form, composed of many different parts, the pattern cannot simply be traced on to the wood in the usual fashion. Use the cutting list and step photos to produce the individual elements in a form similar, but not necessarily identical, to those illustrated, bend them into a similar shape, and assemble them in a similar way to the illustration. Because of the number of variables every carver will end up with a different result, so do what works best for you and put your own stamp on the design.
DID YOU KNOW?
The plant Convolvulus arvensis, with its trumpet-like flowers, heart-shaped leaves and winding stems, is better known to farmers as field bindweed and to gardeners as morning glory. Before the days of modern herbicides it was common in cornfields and hedgerows and is still often found in uncultivated areas. It was popular with children because the flowers could be squeezed out of their stems to float down like a parachute. They are fiddly to carve but are highly decorative in a limewood foliage composition.
MAKING A SIMPLE STEAMER
1. Make a stand. Set up the plastic pipe with a slope to allow the steam to flow upwards and condensation to drain downwards
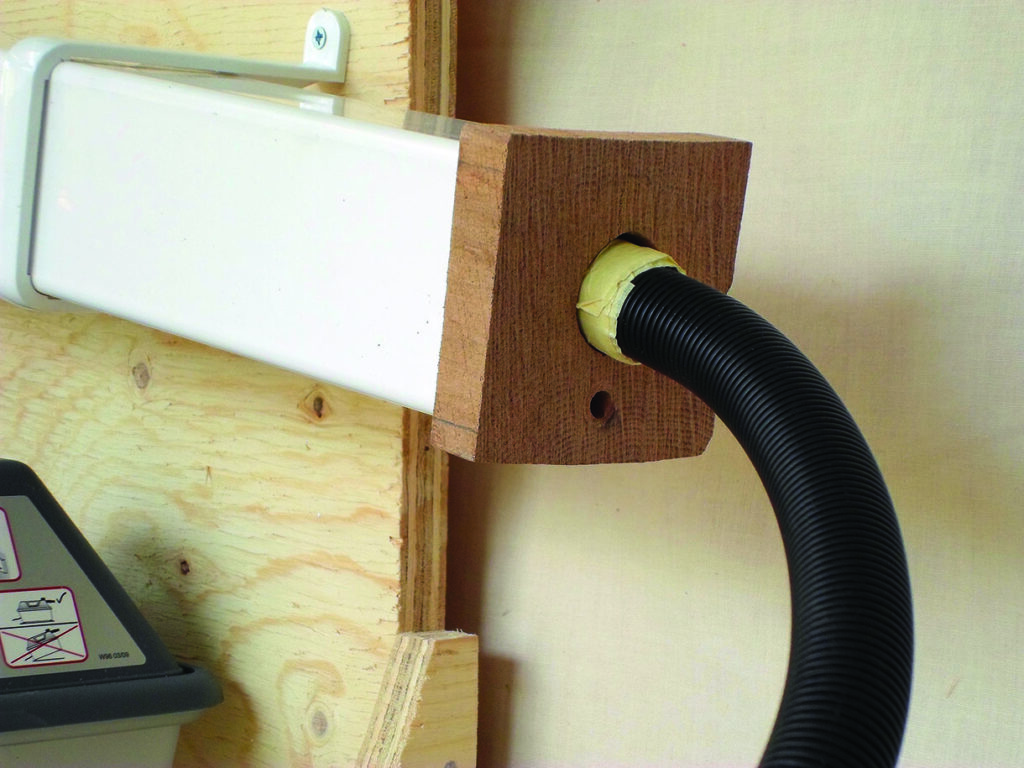
2. Make a ‘plug’ to fit each end of the tube. In the lower end, drill a hole big enough to take the steam tube and a small hole at the bottom edge to allow water to drain out. Use a sealer on the wooden plug or it will swell when damp
3. Drill a 10mm-diameter hole in the upper end plug to allow steam to escape. The tube must not become pressurised
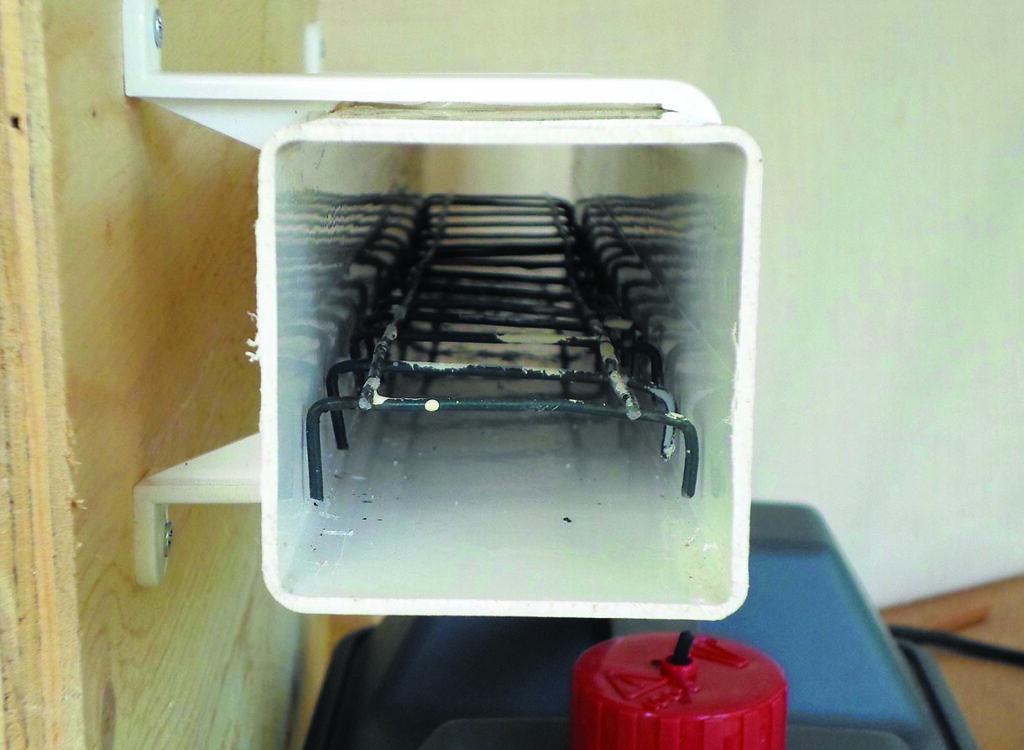
4. Make a rack out of wire, dowels or anything that will allow the steam to circulate around the wood
MAKING A PEG BOARD
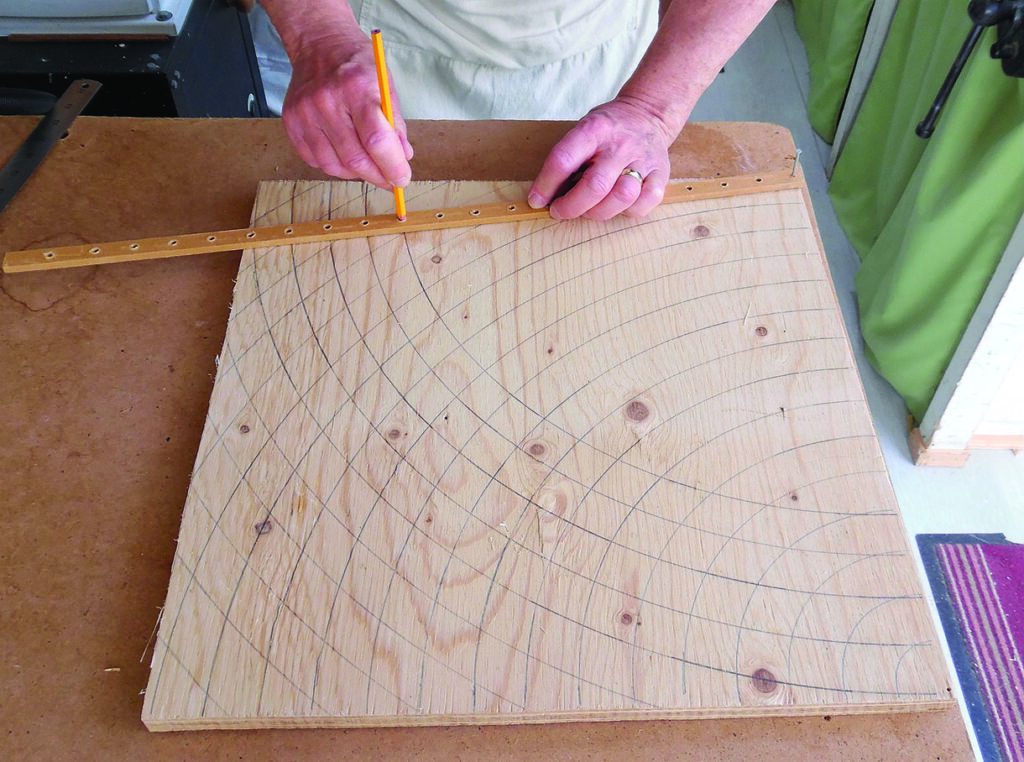
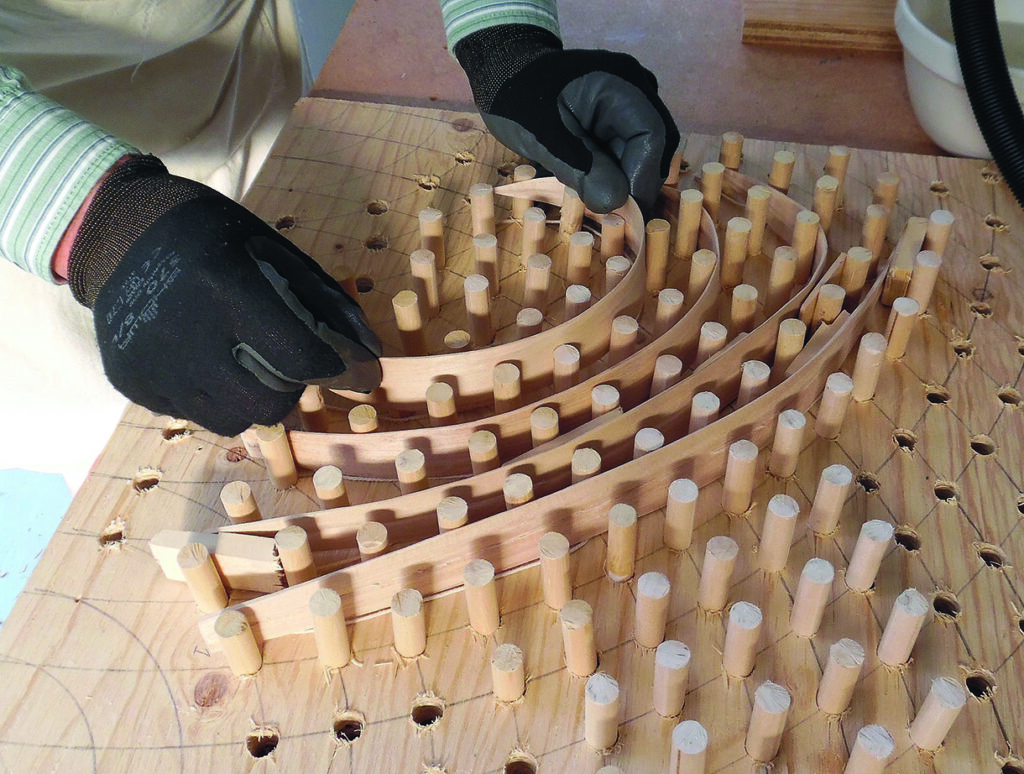
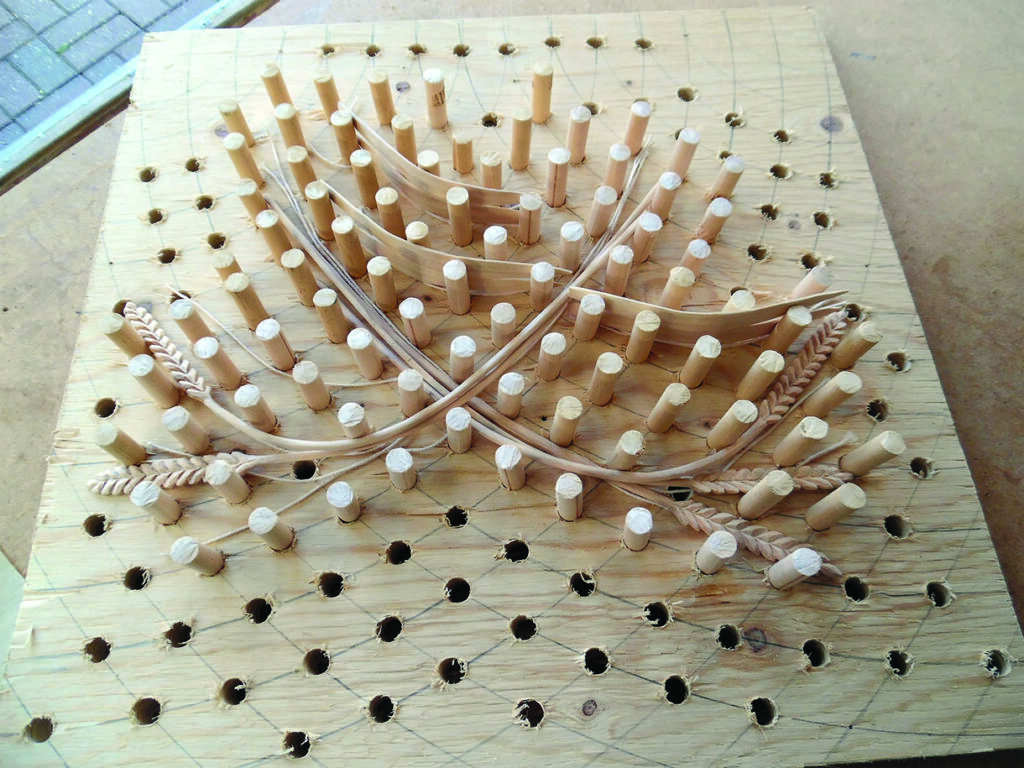
5. Steam bending needs something the wood can be bent around and secured to while it sets. A plywood board drilled and fitted with stout wooden dowels gives a versatile arrangement for bending a variety of leaf and stem shapes. Set out the board by drawing a series of arcs, 30mm apart, centred on the two bottom corners of the board
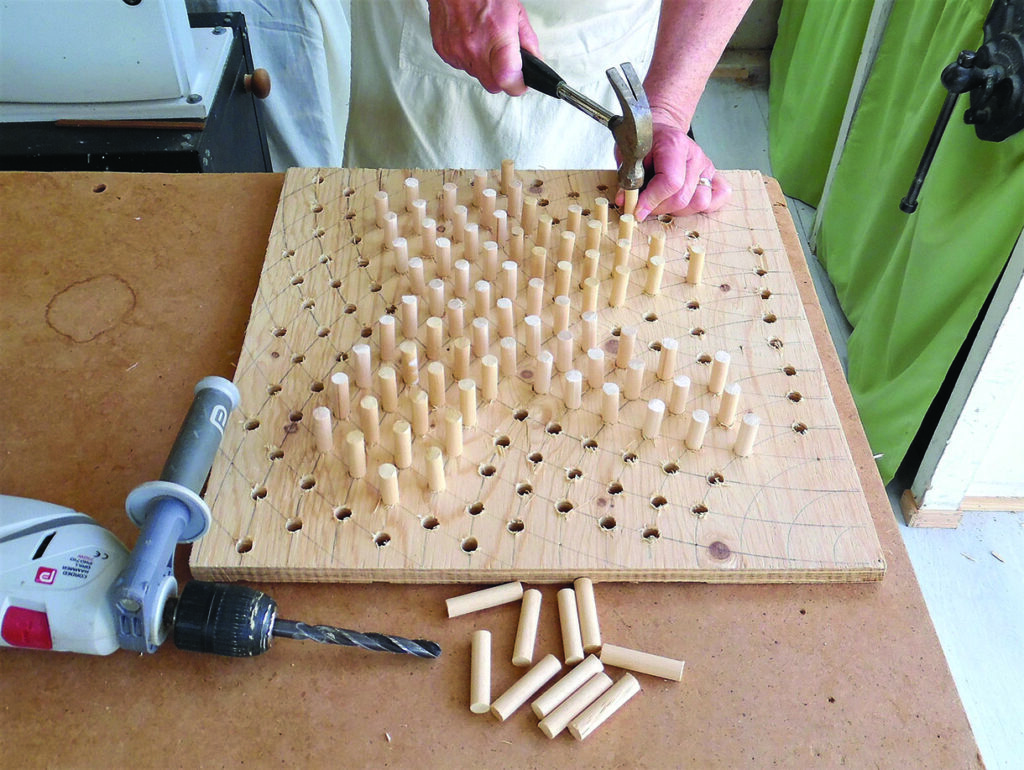
6. At the points where the 30mm lines cross, drill holes for the dowel pegs. Cut 12mm dowel into 50mm lengths, and knock them into the holes for a tight fit. This will provide a firm framework for the bends
PREPARATIONS
7. Copy the drawing and prepare your timber. You will need numerous thin strips of 3mm & 4mm thickness to make the leaves and stems. You also need a square section of 45mm for the central ‘spine’ that all the other pieces will be attached to and some 65mm-thick blocks for the flowers. You can get all the stems, leaves and spine out of a block 450 x 120 x 45mm, and all the flowers out of a block 260 x 130 x 65mm
MAKING LEAVES & STEMS
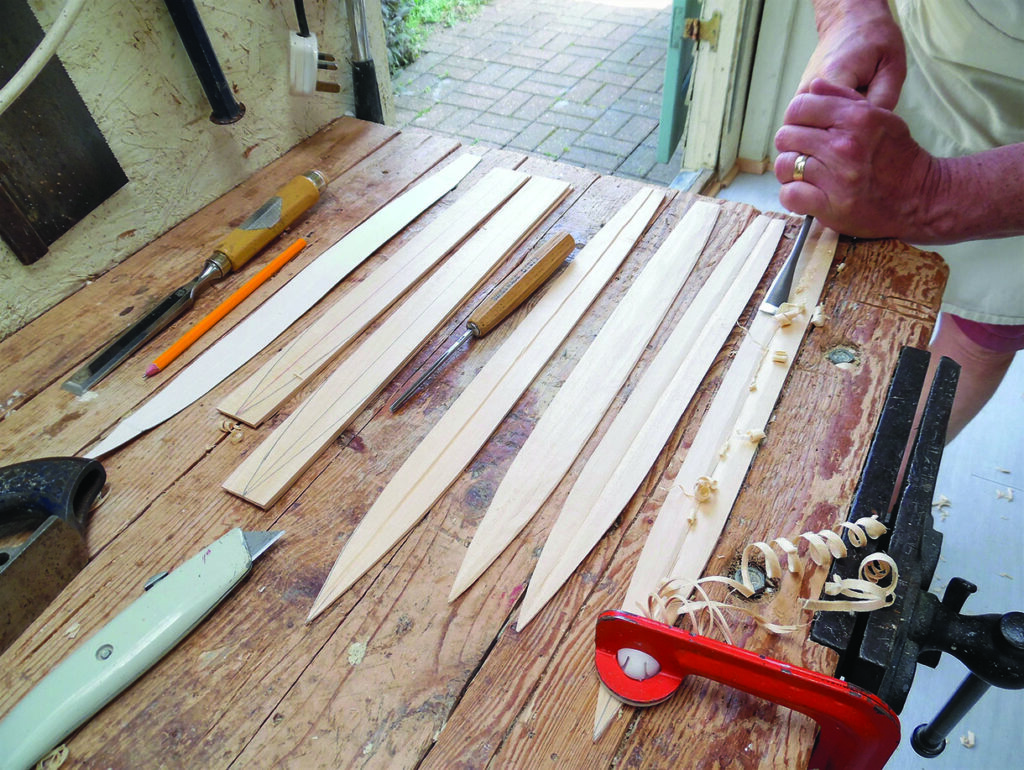
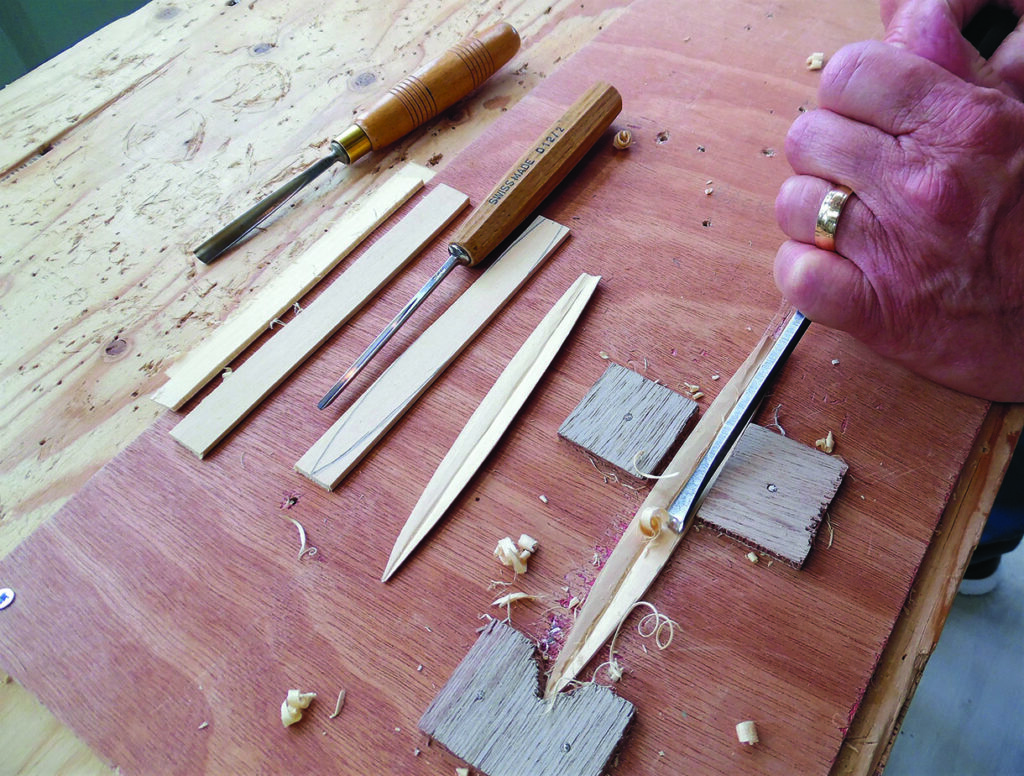
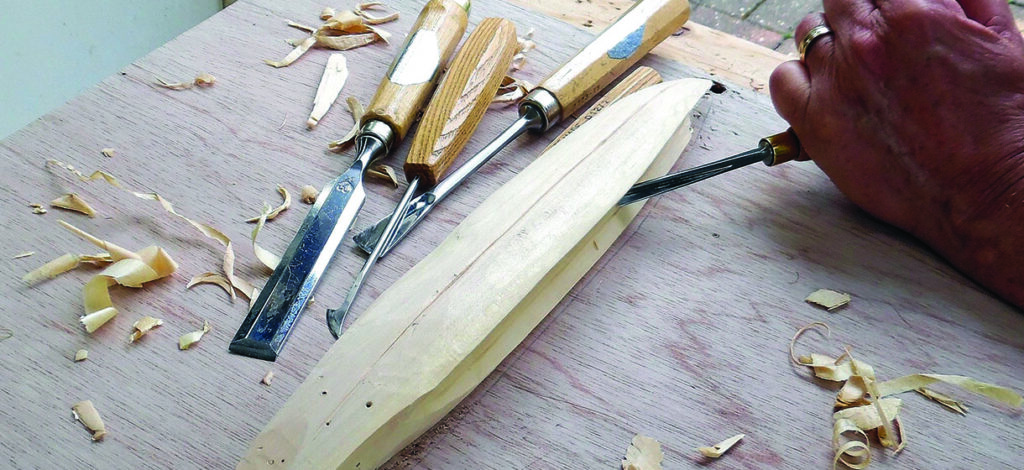
8. Start by carving the seven long, iris-type leaves out of strips 35mm wide and 3mm thick. There are four different lengths – two each of 450, 400 and 380mm, and one of 330mm. Draw the shape on to the wood using a card template, then cut away the outer edges. Using a V-tool, cut a central groove down the front of the leaf, then use a shallow gouge to make a convex slope outwards to the edges. Turn the leaf over and carve concave hollows along each side on the back. Trim the sides to a wafer-thin edge
USING STEAM SAFELY
Steam is scalding hot so take care not to let it come in contact with your skin and eyes. Always turn off the steamer before opening up and removing items. Wear protective gloves, a long-sleeved shirt and eye and face protection when opening the steam chamber. Steam is immensely powerful under compression so ensure the vent never gets blocked, and don’t let steam condense on electrical equipment.
9. Place one or two leaves in the steamer, bring it up to boiling, then steam the wood for 30-40 minutes. Turn off the steamer and carefully extract one leaf at a time
10. Have your pegboard set up ready. Use pieces of string the same length as each leaf to mark out where you want to bend each of the four shapes of leaf. Taking each leaf straight from the steamer, quickly but carefully bend it into the curve you have marked. It helps if you roll the tighter bends over a piece of pipe first to ease the fibres into the curve, then it will slip into the pegboard without kinking. You can use small pieces of wood to adjust the curve within the pegs if needed
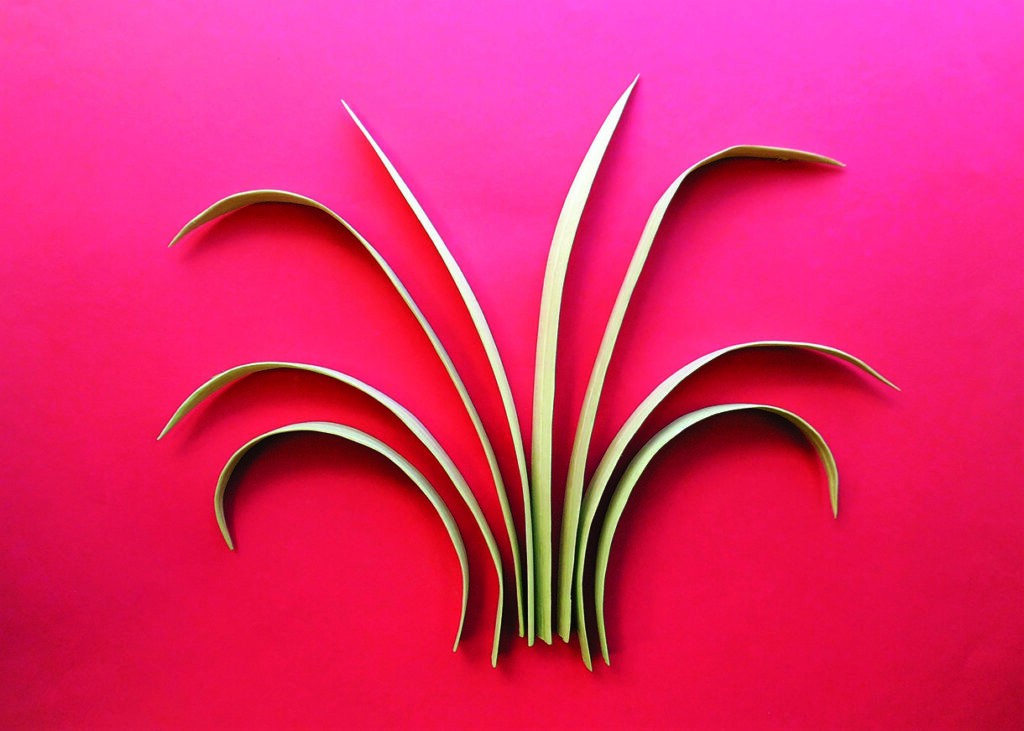
11. Keep the leaves in the pegboard overnight in a warm, dry place so they dry out and set into their new shape. When you have made each of the four shapes of leaf they should look something like this
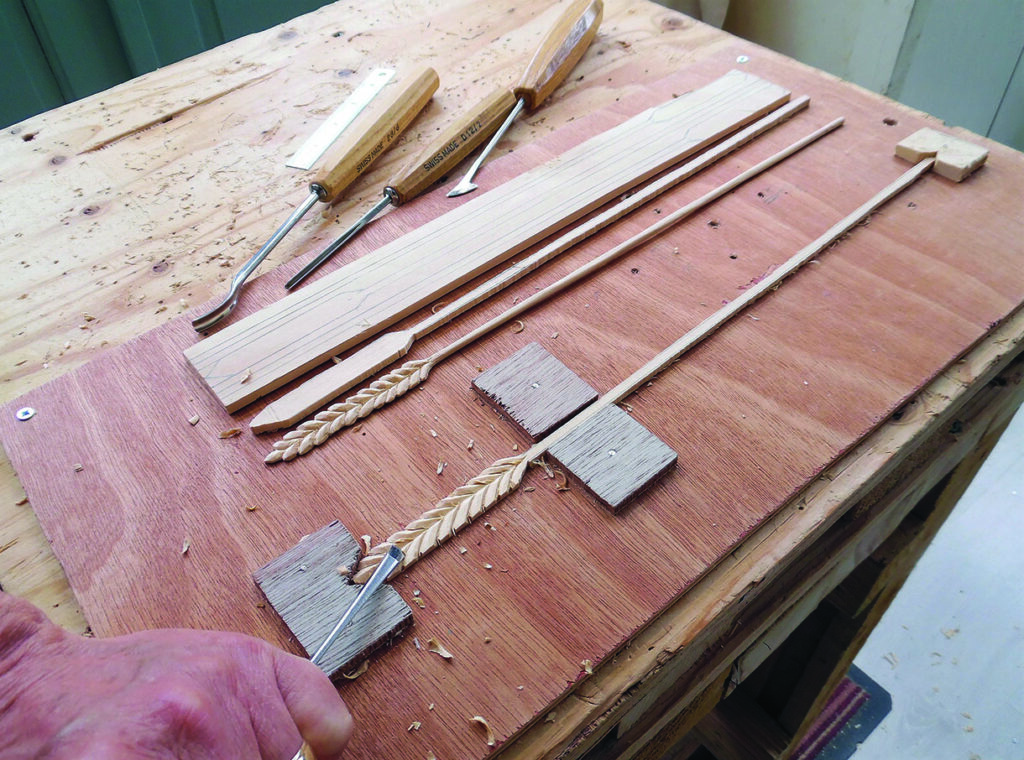
12. Cut out six wheat stalks (and maybe a couple of spares) from the 4mm-thick strips. Carve the wheat ears into individual grains as realistically as you can, then carefully round off the stalks, taking great care not to break them
13. From a 3mm-thick strip, cut and carve the four wheat leaves. These are smaller versions of the main leaves made earlier, but just 15mm wide and 150mm long
14. Steam the wheat stalks and leaves for 30-40 minutes, then set them up in the bender to form two groups of three, one group bending to the left and the other to the right. Take great care with the stalks until they are set as they are fragile
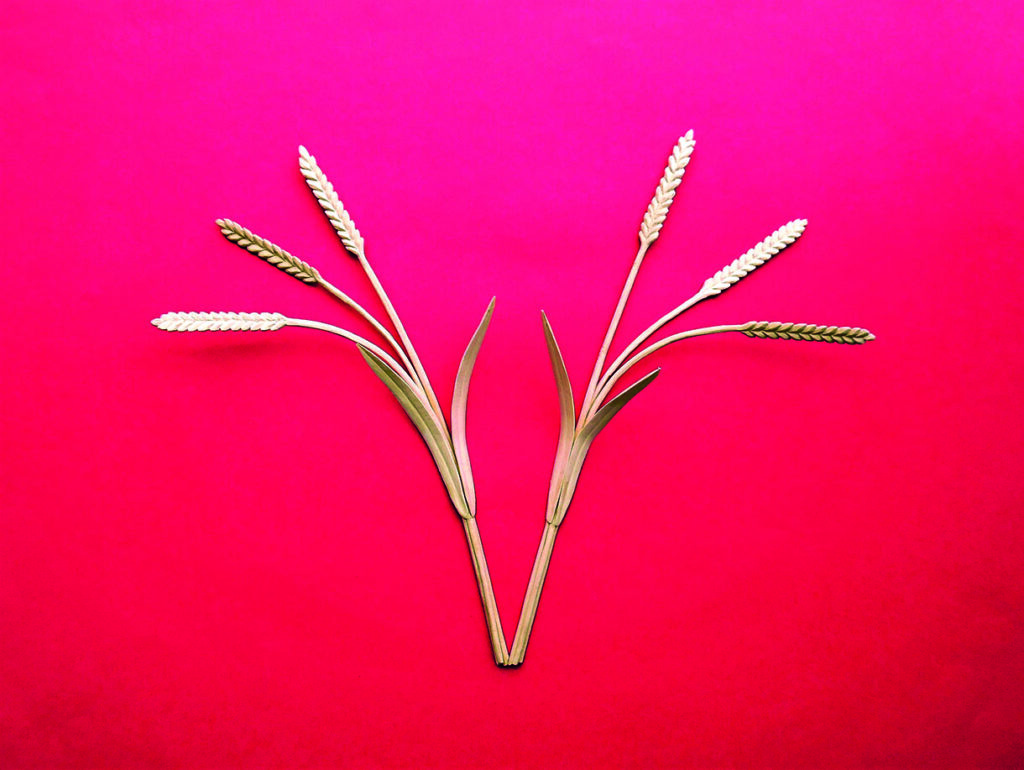
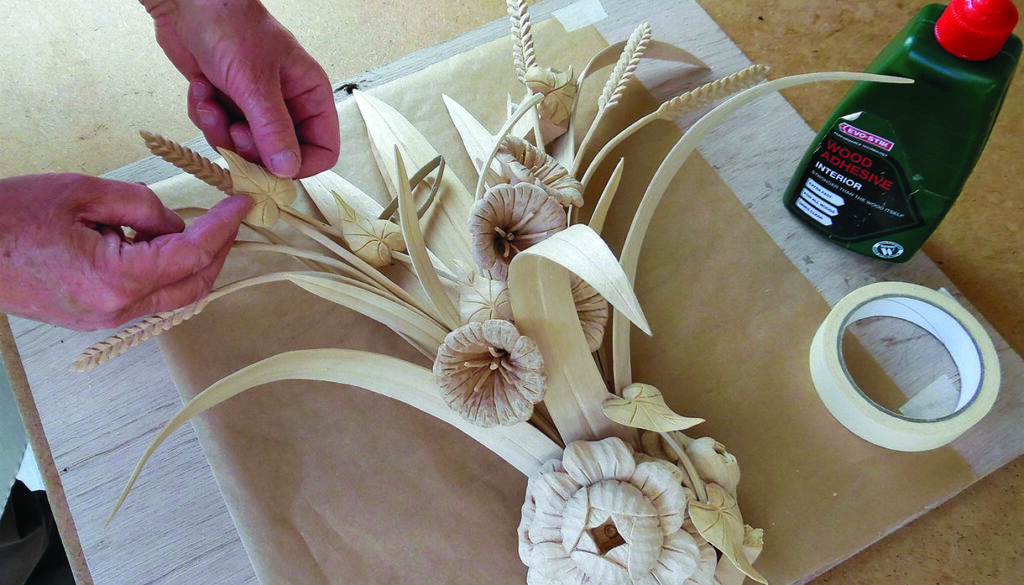
15. Now we need to glue up the wheat stalks into two bunches. Tape each group of three stalks into a bunch, put glue along the stems where they meet, and leave to set. Later, glue two leaves on to each bunch, leave to set, then trim the base of the leaf into the stalk. When finished, the wheat stalks and leaves should look like this
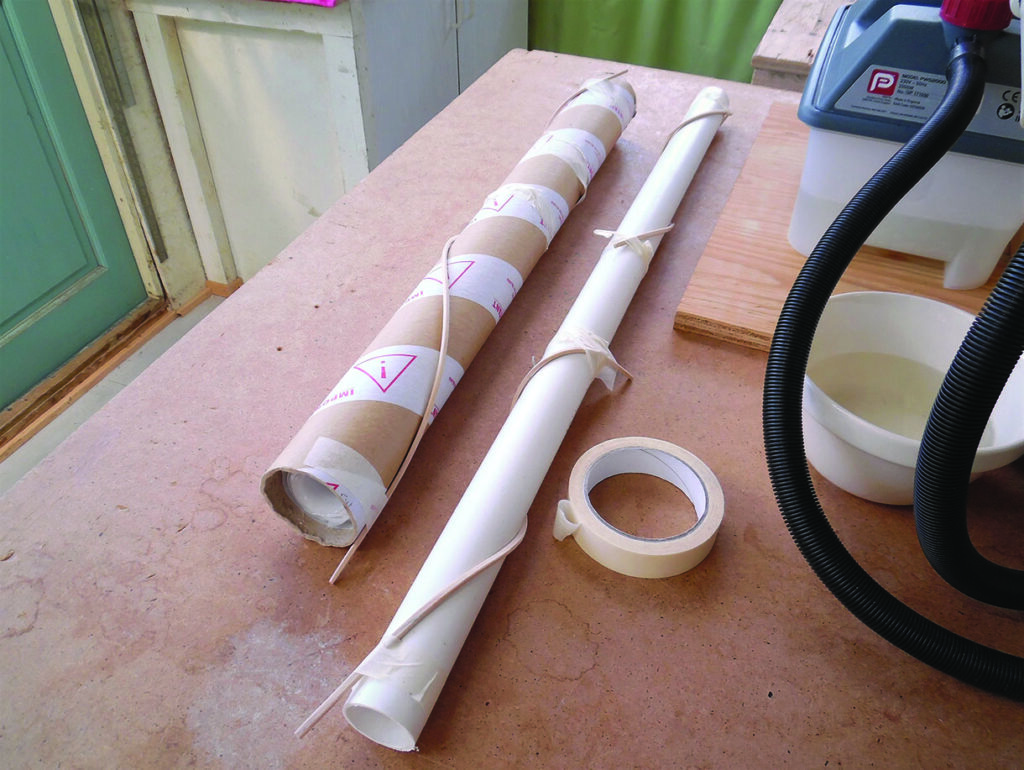
16. We finish the steaming with the curly convolvulus/bindweed stalks. Cut some 3mm-wide stems out of a straight-grained 3mm thick strip (you can do this by clamping a steel rule to the strip and running a knife along it) and put them in the steamer for 30-40 minutes. Carefully wind the stalks around some tubes into an irregular spiral (make several spares as these are quite fragile) and tape them while they set
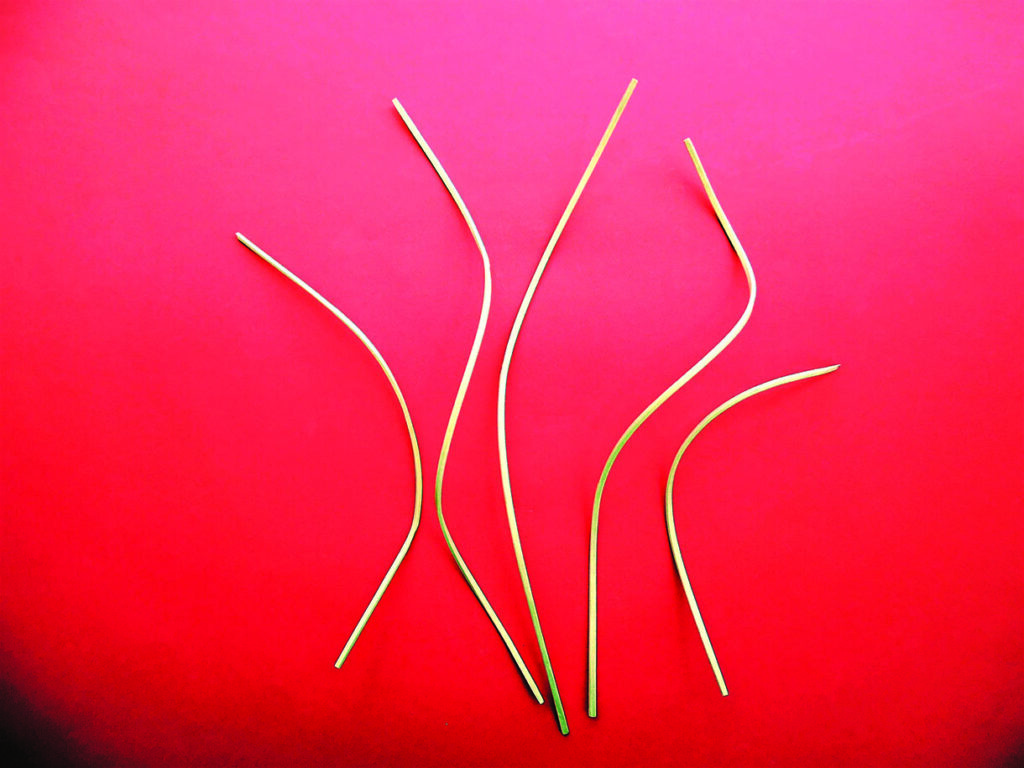
17. The finished bindweed stalks should look something like this. Keep the spare bits to use as braces if needed
ASSEMBLING THE LEAVES
18. Cut and shape the spine section. Fit your wall hanging to this now while it is easy, then screw it to a backing board through the back. Shape the front surface into a long leaf that slopes sideways and curls back at the top. Carve a deep V along each side to give the appearance of more leaves behind the front one. The bottom end needs to be shaped to receive the first four leaves, and this will depend on how you steam bent your own leaves. Just work it to make them fit, testing the best position by screwing them in place
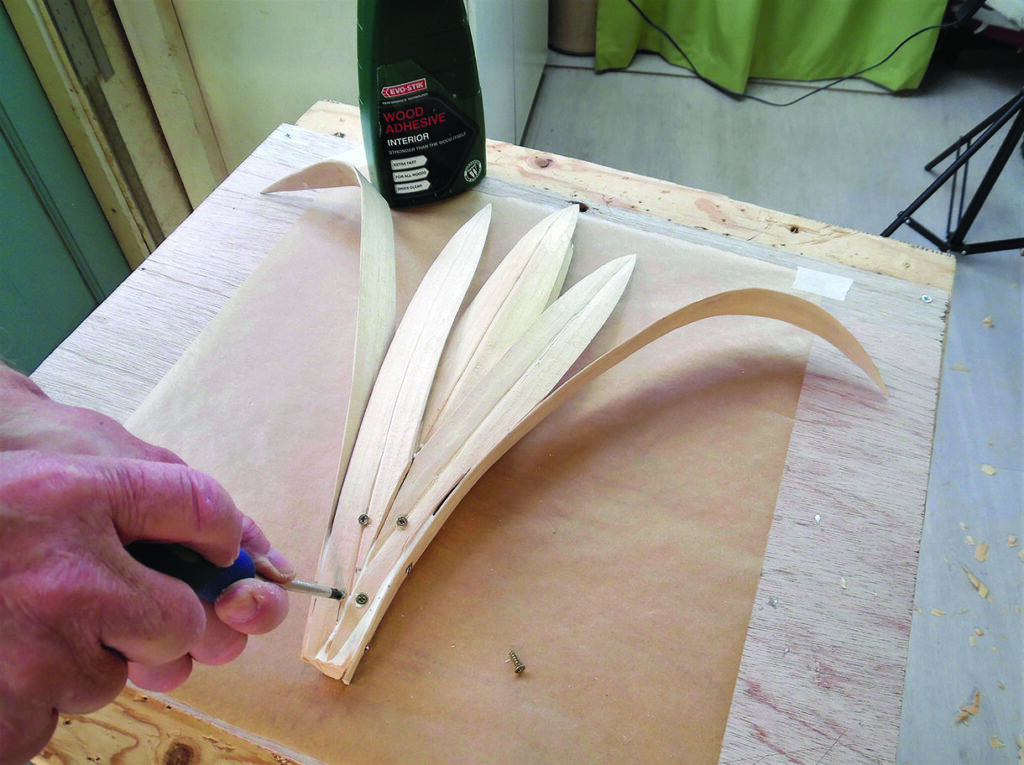
19. Glue the first four leaves on to the spine so they splay out evenly with their tips just clear of the backing board (and the wall). Use plenty of UPVA adhesive and make sure they have a good bond to the spine. Fix them with screws while the glue sets and remove these later
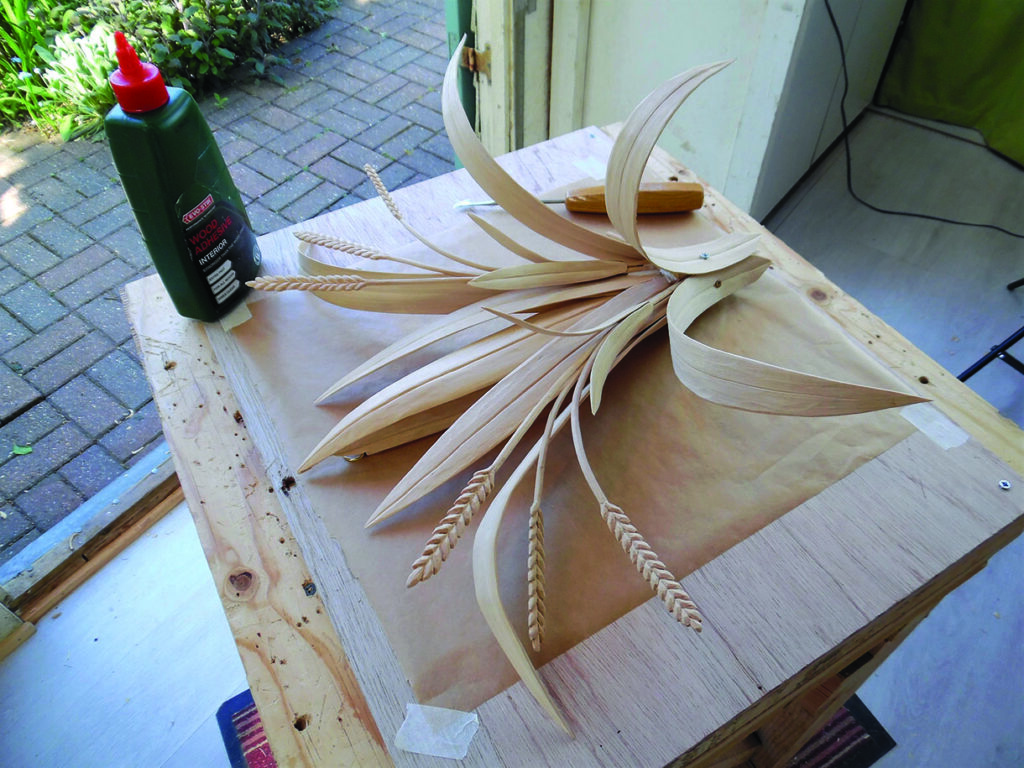
20. Reshape the base area as necessary to receive the forward three leaves and trim the wheat stalks to fit in between the leaves. The lower ends of the forward leaves should be trimmed to a point and should curl outwards a little when fixed. Glue up as before, and when set remove the screws
CARVING THE FLOWERS
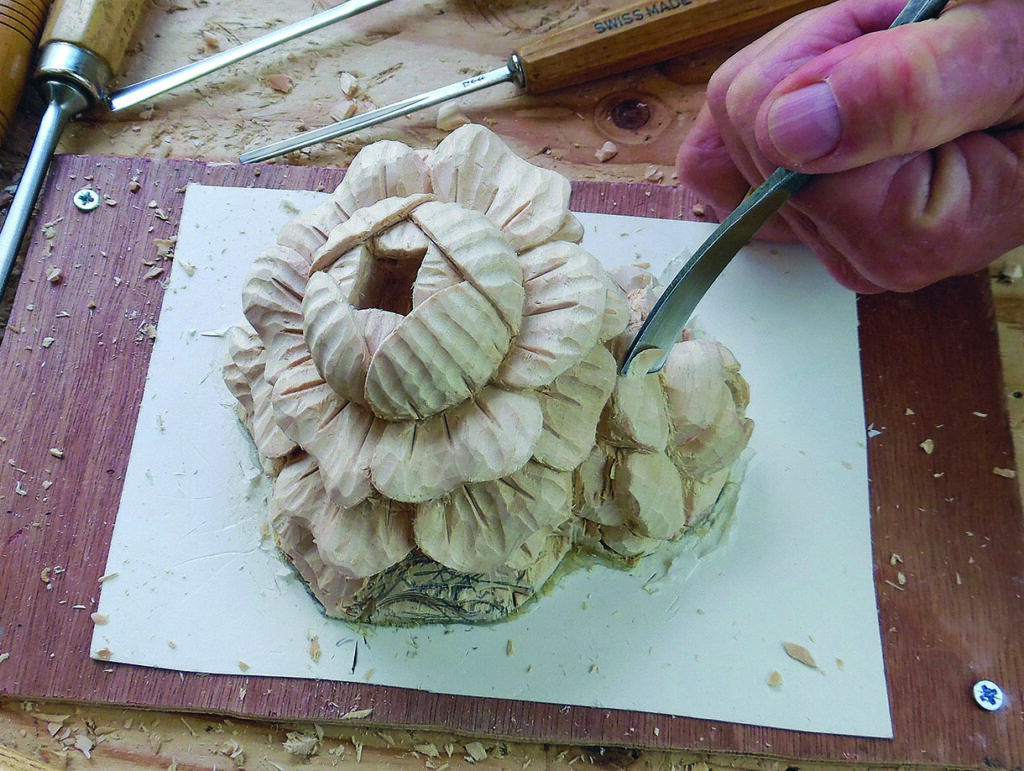
21. Saw out the roses from a block 65mm thick – it is this deep as it has to wrap around the main stem like a saddle. Layer the petals out towards the background and carve them with very thin edges. The centre petals curl inwards into a hollow dome. I have added some extra texturing to the petals to contrast with the smoothness of the iris leaves
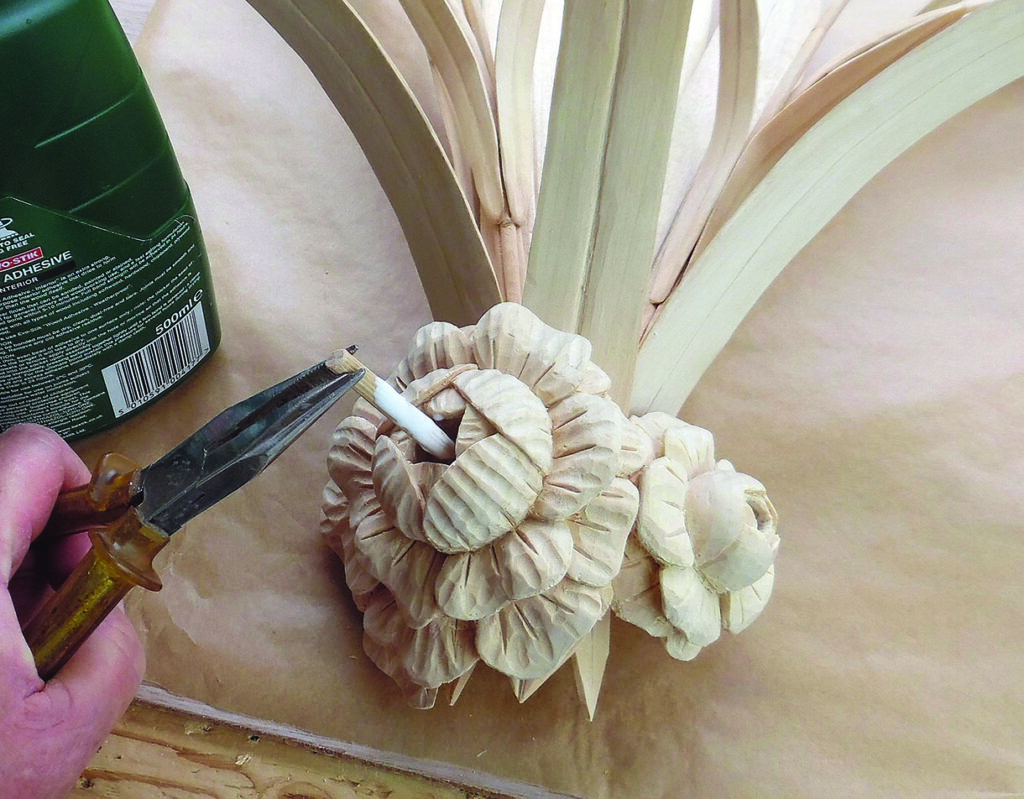
22. Detach the finished roses from the card, lay face down on a soft surface, and undercut the outer petals. Carefully cut a deep channel through the middle of the underside to fit exactly over the base of the leaf stems. Glue the roses firmly in place, held with a screw through the centre of the large rose and, when set, remove the screw and replace it with a 6mm dowel glued right through to the spine for long-term security
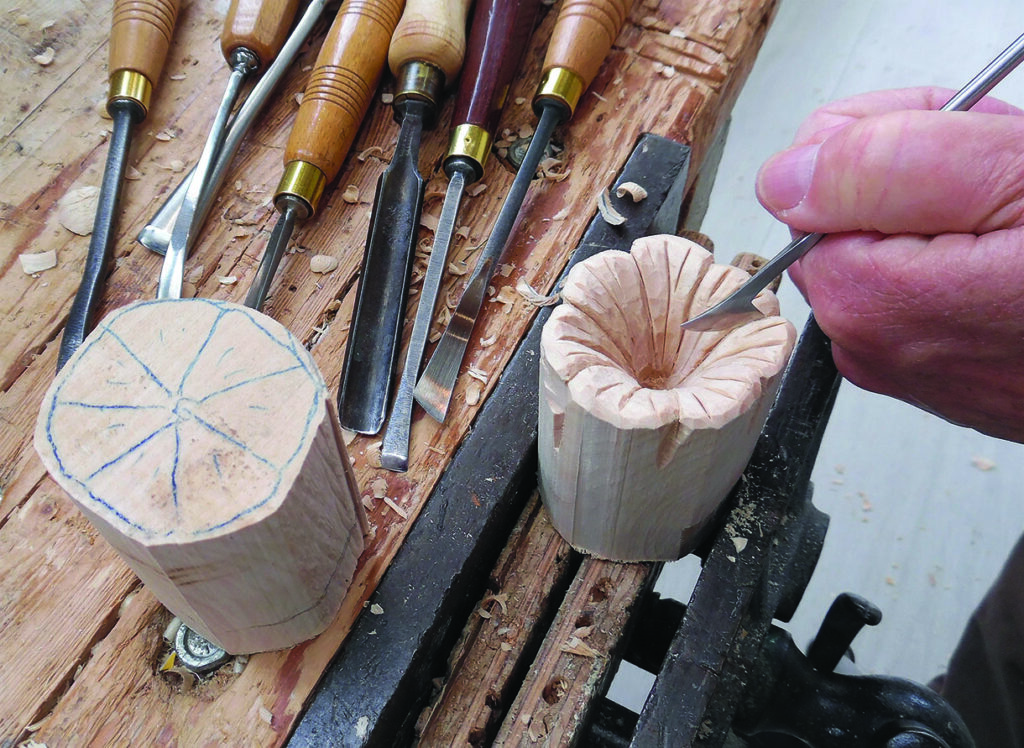
23. The flowers of Convolvulus arvensis, better known as field bindweed or morning glory, can be carved individually from blocks 55-65mm wide and the same depth. Secure the block in a vice, then drill out the inside with an 8mm drill. Open out the inside into a trumpet shape with gouges. Refine the interior surface to look like the natural flower
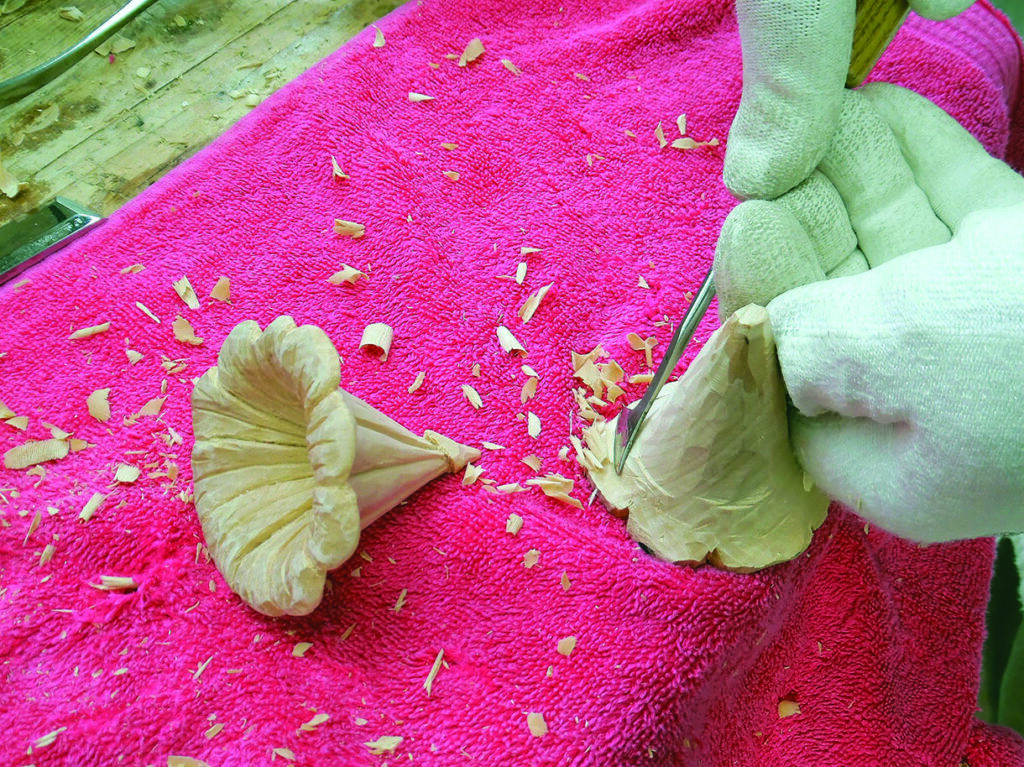
24. Lay the flower on a soft surface and carve away the outside of the trumpet shape until the sides are very thin, then form the little stalk at the bottom end
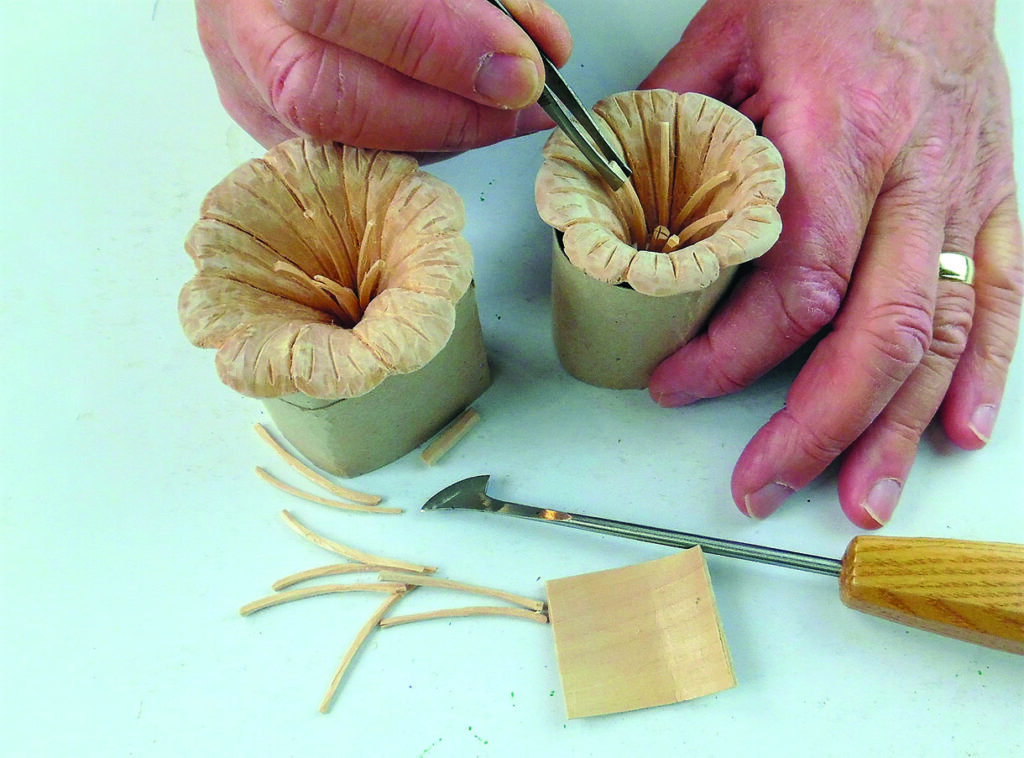
25. The finishing touch on the convolvulus flowers is to add five very thin stamens and a shorter and thicker pistil inside the flower. Cut these from a thin strip of the leaf wood with a slight bend in it which you can prepare earlier while steaming the main parts. Put glue in the bottom of the flower then arrange the stamens with the pistil in the centre
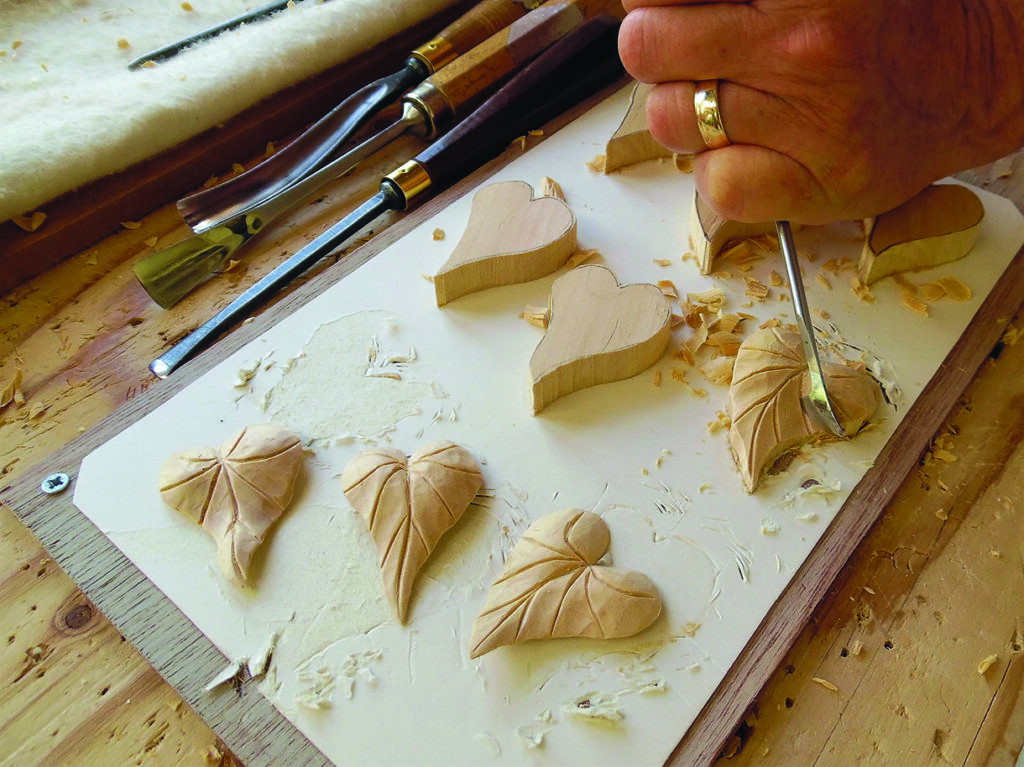
26. Cut out at least six convolvulus leaves about 50mm long and 40mm wide from the 12mm-thick strip, varying the shape slightly with each one. Glue them to some card on a backing board for work holding. Carve each one with plenty of rise and fall, and cut in the vein lines. Then detach it from the card, undercut it on a soft surface so it is just about 2-3mm thick, with sharp edges. Cut a channel under the stem end so it can sit over one of the steam-bent stems when it is glued
27. Glue up the convolvulus flowers, stems and leaves in stages, making sure each piece is secure and set before adding the next layer. Put dabs of glue at the points where the convolvulus elements touch the iris leaves, wheat stalks and each other. Arrange the flowers first for the most decorative effect, then wind your curly bent stems around them, and later add the little leaves to fit in with the stems. Use temporary supports as necessary while the glue sets
28. Finally, carefully detach the finished carving from the backing board. Handle it carefully by the spine and the big rose as other parts could easily be damaged by careless handling
29. Hang it on a wall where no one will walk into it
Top tip: When assembling a carving made up of delicate stems and leaves, strengthen the structure by bracing parts against one another. Create points of contact between the various elements and add a drop of glue where they meet to cement the bond. Add extra bits of stems behind the structure where needed so that the whole carving will be much stronger than it looks.
To provide the best experiences, we use technologies like cookies to store and/or access device information. Consenting to these technologies will allow us to process data such as browsing behaviour or unique IDs on this site. Not consenting or withdrawing consent, may adversely affect certain features and functions.
Functional
Always active
The technical storage or access is strictly necessary for the legitimate purpose of enabling the use of a specific service explicitly requested by the subscriber or user, or for the sole purpose of carrying out the transmission of a communication over an electronic communications network.
Preferences
The technical storage or access is necessary for the legitimate purpose of storing preferences that are not requested by the subscriber or user.
Statistics
The technical storage or access that is used exclusively for statistical purposes.The technical storage or access that is used exclusively for anonymous statistical purposes. Without a subpoena, voluntary compliance on the part of your Internet Service Provider, or additional records from a third party, information stored or retrieved for this purpose alone cannot usually be used to identify you.
Marketing
The technical storage or access is required to create user profiles to send advertising, or to track the user on a website or across several websites for similar marketing purposes.