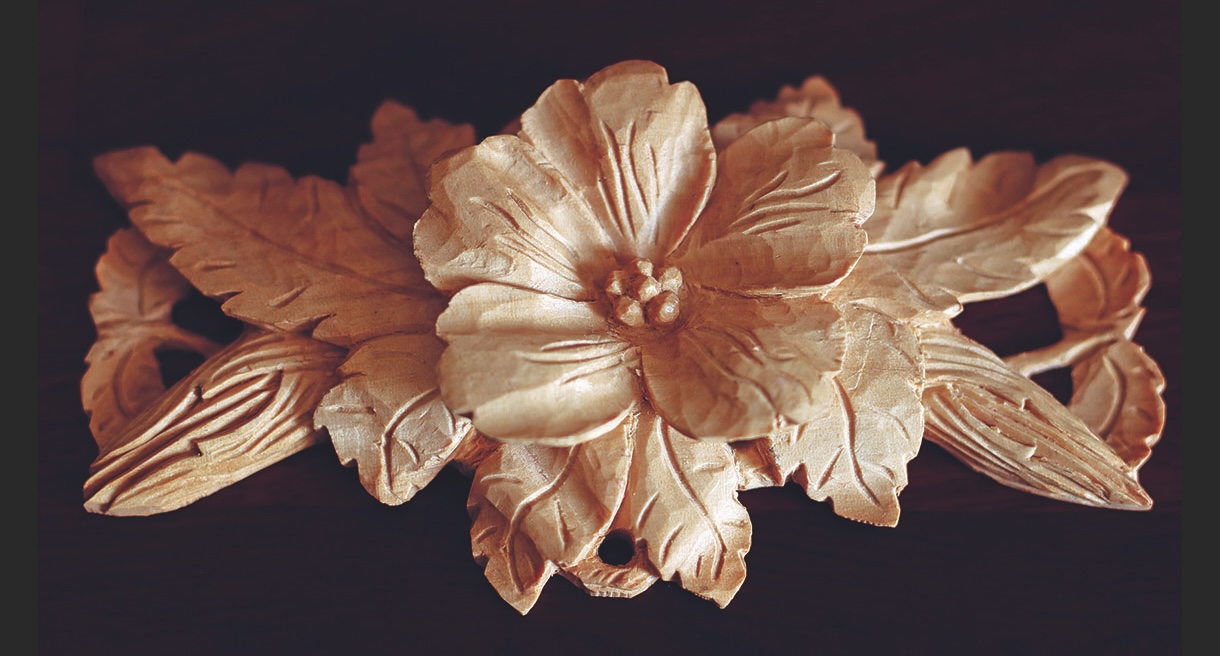
All things in the natural world, whether animal, plant, crystal or snowflake, have a growth pattern. They grow outward in any and all directions, depending on the inherent nature of the form. Working with this in mind will greatly assist in invoking life and character in your carving. Here I have created a strong enclosed form that, although it may appear quite delicate, is in fact robust and durable and suitable for a wide range of applications. Employing the use of some well-executed undercutting lifts the flower head from its surrounding, which is our main focal point.
The subtle but clear distinction between background, middle ground and foreground gives a good sense of depth to the overall piece. Begin by sketching the design to gain an understanding of the form. This will enable you to rough out with greater speed and efficiency, leaving you more time to enjoy the detailing. When drawing from nature, attempts should be made to simplify and stylise the form. By choosing the lines that define the essence of the subject and omitting the incidental, one can create an impression that is comfortable and pleasing to the eye of the observer, allowing it to be more easily read and to make it suitable for the confines of the medium. If the detail is too choppy and busy there is the risk of diminishing the feeling of the overall form.
On the other end of the scale I generally refrain from the use of sandpaper as it can easily drain the life force and integrity from the carving. Both symmetry and geometry are implied but not true. In the roughing out of this piece we may think of the form as four levels with a central boss – from the ground up we have the pierced leaves, buds, main leaves, petals and central boss.
Mounting work and layers
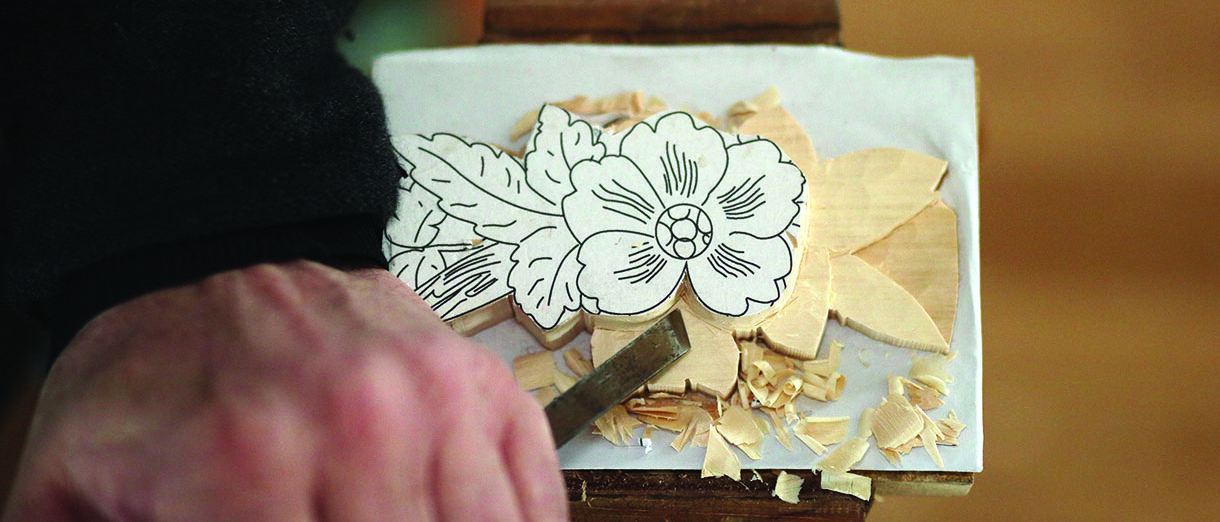
When cutting out your traced/scanned appliqué blank with a bandsaw, leave the serrations and sharp corners for the carving stage and glue it to an MDF backing with paper sandwiched between. Ensure mating surfaces are flat as any gaps will result in breakage when carving. In roughing out, think of the form as four flat levels divided in steps of fifths with a central boss. From the ground up we have the pierced outer leaves and stems (1/5), the buds (1/5), the main and lower leaves (1/5), petals and central boss (2/5).
Things you will need
Tools:
No.1, 10mm
No.2, 10mm
No.3, 8 &13mm
No.5, 8mm
No.8, 6 & 10mm
No.6, 3 & 13mm
No.11, 2mm
No.39, 10mm V-tool
Drill
Materials
PVA glue
MDF backing board
Wood: Lime (Tilia x europea) 135 x 70 x 16mm
Rose Appliqué plan
How to resize drawings
To enlarge or reduce the size of drawings right click on the image to download it and then go HERE to watch a video on how to use paper with a grid to do exactly that.
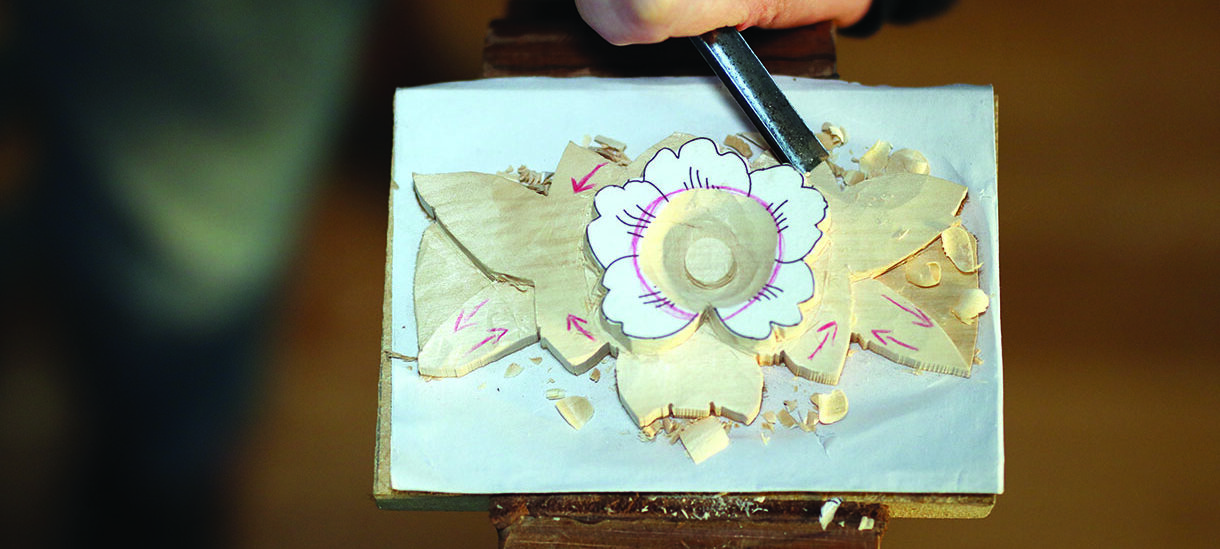
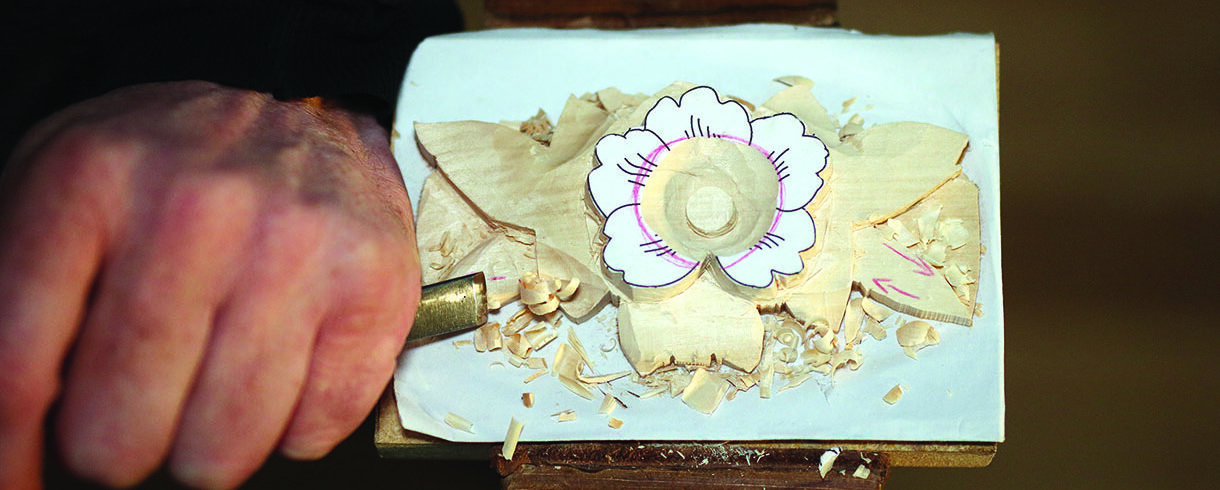
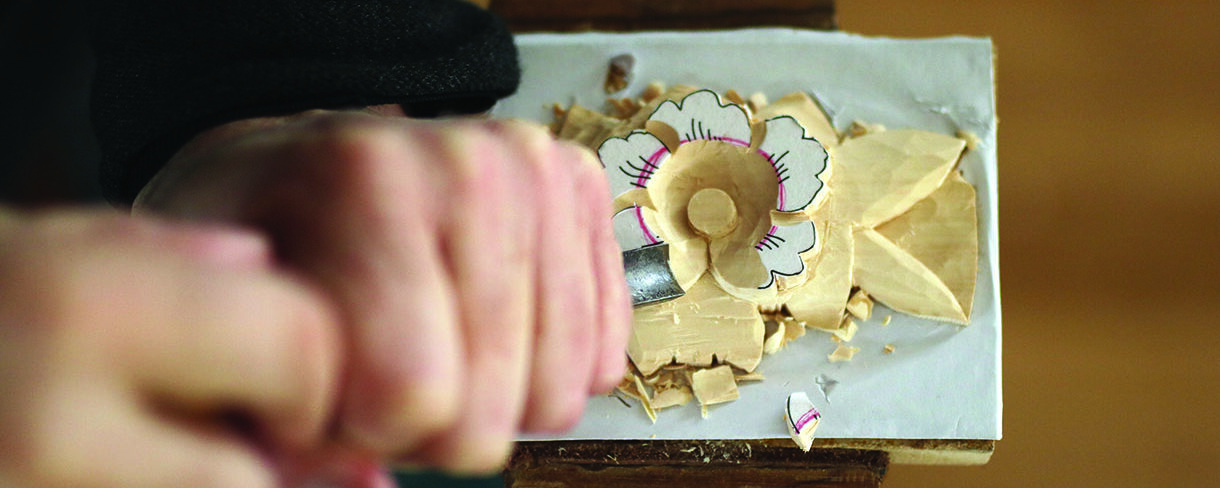
1. Separate the forms with a V-tool, levelling the layers with No.3s to the appropriate height (see sidebar on the previous page), clearing the corners with a skew. We have now established the background, middle ground and foreground2. Refine the outline of the petals by stabbing with a V-tool and paring with a small No.3. Now with your No.8, 10mm, establish the central boss, rising from the level of the main leaves. Gently stab the divisions between petals to establish their placement. Create a bowl using the No.6, 1/3 of the way down the petals. You will need plenty of meat in the other 2/3 towards the tips to evoke movement and life into the flower headTOP TIP
As the boss form is used so often in carving, it’s well worth putting some time and effort into developing good technique to increase speed, dexterity and accuracy of establishing this elementary form. Stab the boss by holding your gouge in a vertical position, assuming a tripod grip with the right hand close to the cutting edge with the left hand on the tool handle. Keep the leading corner of the gouge out of the cut by tilting the gouge and follow the circle by twisting with the left hand. To remove the outer waste, we use a similar technique with the left hand making a broad circular sweeping motion.
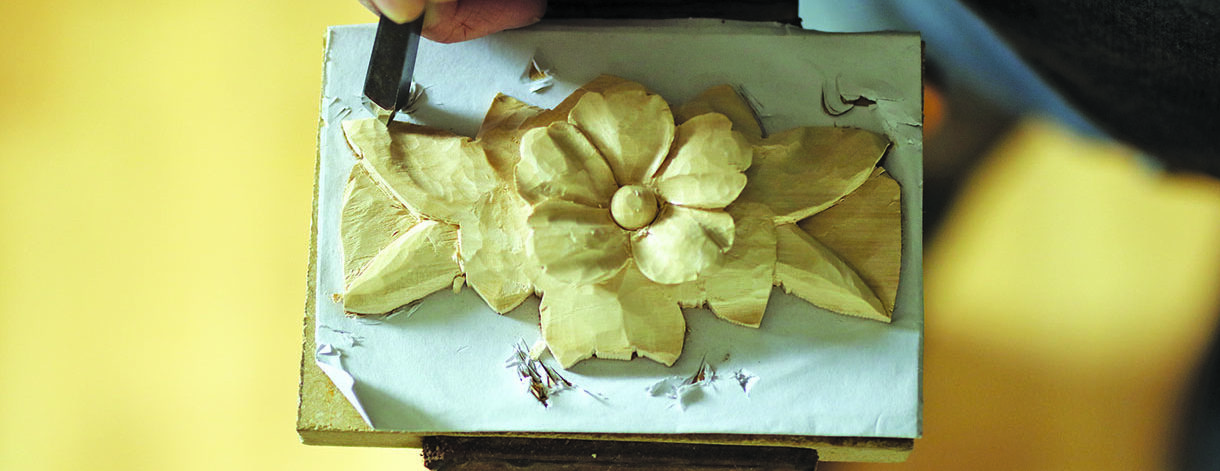
3. Using a No.3 gouge cut with the direction of the grain, reducing the height of the central boss to 4/5 the thickness of the blank4. Following the grain direction, carve the outer leaves of the main leaf grouping from the tips in an ascending manner towards the central leaf with the No.8, 10mm. They should appear to radiate out from behind the flower and drape over the buds and the stem at the apex, suggesting what lies beneath and touching the ground towards the tips5. Invert a No.6 gouge and make a horizontal pass over the lower leaves rounding over towards the tips. Leave a matchstick of thickness for the small stem6. Using a No.3 gouge, round over the buds in the direction indicated by the pink arrows. Use a vertical slicing cut where the access for the tool is restricted7. Visualising the flow to assist the correct placement, make a No.8, 10mm cut across the main leaf tapering to the ground. Smooth and blend with an inverted No.3 gouge. This will evoke movement by creating a feeling of tension in the folds. The leaves should be varied and relate to their growth pattern and surrounding elements. The aim is not to replicate nature but to shepherd the eye of the observer8. With your No.6 gouge, stab the outer parts of the petals and taper the abutting petal. With the same gouge, taper the two lower lobes of the petals to the base of the boss. Leave just enough thickness to complete the impression of the petals fanning out from the centre9. Alternating between No.3 gouges and a skew, undercut the petals to a depth appropriate to the underlying leaf groupings. The junctions between flower and leaf should be clean and well defined. This is a good opportunity to hone your technique with a mallet when undercutting10. Shape the lobes of the petals using the smaller No.8 gouge. Make rolling cuts as you form the troughs on either side of the petal and round over the middle of the petals using an inverted small No.3 gouge. The swells should flow into the troughs for a voluptuous flower head11. Take a No.8, 10mm and, beginning in the centre with the tool lying almost flat, round over the boss, working outwards with the direction of the grain, as if following the curvature of a sphere, first to one side and then to the other12. Now cut the serrations of the main outer leaf groupings using stabbing cuts with a V-tool. Try to visualise their correct placement on the leaf as you go13. You now need to move on to separating and defining the leaf forms, shaping as required. Begin at the top, separating the upper leaves from the stem at the apex. A skew will be necessary to reach in under the overhanging petal14. Separate the individual leaves in the main leaf grouping with a small No.3 gouge using vertical slicing cuts. Cut in the veins with the No.11 V-tool in smooth-flowing, serpentine curves
Relationship lines
Employ the use of relationship lines in your work – that is an imagined line connecting elements of the form, unifying them into a single flowing piece. Try to visualise these connections throughout the carving process.
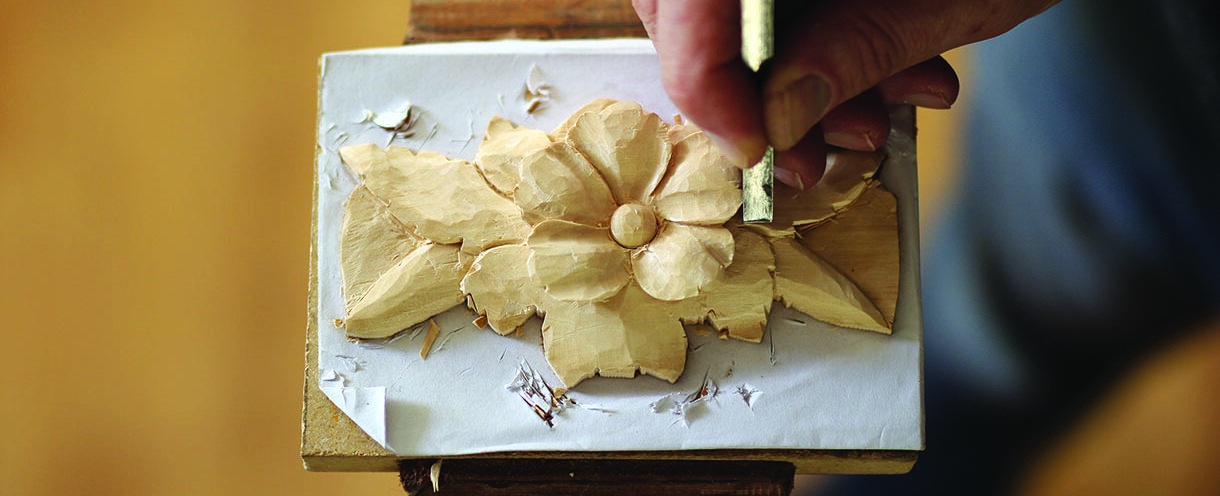
15. Use a No.11 gouge to define and accentuate the form of the petals. Make the first flowing cut in the middle of each petal and continue out to either side of the convex portion of each petal16. With a No.6, 3mm, gently stab the central and five outer domes. Then invert your gouge and use rolling cuts to remove material between domes. Remove pyramidal chips between the domes with a skew. The next stage is to slightly undercut the boss to lift it from the flower head17. With a small No.3 gouge gently slice in the staggered sheaths of the bud, establishing the outer edges. Use a skew to get into the corners. Recess the inner bud and one side of the emerging overlapping sheaths. With a No.1 gouge slice a middle line along the centre of the bud. Then, slicing with the grain, create a central 60° channel, steepening to almost horizontal at the tips. Cut both outer channels in a similar fashion to form two sharp ridges either side of the central channel18. Mark out the following: the division of the two lower leaves with stem, the division between the lower and main leaves with small section of stem between, the stem at the apex and smaller outer leaves and stems. Care must be taken to ensure these outer stems curve and do not form a visual horizontal division. Drill all the pierced stem sections. The apex will require multiple drill holes, much of the waste here can be removed by drilling diagonally between holes19. To complete the lower leaves, use a small veiner to shape the piercing to make it look less like a drill hole. With a No.8, 10mm, visualising the stem beneath, carve the tips of the leaves as if they are draped over the underlying stem. Now divide the leaves and, inverting your small No.3 gouge, carve the right leaf rolling under the left like a wave. Take the smaller No.8 gouge and make a trough on the inner part of the left leaf as it relaxes over the visualised continuation of the stem. Cut the serrations and veins as before. Make a few small cuts in the stems with a veining tool as a tip of the hat to the Black Forest carving style20. With a No.6 gouge, taper the small outer leaves from their outer edge down to the ground at the inner edge. Remove the waste in the pierced section of the stem and undercut the main overhanging leaf, this process can be completed from the rear once the carving is lifted from its backing21. Using smooth, flowing lines, texture the sheaves of the buds with a veining tool. Round over the stems with a small No.3 gouge and texture with the small veiner22. Very carefully, working from all sides and without levering, separate the carving from its backing with a paint scraper. Lubricating the scraper with tallow or coconut oil will greatly ease this process23. Carefully clean up the pierced sections from the rear with a small-bladed chip-carving knife. Any residual paper can be easily removed with the paint scraper by briefly resting the carving on a damp cloth to soften the glue and paper24. Be brave and resist the tendency to reach for the sandpaper. Finish with beeswax polish. This can be easily made by adding a little turpentine to grated beeswax in a lidded jar. Stir occasionally and leave overnight to form a paste. Apply an even coat of polish to the carving with a toothbrush. Wait till the beeswax hardens and buff. The appliqué can be applied with glue or simply hung from the piercing at the apex
To provide the best experiences, we use technologies like cookies to store and/or access device information. Consenting to these technologies will allow us to process data such as browsing behaviour or unique IDs on this site. Not consenting or withdrawing consent, may adversely affect certain features and functions.
Functional
Always active
The technical storage or access is strictly necessary for the legitimate purpose of enabling the use of a specific service explicitly requested by the subscriber or user, or for the sole purpose of carrying out the transmission of a communication over an electronic communications network.
Preferences
The technical storage or access is necessary for the legitimate purpose of storing preferences that are not requested by the subscriber or user.
Statistics
The technical storage or access that is used exclusively for statistical purposes.The technical storage or access that is used exclusively for anonymous statistical purposes. Without a subpoena, voluntary compliance on the part of your Internet Service Provider, or additional records from a third party, information stored or retrieved for this purpose alone cannot usually be used to identify you.
Marketing
The technical storage or access is required to create user profiles to send advertising, or to track the user on a website or across several websites for similar marketing purposes.