Chip-Carved Rosettes:
Murray Taylor takes you through the drawing and carving of a variety of rosettes.
Murray Taylor takes you through the drawing and carving of a variety of rosettes
In this article, I will introduce you to a selection of rosettes, their layout and carving, finishing with a rosette-design project for you to make.
A brief history
Rosettes in various forms have been used as decorative motifs throughout history. They can be found on tribal work or as highly sophisticated decoration in architecture, they can have religious or pagan significance or simply be decorative in their own right.
Originally, the word ‘rosette’ was used to mean a ‘rose-like object’, but it has come to have a much wider meaning. Rosettes can be rose-shaped ornaments worn as a sign of political affiliation, a supporter’s badge or a carved roundel used to decorate domestic objects.
You will find examples of carved rosettes in both the stone and timbers of old buildings A particularly useful source for study are the circular stained-glass windows in churches and cathedrals, such as the amazing Rose Window in York Minster or the superb circular window in Notre Dame Cathedral in Paris.
Coming on to a simpler but no less interesting form, we can find various rosette designs in the plaster work of Victorian houses, especially the central ceiling roses. I hope this gives food for thought and ideas for further research on the subject. To draw different rosettes, we need to divide circles into different numbers of segments and this takes us back to a bit of school geometry. But don’t let this put you off – it really is very easy.
Dividing a circle into three sections
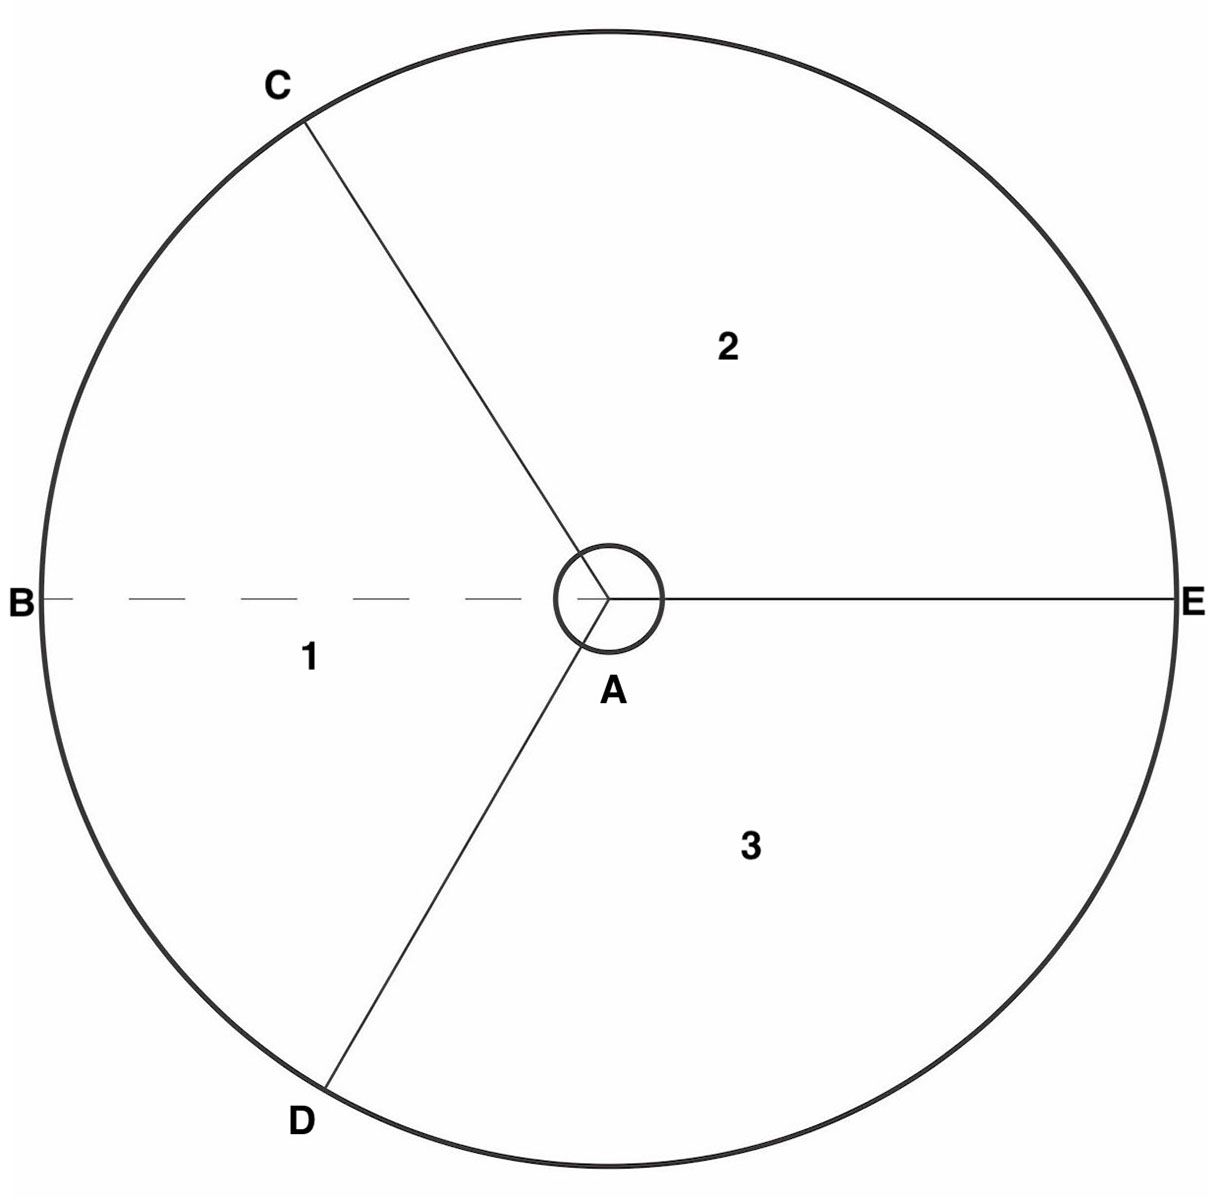
1. Draw a circle from point A.
2. From any point on the circumference, B, strike off an arc at C and D keeping the same compass setting.
3. Continue the line BA on to point E.
4. Join up lines AC and AD.
You have now divided your circle into three equal segments, 1, 2 and 3.
Dividing a circle into three sections
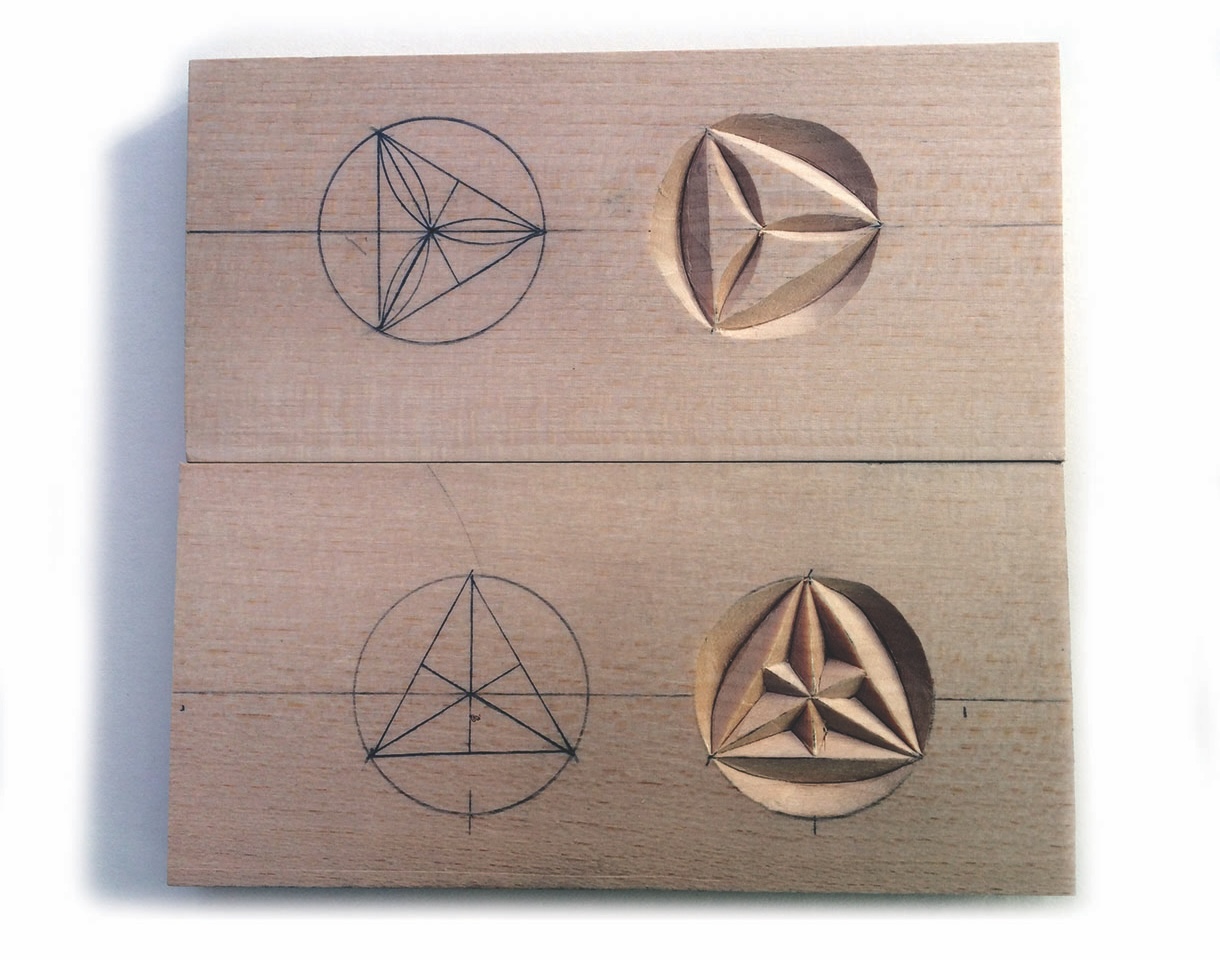
Two examples of three-part rosettes
Top tip: Keep your compass lead sharpened to a fine point and be careful about the placing of your compass point – both things will add to the accuracy of your rosettes.
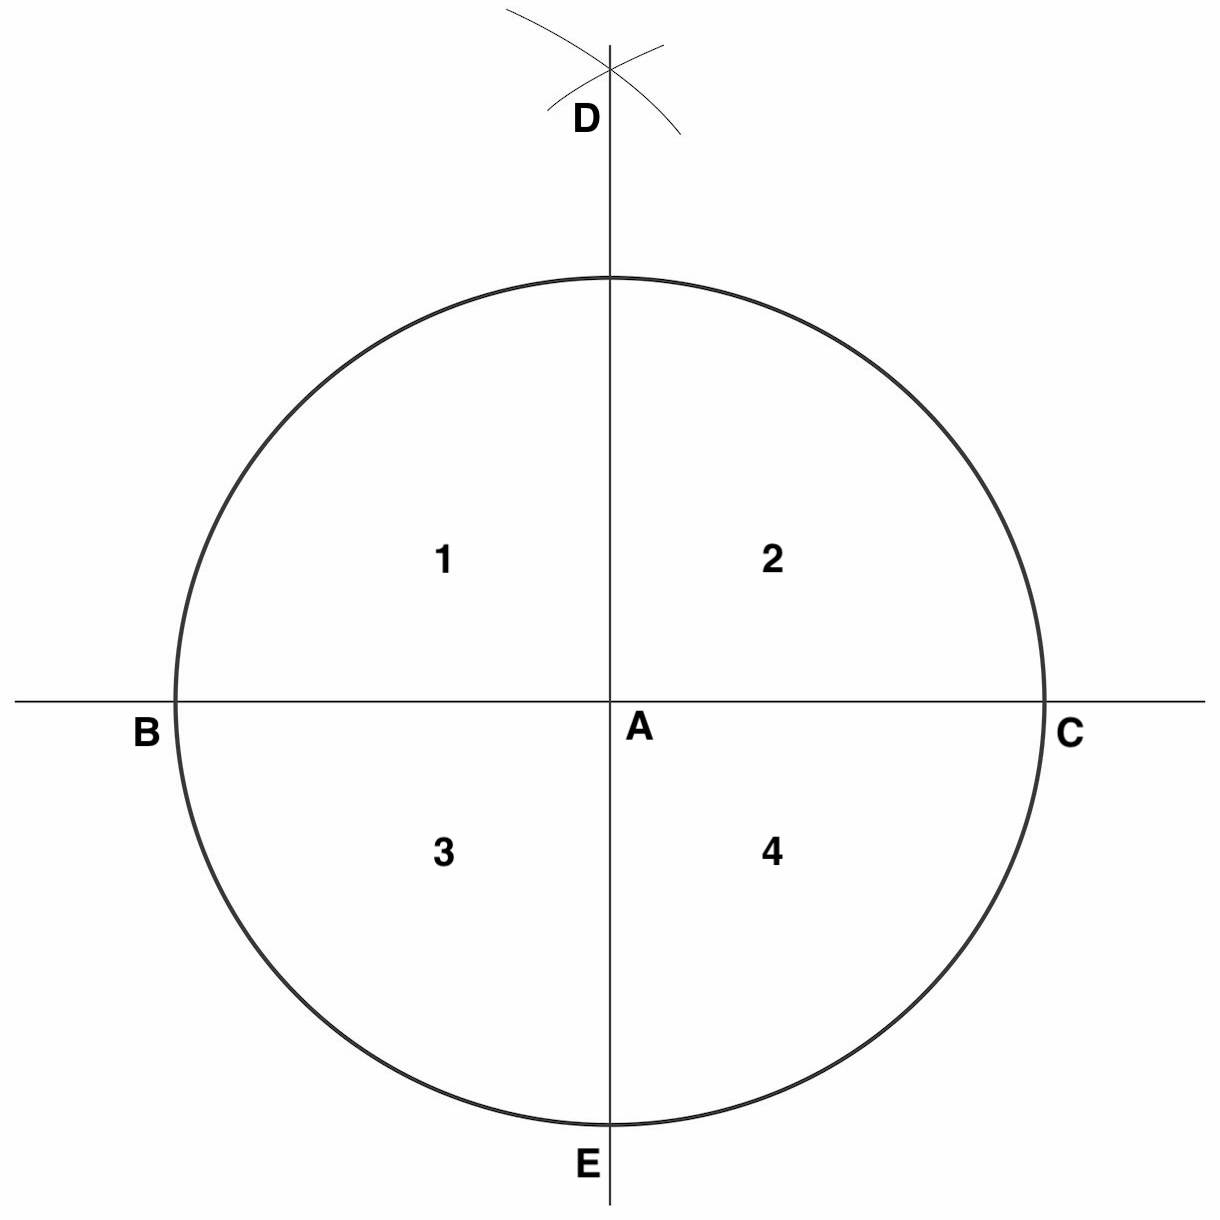
Dividing a circle into four sections
1. Draw a circle from point A.
2. Draw a line through point A to cut two points on the circle at B and C.
3. With a setting larger than the radius of the circle, strike an arc from B and C to cross at D.
4. Draw a line from D through A to cut the circumference on the opposite side at E.
You have now divided your circle into four and you can make up a variety of simple rosettes – think of the four-leaf clover or compass rose, for example. You can try drawing your own variations of three and four-segment rosettes. Divide them any way you like. Try thinking outside the box and mark areas to be removed to avoid confusion.
Dividing a circle into four sections
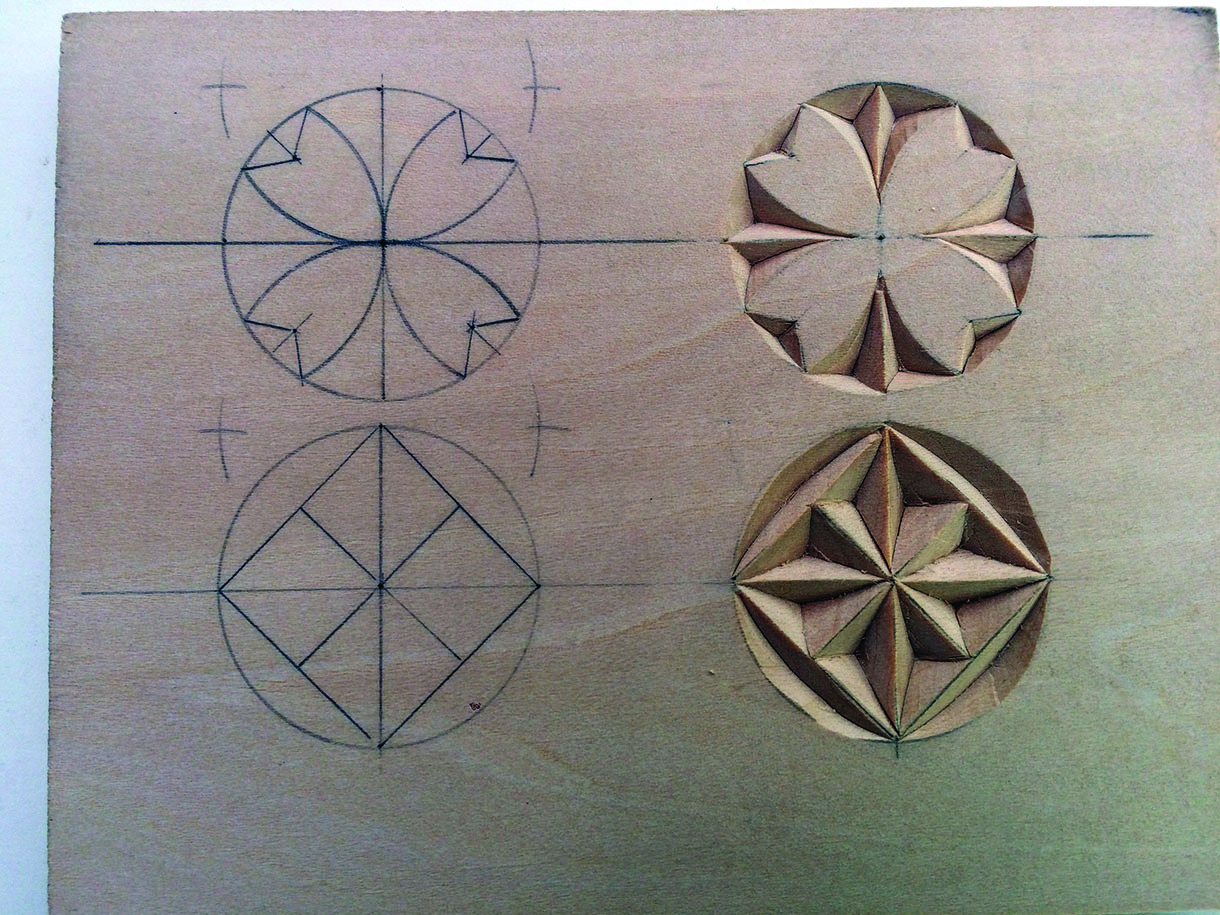
Two examples of rosettes from a circle divided into four segments
Dividing a circle into six sections
Dividing a circle into six then 12 segments is probably the most used in chip carving patterns. The six-segment rosette gives us a wonderful range of flower patterns while the 12 divisions give us a clock face. It is a convenient fact that the radius of a circle fits into the circumference exactly six times.
To form a hexagonal figure:
1. Draw a circle from point A.
2. From any point on the circumference, B, strike off an arc at C, D, E, F and G, keeping the same compass setting.
3. Now draw in the connecting lines to form the hexagon as shown, then connect each point to the centre to form six equilateral triangles.
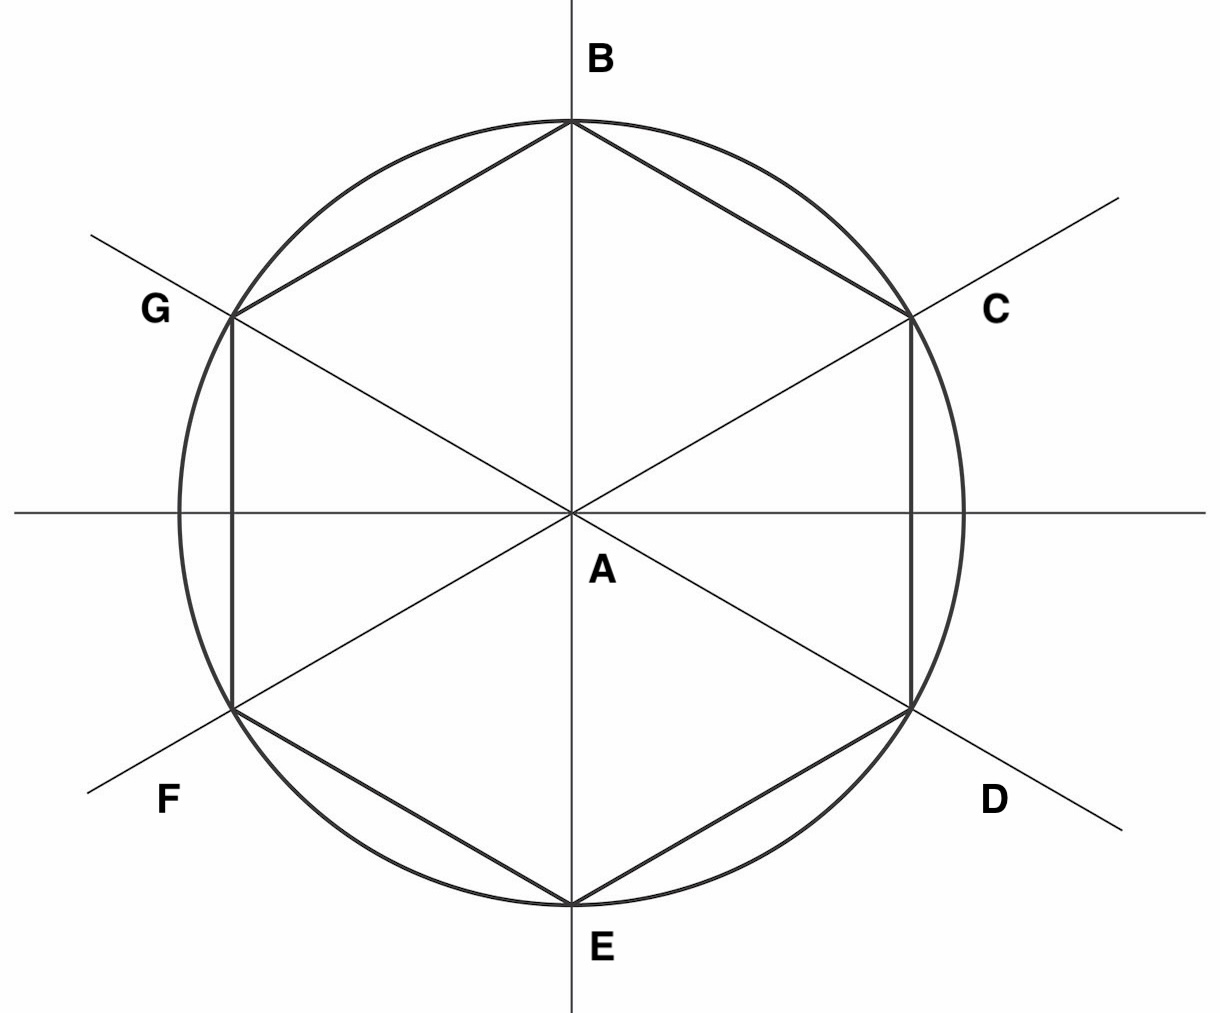
Dividing a circle into six segments
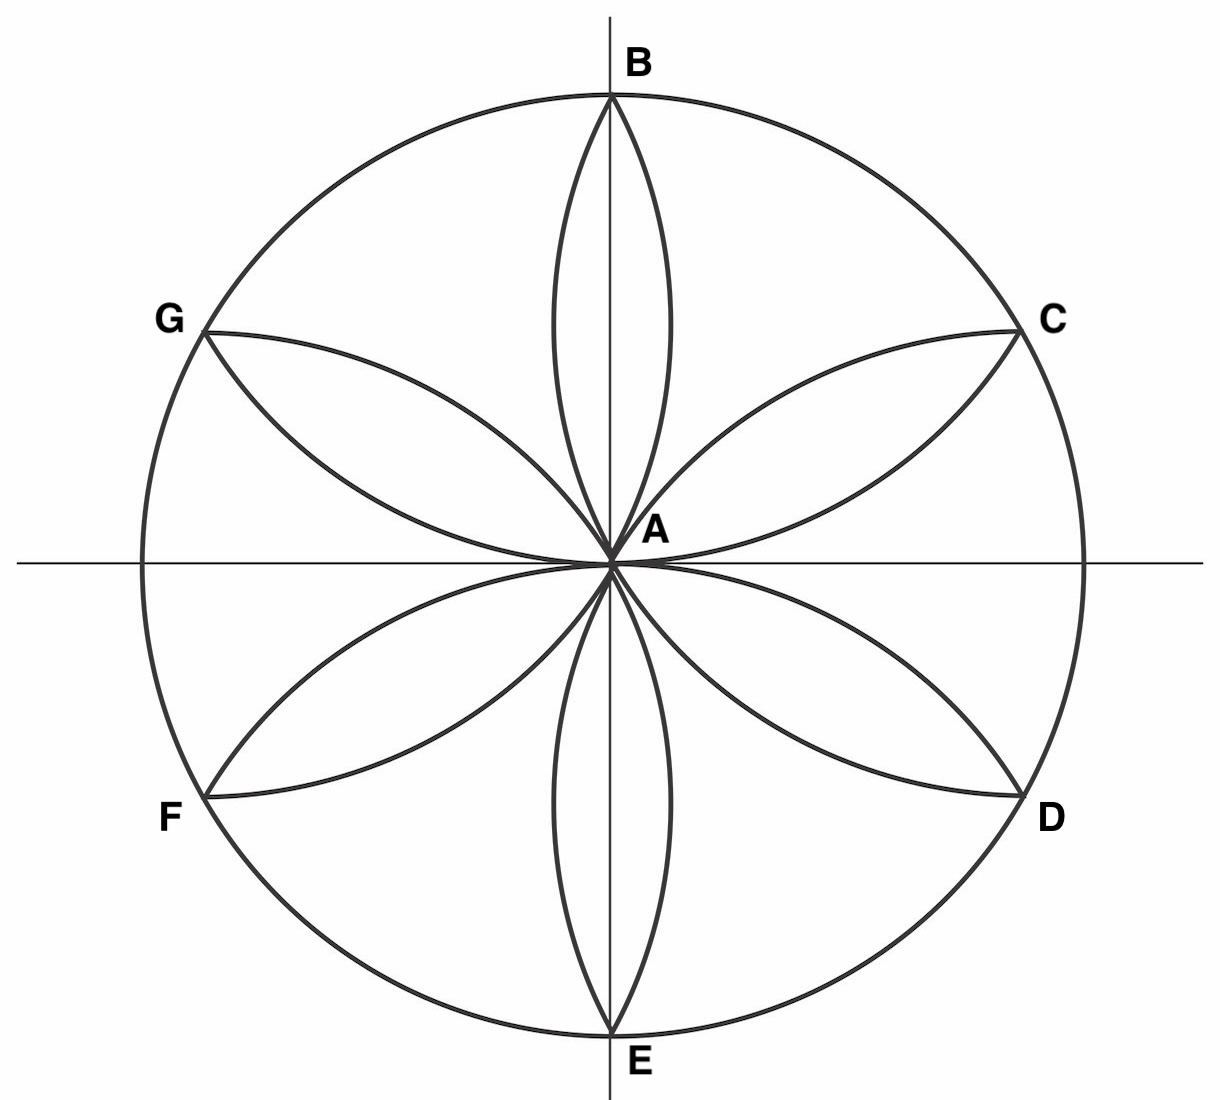
Dividing a circle into six petals
1. Draw a circle from point A.
2. With the same compass setting, describe the arcs GC from B, BD from C.
3. Continue around the circumference until the six petals are formed.
This will give you the starting point for a wide variety of designs.
Dividing a circle into six petals
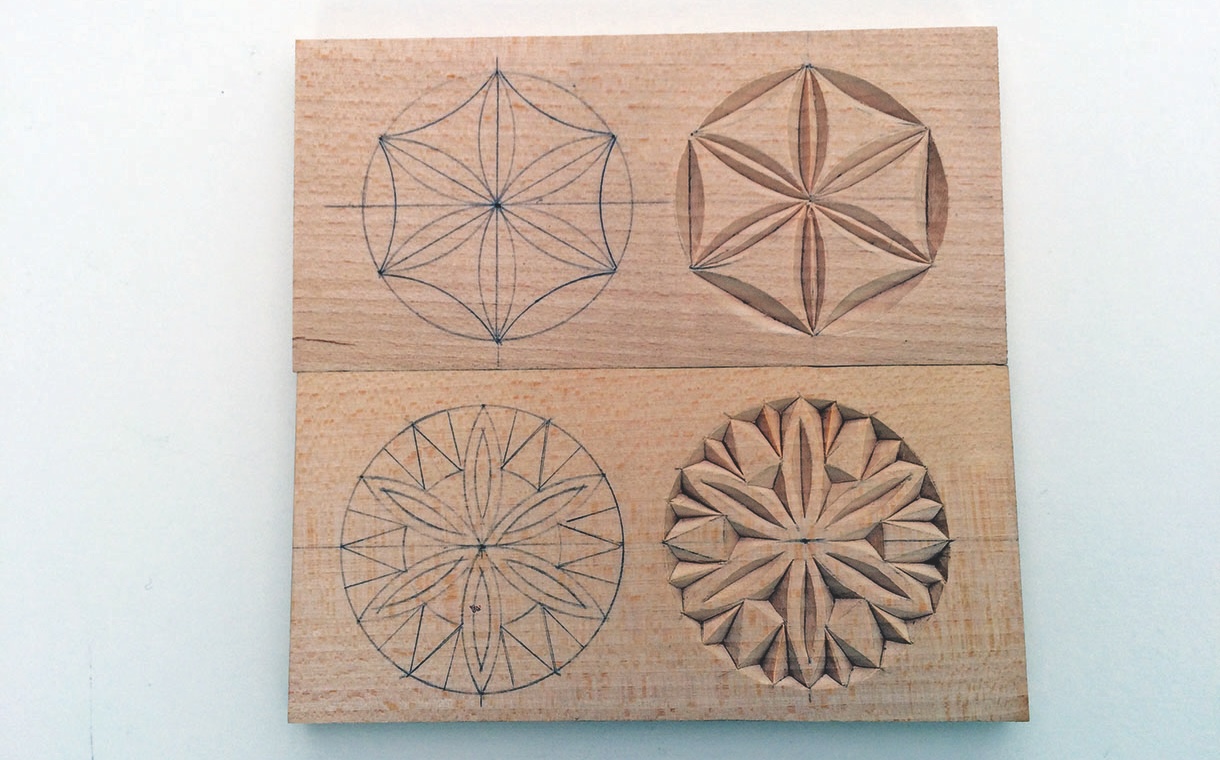
Some variants using a six-petal design
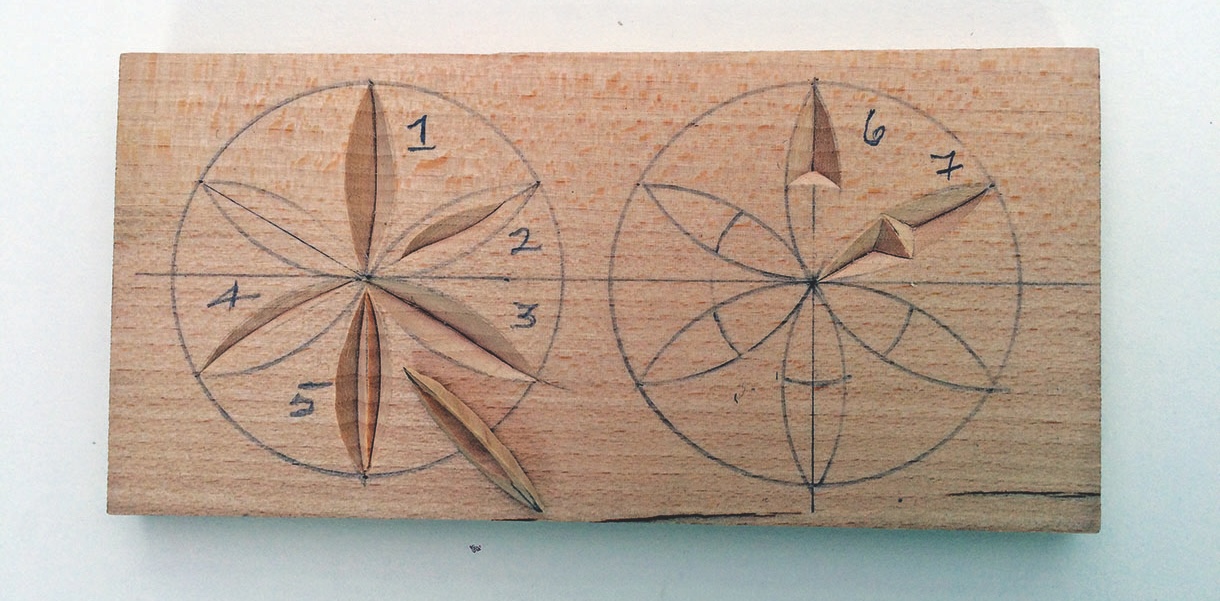
No 1. Petal removed with two cuts. No 2 & 3. Petals removed in stages. No 4 & 5. Dividing the petals down the centre. No 6 & 7. Setting your compass to 15mm and dividing the petal into two sections.
First project
Having now covered chips of various numbers of cuts and shapes, it is time to start putting them to use. I am going to give you some ideas for beginners’ projects but wish to emphasise the word ‘ideas’. They are not set in stone – or should that be wood.
The first project is a trivet based on a 15cm square piece of lime (Tilia spp.). You can, of course, use any suitable size that you have and alter the design to suit, it should also be noted that you can make the design more or less complex according to your carving skill.
If you have difficulty removing the petals with two cuts, there is always a way to get around the problem. You can remove the petal section by taking the centre out first and then carving to the lines of the drawing, or you could divide the petal longitudinally from tip to tip and carve it with a central ridge. You can divide each petal into two sections using compasses set at 15mm.
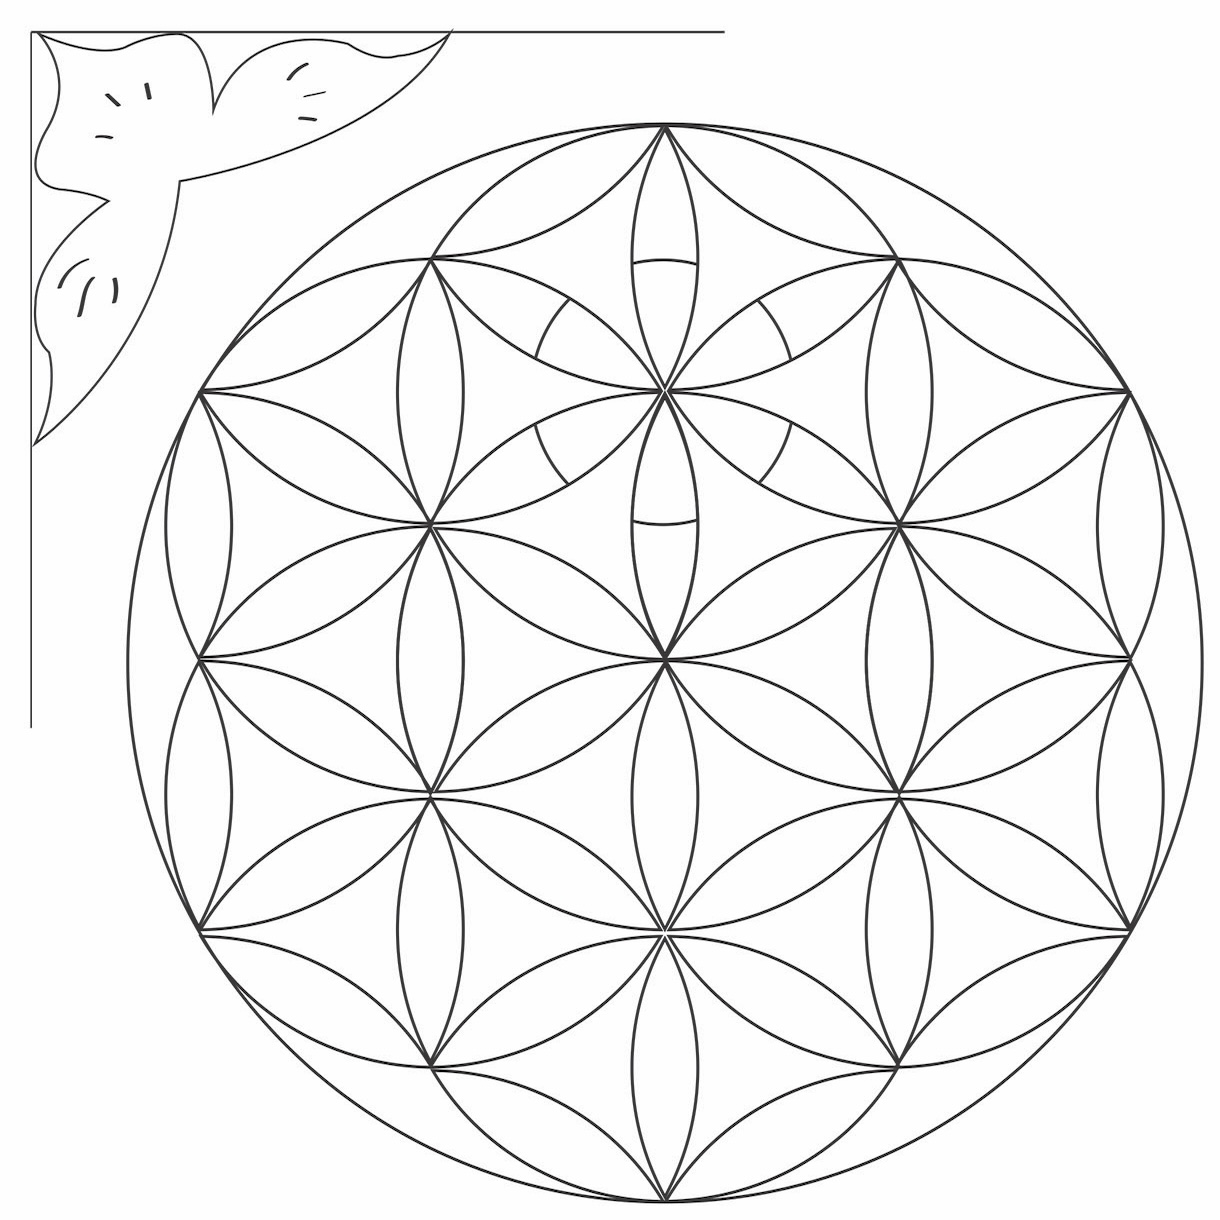
Design for a trivet based on seven circles of 30mm radius. Please note that the bottom circle has the petals divided longitudinally and that the top circle has the petals divided by using your compass set at 15mm. You could use either of these to facilitate the removal of chips
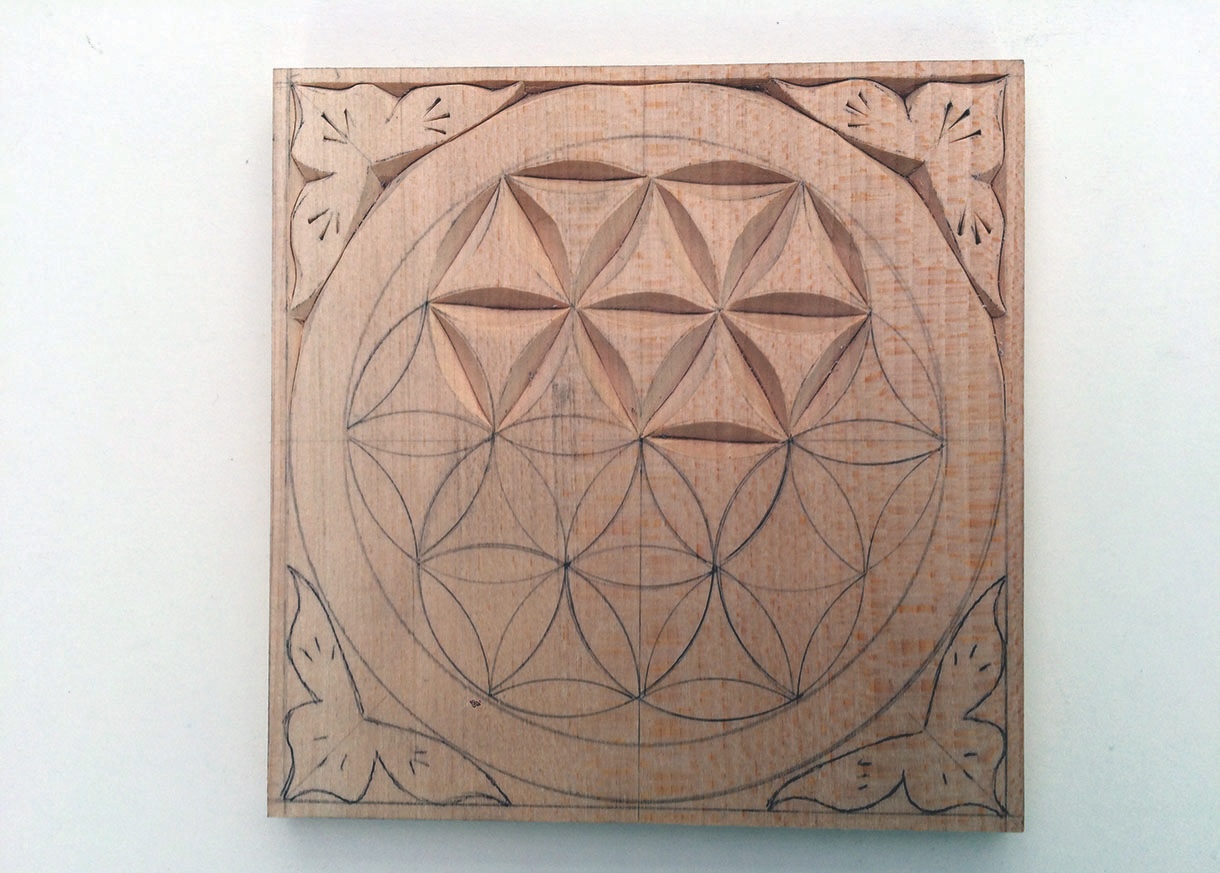
The trivet drawn and partially carved

The finished trivet
Top tip: Try carving the petals on a piece of scrap wood to work out the best variation for you.
You can finish the trivet in several ways. I have used a sanding sealer followed by clear wax. You could use an oil finish or even a polyurethane finish. The underside of the trivet can be finished with wooden pads, say 18mm square, or a self-adhesive baize, available from craft stores.
Clock
Now that you have had a go at the first project, it becomes easier to make up your own designs, shapes sizes etc., so with this idea of flexible projects in mind I would like to lead you on to something a little more adventurous. Quartz clock movements are cheap and readily available, which makes them very popular. The problem I have noticed is that the movements just get placed directly behind the clock face, which leaves a gap between the face and the wall which forms a dust trap and is unsightly.
Clock
Now that you have had a go at the first project, it becomes easier to make up your own designs, shapes sizes etc., so with this idea of flexible projects in mind I would like to lead you on to something a little more adventurous.
Quartz clock movements are cheap and readily available, which makes them very popular. The problem I have noticed is that the movements just get placed directly behind the clock face, which leaves a gap between the face and the wall which forms a dust trap and is unsightly.
The unsightly dust trap. The solution to the problem is to make your clock in two parts – the backing plate and the clock face
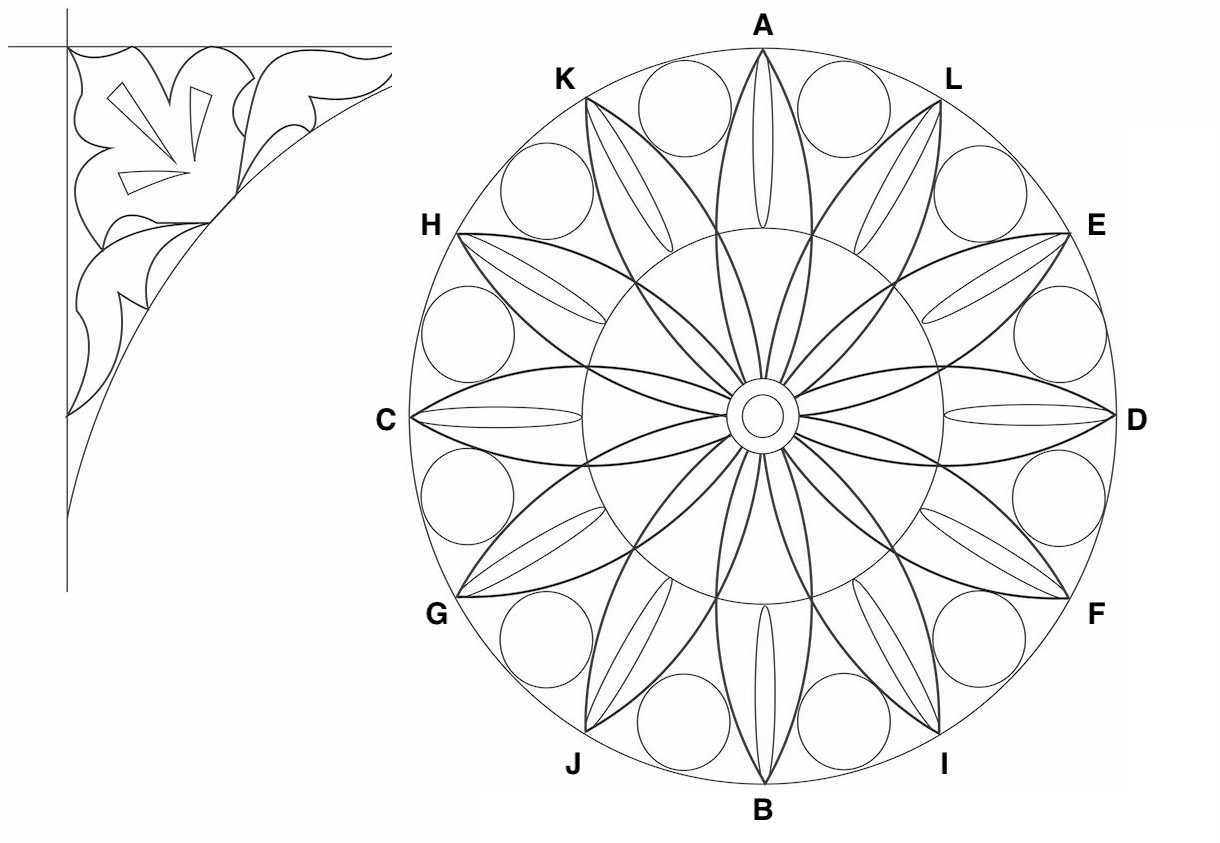
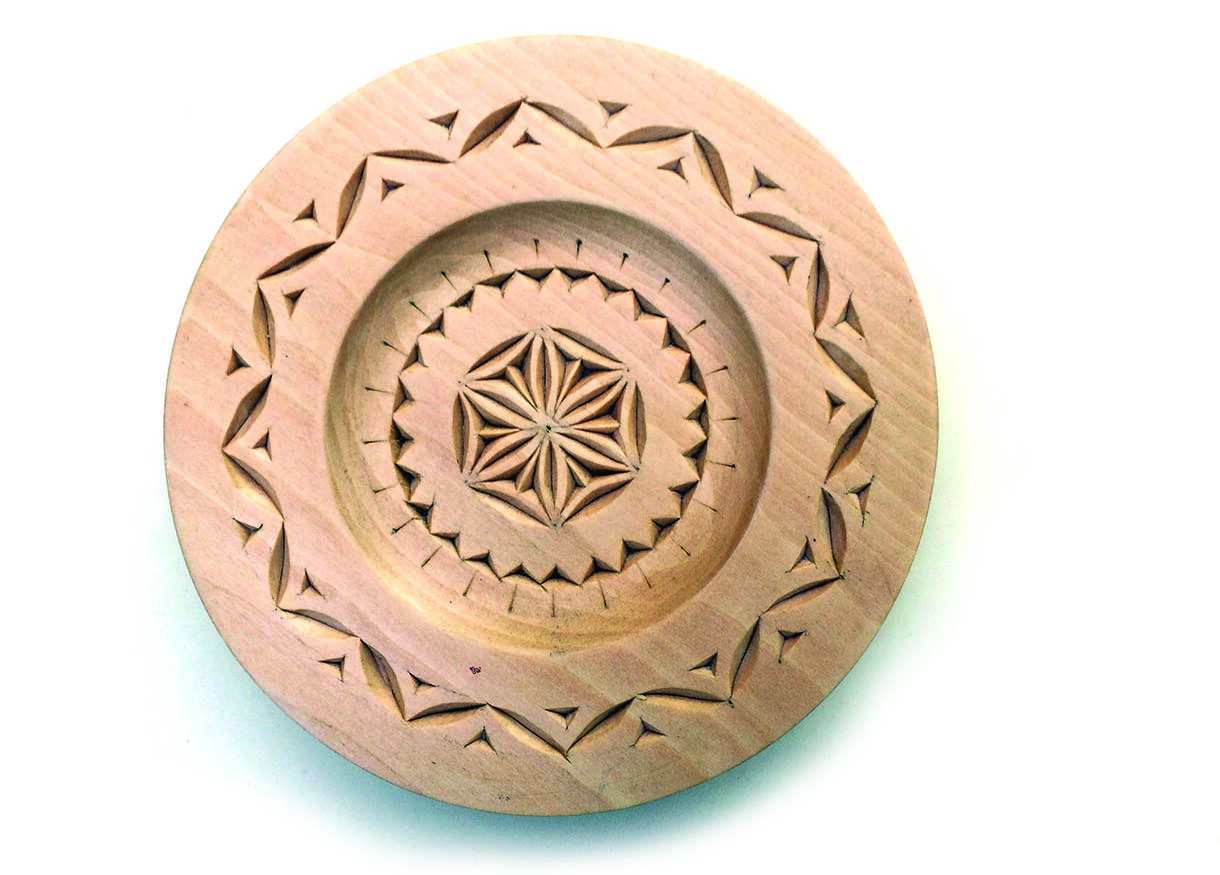
The clock face and spandrels (corner decorations)
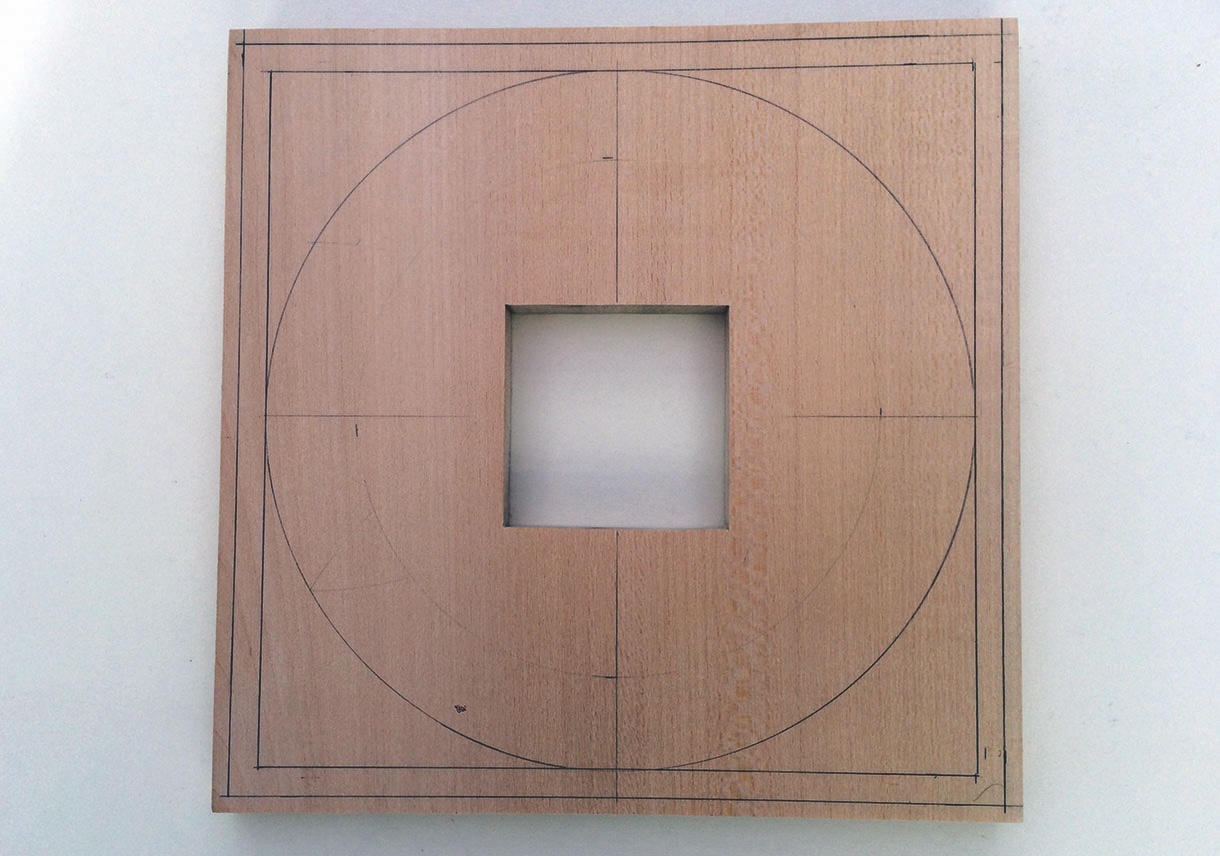
Backing plate marked out for spandrels and pierced for the movement. You can use a scrollsaw or good old-fashioned fretsaw
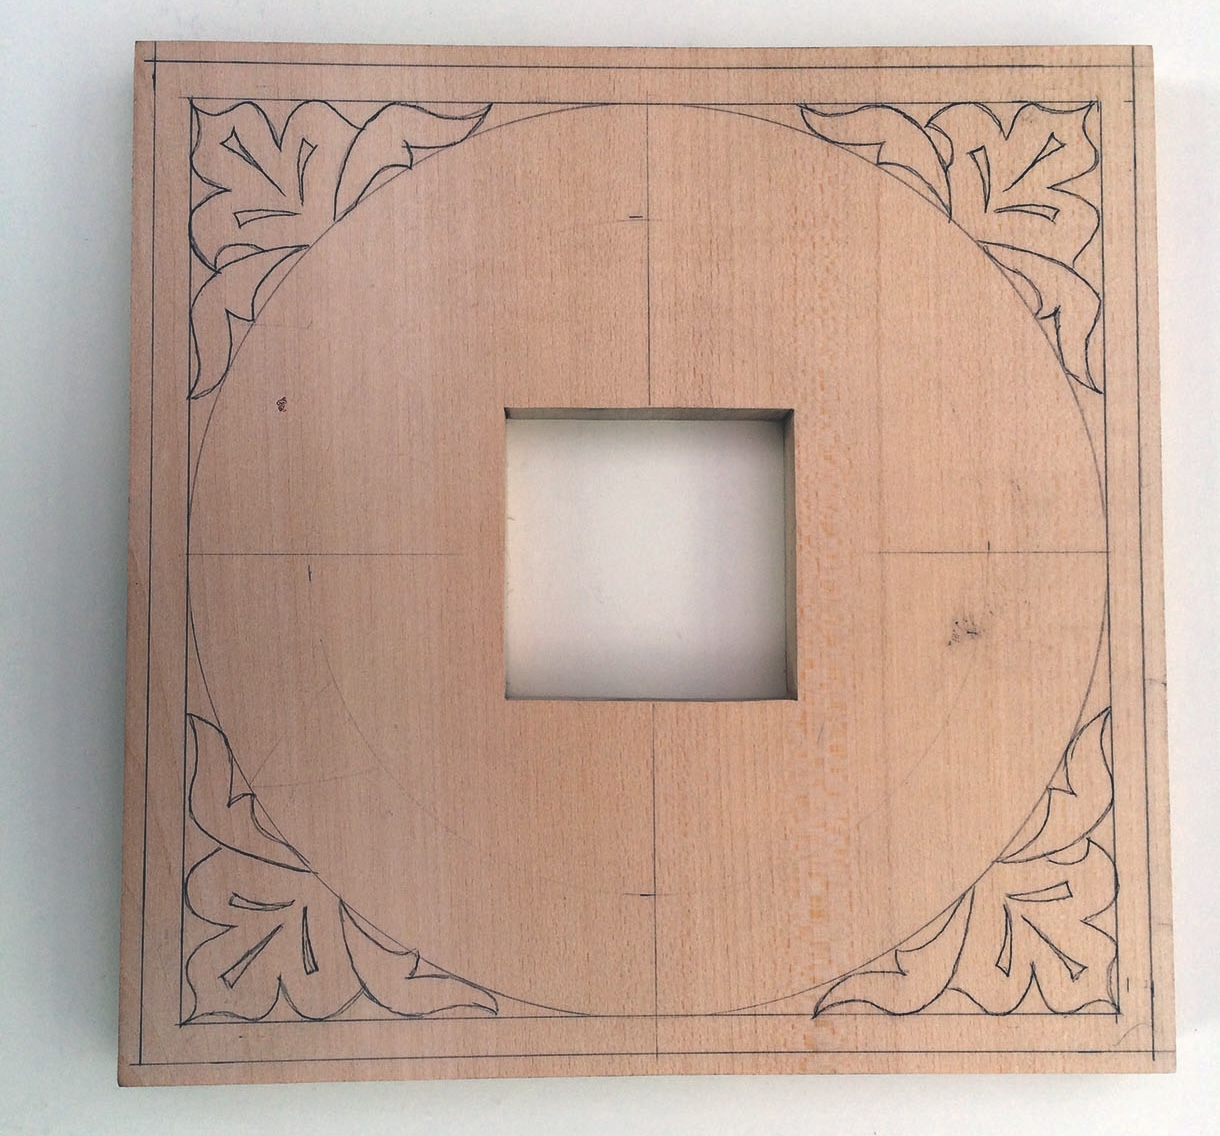
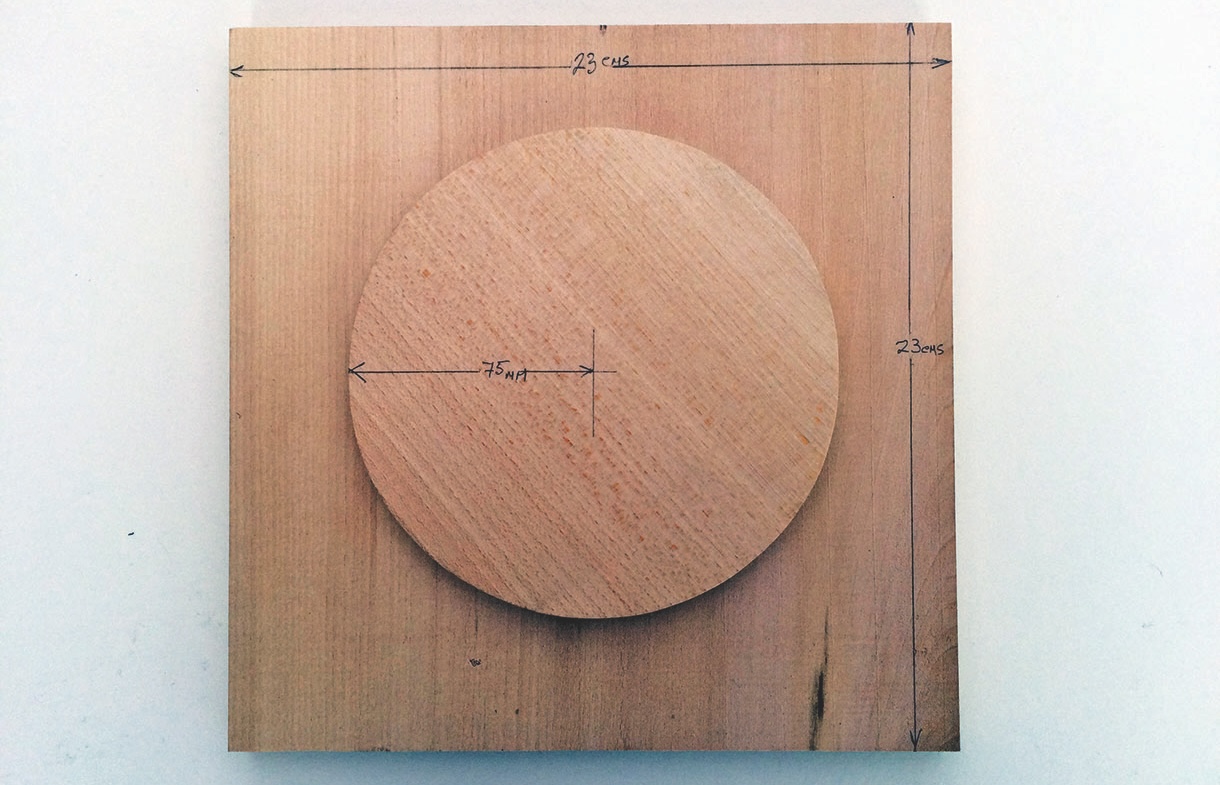
The backing plate in the process of drawing in the spandrels
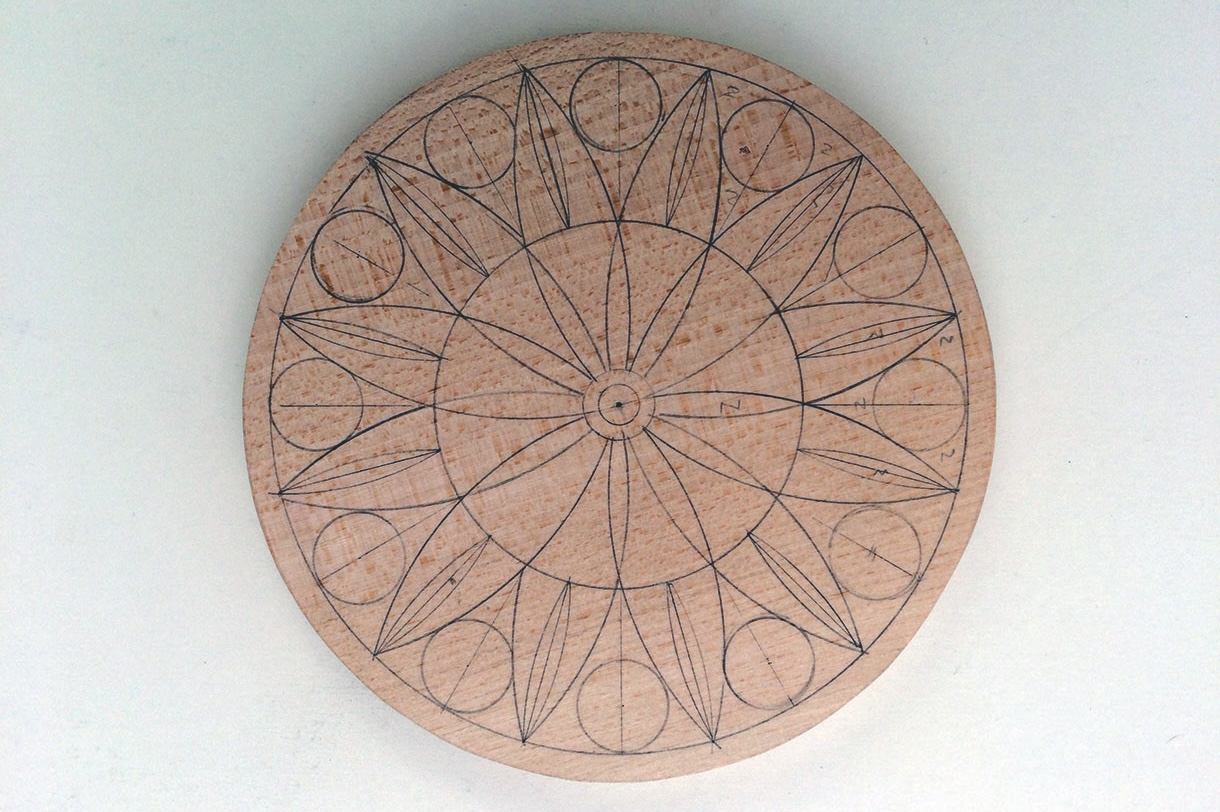
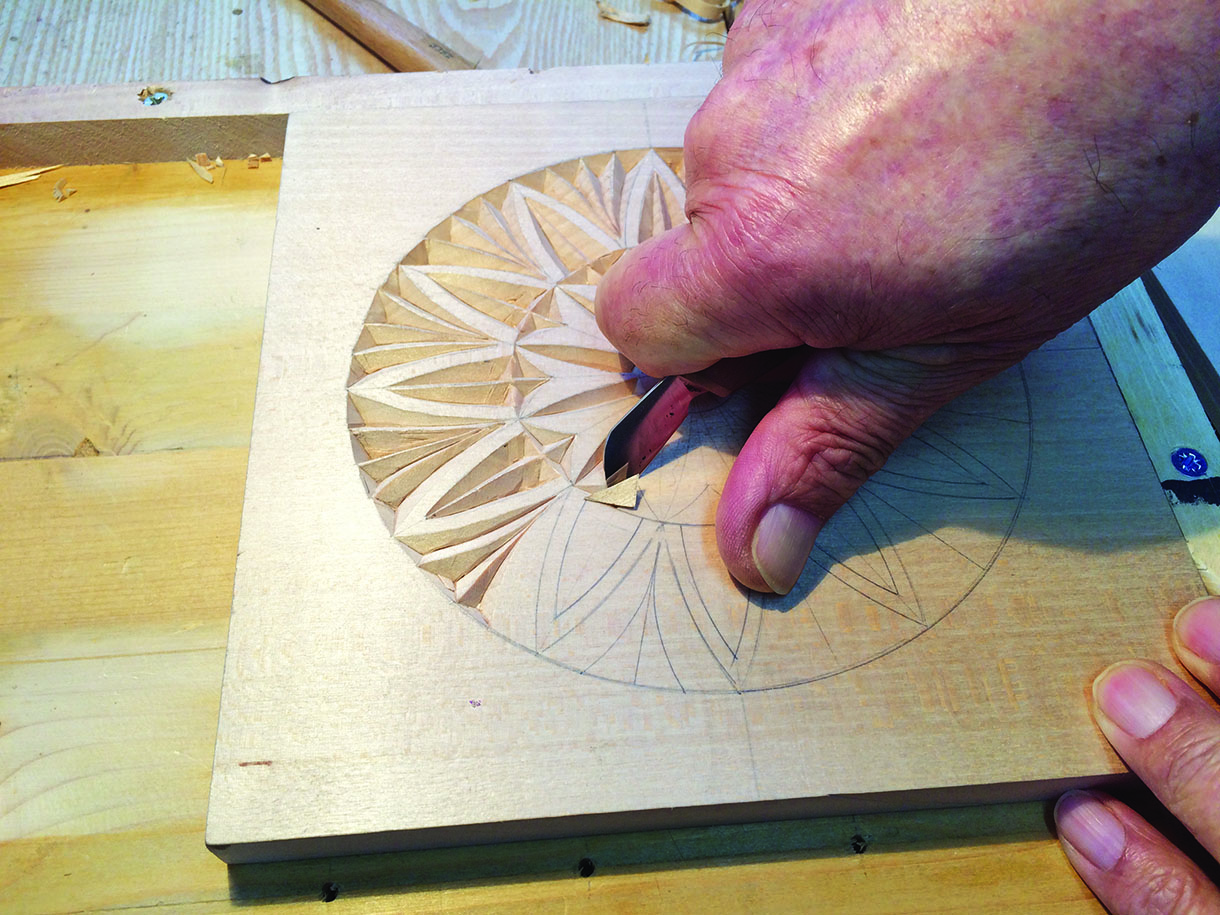
Clock face in the process of being marked out. Now is the time to put into practice the skills you have gained. Make sure your knife is sharp, get comfortable and start carving

Backing plate in the process of being carved
Top tip: Remember to use your compass to describe the circle for the spandrels before removing the centre of the back plate.
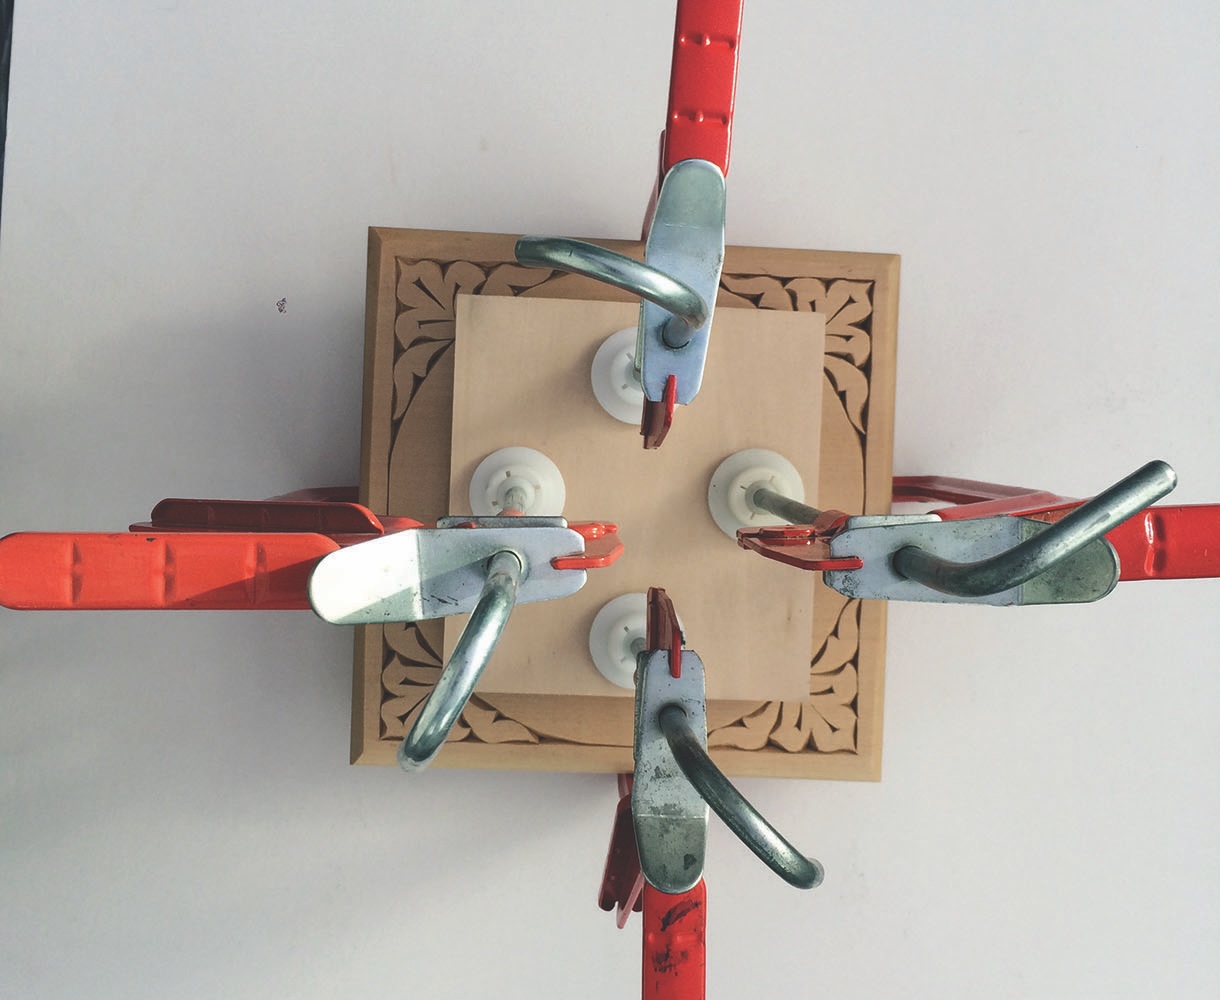
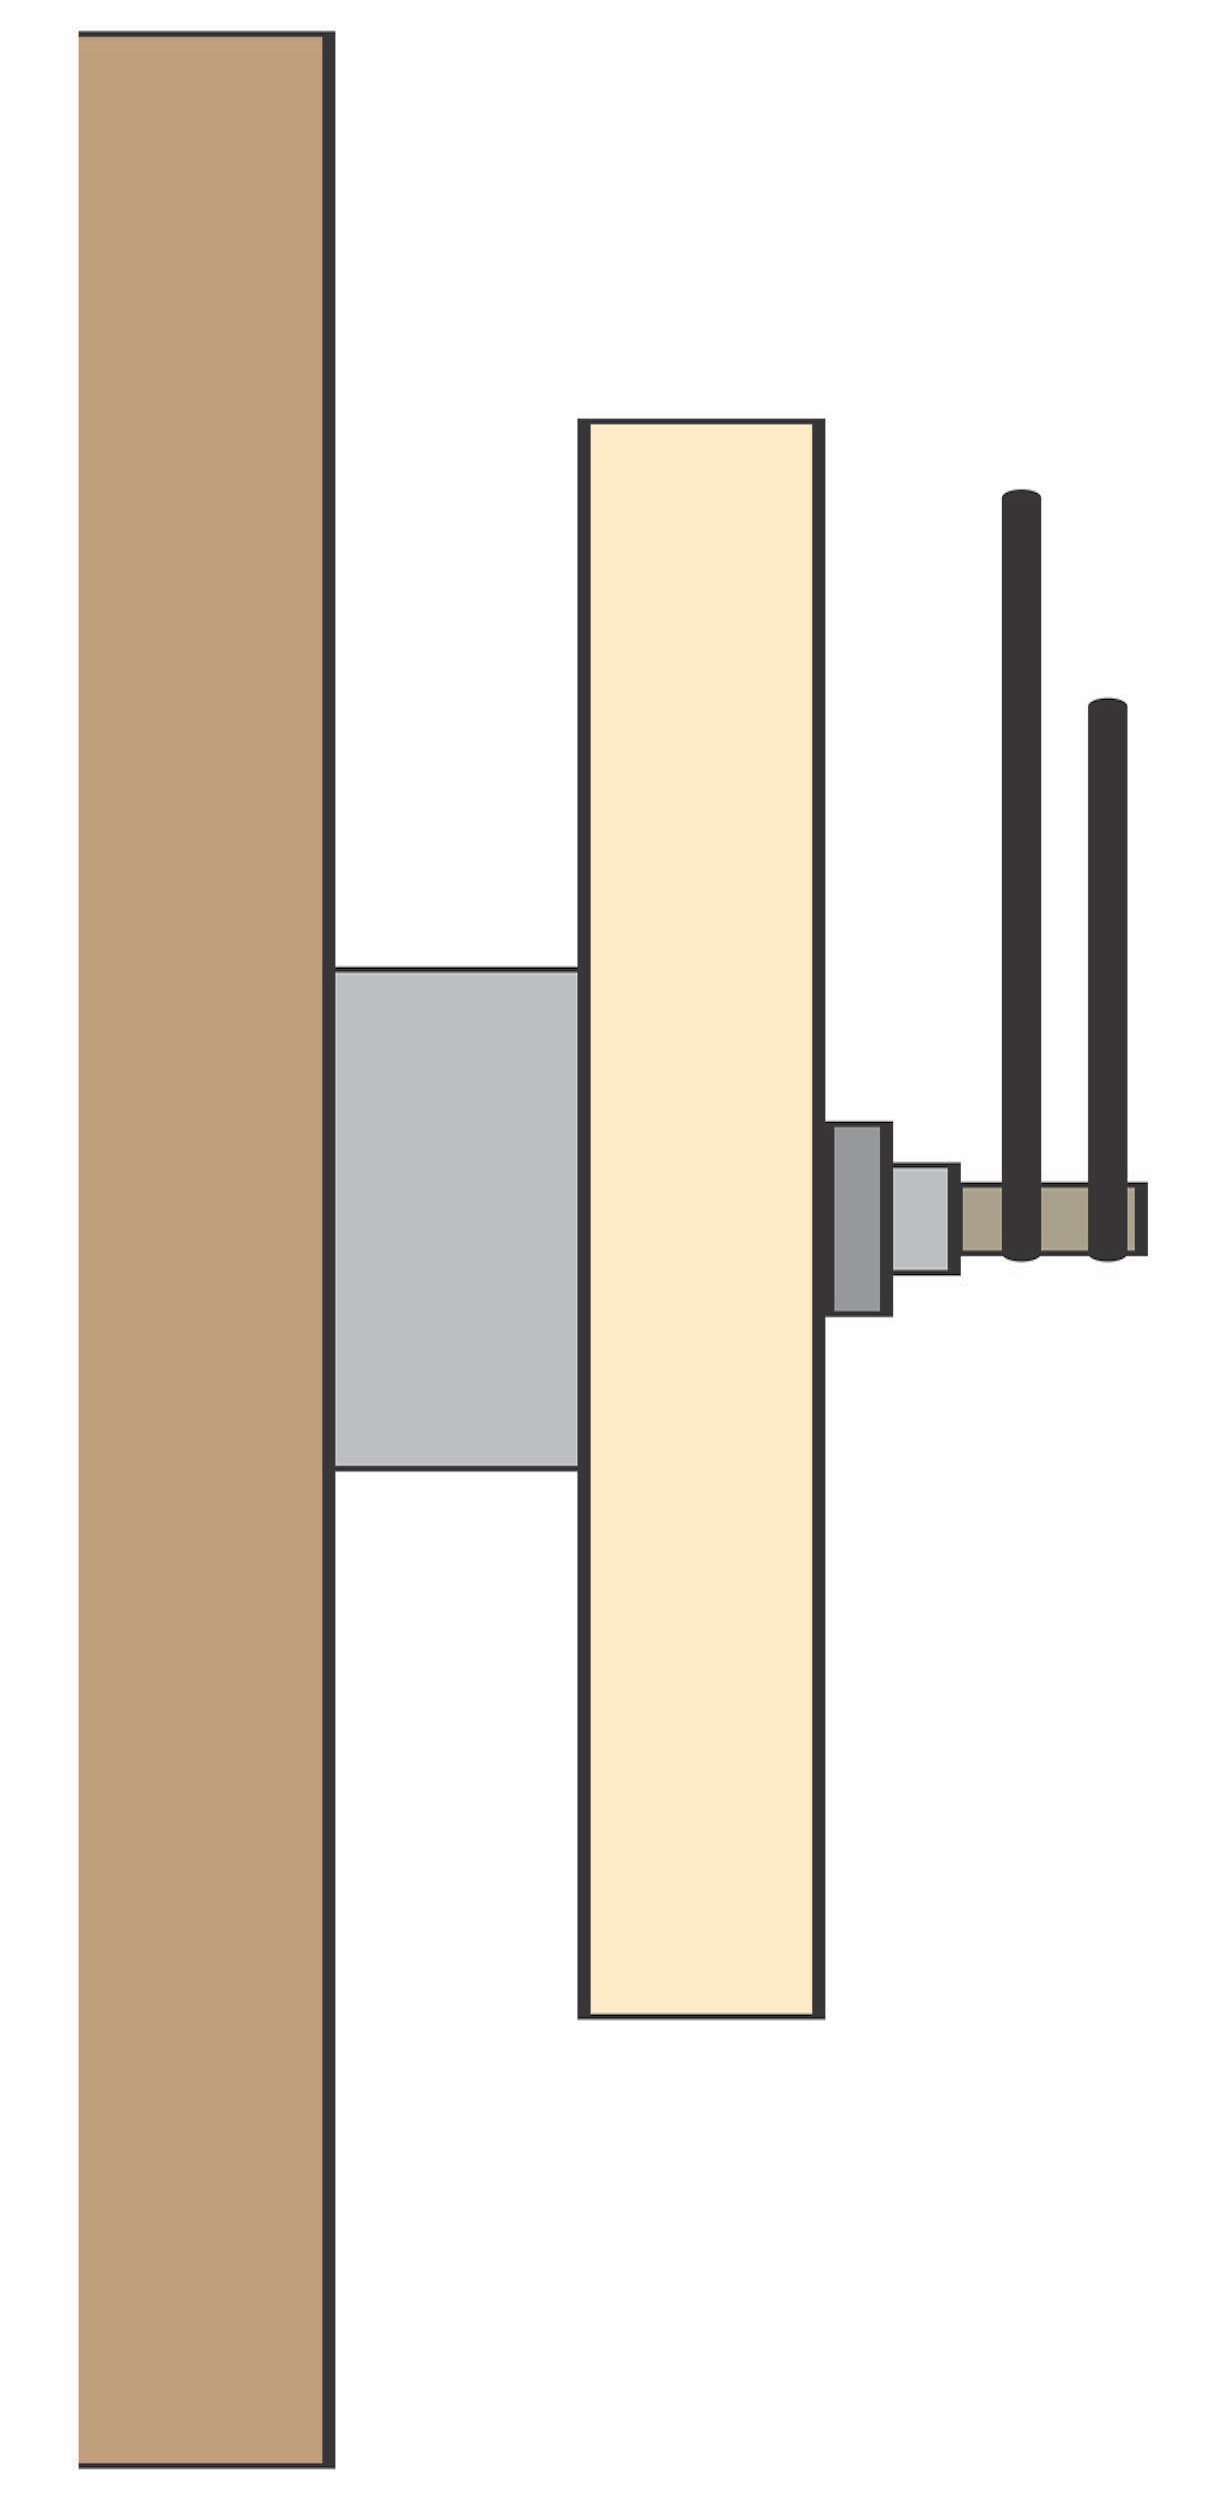
Assembling the backing plate and face. Note the four clamps for even pressure and the piece of scrap wood to protect the face
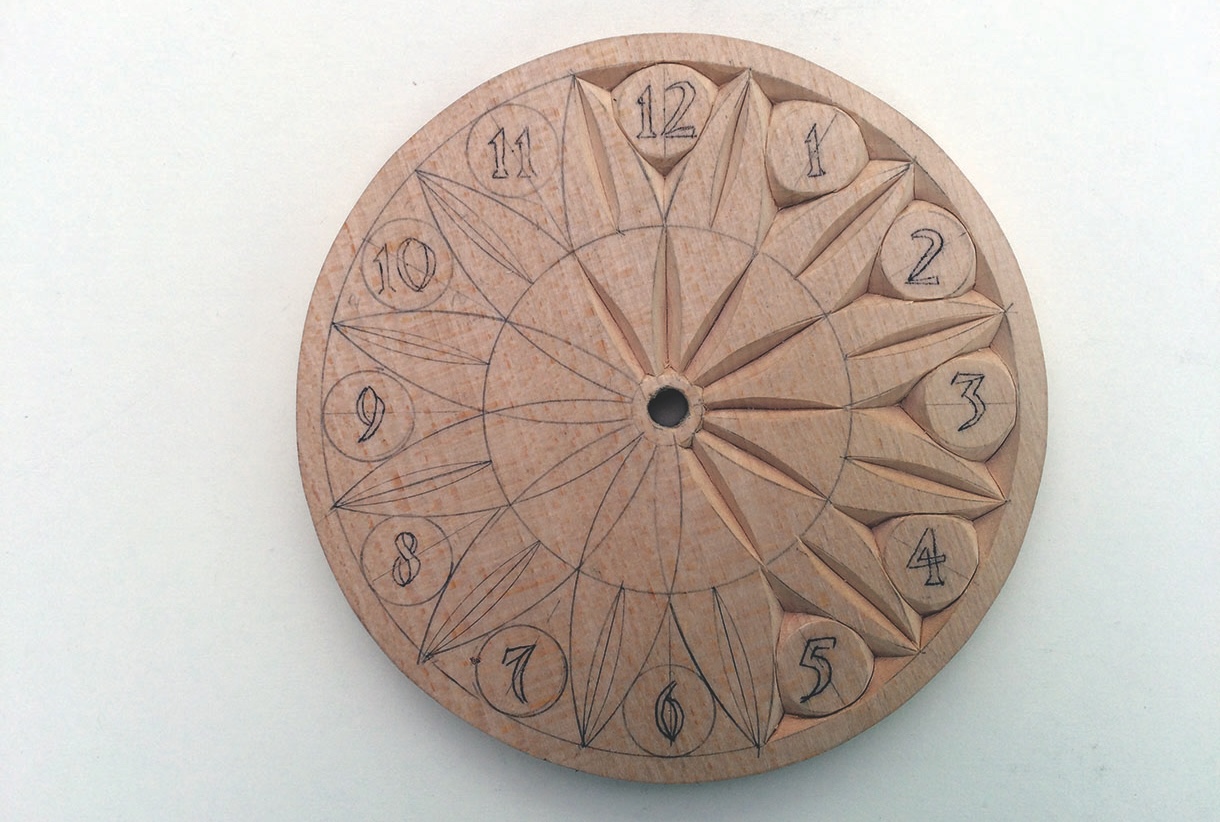
The clock face in the process of being carved. When all the carving is completed, drill out the centre of the face to accept the spindle of the quartz movement. It is important to take note of any fitting instructions that are provided. Now it is time to assemble the backing plate and the face. This is done by gluing the two pieces together. In order to do this accurately, it is necessary to put some very faint reference marks on the backing plate and prepare four G-clamps. I always prefer to have a dry run just to make sure there are no problems. Now apply a suitable wood glue to the back of the face, position it on the backing plate and carefully clamp it up. The choice of wood finish is a personal matter. Here I have used a sanding sealer with the addition of a little yew stain and then an antique pine wax polish. The movement hands are fitted according to manufacturer’s instructions. Pop in a battery and – tempus fugit.
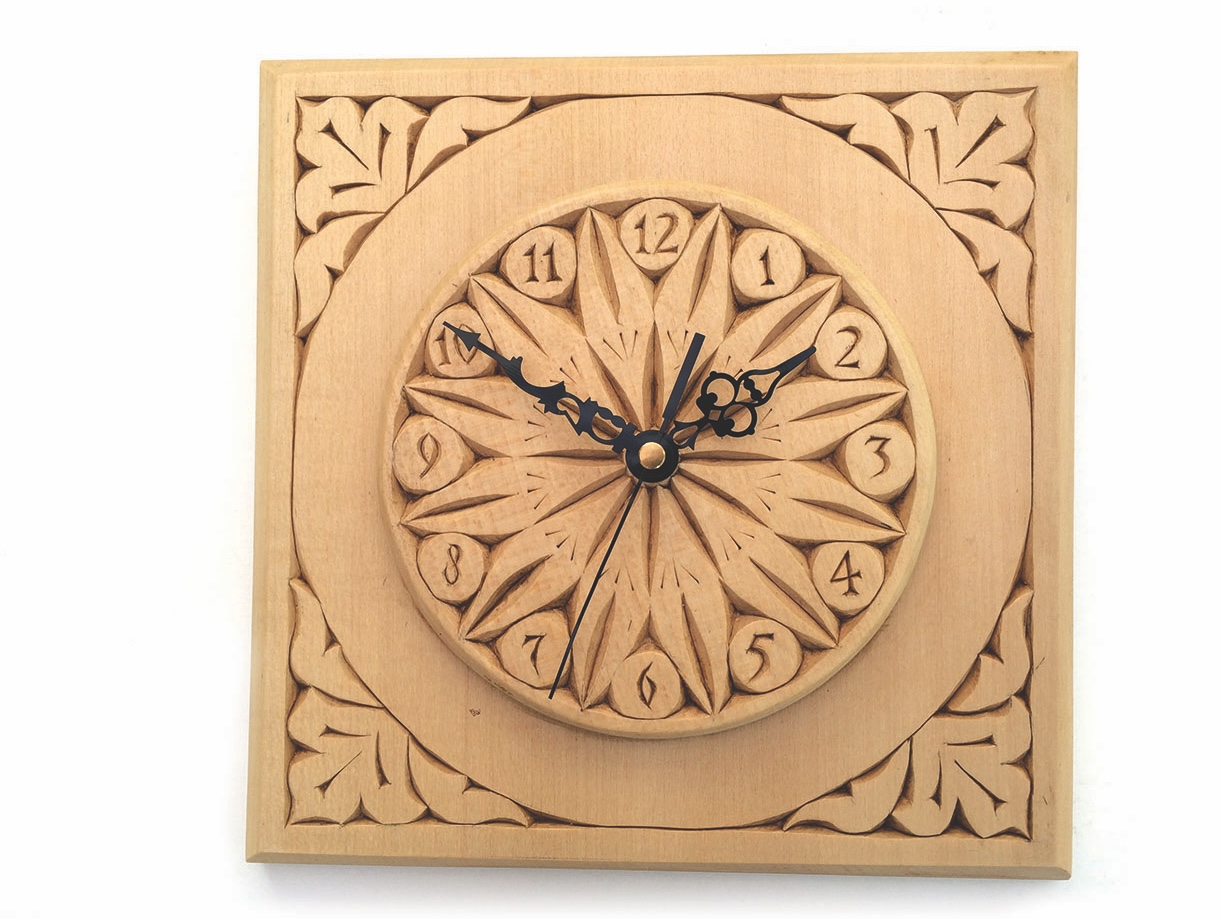
The completed clock


