Using Pewter in Turning:
Richard Findley uses pewter in his woodturning for the first time.

Richard Findley uses pewter in his woodturning for the first time
I have been aware of the use of pewter in turning for a number of years. The first time I saw it was on a quaich, made by well known pole-lathe turner Robin Wood in his book, The Wooden Bowl. I have since seen pewter used by well known turners such as Simon Hope and Stuart Mortimer. For some time I have fancied giving it a try and this series is a perfect opportunity for me to do so.
Pewter is a soft metal which lends itself to use by turners as it has a relatively low melting point of between 170–230° depending on the exact mix of component metals (according to the internet), which means it is easily melted over a domestic stove without the need for industrial equipment. Being quite soft it will turn
with standard HSS turning tools, making it ideal to add to turned work as a feature.
The plan
Taking my inspiration from Robin Wood’s turned quaich, I plan to turn a small bowl with a decorative pewter rim. A quaich is a traditional Scottish drinking bowl with carved handles, often associated with whiskey. As a nod to these early drinking bowls I intend to make a palm-sized, round bottomed bowl, but for purely decorative purposes and without the carved handles.
The theory
My experience of working pewter is entirely based on what I’ve seen in a number of demos over the years and having read a few articles in magazines and on the internet. It seems quite straightforward as pewter will melt in a pan over a stove and can be cast into a simple wooden former or mould. If this goes to plan I will fix the cast pewter ring to the rim of a bowl and turn it all together into a finished decorative bowl. It should be reasonably simple, although I expect a few challenges along the way, but we shall see!
Timber selection
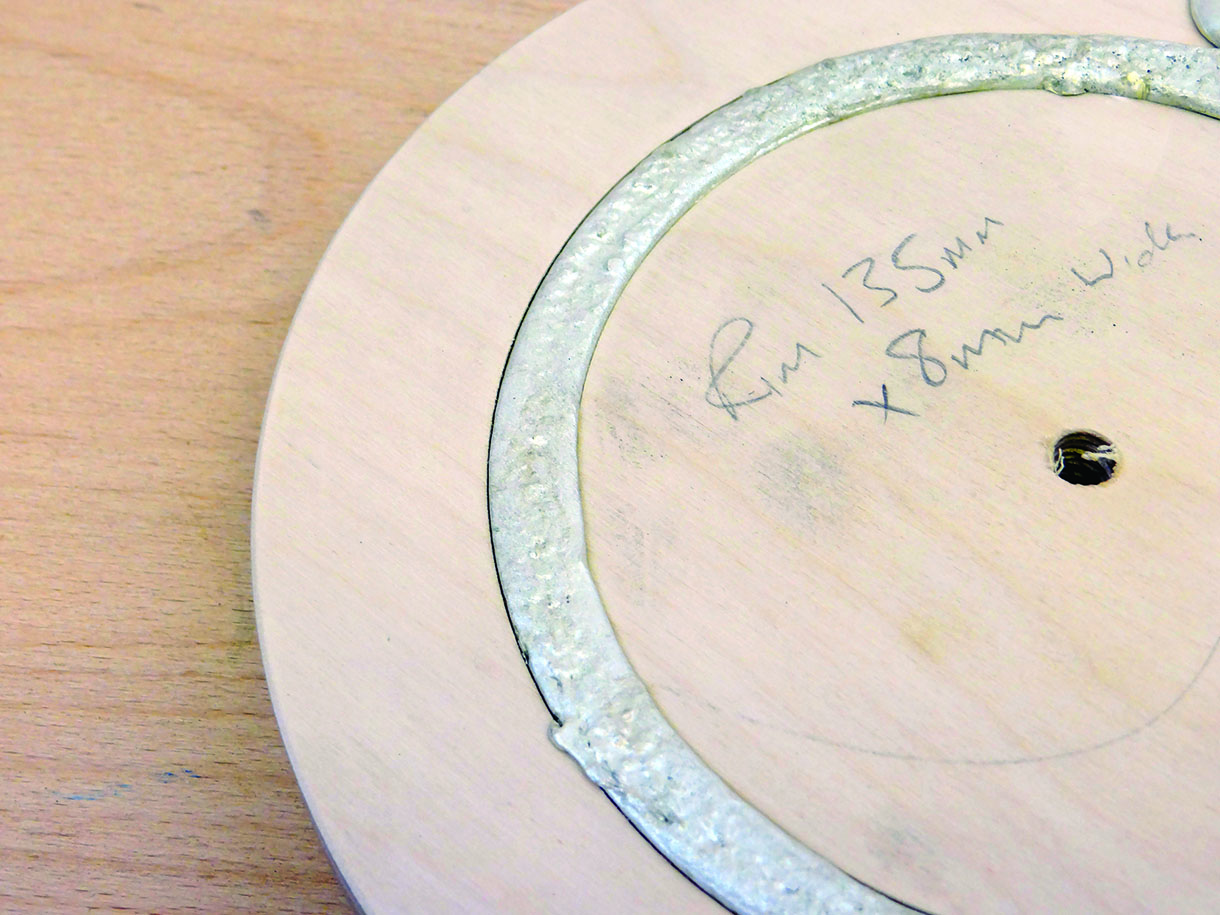
Pewter, once polished, will have a shiny silver appearance, so I think a darker timber would suit this job best. To me, the addition of a polished pewter rim suggests a luxury, high end product, so my choice of timber is a pretty easy one. Walnut (Juglans spp.) is one of the most expensive commercial hardwoods, not considered exotic. It’s a deep chocolate brown colour that will work well with the polished metal and the two materials will contrast, but should work beautifully together. The plan is for a palm-sized bowl, so roughly 135mm in diameter seems about right. I have some 75mm thick American black walnut in stock, which fits the bill perfectly.
Preparation and planning
I always make some sort of plan, sometimes I write it down or do a sketch and sometimes it stays in my head. In this case I sketched out my idea with a few notes to make sure what is rattling around my head is actually going to work. I need a good way of attaching the pewter to the bowl, so by forming a kind of tongue and groove joint between the two, I think I should have a good surface area to allow epoxy resin to bond them together. I ordered some pewter online, in 1oz ingot form, which I’m sure is not the most economical way to buy it but due to me not planning quite far enough ahead, I needed it quickly and this seemed like a good option.
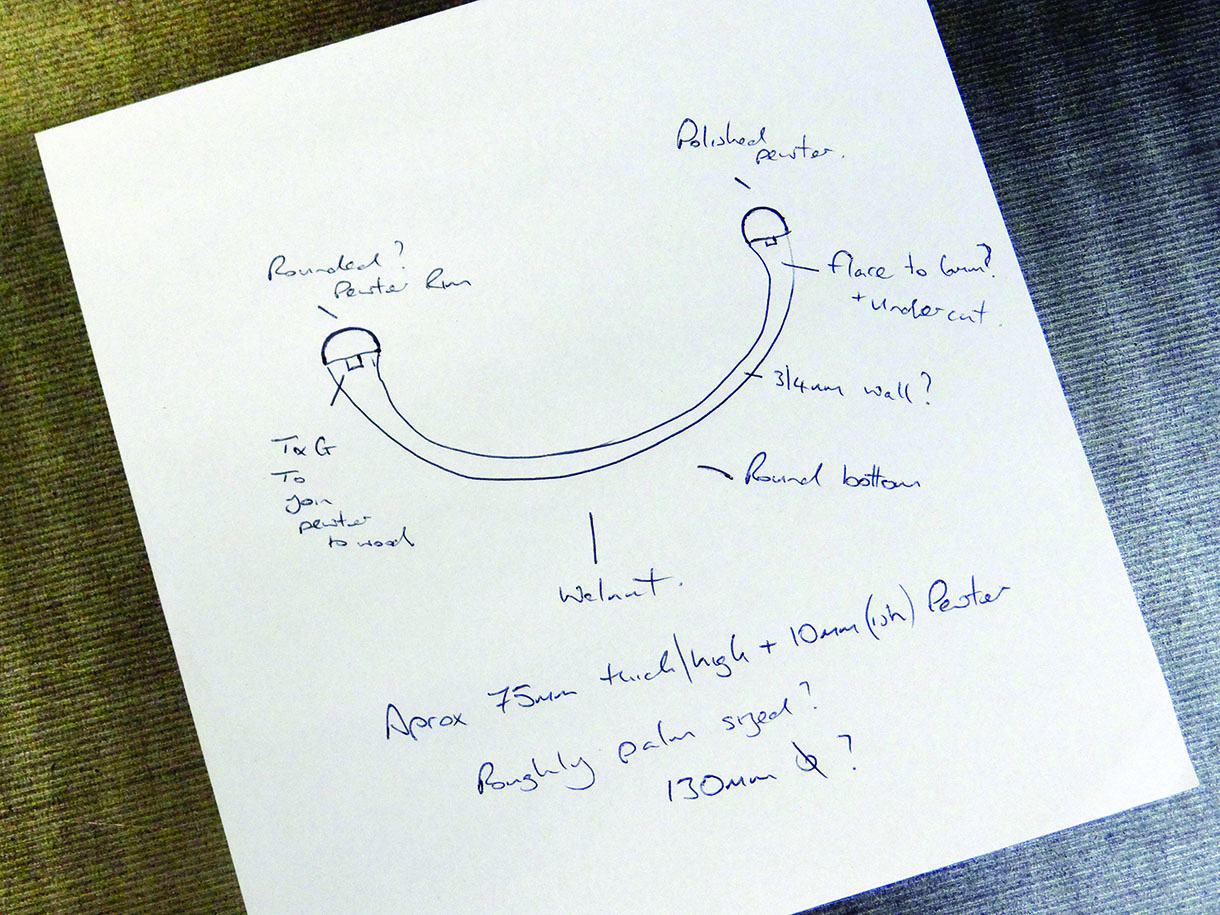
My initial roughly sketched plan
Step one
I’m sure this could be done in a number of ways and the various steps could be done in a different order, but to me at least, the order I decide to work in seems logical. My first step is to turn the outside shape of the bowl. With this turned I know exactly what I’m going to be working with, which hopefully eliminates some guess work.
The outside shape is a simple curve, I just need to leave enough additional timber on the base to be able to achieve a continuation of this curve at the end, while leaving myself a good holding spigot to grip the bowl. Happy with the curve I sand the outer surface, for no other reason than it seems like a good idea.
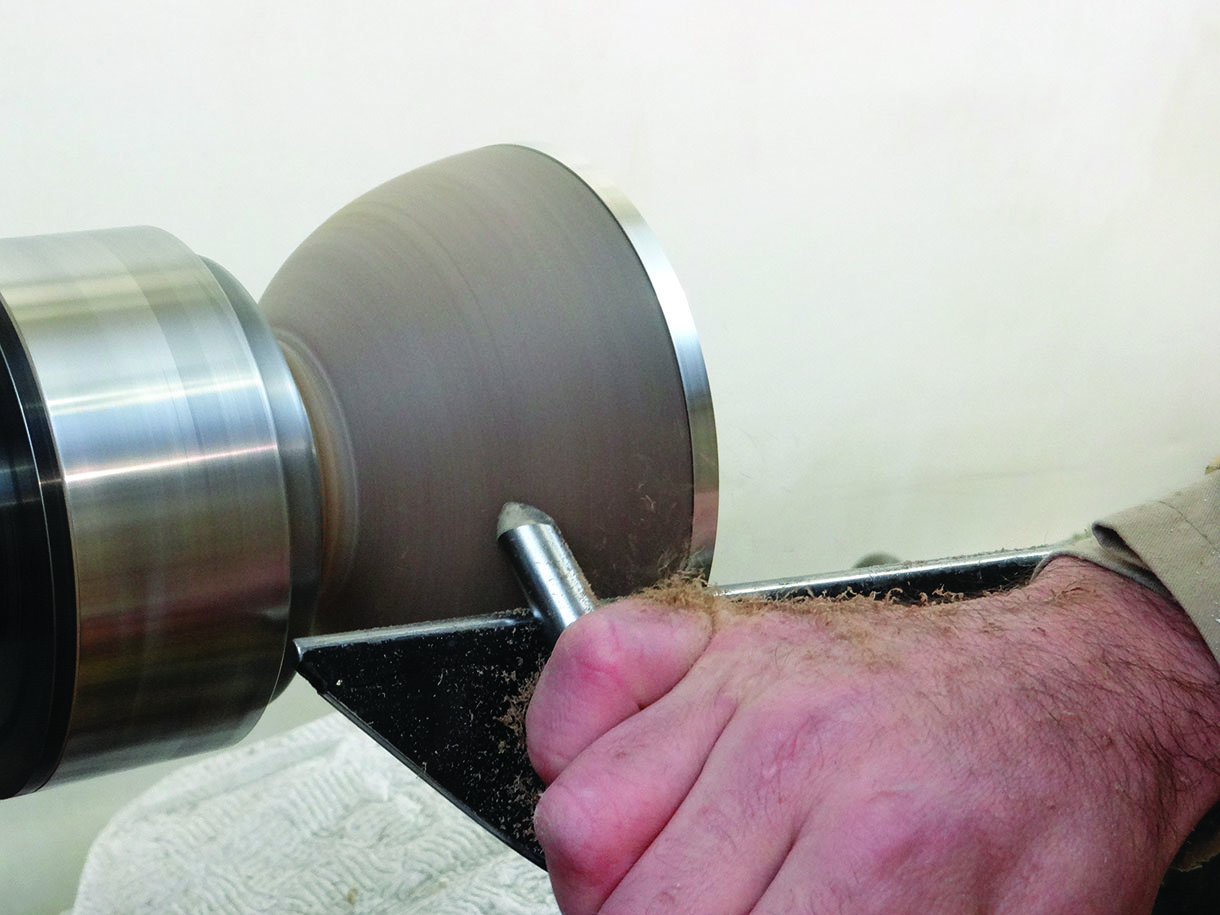
Next is to prepare the rim to accept the pewter casting. My intention is to cut a groove in the rim of the bowl with my thin 2mm parting tool and to cast the pewter with a corresponding tongue, which should give me a good strong join. I turn the rim of the bowl around 8mm wide, double checking it is dead flat with a steel ruler then cut a 2mm wide groove in the centre, approximately 4mm deep. I also make a couple of cuts into the bowl just to distinguish the rim, but leaving the bulk in the centre of the bowl, hoping this will keep the bowl stable while I sort out the pewter.
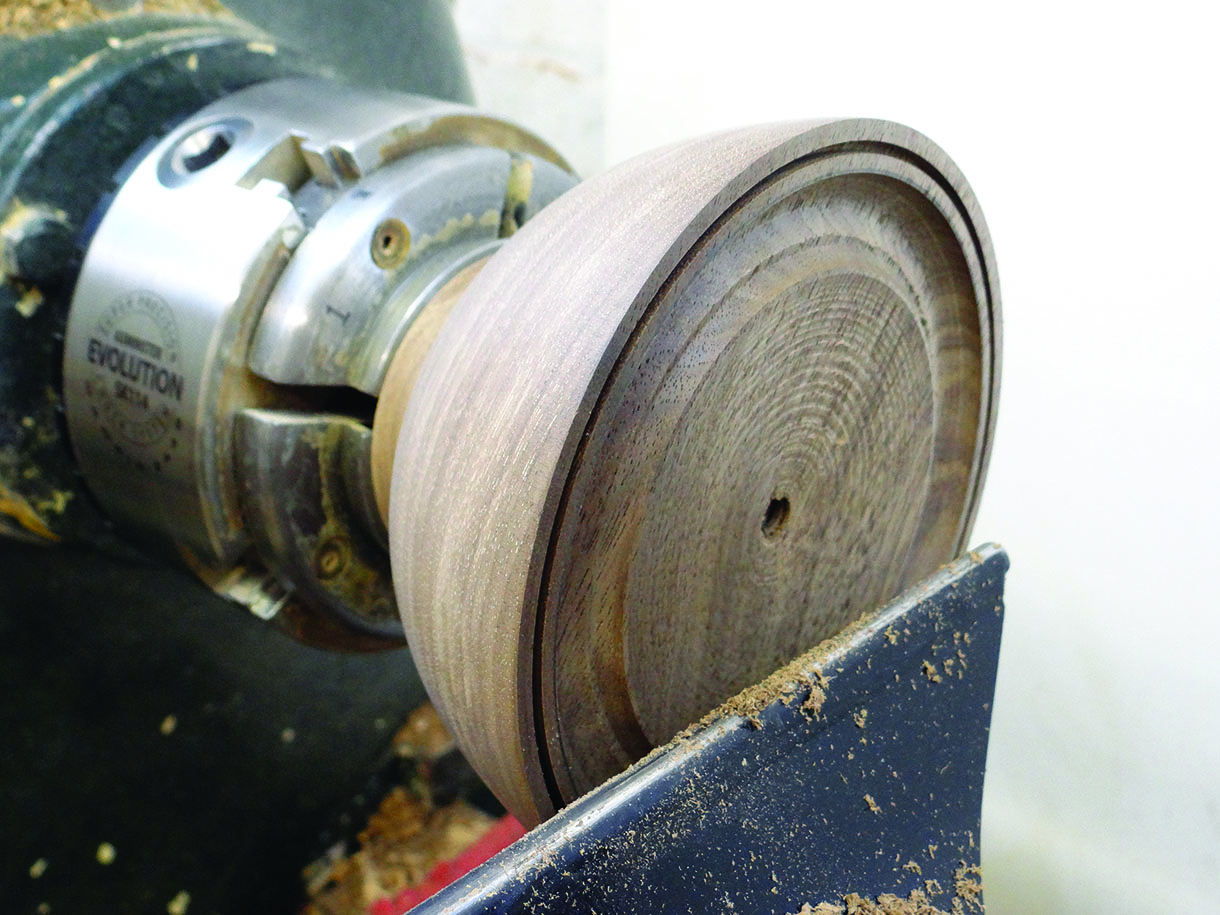
The bowl is turned and the next stage is casting the pewter
The mould
There isn’t much more I can do to the bowl itself until I have the pewter ring cast, so my next job is to make a mould or former in which to pour the molten pewter. There are a number of choices available to me here: I could use an offcut of timber but from internet research it seems that the moisture that is ever present in wood can cause some trouble. Solid wood is prone to movement, which I don’t really want here. There can also be reactions with molten metal, in the worst cases – as I read online – causing it to spit back as it’s poured. I’ve seen MDF used in demos, this has the advantage of being stable, unlike solid timber. As I expect the boiling pewter to burn the former somewhat, I don’t really want MDF smoke to deal with as well as everything else that is likely to be happening during the pour. I settled on using good quality birch (Betula spp.) ply as this seems to be the best of both worlds having great stability, but being less noxious than MDF. I also had several suitable offcuts in the workshop which are crying out to be used.
I carefully measure the rim of the walnut bowl and transfer the dimensions to the ply, which I cut into a disc and mount on a screw chuck on the lathe. Erring on the safe side, I cut the groove in my former around 10mm wide with a 6mm beading and parting tool used as a scraper, giving me 1mm extra of pewter each side of the rim. I expect a little shrinkage in the pewter as it cools so I guess this should be fine. With the groove for the pewter cut around 8mm deep I then cut a narrow groove with my 2mm parting tool, which will form the tongue in the pewter. Again, in case of any shrinkage, I cut this groove around 3mm wide, which should also allow a little for fitting it into the groove in the bowl. Sitting the bowl upside down on the former, it all seems to fit together well so I am encouraged by everything so far.
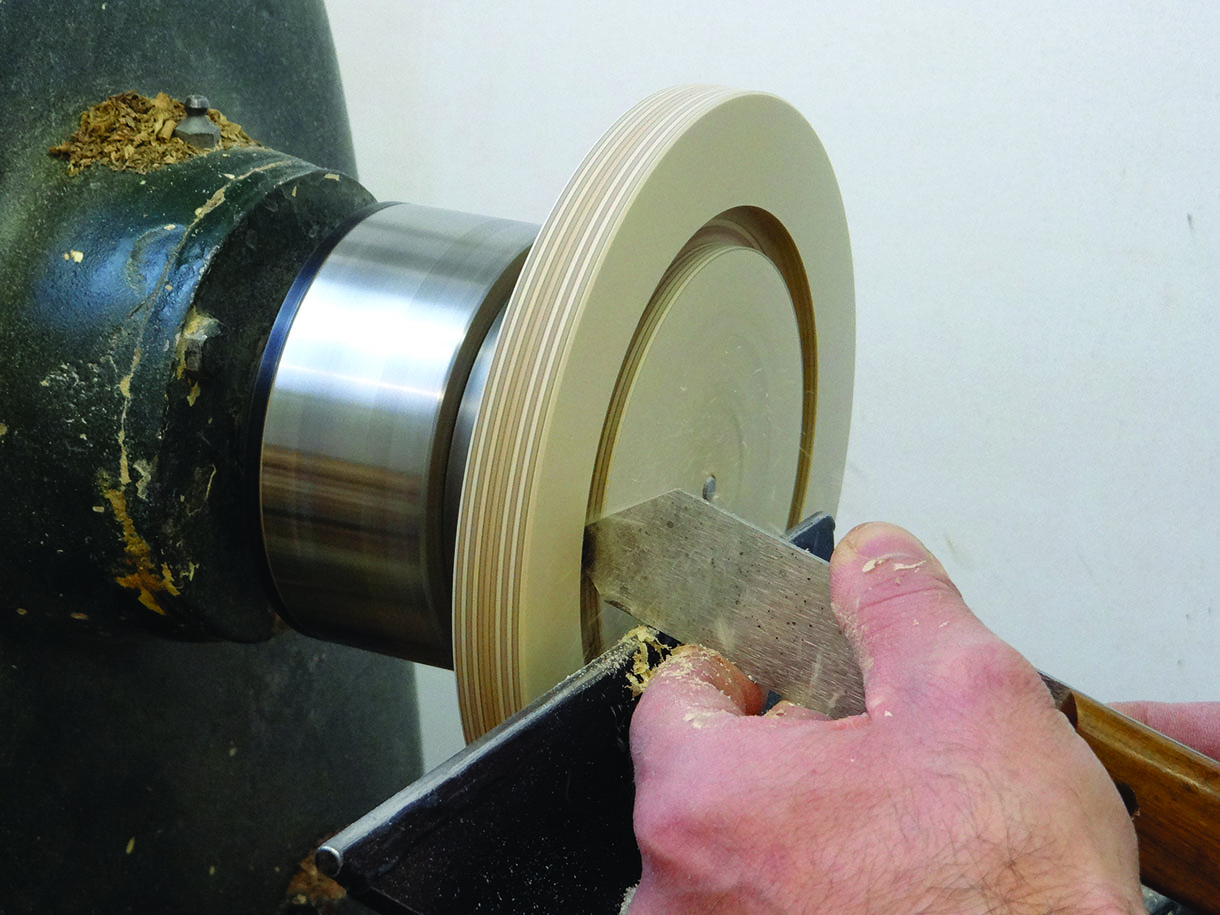
Forming the groove for the tongue and groove joint in the mould
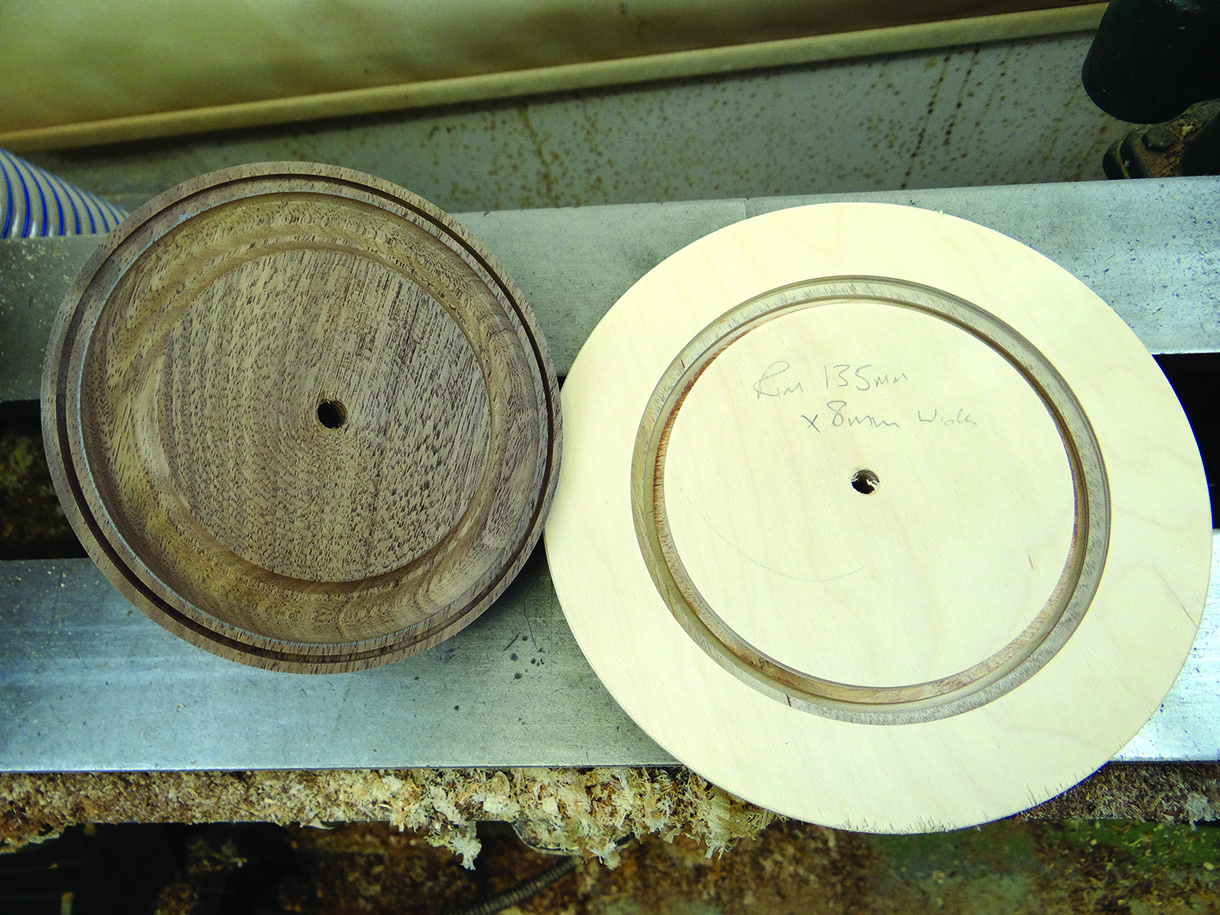
The rim of the bowl and the mould ready for the next stage
Pewter
A few days before I had ordered some pewter from eBay. I found some 1oz ingots of Sheffield lead free pewter, which seemed to fit the bill. Not knowing how much I’d need or how much pewter is in an ounce,
I ordered 10 and crossed my fingers!
Having cut the channel in my plywood mould, I lay my 10 ingots in the groove to see if there would be enough. Not being terribly mathematically minded, but having a reasonably good eye for quantities, I estimate that, as my channel isn’t as wide or deep as the ingots, the fact that there is only enough ingots to go three quarters of the way round the former shouldn’t be an issue and that I probably had just about enough. I’m sure it would be possible to work out things like the volume of the ingots and that of the channel but to be honest, I just wanted to get to the melting part so that’s what I did.
Having bought a small gas camping stove and a pan from local shops, I set the stove and pan up on the loading bay outside of my workshop. While this is essentially going to be like cooking soup or perhaps gravy over my hob at home, I am really not comfortable doing that in a workshop filled with wood, sawdust, wood shavings and flammable finishes. While it would certainly be possible to give the workshop a thorough deep clean and tidy an area to work, I don’t have the several weeks to do this just now, not to mention that Mr Wallace, my insurance man would most likely not be at all happy with me burning an open gas flame in the workshop. All in all, outside on the loading bay seems like the most sensible option.
I set up a plywood screen to shelter my working area from a side wind that blows up just as I start setting up and lay out everything I should need, close to hand. The loading bay is a useful working height and I often use it for glue ups and other jobs that require more space than is available inside the workshop.
I wear my long sleeved turning smock, a full face shield and some protective gloves, just in case. While this does seem to be a simple case of boiling a pan over a stove, I don’t feel like splashes of hot pewter would wipe away as easily as hot soup, so I proceed cautiously.
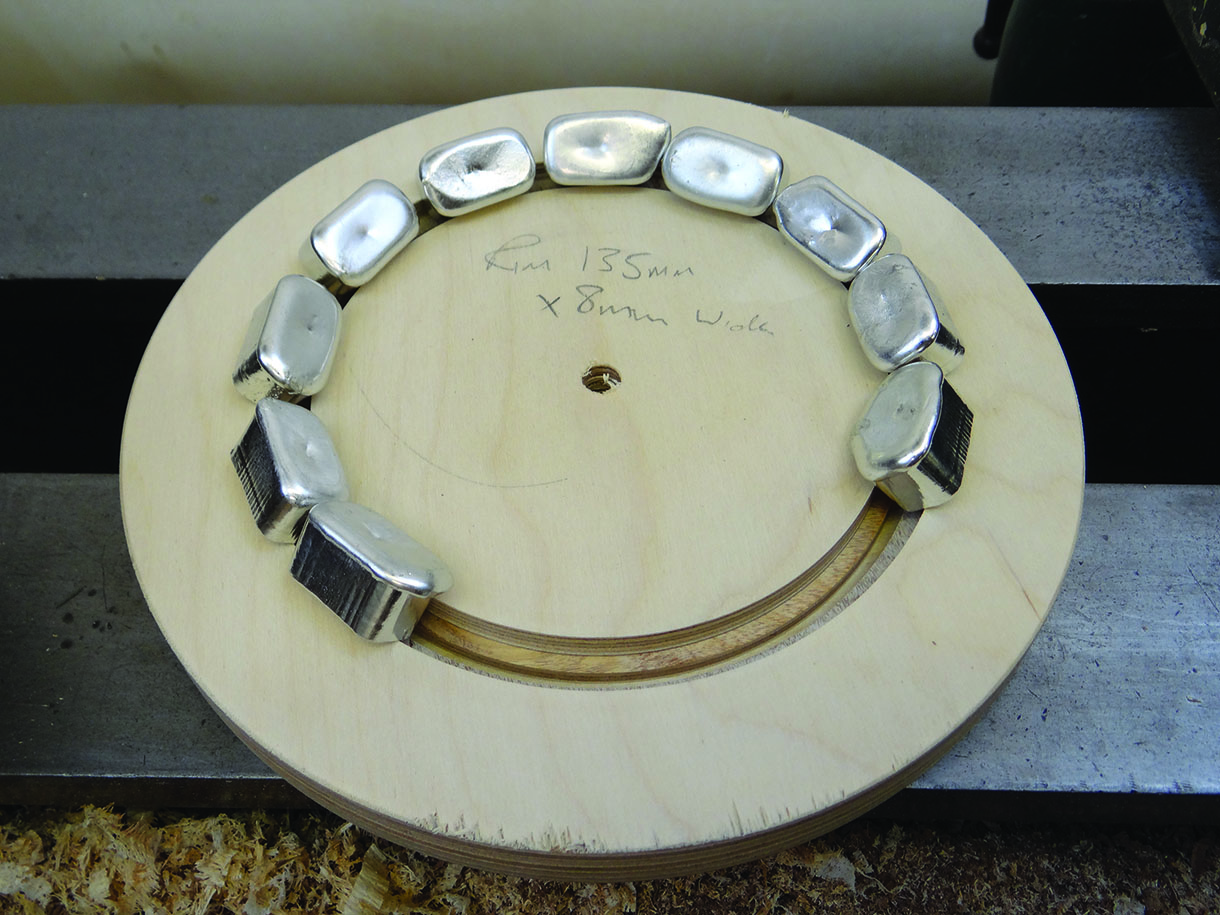
The mould with the pewter ingots
Sources for pewter
I bought my pewter from an eBay seller, which was easy to find and organise, but not the most economical way to buy it. I have since found it at a much better prices elsewhere online. There is also the option of re-purposing old pewter from things like beer tankards, which are often available in charity shops. The only issue with recycling old pewter is that it is very difficult to know if it contains lead, which is of course hazardous to health. If you choose this route extra care and personal protection needs to be taken, in particular the use of breathing protection during the melting process.
The casting
With everything set out on the loading bay I am ready to make a start. I’m not entirely sure what I’m expecting to happen, but I turn on the gas with the pewter ingots in the pan and it takes what seems an age before anything happens. I give them an occasional stir, more for something to do with my hands than for any real reason, I think. Gradually the ingots begin to melt. As the metal becomes soft, the amount of liquid increases and the ingots become like melting ice cubes in a pool of quicksilver, until the pan just has liquid pewter swilling around inside.
Once I’m sure all of the metal has melted I am ready to pour into the mould. I had looked for a pan with a spout – I think they are known as milk pans – but could only find a standard pan, but I’m sure it will be fine. Straight away I miss the groove and end up with a puddle of pewter on the rim of the mould, but quickly get my aim and I’m able to run it round the channel. I am surprised how quickly it hardens off and how high it sits above the ply of the mould. There is nothing else I can do now the mould is full. I had assumed I would need to leave it overnight to cool and fully harden, but it quickly becomes apparent that as soon as everything has cooled to a normal temperature I am going to be ready to remove the casting from the mould.

The pewter ingots are melting well
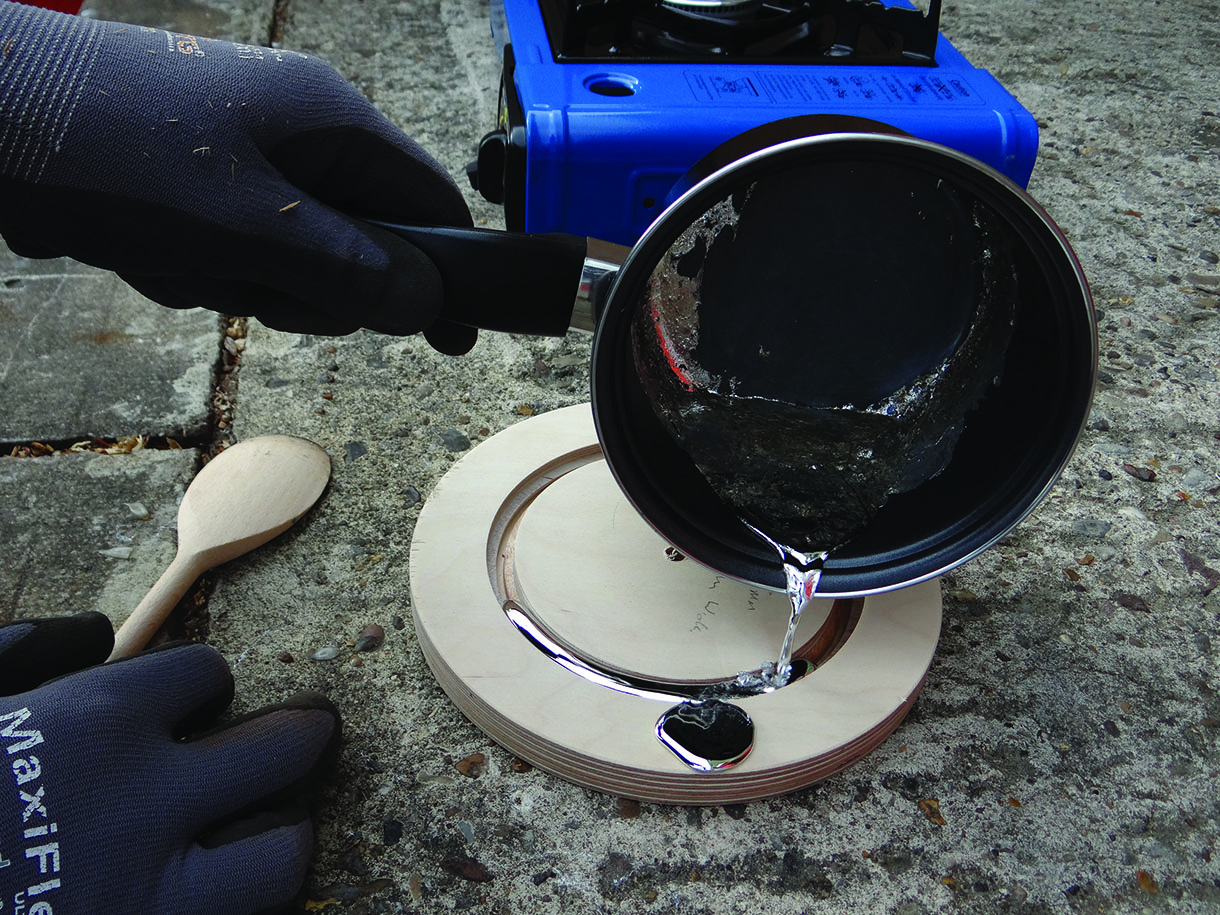
Pouring the pewter
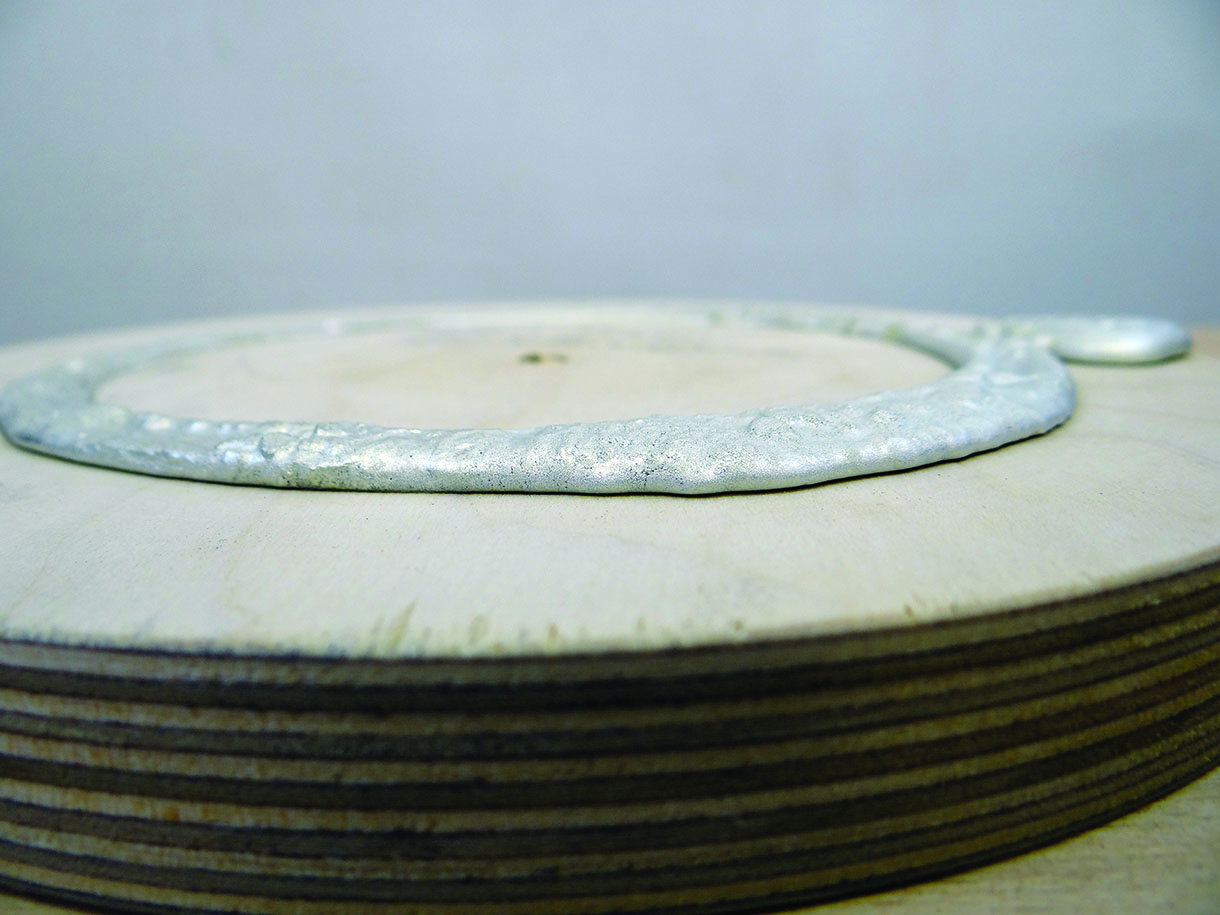
The cooled and cast pewter stands well proud of the mould
It looks like the cooled pewter has shrunk slightly in the mould
Health and safety
As ever, health and safety is largely common sense. Melting the pewter should be done away from anything combustible, so ideally outside in a sheltered area – it is highly unlikely your insurance would cover you should anything go wrong in the workshop.
Personal protective equipment should be worn throughout including gloves, long sleeves and a face shield as a minimum. Breathing protection is certainly advised if there is any possiblity of lead being present in the pewter.
Removing from the mould
I had assumed that as the pewter cooled it would shrink a little in the mould, making it easy to separate the two. I was wrong! Despite it looking like it had shrunk slightly, it certainly does not release itself from the mould, if anything it welds itself to it. Initially, I tried prying and levering with screw drivers, knocking and banging it on the concrete floor and even cutting away excess plywood on the bandsaw, all to no avail. The only option left is far from ideal and certainly not recommended – I remount the plywood former on my
screw chuck the opposite way to how I did originally, and gradually turn away the ply former. My biggest fear is the pewter ring will suddenly come away and become an airborne hazard but this doesn’t happen, in fact it clings to the mould even after there appears to be no contact between the two materials. Throughout, I regularly stop the lathe to check the contact between the two and eventually I manage to prise them apart. This is far more difficult than I had expected, perhaps ply isn’t the best material or perhaps I should have better prepared the mould. This is an area I will need to experiment with to find the best solution.
Turning the pewter from the ply mould
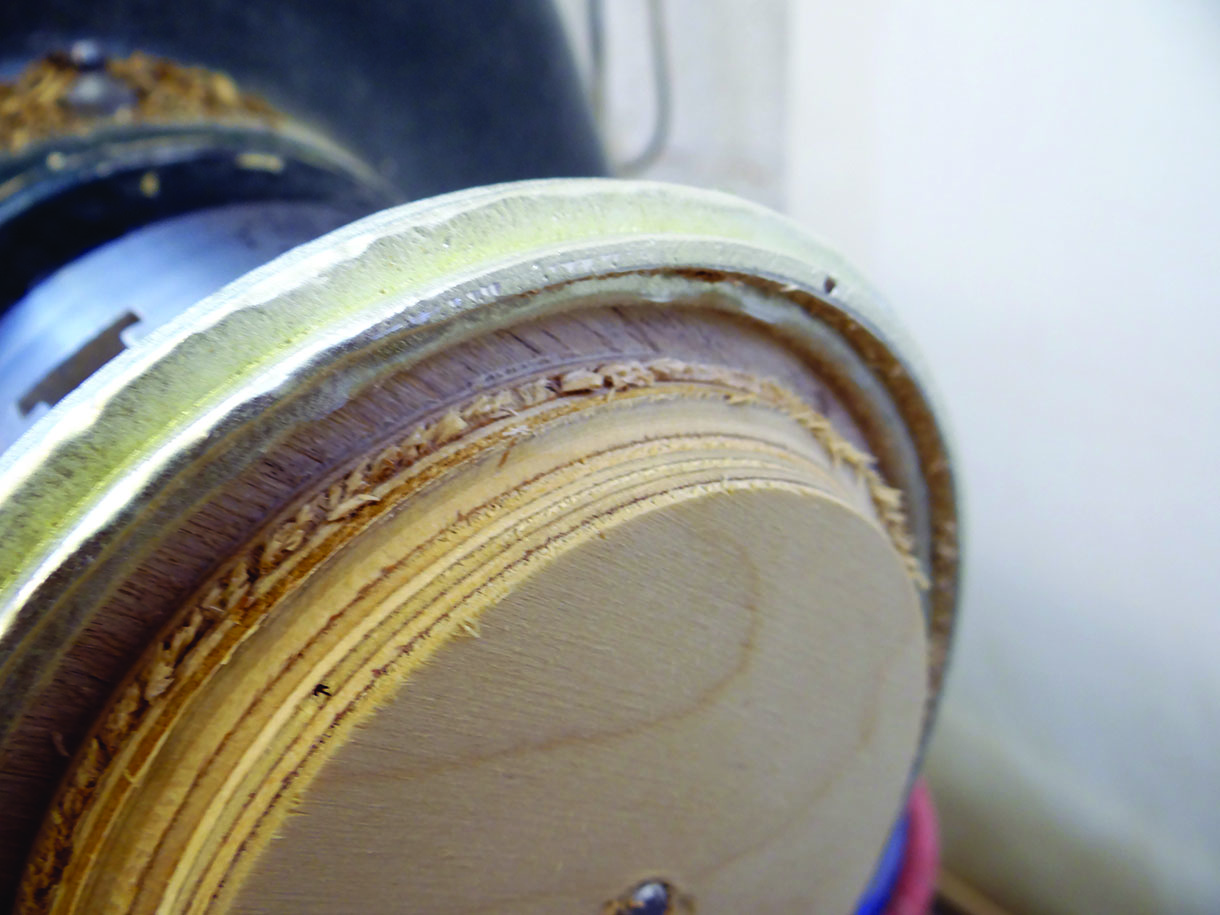
Finally free of the mould
Working the pewter
The pewter, now free of the mould, is reassuringly solid and weighty, but with a very rough and uneven surface. I will need to clean it up to fit it to the bowl, so I fit my wooden plate jaws to my chuck and turn a shape, which will hold the pewter ring in expansion mode. The tongue on the pewter is rough and oversized, as planned, so my next job is to trim it down and fit it to the bowl. I take careful measurements from the groove in the bowl and use my negative rake scraper, which is a re-purposed round skew, ground straight across to gently reshape the tongue. I am pleasantly surprised as to how easily the pewter works. With the scraper I largely get dust rather than long shavings, but the surface revealed by the tool is clean and shiny. After several passes and trial fits I am satisfied with how the two parts fit together and am ready to join them.
I have always found epoxy resin to be an excellent way of fixing wood to metal, so don’t hesitate to use it here. I mix the two parts of the resin and spread it around the rim of the bowl and into the groove, fitting
them together and leaving them to one side to cure overnight under some heavy weights. Despite my care in applying the epoxy, I still manage to dribble some down the side of the walnut bowl. Hopefully the fact that I fine sanded the outside of the bowl will minimise any marking or staining that may occur from this.
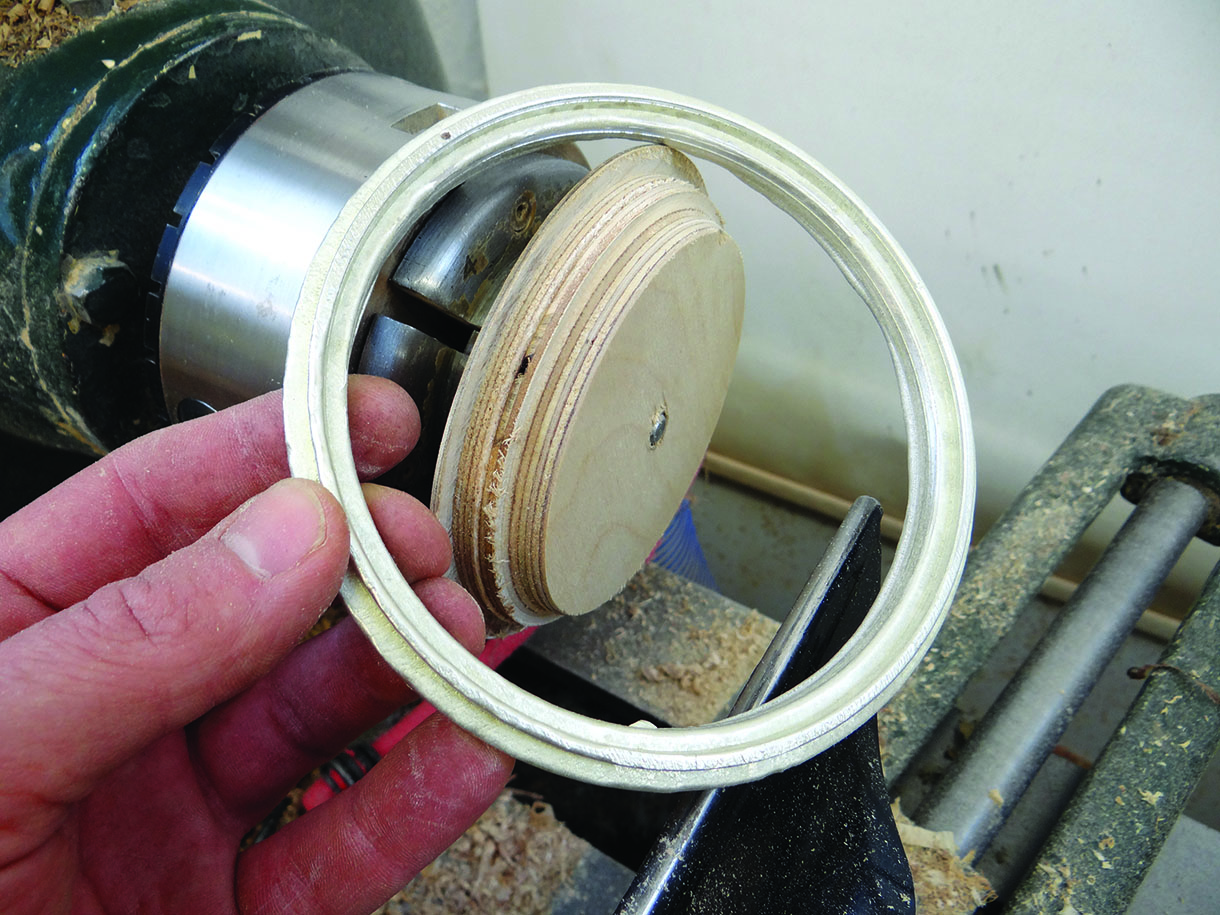
Holding the pewter ring with my wooden plate jaws in expansion mode
Beginning to shape the tongue on the pewter
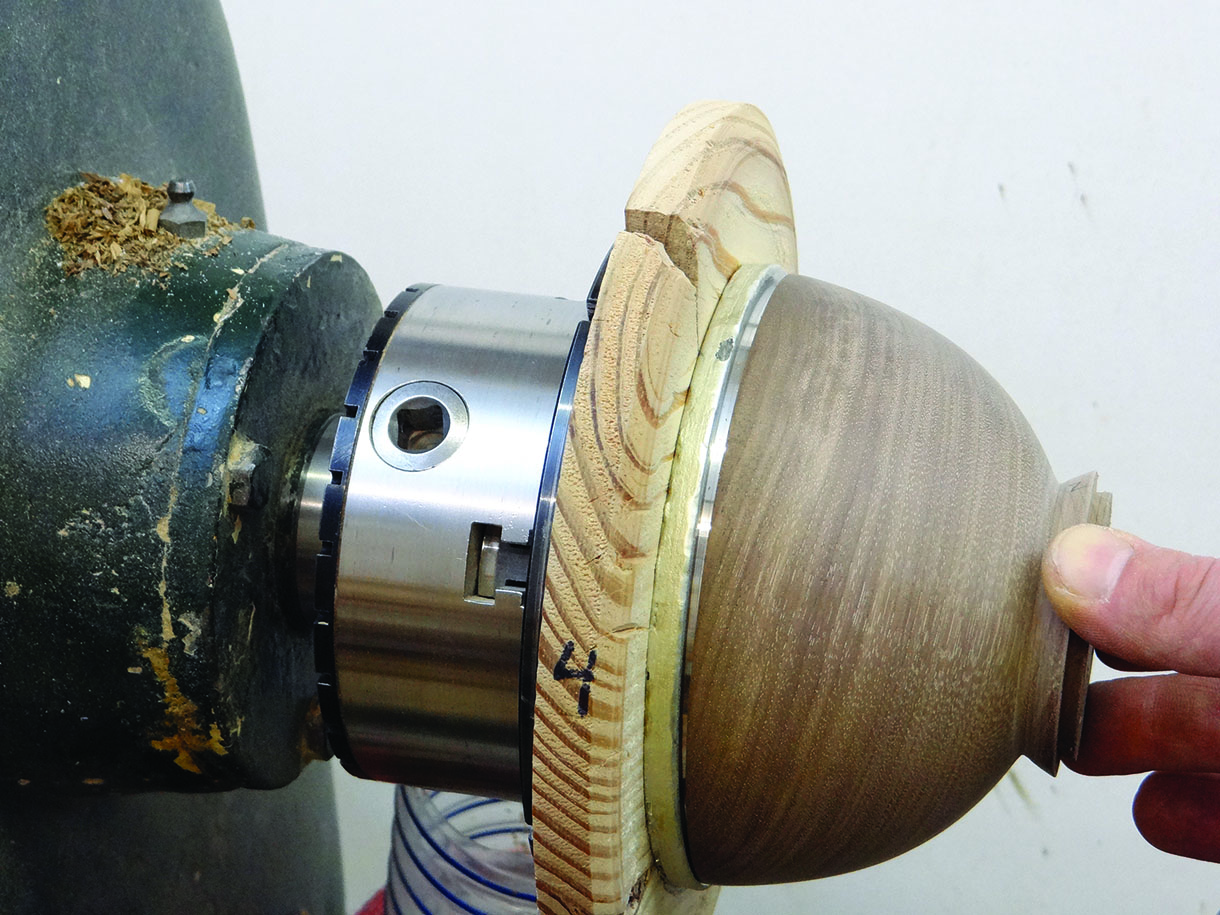
Test fitting the bowl to the pewter rim
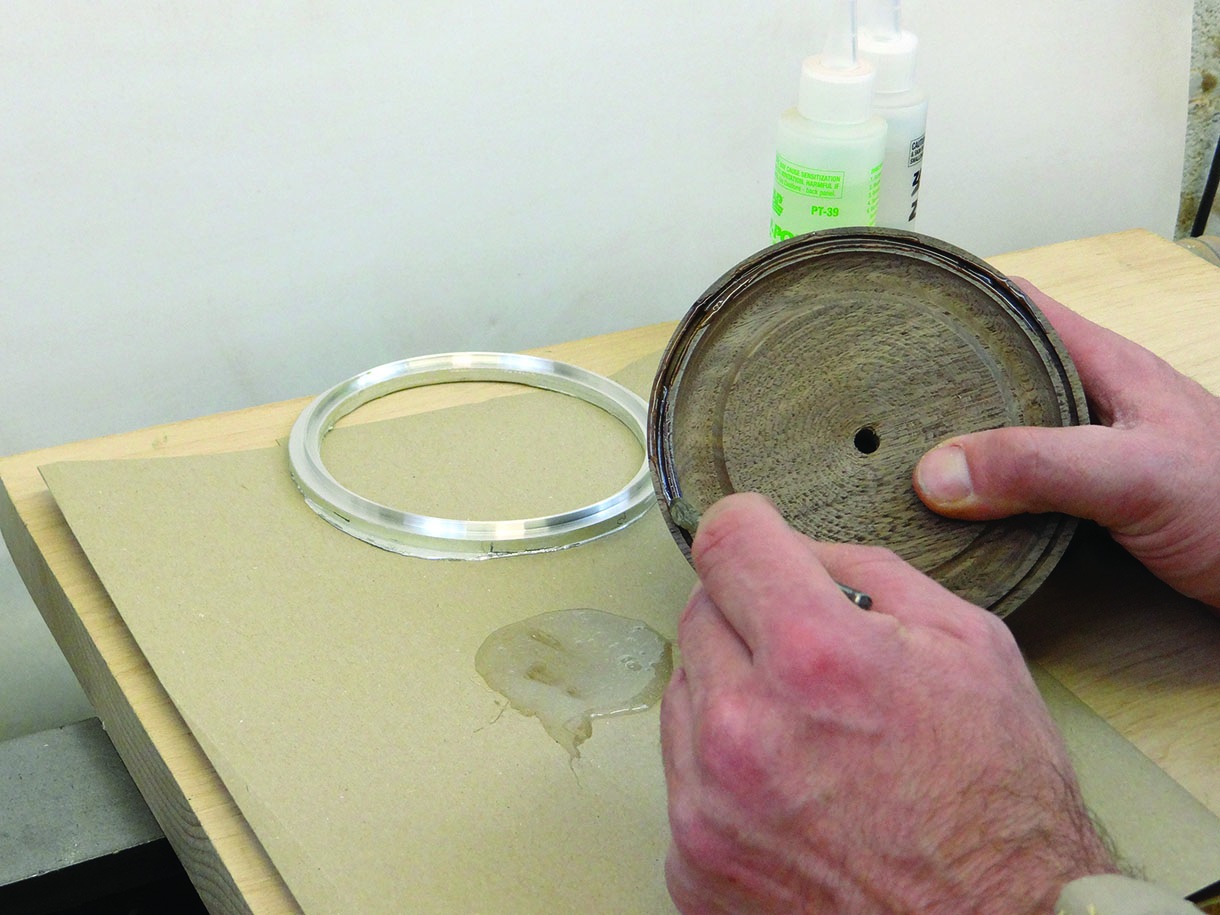
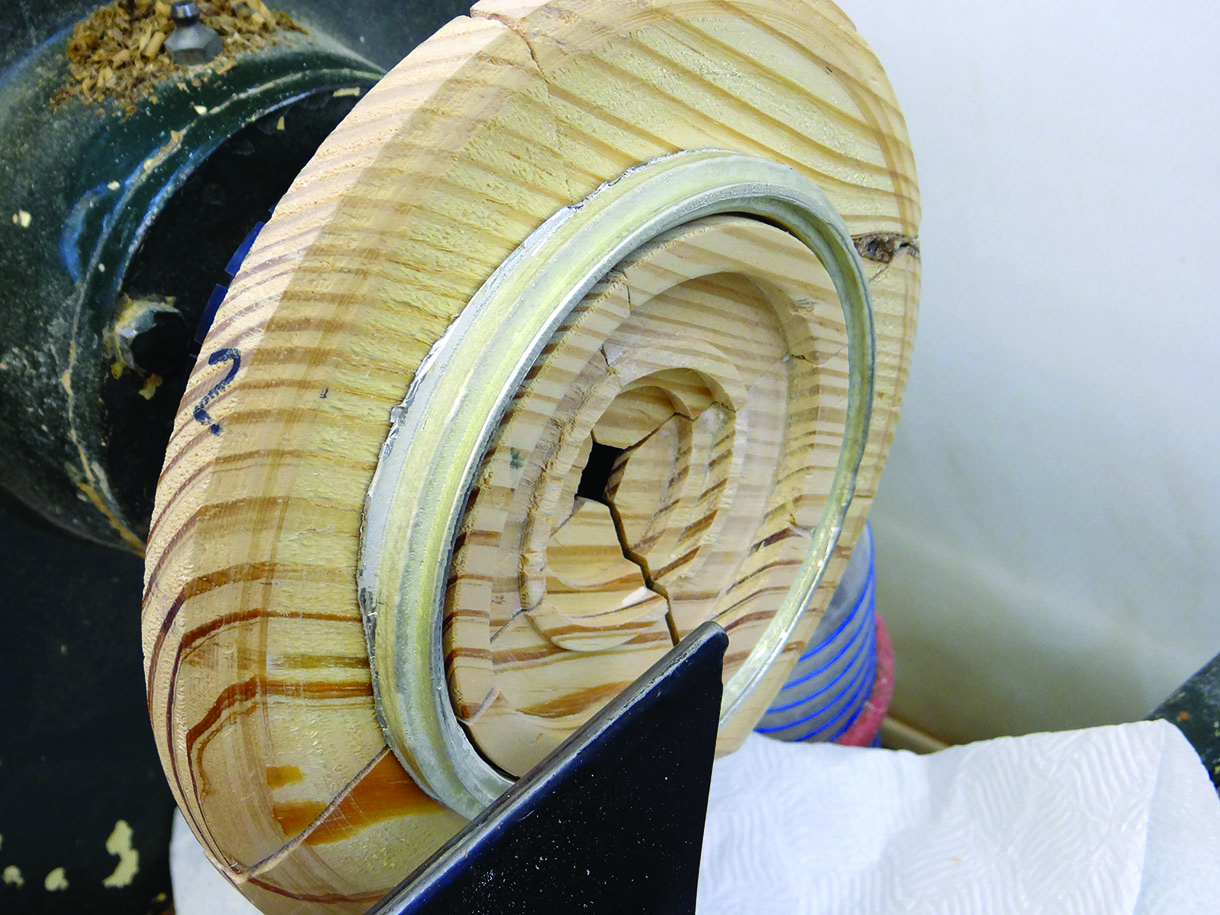
Carefully spreading the epoxy around the rim of the bowl
The following morning the epoxy is dry including the dribble down the edge of the bowl
Turning the bowl
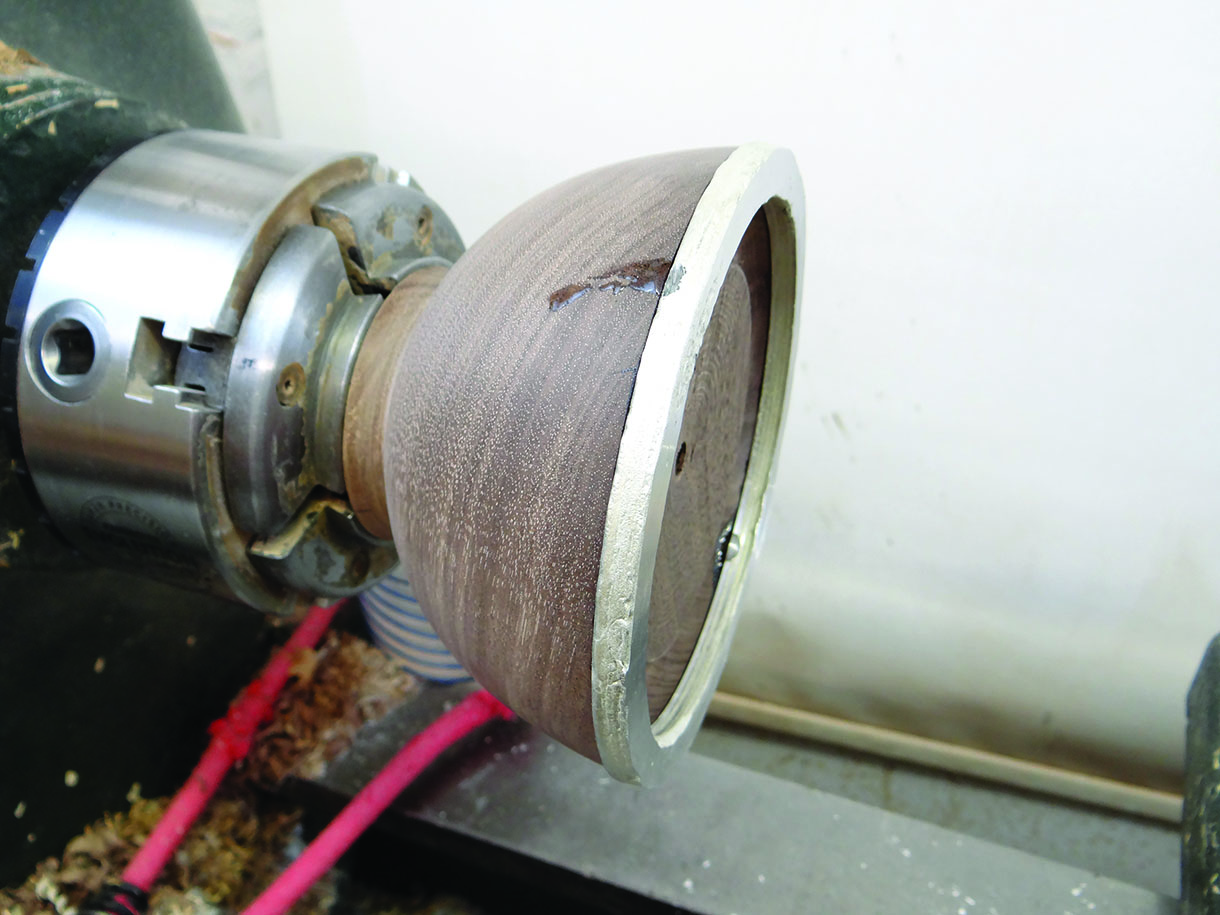
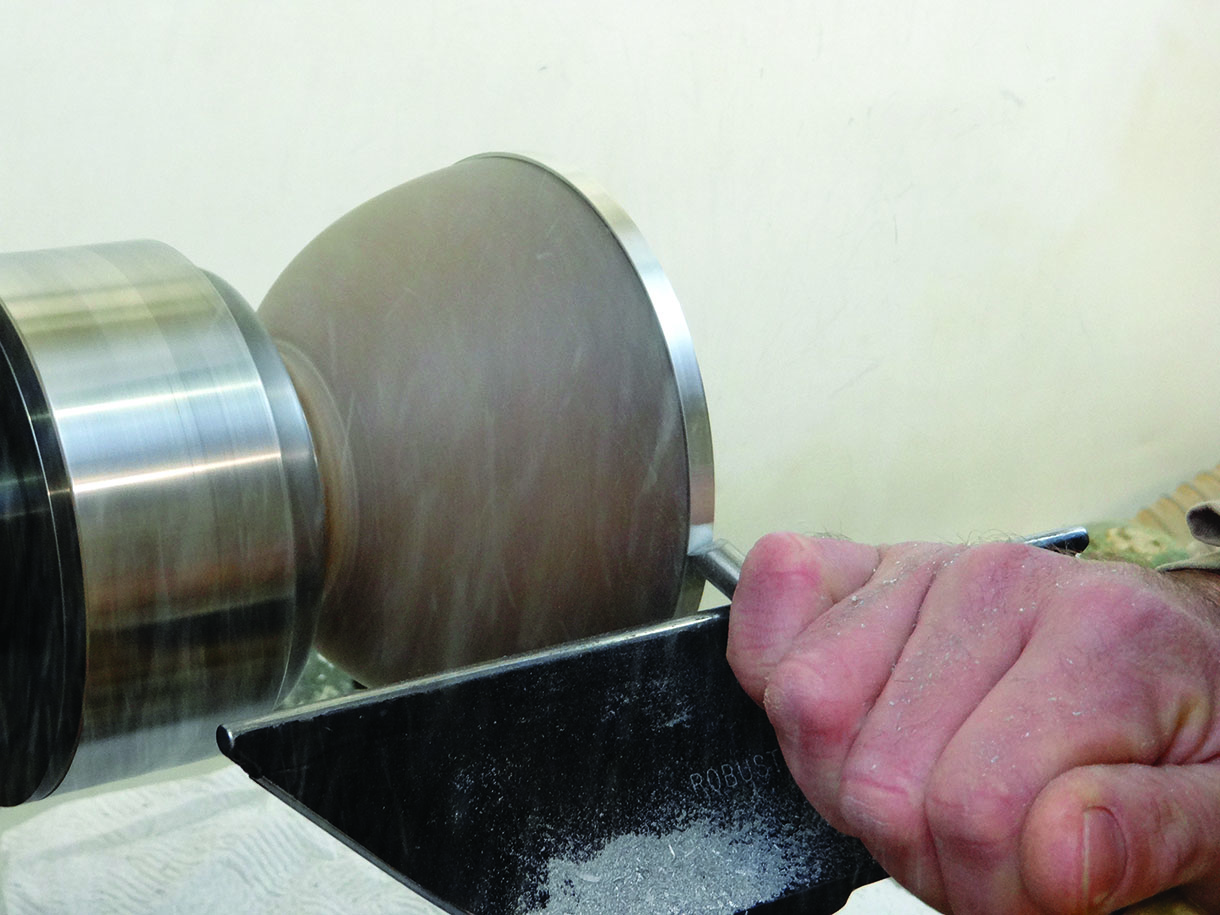
Strictly speaking the epoxy only takes 30 minutes to dry so having left it overnight, I am comfortable to get straight on with the turning the next morning. I once again use my scraper to tidy the pewter and bring it level with the walnut, before switching to my bowl gouge and making a shearing cut over the wood and the pewter to ensure a flowing curve. Interestingly, the gouge does produce some longer shavings from the pewter. Happy with the outside I round over the top of the pewter rim with my scraper. You can see from the picture how the dust comes away from the rim, which quickly goes from square to round. Once happy with the rim, I can continue to hollow out the rest of the bowl. This is just standard bowl turning, but with the added advantage of having the pewter rim to rest the bevel of my bowl gouge on as it enters the bowl, completely removing the chance of a catch on the rim of the bowl. I am looking for a reasonably thin bowl so I regularly check the wall thickness with my callipers. Once I am happy with the turning I can sand, initially under power and then by hand. My biggest concern with sanding is that pewter dust may contaminate and discolour the timber. To minimise the chance of this I try to sand from the wood outwards toward the rim, sanding the pewter last at each grit and carefully check the line between the two regularly. I take the whole thing to 600 grit and the pewter rim onward to 1200 grit finishing it very carefully with burnishing cream, which leaves it beautifully smooth and shiny.
I decide to place a very fine ‘V’ cut between the wood and pewter with my point tool, which succeeds in making the joint as tidy as possible while hopefully helping to disguise any subsequent movement in the wood. Finally, I reverse the bowl in my usual way, between a disc of MDF fixed to a faceplate and the live tail centre and remove the holding spigot and round off the bottom of the bowl, finishing the tiny pip that remains with a sharp carving gouge, power sander and finally with hand sanding.
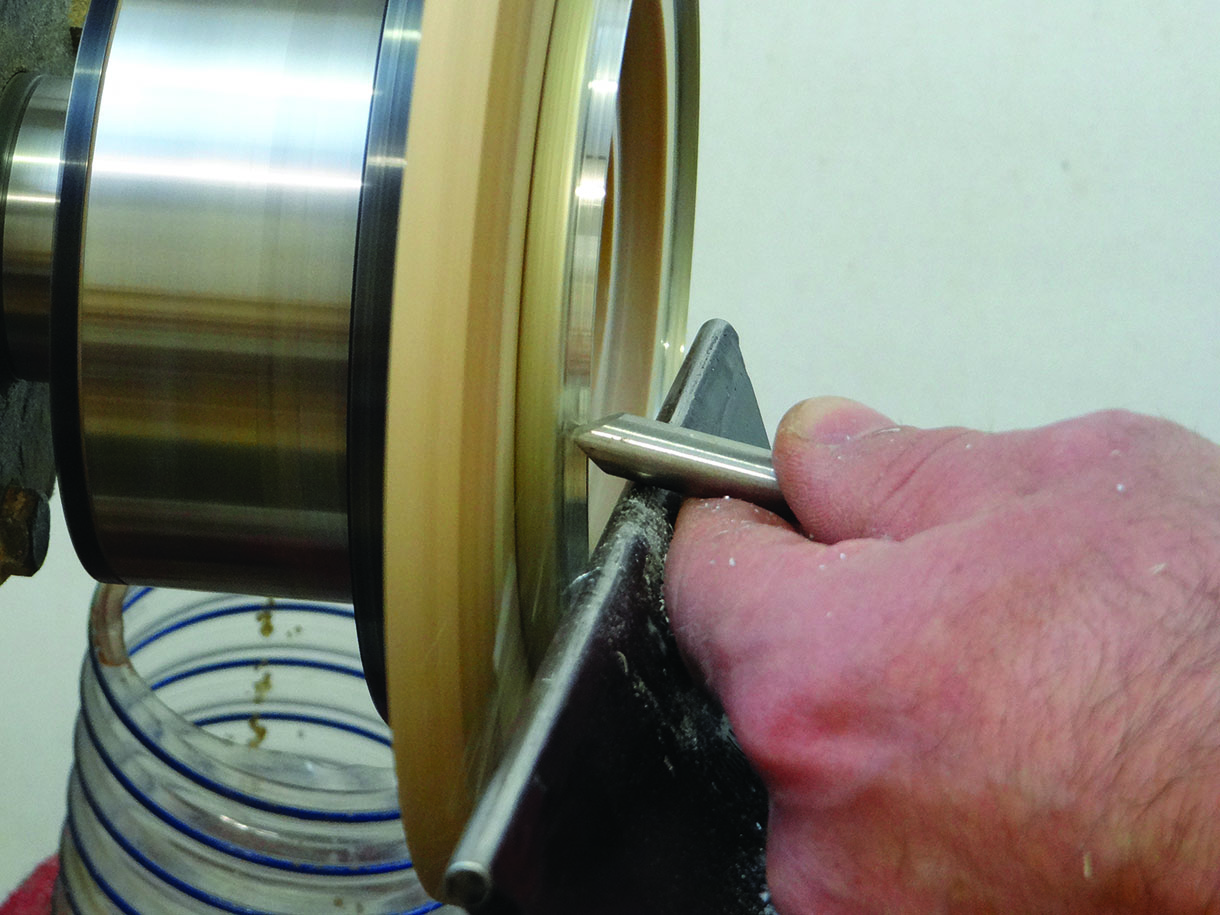
Tidying the rim with my scraper
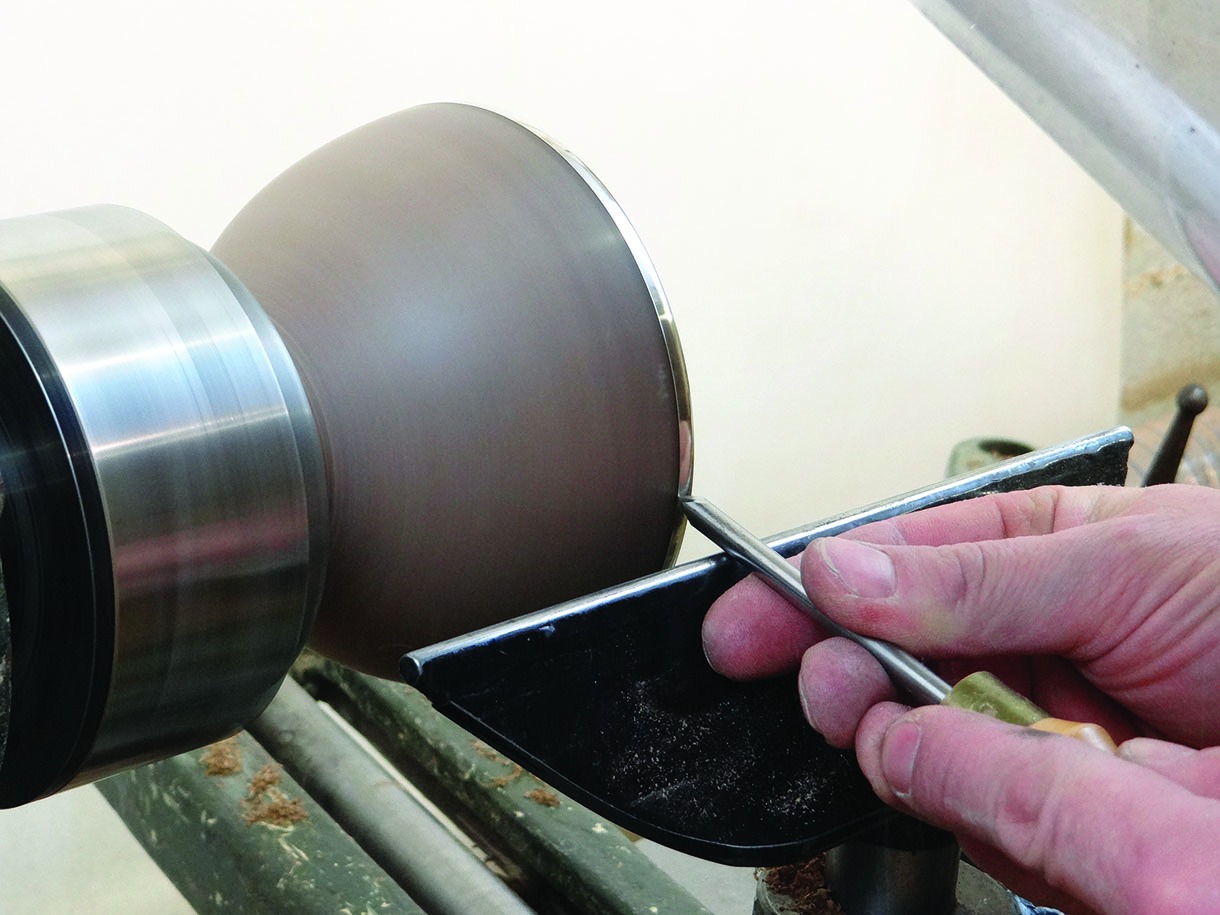
Cleaning the bowl and blending with the rim with my bowl gouge in shear cutting mode
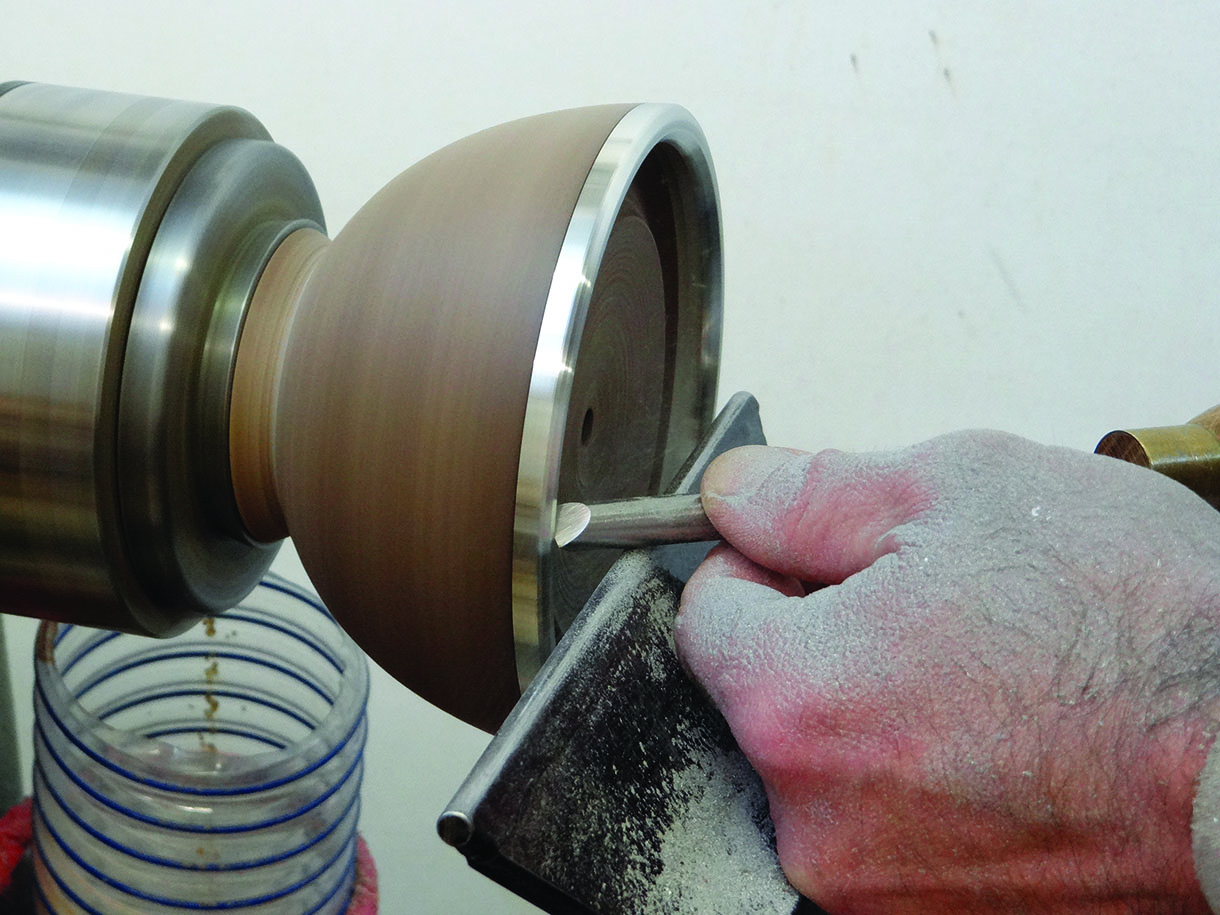
Shaping the pewter with my scraper – notice the metallic dust from the tool
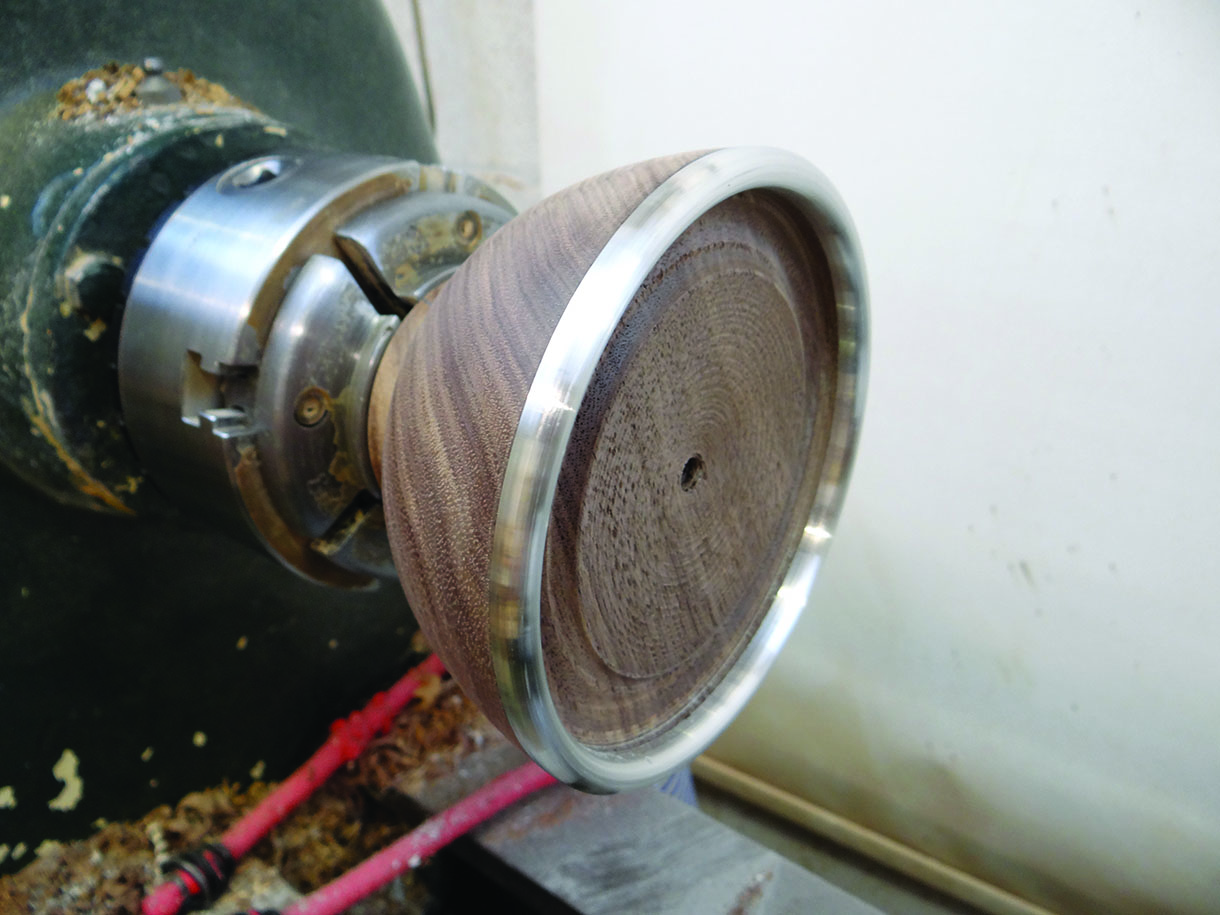
The rim, straight from the tool
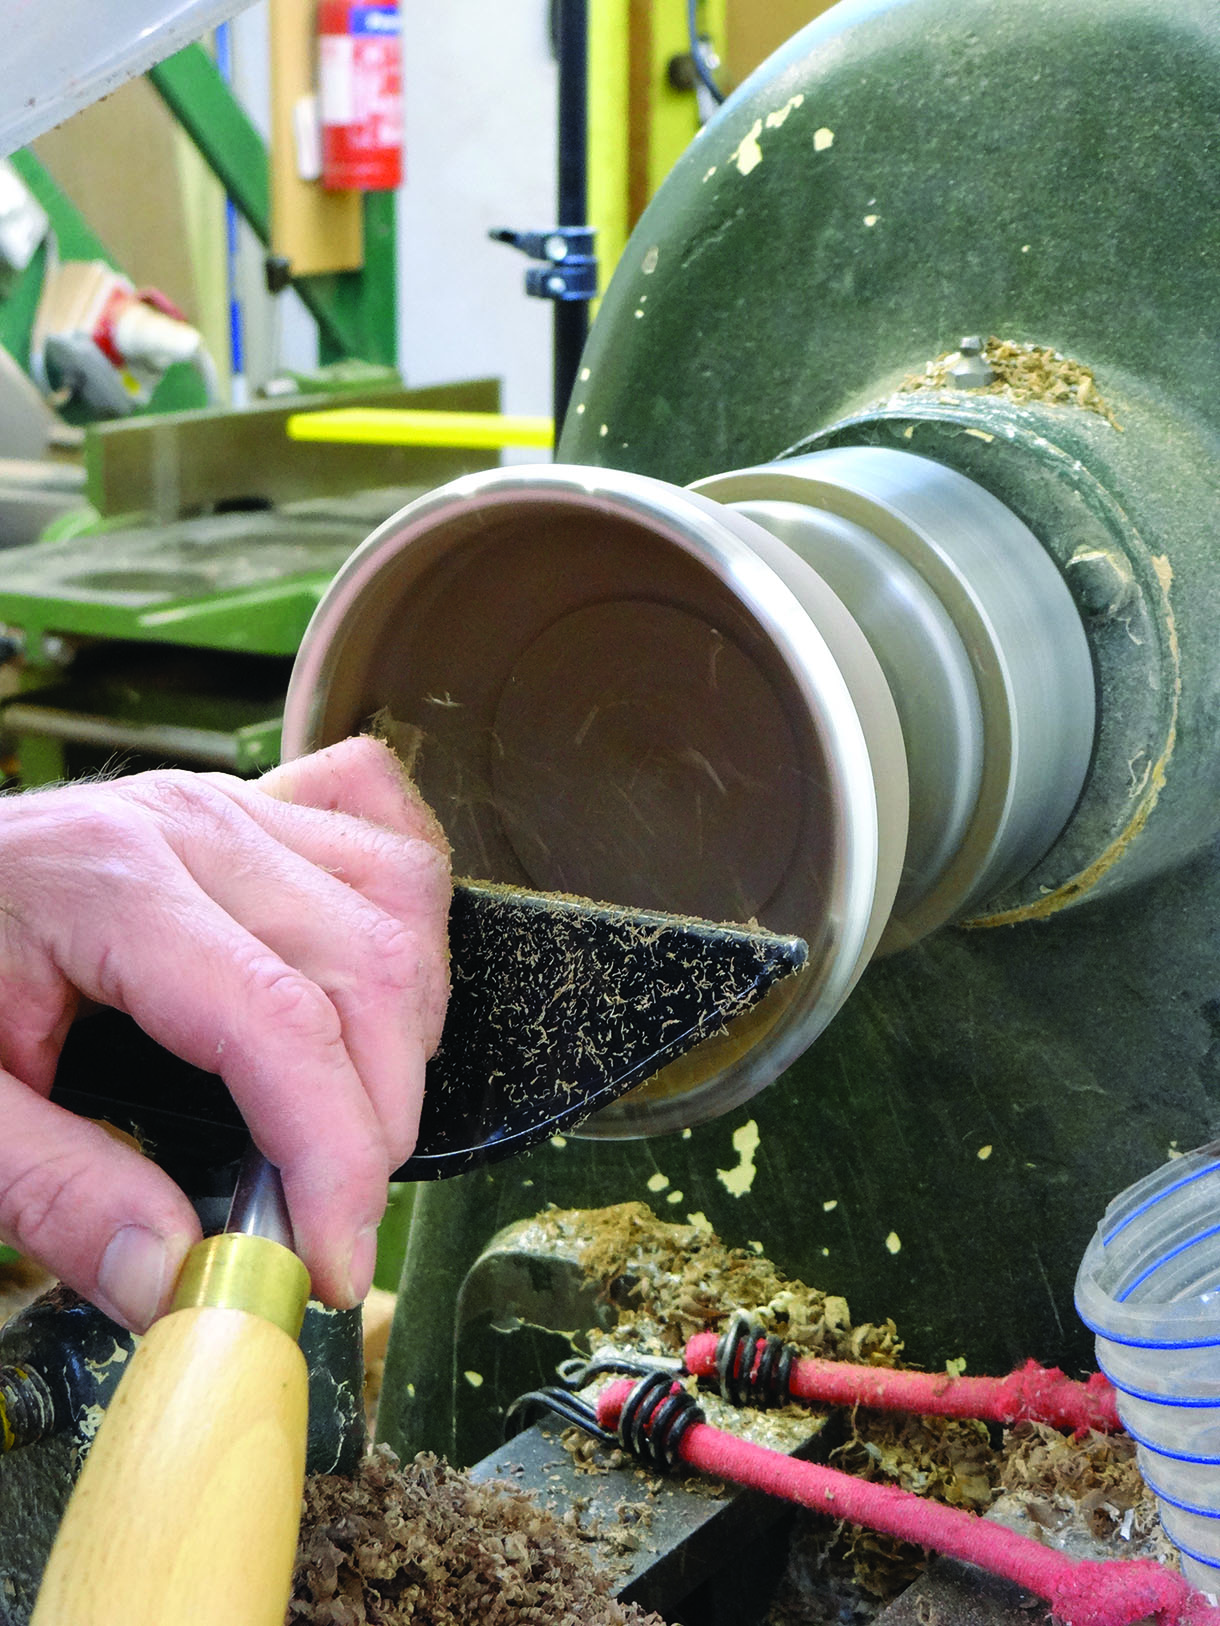
Turning the inside of the bowl
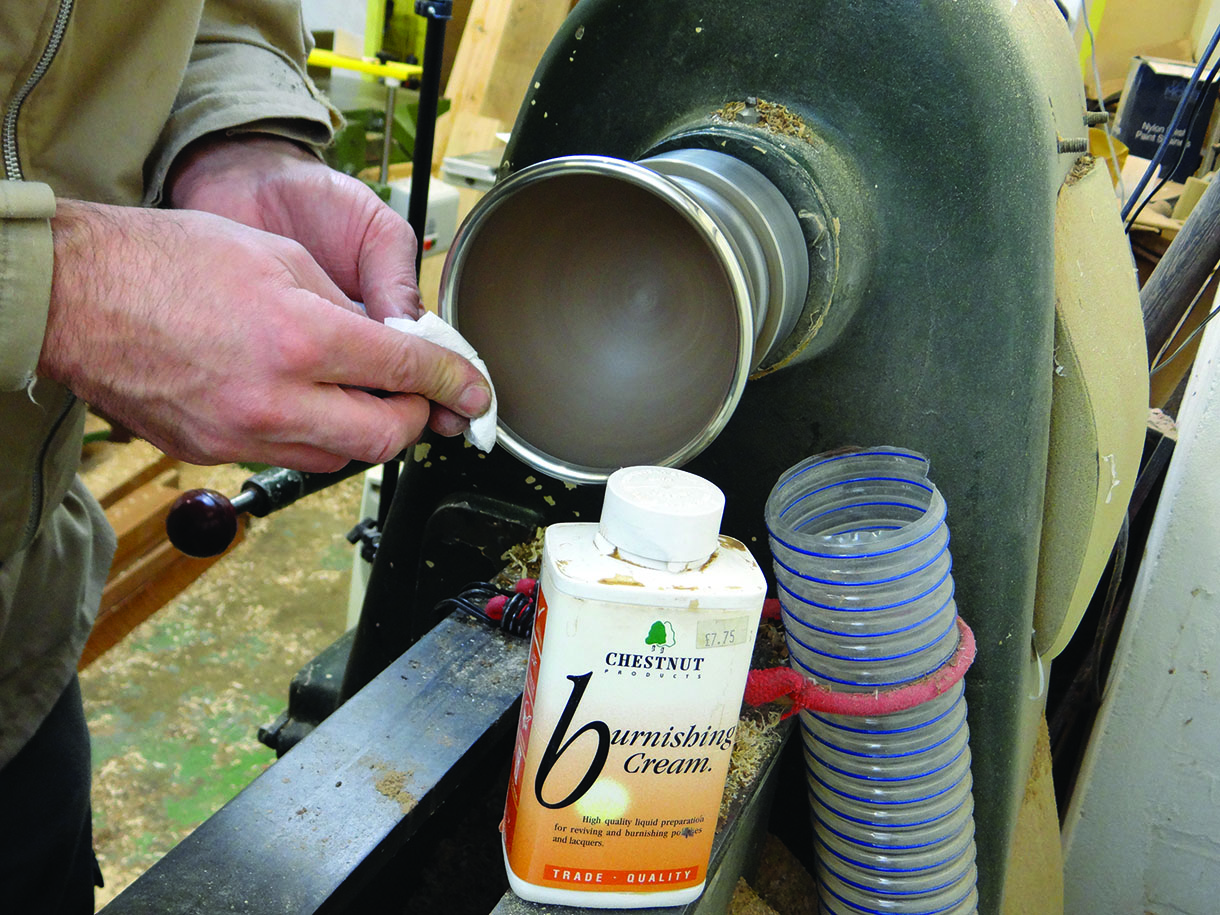
Burnishing the pewter – very carefully – to a high shine
Adding the tiny V cut between the walnut and pewter
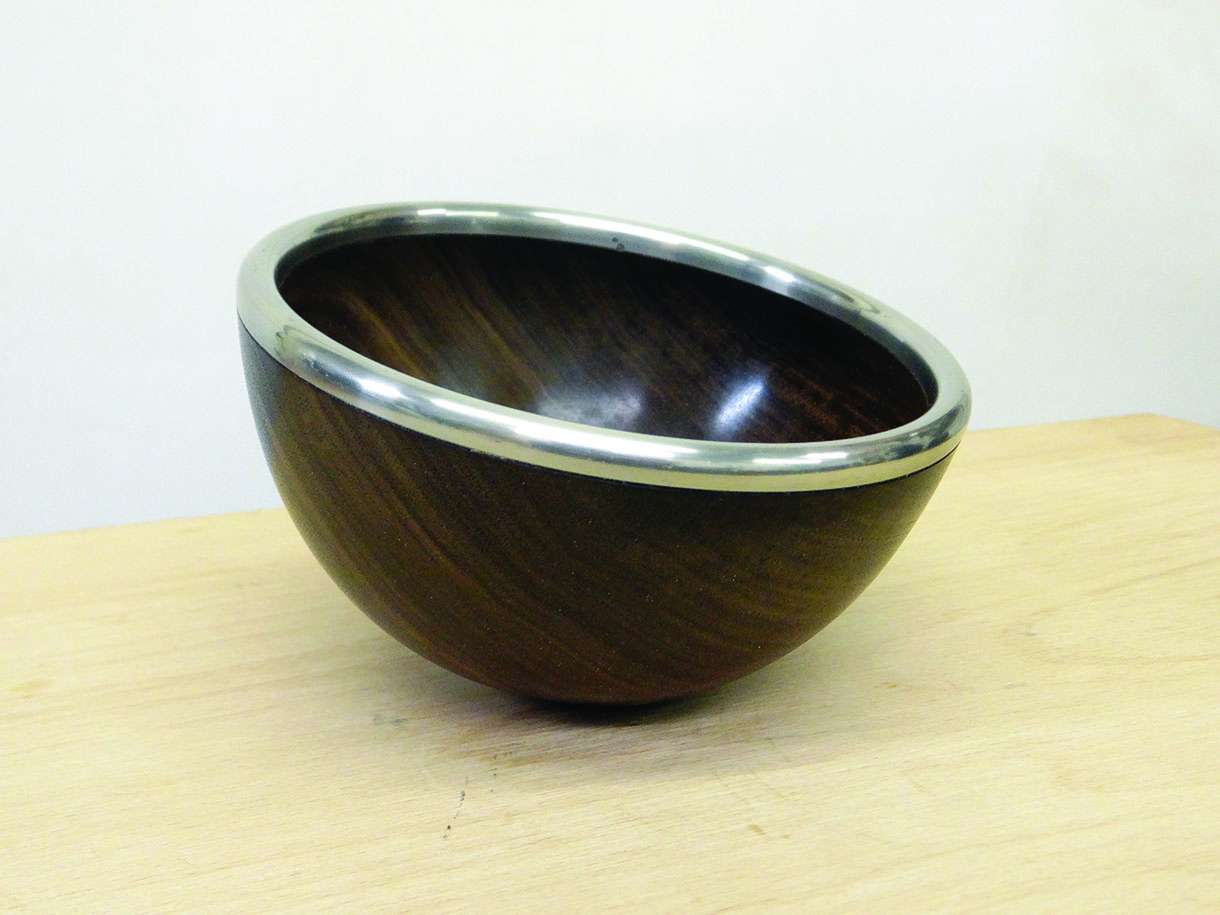
The finished walnut bowl with pewter rim
Conclusion
I have thoroughly enjoyed making this bowl and feel that out of all of the projects from this series, this one has probably turned out best of all. I’m happy with the shape of the bowl, which sits in the hand well and nicely on a surface while rocking pleasingly when nudged. The pewter contrasts well and sets off the beautiful colour of the walnut. If I were to do this again, which I probably will, I need to research the moulds more carefully so it is easier to release the pewter rather than having to wrestle the two apart.


