Steve Bisco carves an oak panel in the strapwork style of the Jacobethan era
Wooden panelling was the principal form of surface decoration in houses in the Elizabethan and Jacobean periods. In Tudor times this had mostly been in the ‘linenfold’ pattern resembling folded cloth, but in Elizabeth’s reign a new style called ‘strapwork’ (see previous pages) swept in from Europe. Strapwork panels are generally much more complex than linenfold, with tightly-curled scrolls and pyramid-like projections giving them more visual depth and bolder contrasts of light and shadow. They could be found on walls, on doors, on newel posts, on chests and cabinets, and even on chair backs, where the projections must have been less than comfortable.
For the carver, the extra depth of decoration makes much more work than a linenfold panel. The board must be as thick as its foremost point and, as this is often a fairly small part of the overall composition, it means that a lot of surplus wood has to be removed to work back to the basic strapwork and the background level of the panel. For the paying customer it would have been a lot more expensive than linenfold wainscot, which can be produced mainly with moulding planes.
Strapwork remained the principal style throughout the reign of King James I/VI but, like most styles, it enjoyed its own renaissance in Victorian and Edwardian times when there was a desire to recreate ‘Old England’ in the new industrial world.
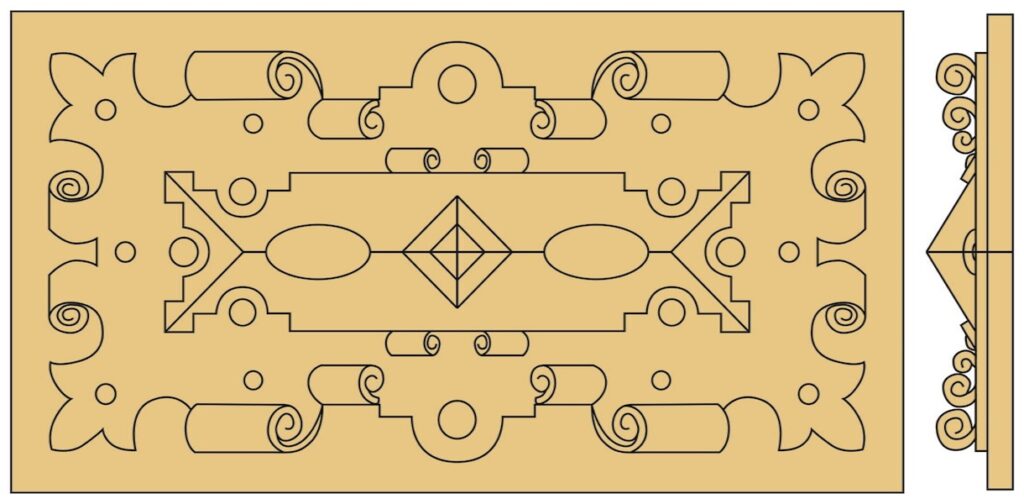
This design comes from The Manual of Traditional Woodcarving, published in 1911 and still available from Dover Publications. If you want to look it up, it is fig.876 on page 455, one of several alternative panels designed as hall panelling to go with a grand Jacobethan staircase. It has all the key features of strapwork – the appearance of thick leather or wrought iron straps with three-pointed corners and curled scrolls at various points ‘nailed’ on to a flat board with a central projection of an elongated pyramid. This is the image we have to create in a solid board with the 50mm thickness needed to accommodate the central ridge.
It really has to be in oak to fit the period style, so there is some heavy chiselling involved.To recreate a 400-year-old appearance I have gone for a fumed finish with dark wax polish, but if you prefer you can leave it in its new oak colour with just a light-brown wax.
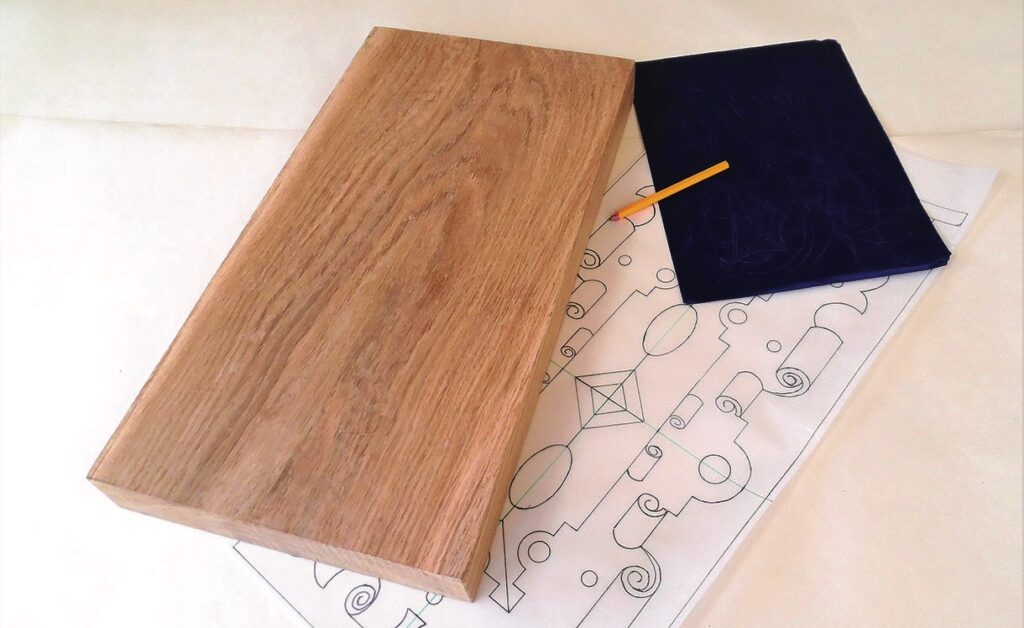
Materials: • Oak (Quercus robur) 480 x 254 x 50mm • Household ammonia (for fuming) • Dark-brown wax polish (Antiquax brown wax)
Drawing
Did you know?
Strapwork decoration is said to have developed originally in Spain from the influence of Moorish interlaced patterns in about 1450. It spread to Italy in the Renaissance and then to France where it was used in the 1530s in the Palace of Fontainbleau. It was then adopted in the Low Countries and eventually became popular in Britain from around 1550 to 1630, by which time it had gone out of fashion in Italy and Spain.
Preparation
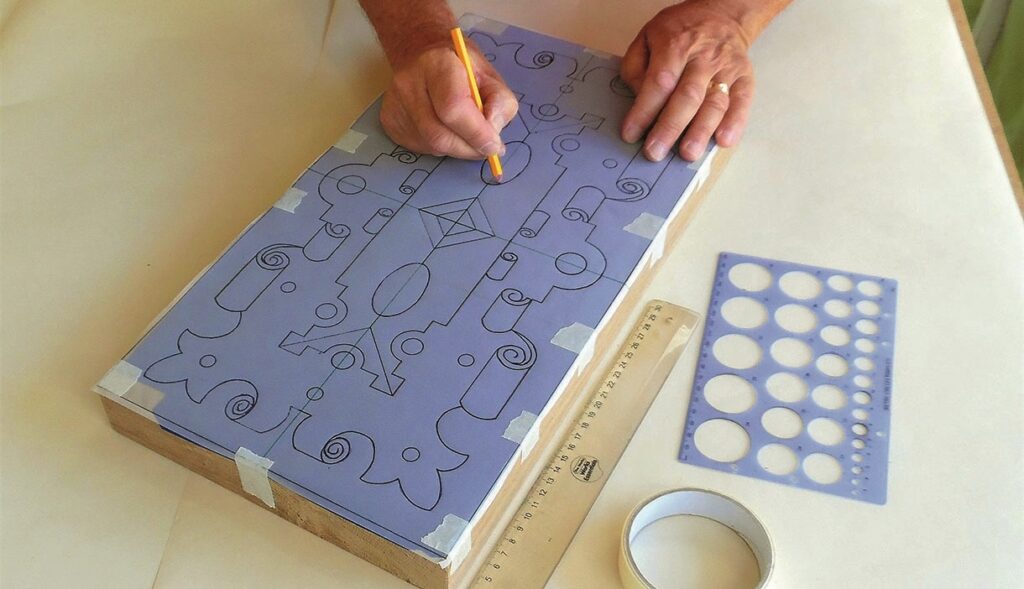
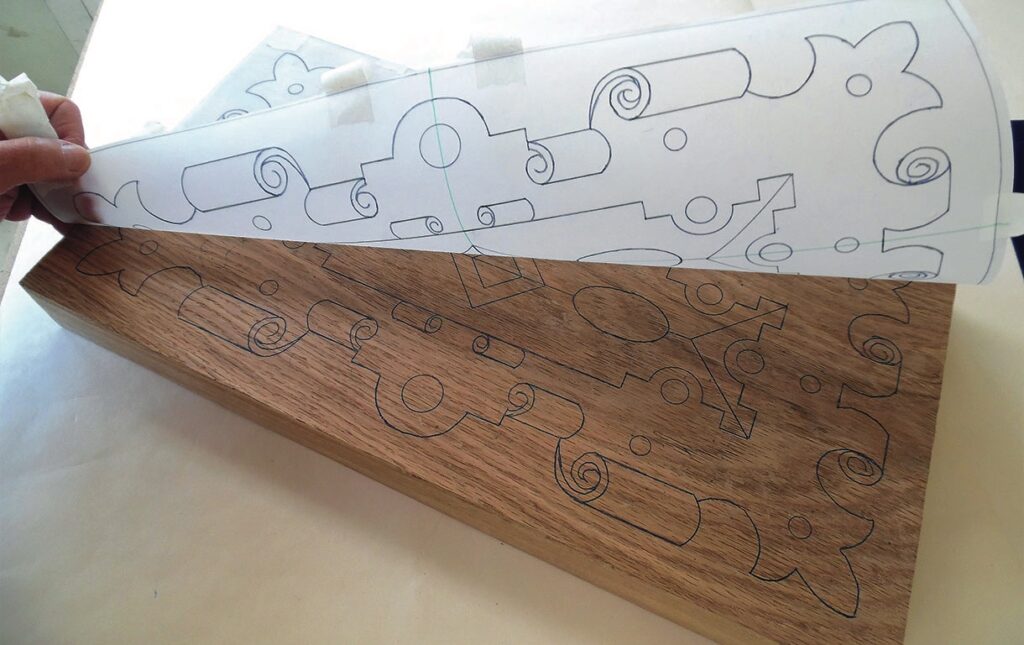
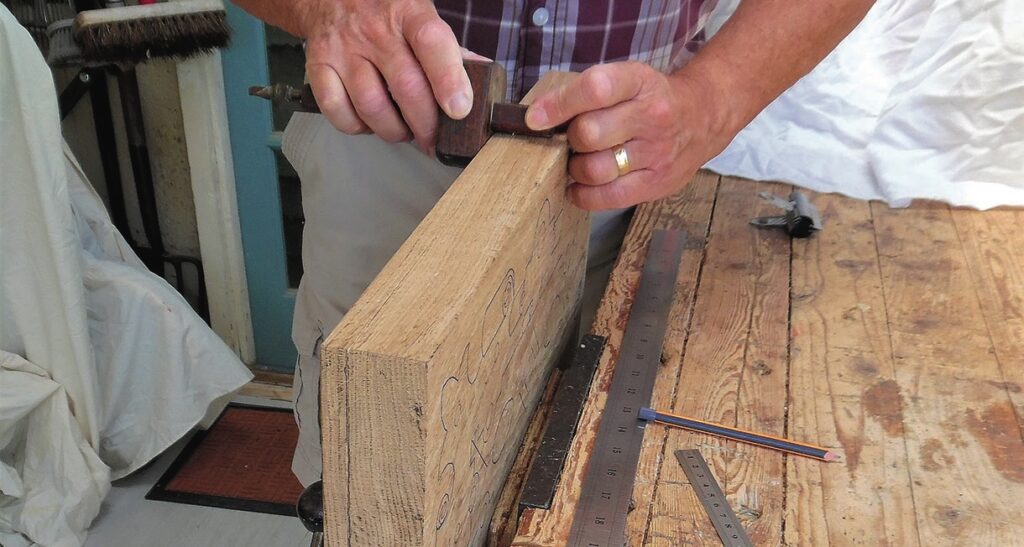
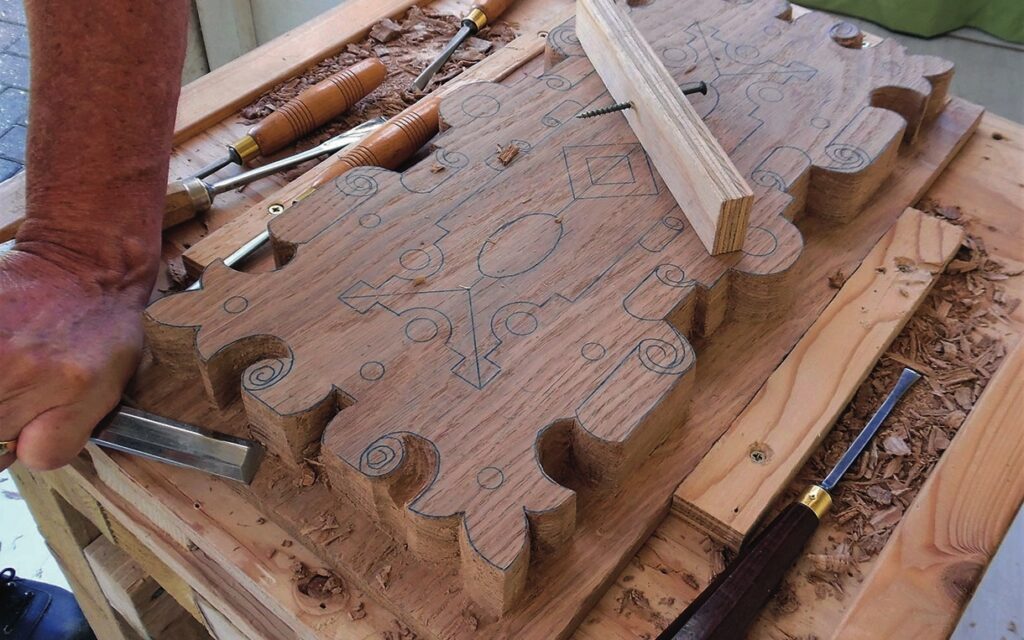
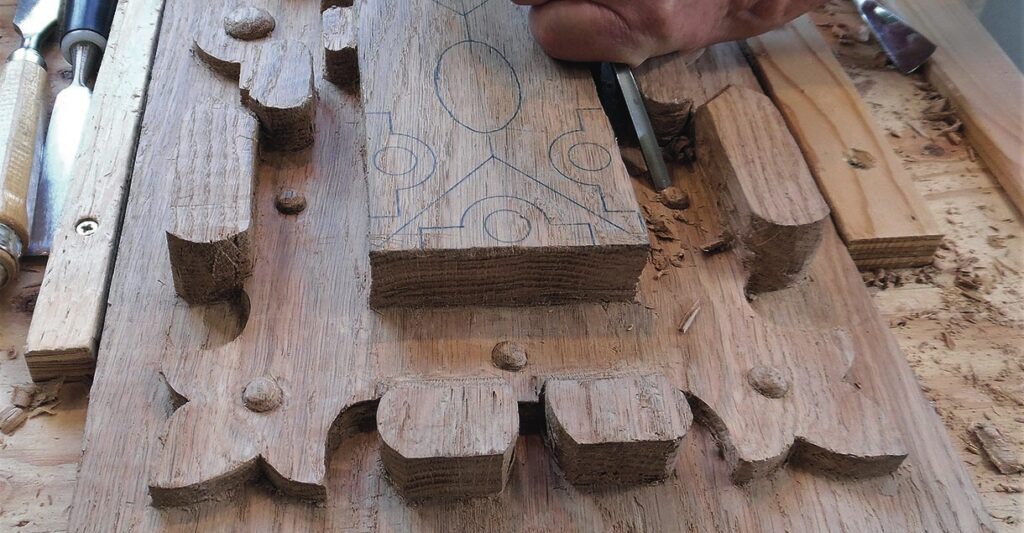
1. Get a piece of oak, 480 x 254 x 50mm with planed edges, and make a full-size copy of the drawing to fit it (a print shop can help you with this). Get a few sheets of carbon paper to cover the surface2. Tape the drawing firmly and accurately to the wood with the carbon paper under it. Now carefully trace the pattern on to the wood. This pattern has lots of straight lines, circles and semi-circles, so use a ruler and a circle template if you have one3. This is a complex pattern and it is easy to miss bits, so keep the drawing taped on one edge while you lift it up to check, then you can put it back exactly in place to trace in any missing bits. By tracing the pattern instead of pasting it on you can see how the grain runs in relation to the pattern lines4. Scribe or draw a line around the block at a depth of 13mm from the back. This will be the level of the ‘floor’ of the panel, above which everything else will stand
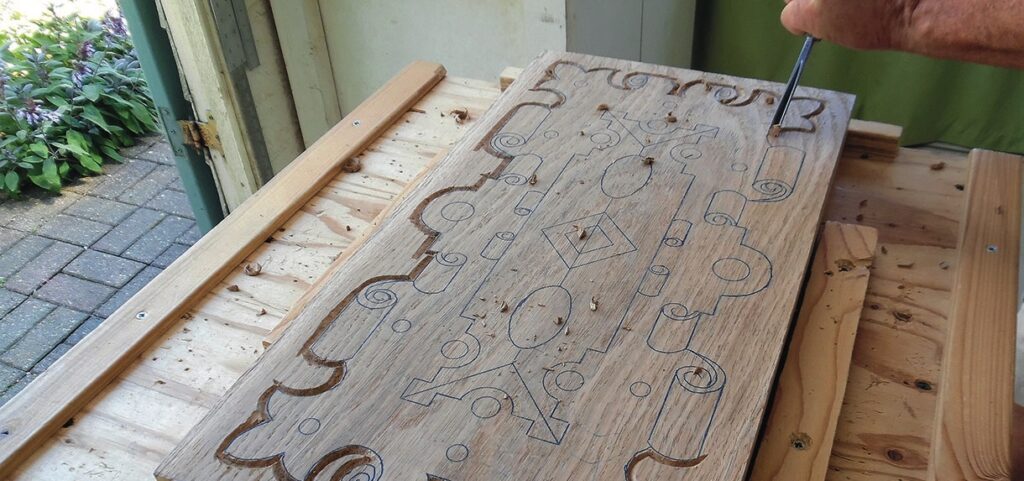
Blocking out the levels
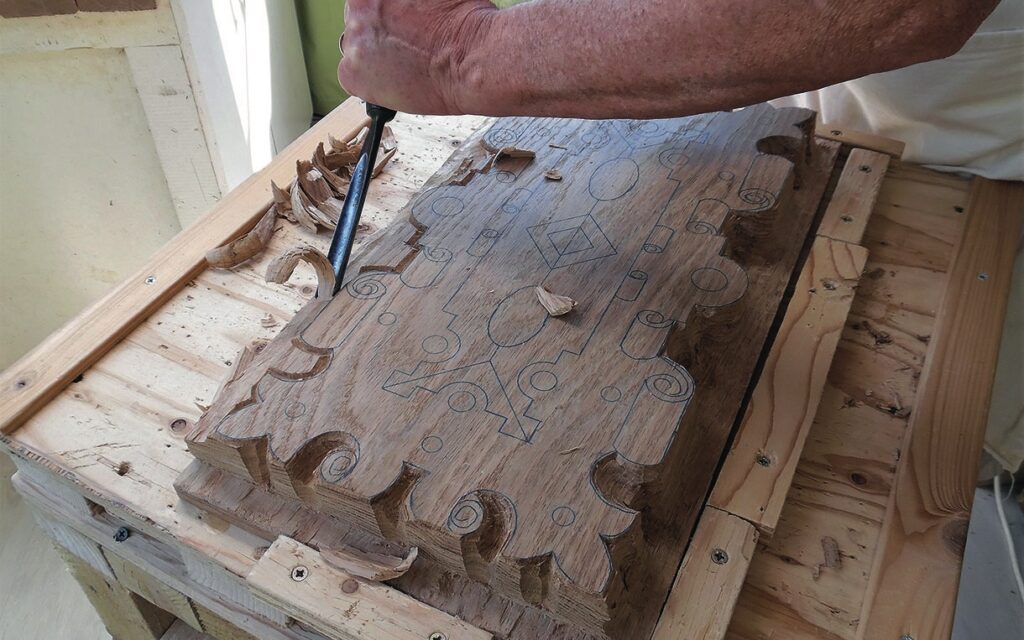
5. Now we must remove all the wood outside the pattern area and down to the floor level. Start by using a V-tool to cut around the outside of the pattern and along the top of the 13mm line to create a stop line to reduce the risk of splinters running off into the pattern and floor6. Use a large, deep gouge, such as a No.9 20mm, to cut away the surplus wood. Make sure you keep the ‘wings’ at each side of the cutting edge above the surface to prevent splinters running off into the wood you want to keep. Take note of the grain direction along the pattern edges and also the ‘up and down’ direction in relation to the floor. The end grain across the ends of the pattern is hard to chisel so it is best cut away with a tenon saw
Top tip
If you are skilled with a router you could use it to save some time and effort in blocking out the levels (steps 6 to 9). But take care – if your routing skills are not up to the job you could quickly wreck the whole carving.
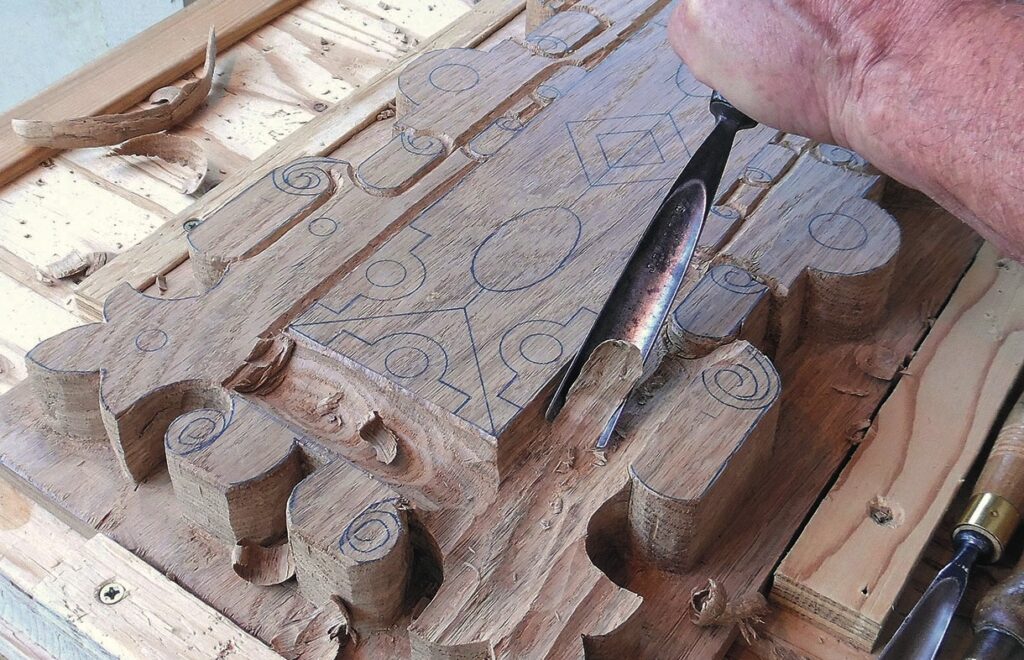
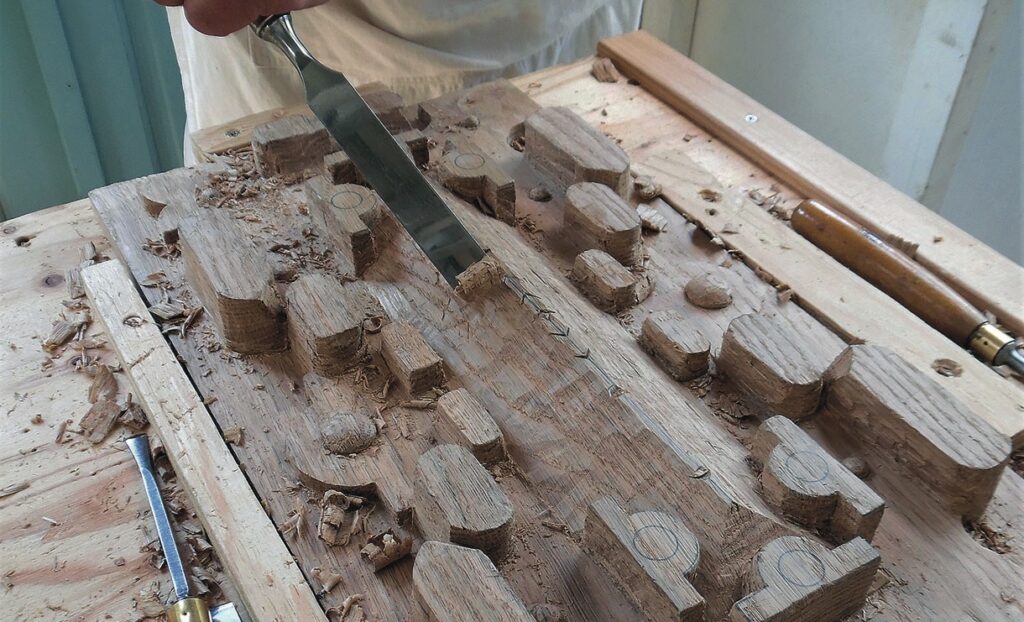
7. With the bulk removed, you can pare down the edges of the pattern, making sure they are vertical to avoid the pattern spreading, and level the floor to the 13mm line. Use a simple depth gauge of a flat piece of wood with a screw inserted through it to ensure all of the floor is at the same level8. Now it gets more complicated as we start to gouge away the surplus wood above the level of the strapwork. It is not practical to leave the ‘nailheads’ in place at this stage, so leave the new ground level 10mm above the floor level so there is enough wood to mark them in later and cut around them9. Work the strap area flat and level at 10mm above the floor level at this stage, but leaving a slightly higher section where the large ‘nail’ on the side projections will be. Make precise, vertical cuts down the sides of all the scrolls and the central block so their exact position is translated down to the strap level10. Now lower the height of the scrolls so each one will be roughly as tall as it is wide when it is rounded into a cylinder later
Carving the detail
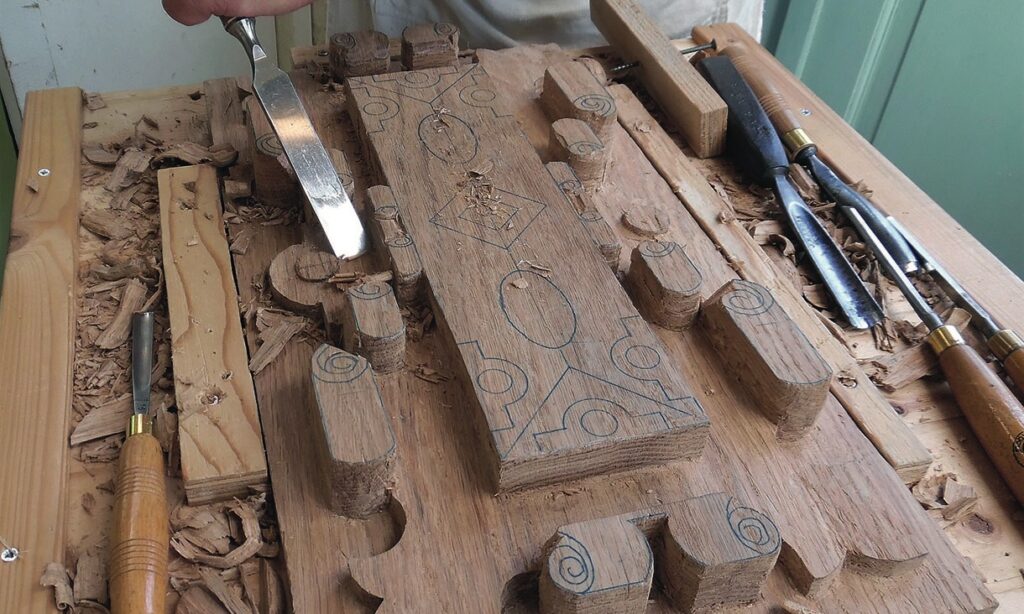
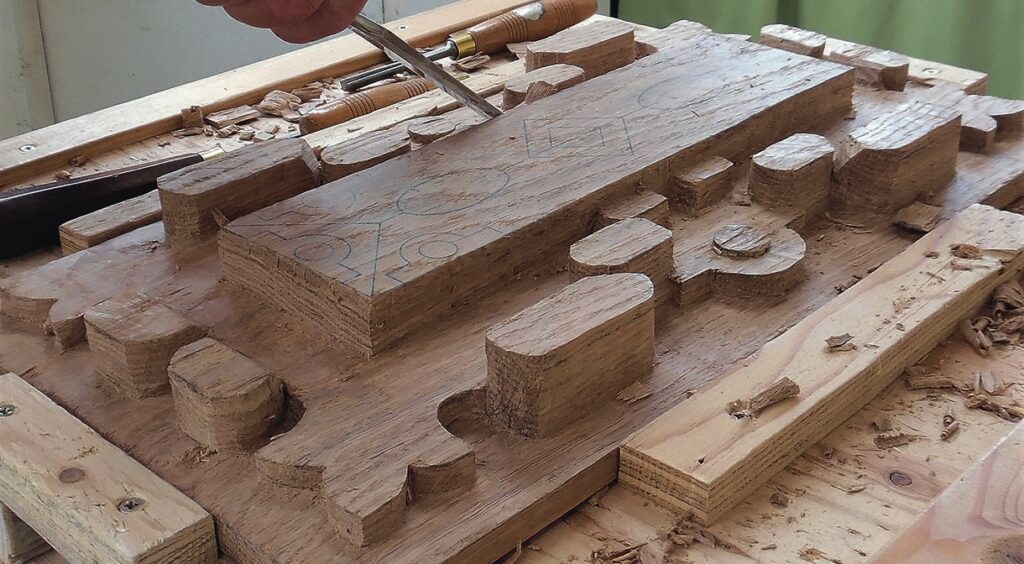
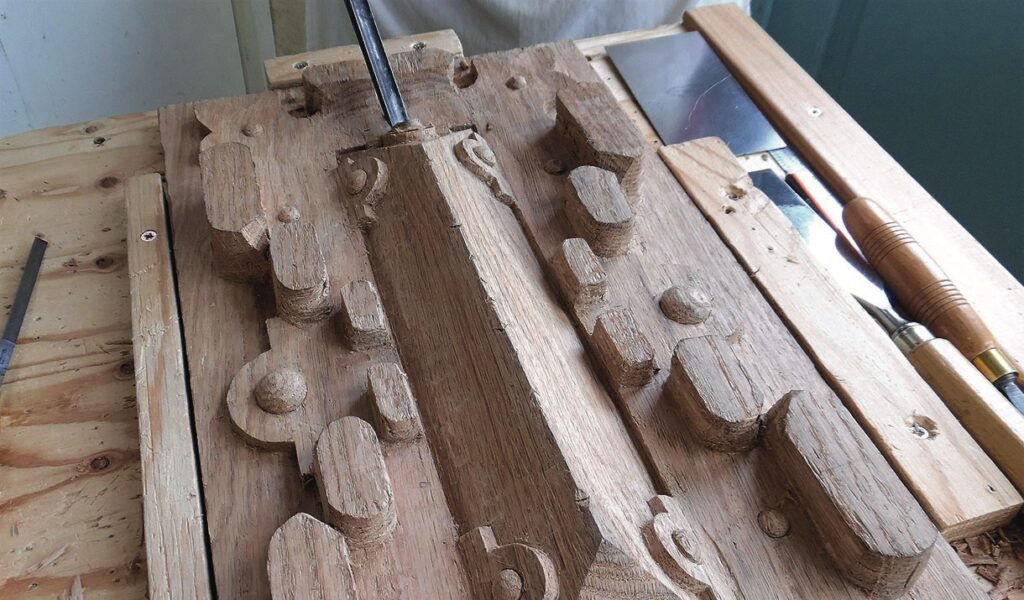
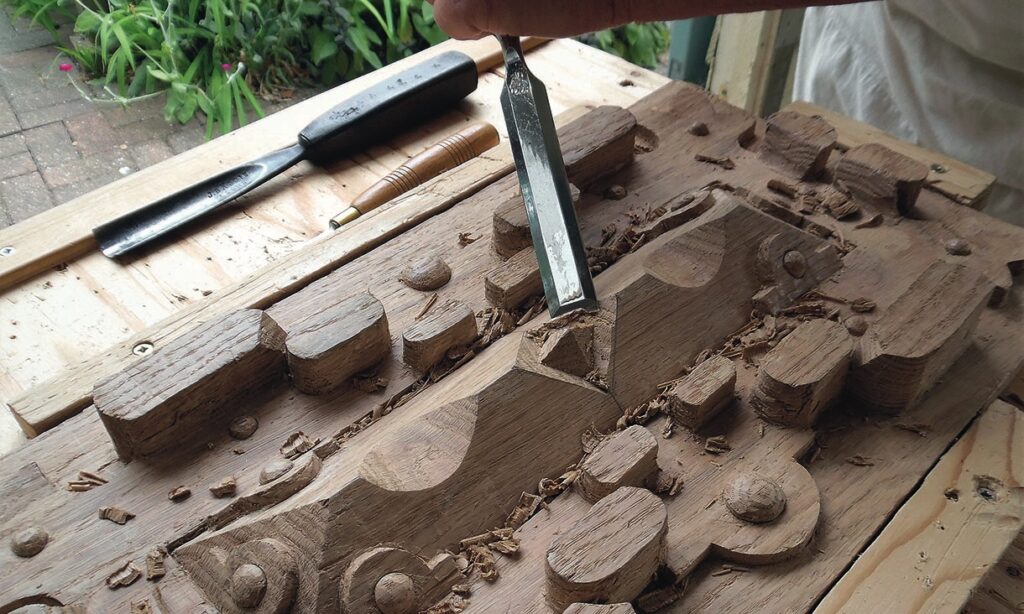
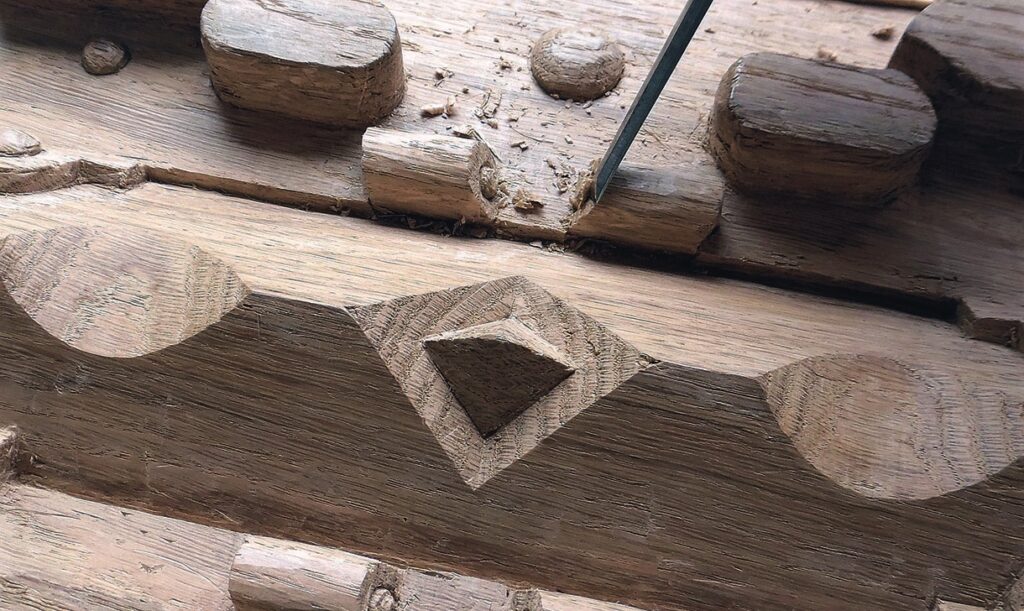
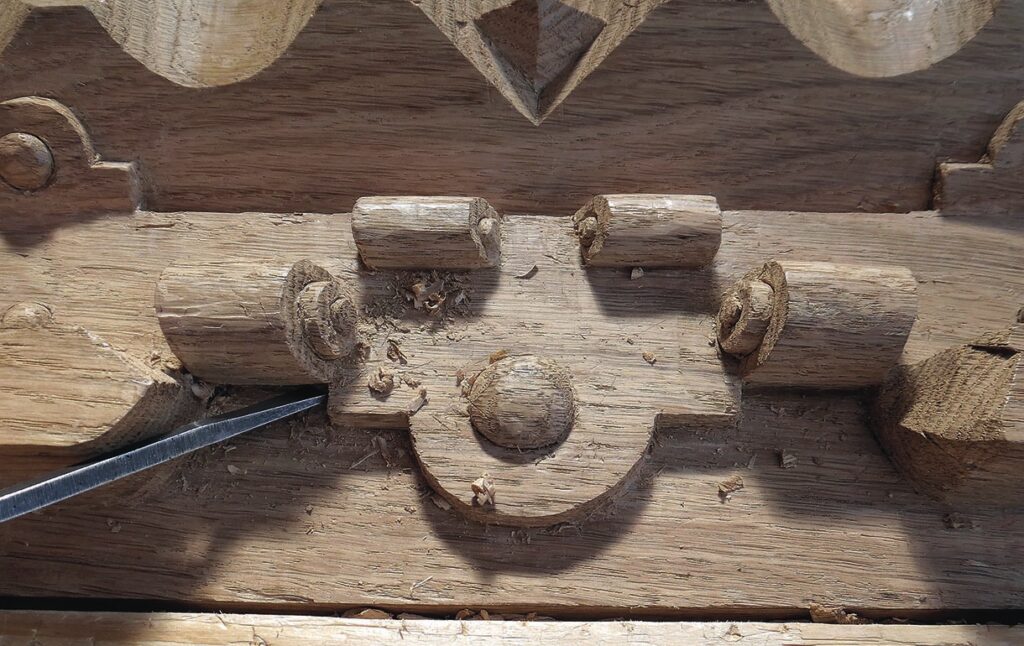
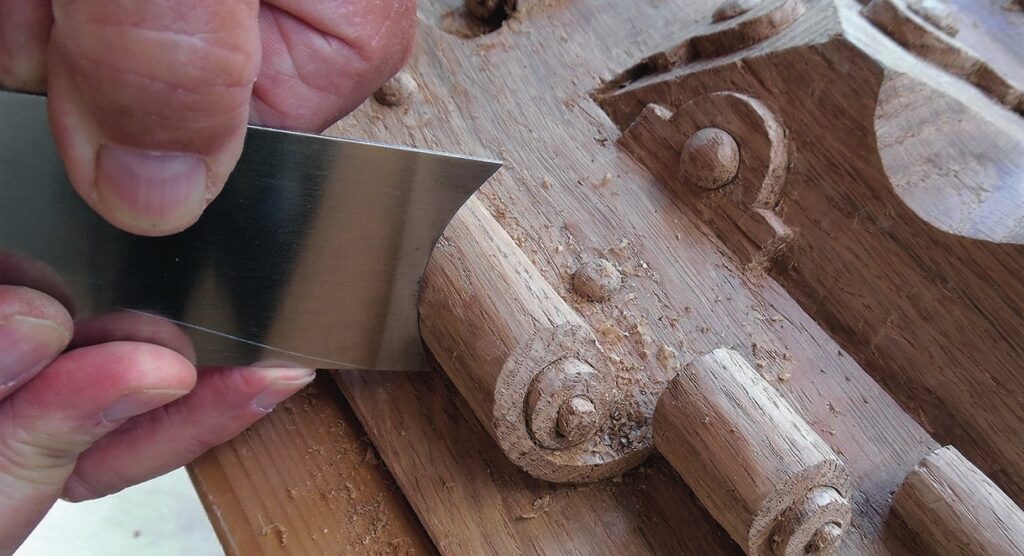
11. With everything blocked out in the right position and at the right height, you can now start working on the details. Start by marking the small 10mm diameter nailheads in their correct position and cut round them. Work the strap surface down so it is 25mm below the top of the central block, which we can still measure from with the depth gauge at this stage. It can curve slightly upwards at the corner points and slightly down at some nailheads to create the effect of being pliant. Round over the 10mm nailheads and the large 20mm ones on each side12. Now shape the pyramidal ridge along the centre. Mark the positions of the two ovals, the diamond shape and the two ends of the ridge along the centreline, then chisel round the straps that project on to the sides and ends of the ridge. Now chisel away the surplus wood to form the sides of the ridge into an inverted V13. The sides of the ridge must go down to the floor level inside the strap area, with the strap extensions laying up the sides and ends. Shape the strap extensions and their 13mm nailheads. Use a broad, flat chisel to make the sides of the V dead flat with a sharp ridge. Slide the chisel sideways in a slicing motion as you push, then finish with a flat cabinet scraper to get a fine, smooth finish
Top tip
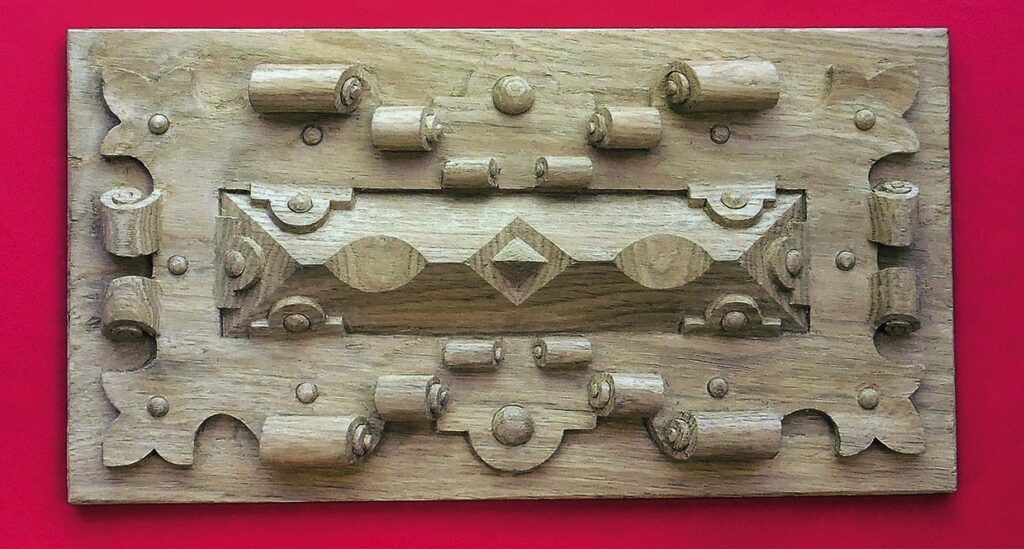
Abrasives tend to dull the surface of oak, so to get a smooth, glossy finish it is best to scrape it smooth. This can be done by holding a flat chisel in an upright position and pulling it towards you. Better still, get a set of cabinet scrapers, which come with flat and curved edges that are dragged across the surface.
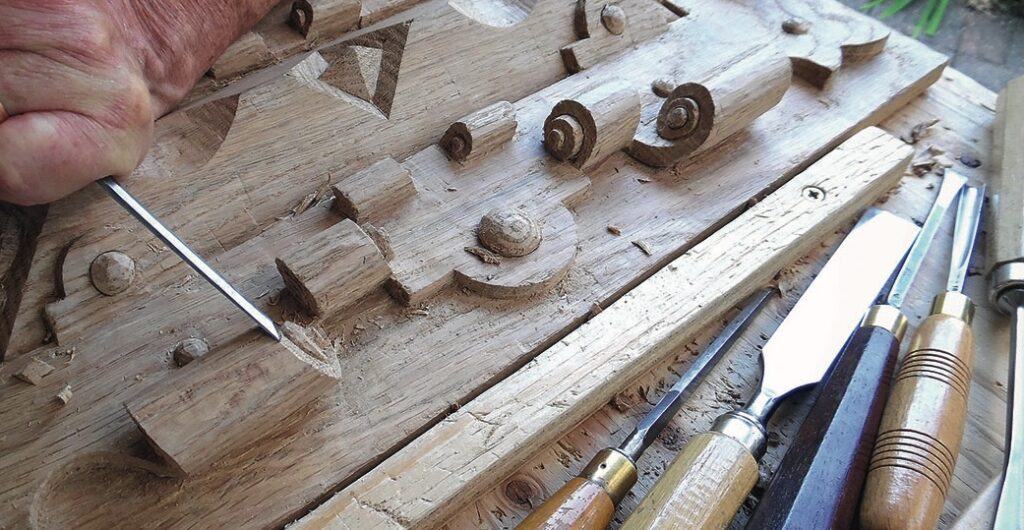
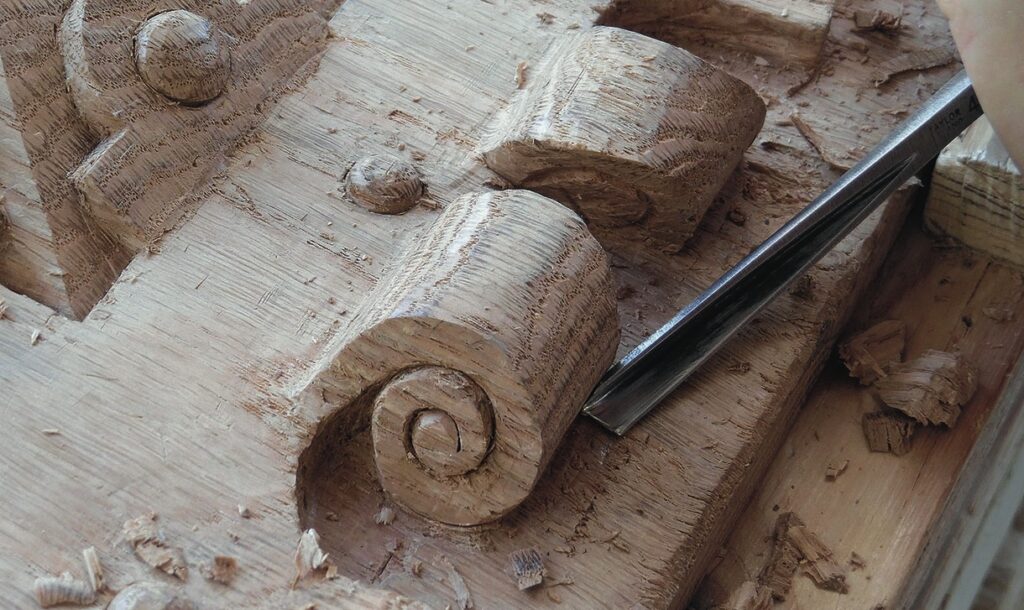
14. Carefully mark out and carve the two oval features and the incised diamond shape in the centre. These need to be crisp and accurate in view of their prominent position in the carving15. Now we move to the scrolls, starting with the four small ones that curl outwards from the central ridge. These are too small to hold much detail, but try to create a ‘swiss roll’ that appears to be a part of the strapwork that has curled up like a dry leaf16. Move to the medium-size scrolls. The size of these allows a more defined spiral that can be carved by slicing with very sharp 3 and 6mm flat chisels. Undercut both sides of each scroll so it clearly appears to be a part of the strapwork that has curled up upon itself17. The four biggest scrolls that curl back from the outer edge are a defining part of the carving. Carefully shape the edge of the strapwork into the spiral edge of the scroll, and undercut as before to make the ‘roll’ stand above both the strapwork surface and the background floor of the panel18. Now carve the two scrolls at each end of the panel. These rise up from the surface of the strapwork and curl under themselves on to the background surface. Use a No.8, 8mm gouge to create a soft bend rather than a square edge where the scroll rises up from the strapwork. As the ends of the spirals project across short grain it is best to keep them almost flat and cut the spiral lines into the ends with gouges
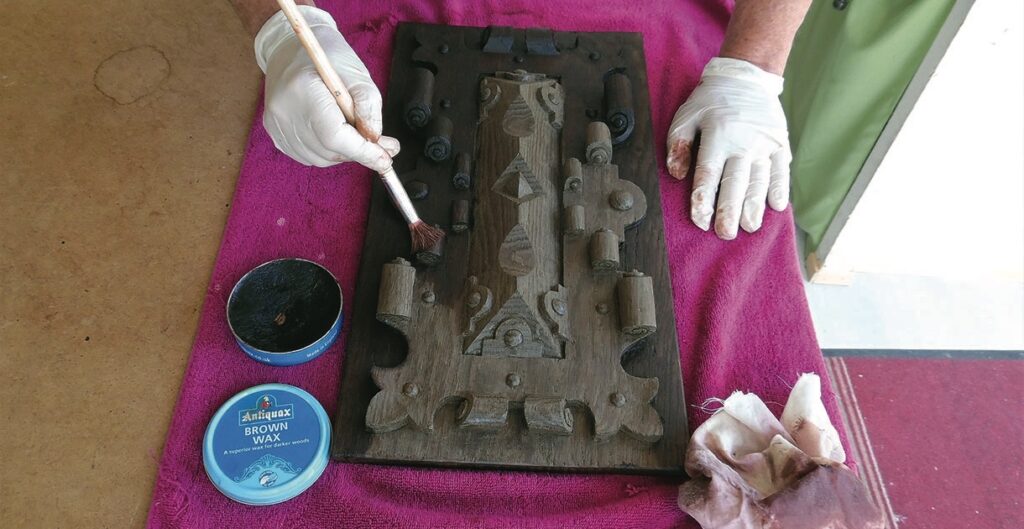
Finishing
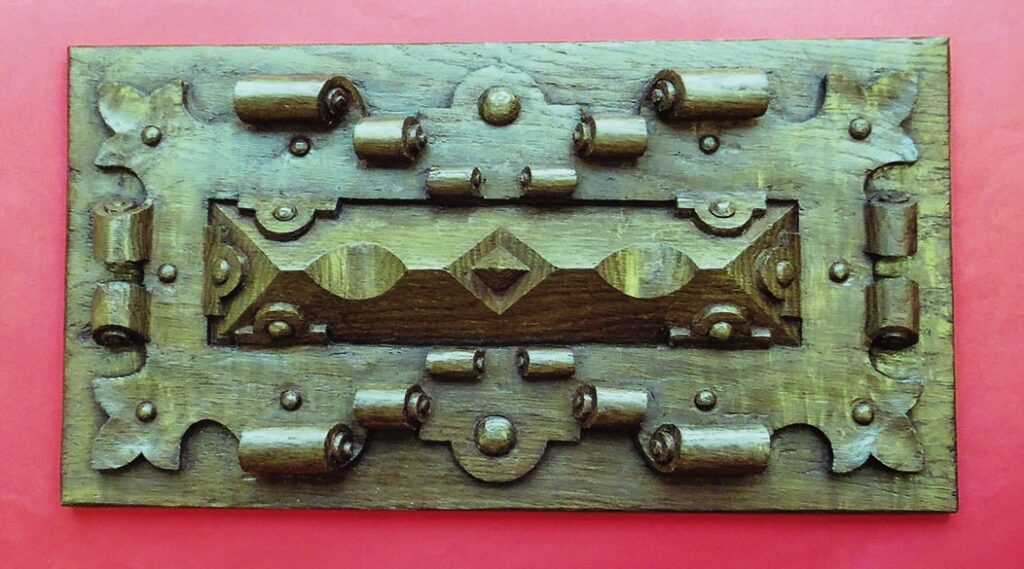
19. Plane a chamfer of about 2mm around the outer edges of the panel to give it a neater finish. Slightly undercut around the whole outer edge of the strapwork with a 3mm V-tool to make it look detached from the background of the panel, and generally check over the whole carving to refine details and surfaces. Use cabinet scrapers and the edge of a flat chisel in the narrower parts to scrape the flat and curved surfaces to a smooth finish without using abrasives, which would dull the surface20. Here’s the finished panel. If you want to leave it in its new oak colour, just give it a couple of coats of a light-brown wax polish, but if you want to ‘age’ it to the dark brown of 400-year-old oak, don’t polish it yet
Fuming oak
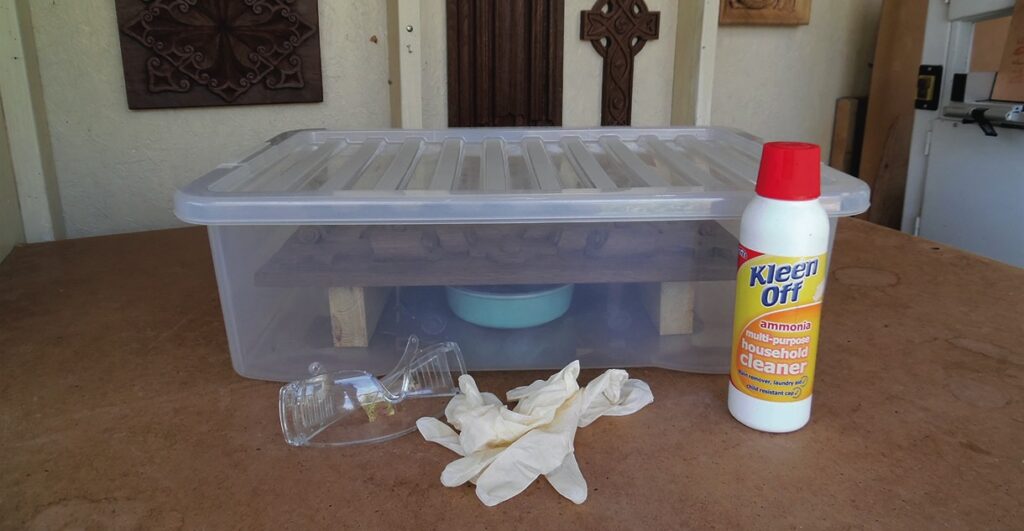
New oak is pale, but it darkens to a deep brown after centuries of exposure to the air. Placing new oak in ammonia fumes replicates nature’s ageing process at the rate of about a century an hour. The ammonia acts on the tannins found in the heartwood of oak – but sapwood (the young outer layer of wood under the bark) has no tannins and will stay pale, so make sure your oak is all heartwood.
21. To darken the oak by fuming get a plastic tub and put in about 50-80ml of household ammonia in a shallow dish. Place the carving in the tub, raised above the dish on wooden supports, and seal the tub. Follow the manufacturer’s safety instructions, wear suitable personal and respiratory protective equipment and work in a well ventilated place. Stand back at arm’s length. Leave it until the oak darkens to a pleasing dark brown – about 4-8 hours depending on the temperature, the concentration of ammonia and the amount of tannin in the oak. When you open the tub afterwards, stand back and let the fumes clear before you take the carving out22. The smell of ammonia will clear from it after a while. Then, give it a coat of a dark wax polish, brushed into the crevices and then buffed up to a soft sheen with a cloth23. The finished carving now looks like a relic from Shakespeare’s time
To provide the best experiences, we use technologies like cookies to store and/or access device information. Consenting to these technologies will allow us to process data such as browsing behaviour or unique IDs on this site. Not consenting or withdrawing consent, may adversely affect certain features and functions.
Functional
Always active
The technical storage or access is strictly necessary for the legitimate purpose of enabling the use of a specific service explicitly requested by the subscriber or user, or for the sole purpose of carrying out the transmission of a communication over an electronic communications network.
Preferences
The technical storage or access is necessary for the legitimate purpose of storing preferences that are not requested by the subscriber or user.
Statistics
The technical storage or access that is used exclusively for statistical purposes.The technical storage or access that is used exclusively for anonymous statistical purposes. Without a subpoena, voluntary compliance on the part of your Internet Service Provider, or additional records from a third party, information stored or retrieved for this purpose alone cannot usually be used to identify you.
Marketing
The technical storage or access is required to create user profiles to send advertising, or to track the user on a website or across several websites for similar marketing purposes.