Romanesque Modillion:
Johan Roudy continues his look at styles of ornament by carving a classical form of bracket.

Johan Roudy continues his look at styles of ornament by carving a classical form of bracket
This modillion bracket is a good example of Romanesque style. Chimeras and other monsters are an usual theme of this period. They obviously try to frighten sinners and show what they will have to face in hell, but are also often an allegory for the human’s own passions and bestiality.
Modillions are more often carved in stone, and this material is predominant in Romanesque art for carved ornaments. This project could fit well under an old beam, on the ceiling above a door or even under a shelf, keeping in mind it looks better if it’s set at a certain height.
My piece of wood is a glue-up of two blocks of 110 x 160 x 220mm. I chose to darken the wood to match more easily with the old house frames in my area. If you plan to set the carving outdoors, use a finishing product offering a good protection from UV and moisture rather than wax.
Things you will need
Tools:
• No.3, 6, 10, 16, 30mm 16mm & 25mm
• No. 8, 6mm & 22mm
• No.11, 5mm & 10mm
• 5 & 10mm V-tool
• 6mm skew
• 30mm chisel
• Bandsaw (alternatively handsaw)
Materials:
• Chestnut (Castanea sativa) 220 x 160 x 220mm
 Drawings and how to resize them
To enlarge or reduce the size of drawings right click on the image to download it and then go HERE to watch a video on how to use paper with a grid to do exactly that.
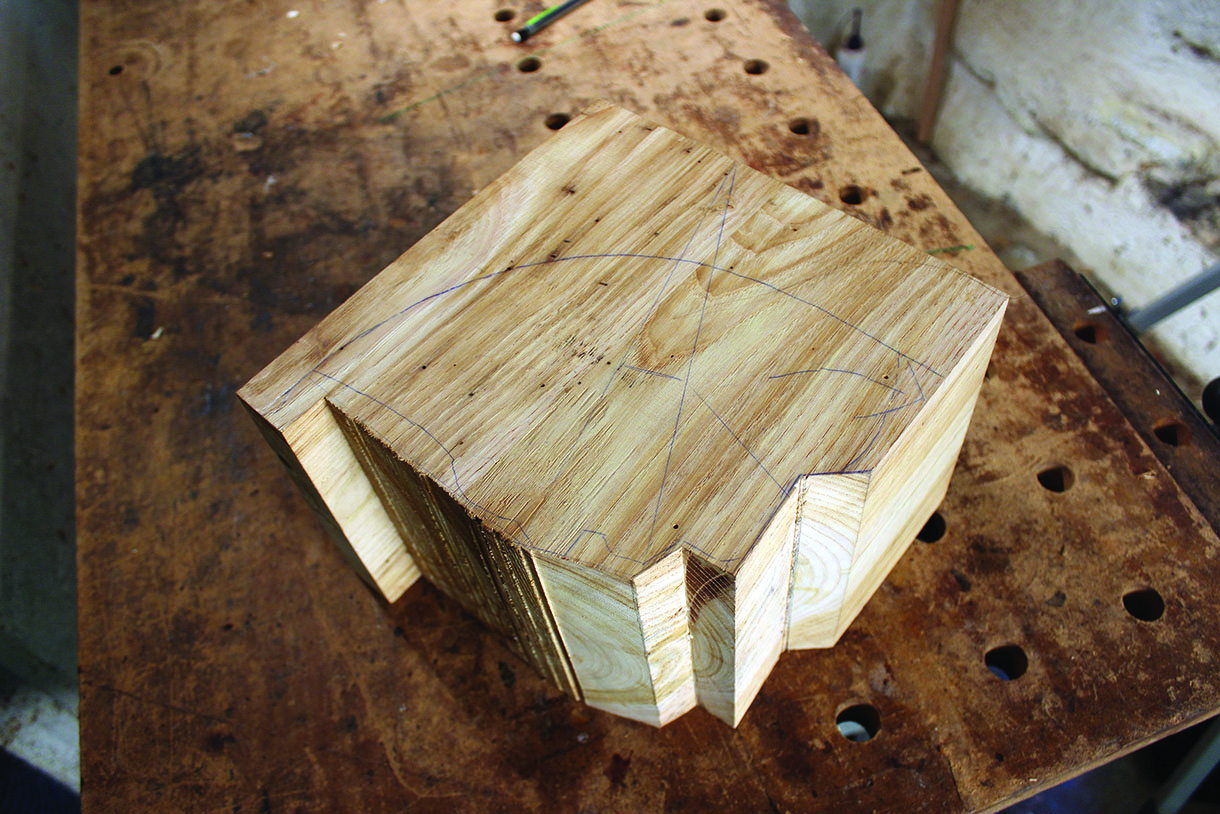
1. Copy the template, at the size you want it, on the sides of your timber. Now, use a bandsaw to cut the profile following the red lines shown on the template. Carve a hollow 10mm deep with the no.8, 22mm up to the ear, following the curve of the bracket. Then stab at a straight angle using a No.3, 30mm and clean the waste


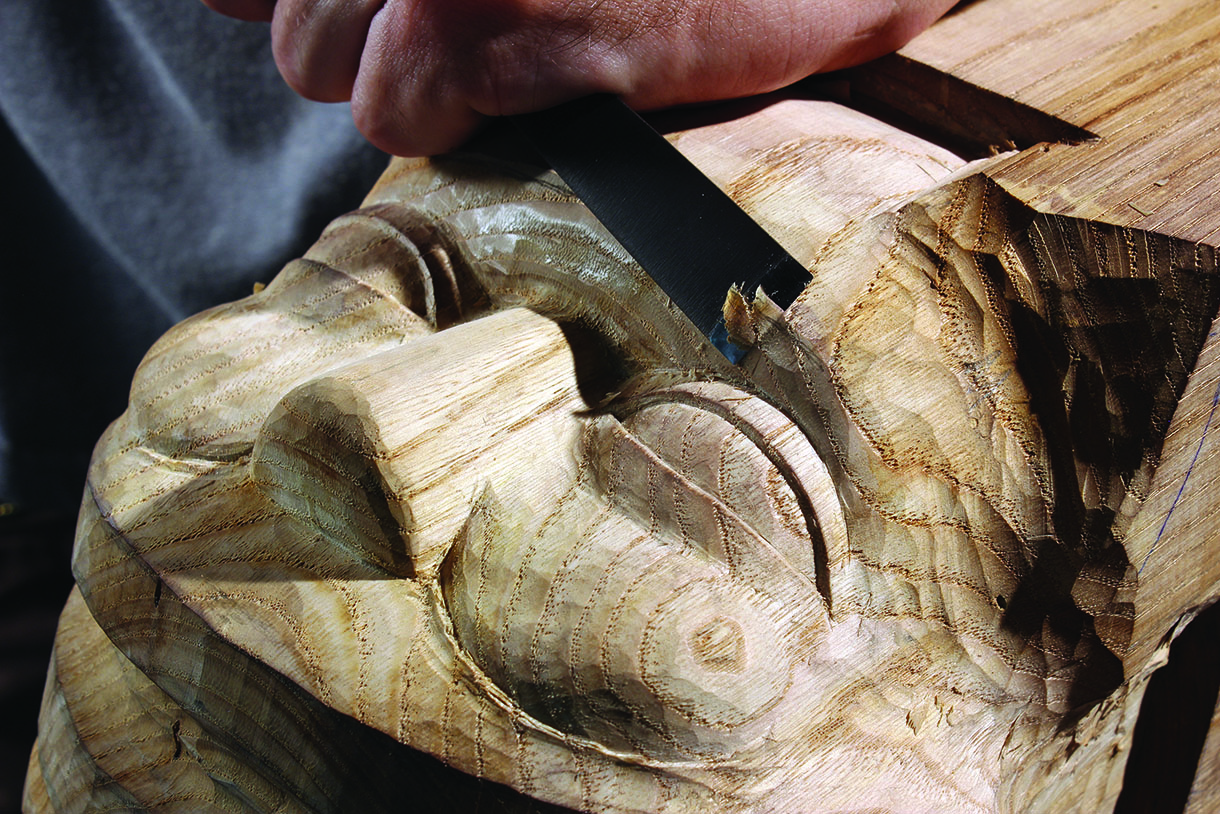
2. To create the nose, use a V-tool to separate it from the cheeks and carve a flat surface from the eye area to the mouth cut
Top tip: In this style of carving, if the face features are simpler than a realistic character, it is still important to check symmetry regularly and from different points of view. It is advisable to realise each step on both sides before moving on to the next one.

3. To shape the mouth area, a semi-circular area must be carved from one side to the other. To achieve an even curve, draw a line parallel to the cut of the mouth, 45mm away from the angle, on each side. Use a straight chisel and cut end grain to shape a flat plane between the lines. Now, draw lines 15mm away from both newly shaped angles and remove the waste between the lines. Break the remaining angles to smooth the curve and get a nice, round shape

4. Using a No.8 and No.6 gouge, remove waste under the ears and start to round the brow bone. Pay attention not to cut the ear or the upper lip

5. Between the ears, make a stop cut along the edge of the bracket and round the forehead with a No.3, 30mm. Carve about 10mm deep. Use a deep gouge to mark out the ear area with a straight groove along the grain

6. Redraw the lines of the lips and carve a hollow with a No.8, 22mm above the upper lip. This groove will also mark the cheeks and should fade out under the nose

7. With a No.8, 22mm, start to round the neck below the bump that will represent the chin bone. Once most of the waste has been removed, switch to a No.3, 30mm to even the surface. A No.11, 10mm and the V-tool can be used to clean the walls of the bracket

8. The eyes are first rounded horizontally. You can mainly use a No.11, 10mm – while the tight curve can get into the corner of the eyes, the wings can be used as a flatter gouge to round the eyeball. The eyes are rather large – they will be 45mm wide maximum, separated by 40mm, the width of the nose. If they are larger, it means you didn’t round the brow bone enough on the sides

9. Mark the bottom of the eyes with a groove and round the eyeballs vertically. The waste on the cheeks is removed with a flat gouge, following the grain direction to get a smooth transition

10. Using a no.3, 10mm, lightly round the tip and soften the edges of the nose. Go back with a No.11, 10mm to mark the edge of the cheeks towards the nose. Clean the upper lip area with a flat gouge

11. Draw the lips and the mouth opening with a pencil. Use the No.11, 10mm to open the mouth with a groove, about 10mm deep

12. Mark the shape of the eyes with the pencil and mark the upper line with the V-tool. Clean with a flat gouge if necessary and check the roundness and symmetry of the eyeballs

13. Refine the shape of the upper eyelid with the No.11, 10mm . It should bite a little on the brow bone cut at the middle of the eye

14. Set in the lower line of the eye with a no.3, 16mm gouge. Refine the shape of the lower eyelid. Use the No.3, 10mm to let it draw back under the upper eyelid at the corners and use a small flat gouge to round the surface of the eyes. Make a deeper cut at the corners and remove the waste with a skew chisel to make the eye look more like a ball

15. Round the cheeks with a flat gouge turned backwards. The area beside the nose is lowered a little bit to get a better-looking shape and to remove any flat-looking spots. It also marks slightly the corner of the wings of the nostrils. Once happy with the shape, clean the connection to the upper lip area with a No.11, 5mm
16. Refine the shape of the brow bone with flat gouges around the eyes. Let it fade out towards the temples. Soften the brow bone line and clean the area to remove any mark of the saw cut

17. Mark the outer edge of the lower lip with a groove using the No.8, 22mm. Inside the mouth, shape the inner edge of the lips with the V-tool and clean the teeth area to a flat surface with a No.3, 6mm gouge. Make sure that there is an even depth of 1cm from one side to the other. Then round the inside walls with a No.6, 16mm gouge turned backwards. Make sure your lips have an even width. Let a stripe about 10mm wide between the outer edge of the lip and the edge of the inside walls

18. Draw the teeth and, using a No.8, 6mm, remove the waste between the teeth at a square angle of each tooth. Working from the side will allow you to remove the waste more easily. Use the same tool to set in the corners of the mouth and to match with the curvature of the inside walls of the lips
Top tip: When digging tight areas, learn to know when to stop. If you don’t go deep enough, you won’t get a dramatic shadow. But if you dig too deep, you will struggle to get a clean result. Just stop when you’re happy with the result – you don’t have to dig the whole mouth.

19. Run the 5mm V-tool between the lip and the teeth to create a shadow. Clean the inside of the mouth between the teeth using a no.3, 10mm and 6mm

20. Define the bottom edge of the lower lip by carving deeper the hollow under the mouth with the No.8, 22mm. Turn around the corners to connect with the temple area and the upper lip, paying attention to the grain direction

21. Carve a second hollow under the jaw bump and use No.3, 30mm to even the neck down to the depth of the hollow. Round the bump with the same tool turned backwards, and let it fade out towards the corners of the mouth. There should be more wood to remove on the sides of the bump than on the middle to achieve a pleasant shape


22. Using a No.3, 16mm , carve a flat surface between the tip and the base of the ears. Draw the profile of the ears with a pencil. Make a stop-cut along the edge of the bracket, turn the gouge backwards and remove the waste along the grain

23. Focus on the front side and use a No.6, 25mm gouge to carve inside the ears, 5mm from the edge of the ear. The no.3, 10mm and the No.11, 12mm will be useful to clean the connection between the ears and the temples

24. Redraw the edge of the ears on both sides and remove the waste as in step 22

25. Dig the ears deeper using a No.8, 16mm. On the sides, use a No.11, 12mm to mark the back of the ears, and shape the top of the ears on both the front and the sides of the modillion with a No.3, 16mm and 30mm


26. Clean and deepen the walls of the bracket. There should be a slight curve showing the curvature of the cranium at the top of the head. At the opposite side, the base of the neck meets the bracket at a square angle, and it should look more like an oval than a round

27. The nostrils are simply marked with a cut using the 5mm V-tool

28. In Romanesque style, the iris or pupils are often simply represented by a hole. Draw the pupils and set them in with the No.8, 6mm. Remove the waste using No.3, 3mm gouge. The eyes can also be left blank, without marking the iris. Dig enough to create a dark shadow. I chose to fume the wood before applying a coat of linseed oil and wax


