Your First Segmented Turning:
Kurt Hertzog looks at turning your first segmented piece
Kurt Hertzog looks at turning your first segmented piece
The goal of this article is to potentially awaken a desire among the ‘never-have-segmented’ crowd.
I’ll provide a simple, low-tech method to get started. No software analysis and design tools in favour of a piece of graph paper and perhaps a calculator. Multicolour, multi-species feature ring(s) can wait until the basics have been mastered. We’ll do a segmented turning blank from a single species board using common ’shop equipment, wood adhesive and some rubber bands or tape. Whether we make a bowl, platter or something else is immaterial. We’re striving to learn why, how and some pitfalls to beware of. We will focus on the very basics and a successful outcome.
Are there more advanced methods of cutting, gluing, clamping, computer design and graphic presentation of the final outcome? Certainly, but it can wait. If you have or have access to a tablesaw, mitre saw or bandsaw, along with the regular ’shop supplies like abrasives and glue, you are ready to begin.
Safety
The usual turning safety guidelines always apply when you are woodturning or doing other work in the ’shop. Wear safety glasses, no loose clothing and dust protection as needed. In addition to the standard precautions, please be familiar with and follow all safe operating procedures for using a tablesaw, bandsaw or mitre saw. We will be cutting many small pieces on one of these tools. It is easy to become complacent. Don’t let that happen! Pay attention to what you are doing and at any sign of fatigue, stop! Pick back up at another time when your focus is with you. Use the appropriate clamps, stop blocks and push tools to keep your hands always in a safe place. If you are not familiar with the use of any of this equipment, get assistance from someone who is.
Understand and heed all of the safety requirements for whatever saw you use to cut your segments
Why segmented turning?
If we aren’t going to do designs or fancy shapes, why do segmented turning? There are many advantages to segmented turning that have nothing to do with the ‘art’ part of the equation. Even if you only work with one species alone, you have two huge advantages that can’t be matched with the standard wood blank.
First and foremost, with proper design and construction in our initial foray, you can always be turning face grain. Not a lick of end grain to be dealt with. All face grain with the beauty of how it turns, sands uniformly and takes finish. That alone can be worth doing segmented turning. The other big advantage is the ability to obtain blanks that couldn’t otherwise be found or afforded. If you want to turn a vessel that is two metres, you’d be hard pressed to find a blank that would be affordable, much less be intact and safe to turn. By avoiding upwards of 90% of the waste that usually winds up on the ’shop floor, your constructed segmented blank puts sufficient wood where it needs to be and not a lot of extra. That savings in shavings does come at a time penalty of creating the segmented blank but your turning is now possible in sizes and shapes that cannot be found in nature. Later on, you’ll appreciate the ability to build your turning as you go. Glue up some of the rings, turn, add additional rings, turn and continue. You can have easy access to areas as you go, allowing for progressive processing. This, along with the ability to create ‘subcomponents’ that can be assembled and finished, is an incredibly powerful technique.
Whether solid wood or plywood, your segmented blank can present you face grain for your cutting
Planning your blank
While there is a variety of great software available for the planning of segmenting, the old-fashioned way of graph paper and pencil works well. Many of the world’s finest segmented turners still use a pad and pencil. For the sake of simplicity, I suggest you begin with eight segments per layer. It is an easily handled number both in planning and handling for glue ups. The example shown is only going to be a few layers, to illustrate the planning process. Feel free to build higher and wider if you wish but remember we’re only covering basics. As such, we’ll plan the diameter and height of the final blank along with the number of layers based on the thickness of our stock. A bit of thinking on the wall thickness and shape gives us all we need to design. Sometimes it is easier to start with the material dimensions and see what can be made from it. The example here is what I could easily make from a plank in the shop. Not necessarily the best grain orientation but workable. Because it was already milled and thickness planed, the thickness was uniform throughout. Your stock will need to be uniform regardless of thickness or you’ll need to process it later to make your glue-up ring thickness uniform. My thinking was that I had 100mm wide after removing the waning. By using a cutoff of 100mm, I now had my base of 100 x 100mm. Allowing for 10mm wall thickness, I’d need a width of 32mm wide to cut my segments. That worked nicely by ripping my 100mm wide plank into three pieces. Those three pieces of 815mm length provided 2438mm of segment stock. If you check the running total of my circumferences, you’ll see I’m using up 2082mm plus 32 kerfs. Not enough to do another bigger ring and not enough to do a double smallest ring. A miss cut or two and the potential to have losses with stock quality will teach you to plan for some extra. The math is pretty straight-forward. A circle of 360° divide by eight segments yields 45°. That 45° split equally on each side of each segment gives you a cut angle of 22.5°. My arbitrary selection of outer diameters was for simple shape. Each diameter multiplied by pi calculated the circumference. That circumference divided by the number of segments yielded the cut length of the long edge of each segment. That number will be used to set the stop block for each of the different rings when they are being cut.
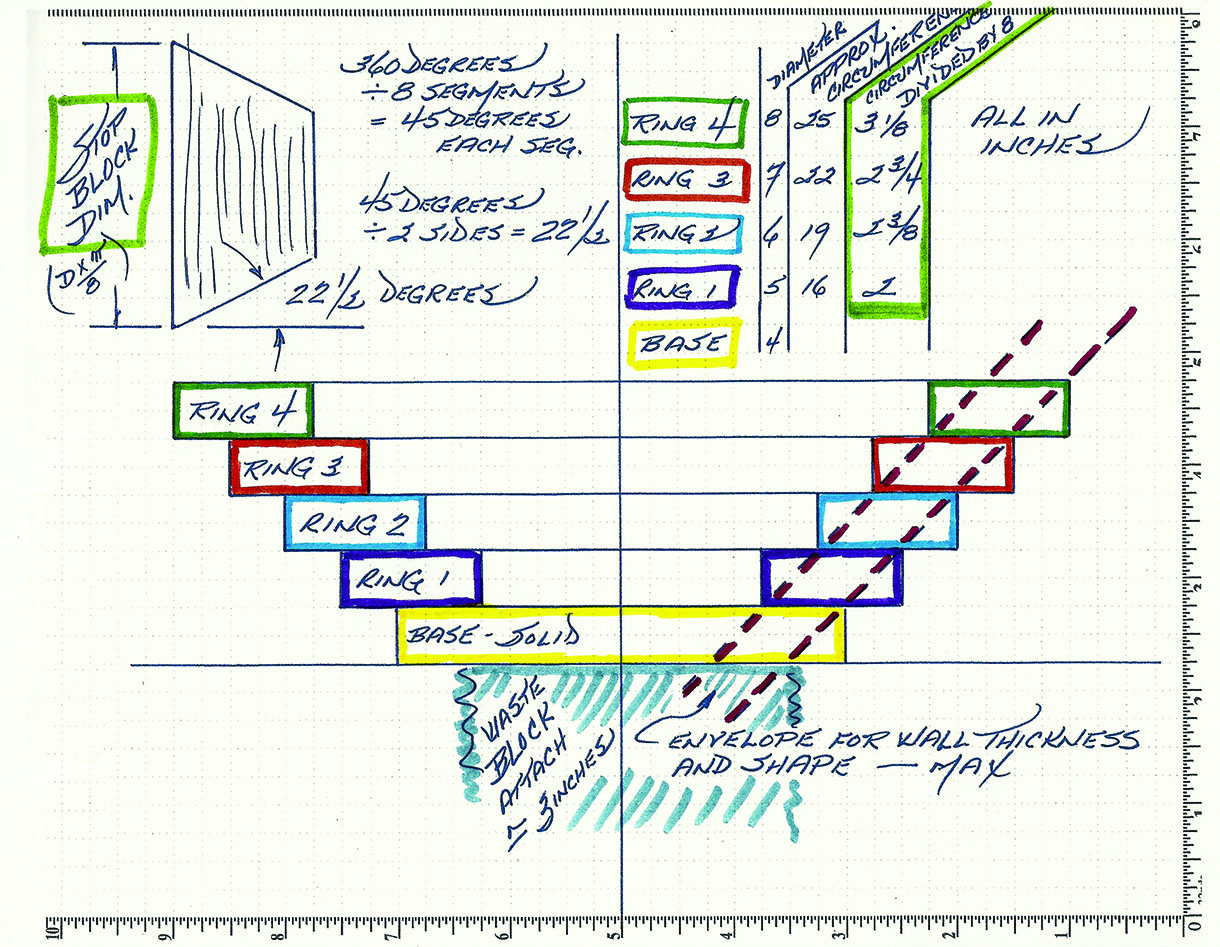
With that plank, I’ve sketched a tapering blank from 200mm to 100mm, 63mm tall with eight segments per layer
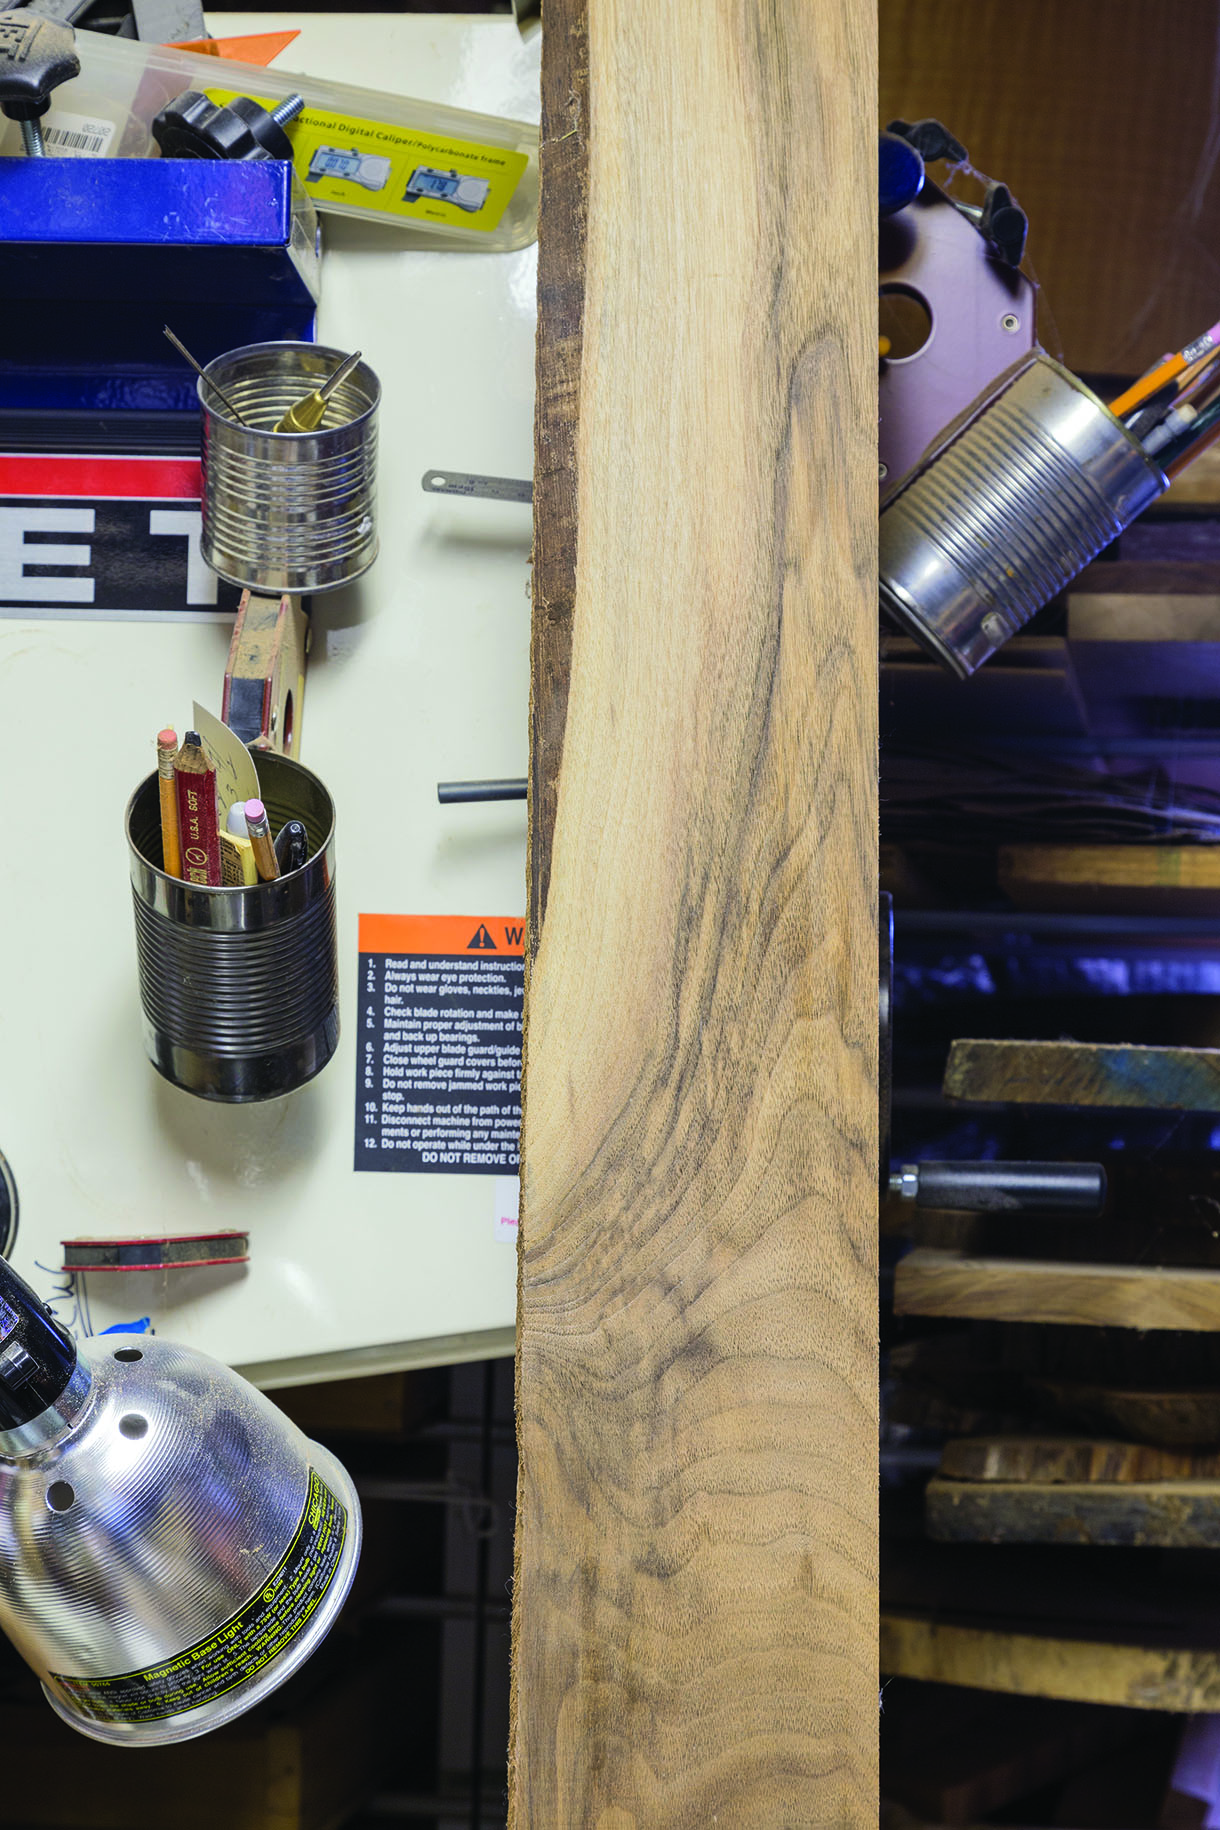
I’m using a gnarly piece of walnut, roughly 915 x 100 x 12mm once the waning is removed
Checking your saw accuracy
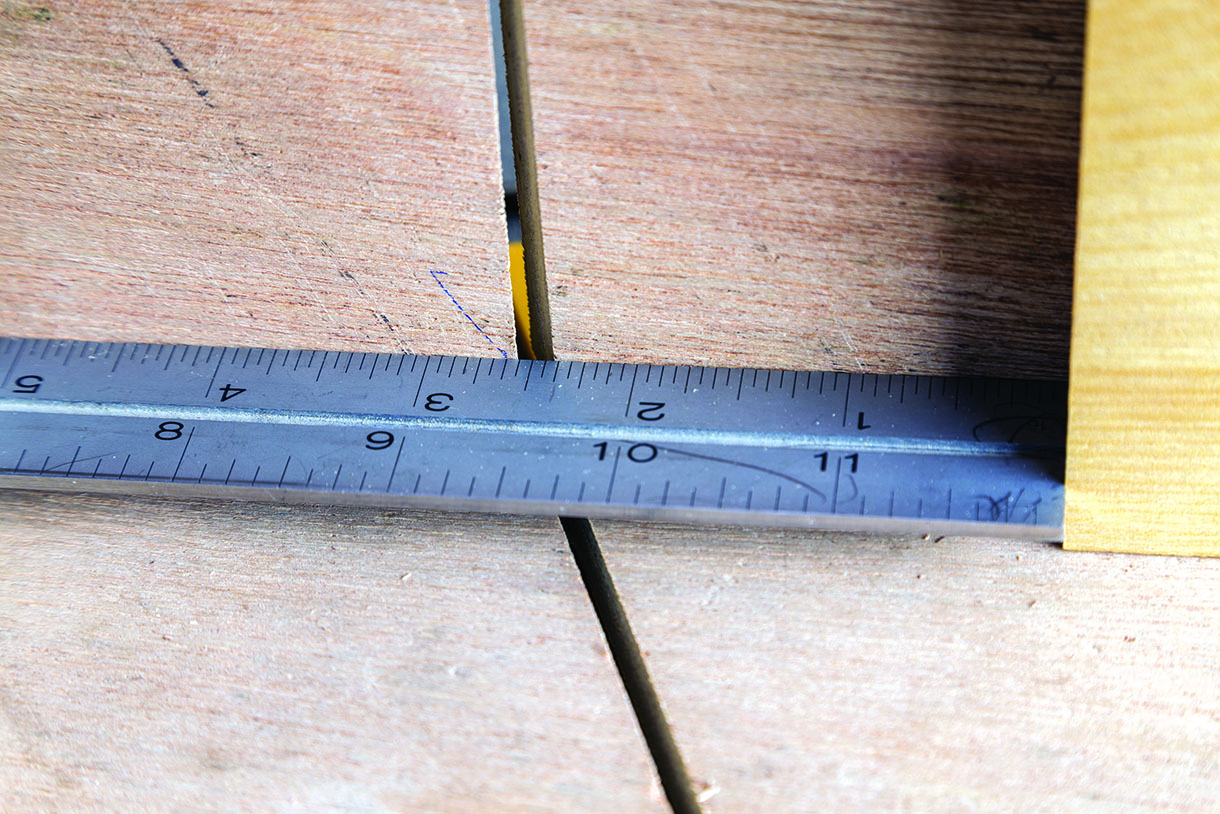
It sounds more ominous and difficult than it really is. The time spent checking and properly adjusting your equipment will pay huge dividends here and in your other work. Nearly every saw needs some attention to accurately cut segments. Whether eight segments or 48, our segment cuts need to be at 90° perpendicularity. With our eight segments per ring, we need to be at the specified angle of 22.5°. All equipment is suspect and especially any piece of equipment with adjustable blades or tables. Regardless of whether you use a tablesaw, bandsaw or mitre saw, you need to check and be certain your blade is cutting at 90°. Once you have your perpendicularity at precisely 90°, you can begin to worry about your angled cut accuracy.
Regardless of price, nearly all equipment indicators are not accurate enough. Set your mitre gauge on your bandsaw, table saw, or mitre saw for the desired angle. In our example, 22.5°. Set your segment length stop block for a reasonable distance. You can use similar sized scrap stock if you wish. Make your first cut to establish that initial angle on your stock, flip the stock 180°, position the stock against the stop block, and make your segment completion cut. Cut enough segments to create a half circle. Check for any gaps or more than 180° stackup. Adjust your angle and repeat this process until your segments fit together properly and are a true half circle. You can glue them up if you wish.
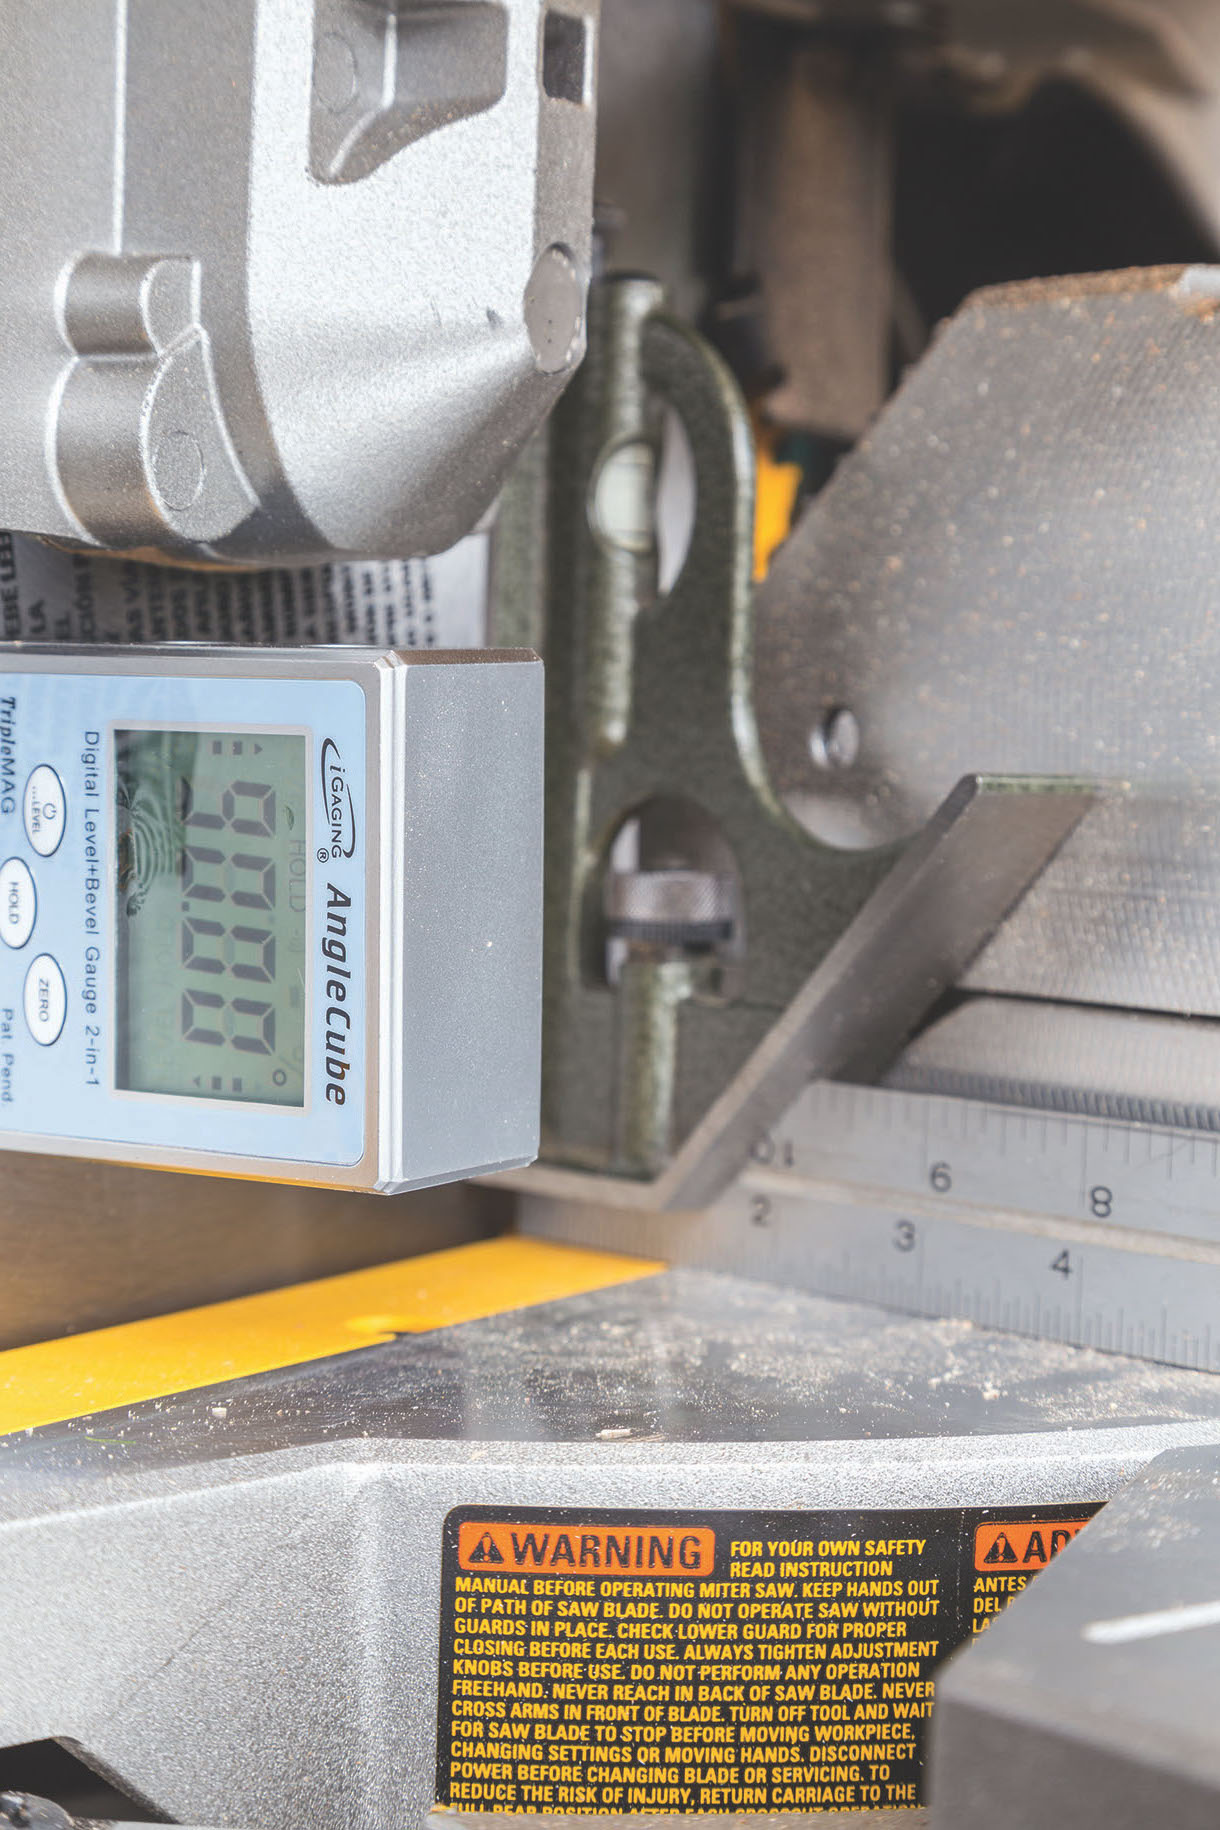
Whether using most modern electronics or an old-fashioned square, be certain you are cutting at 90°
Adjustable and not accurate or repeatable enough. Don’t rely on the detents on your equipment
Insufficient resolution or accuracy. A tenth of a degree error times 16 cuts is a 1.6° problem

Cutting segments from scrap and checking the error stackup lets you tweek the angle setting until correct
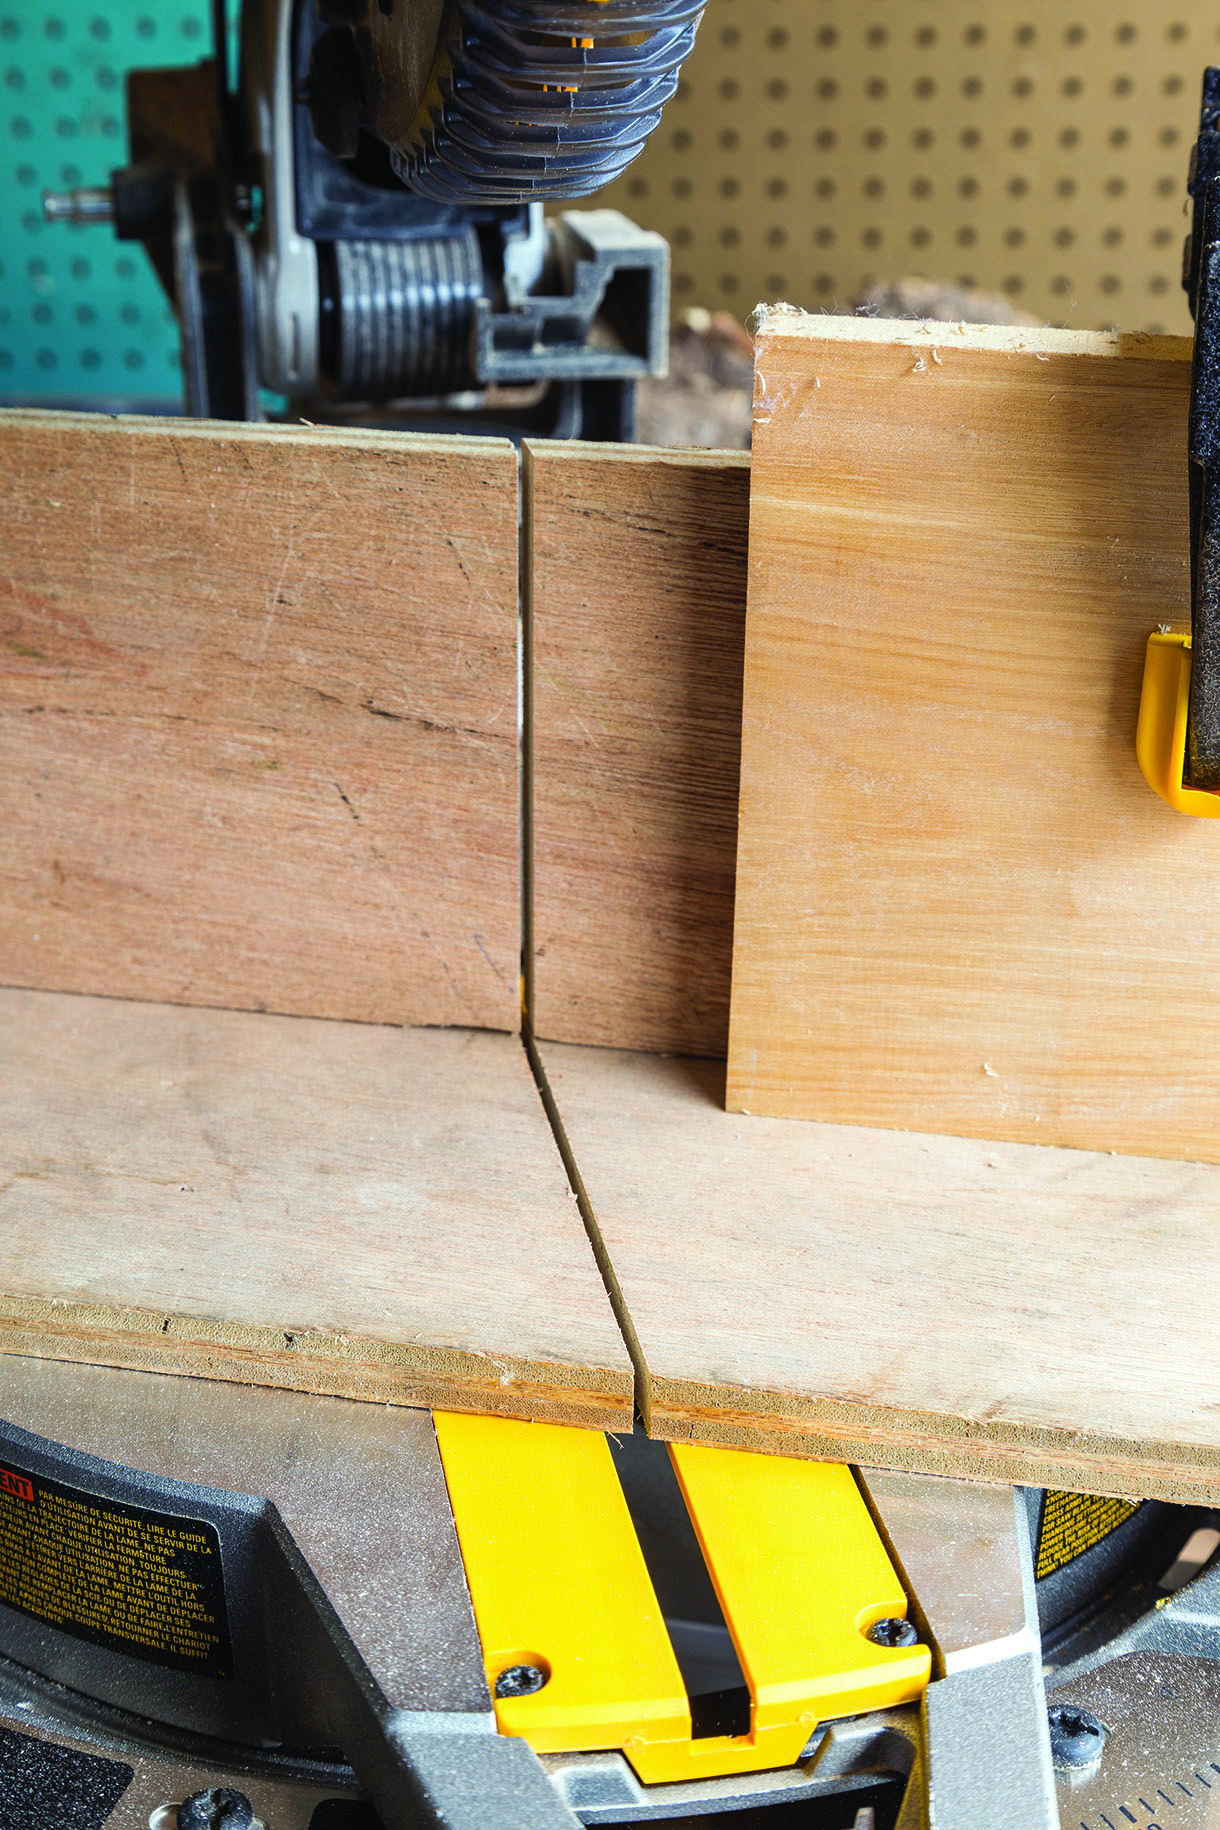
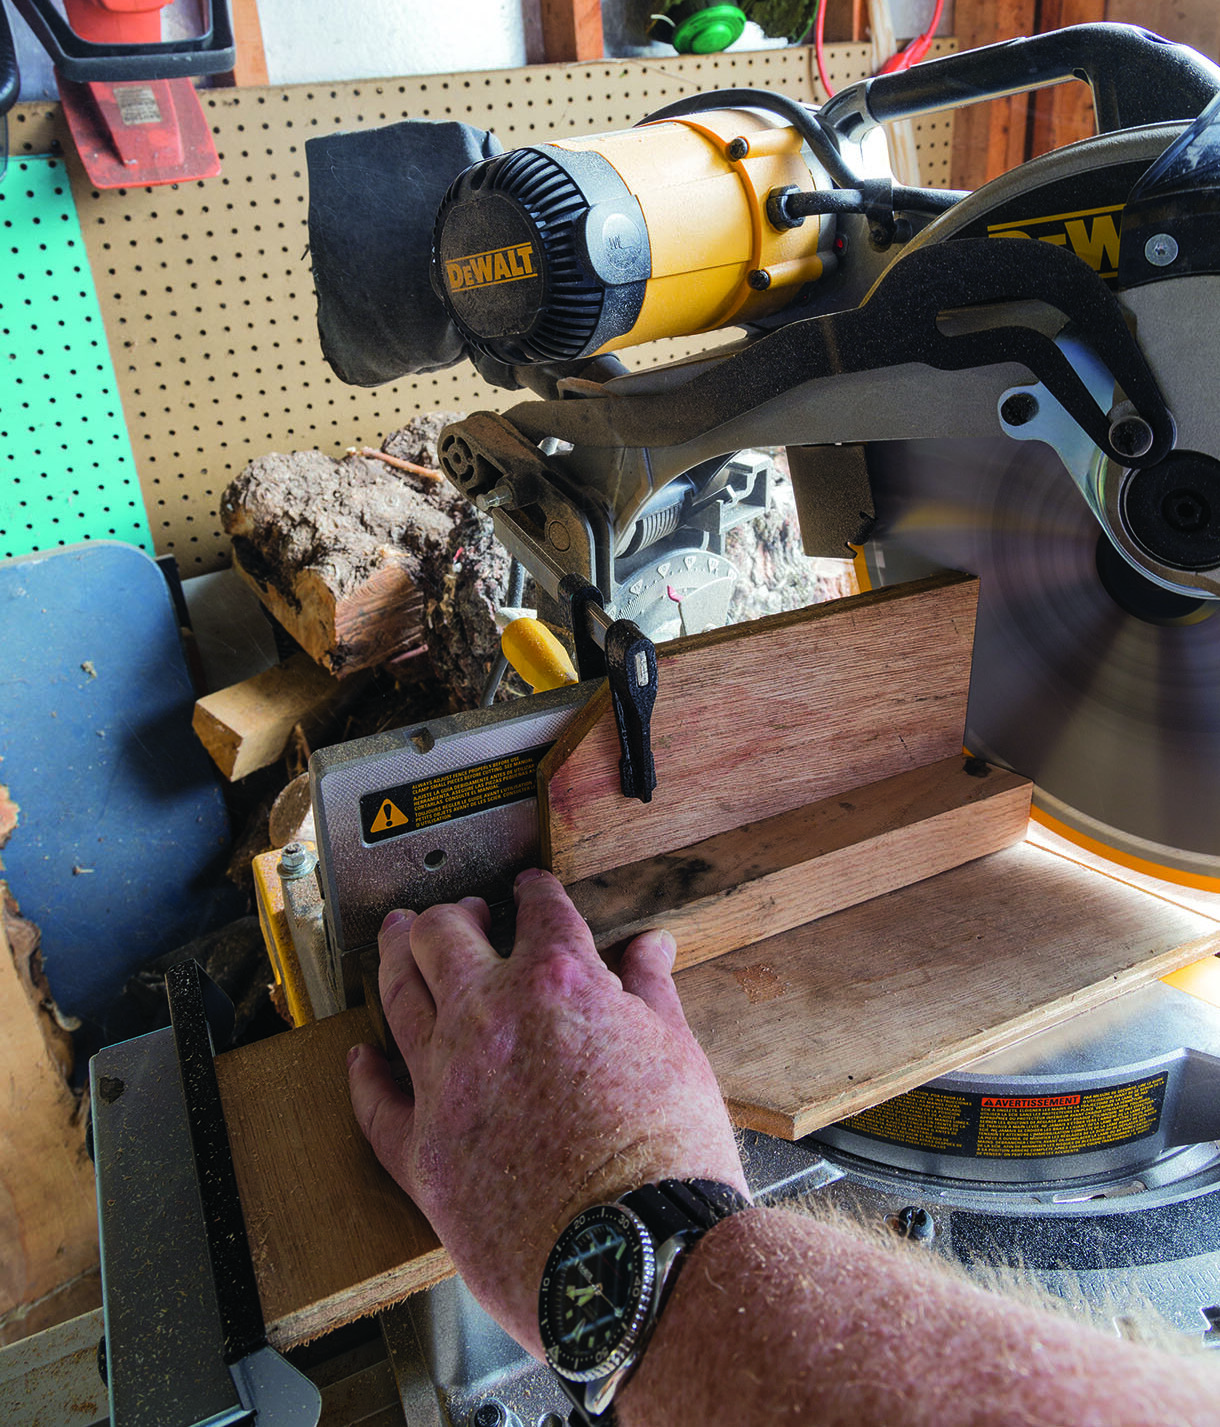
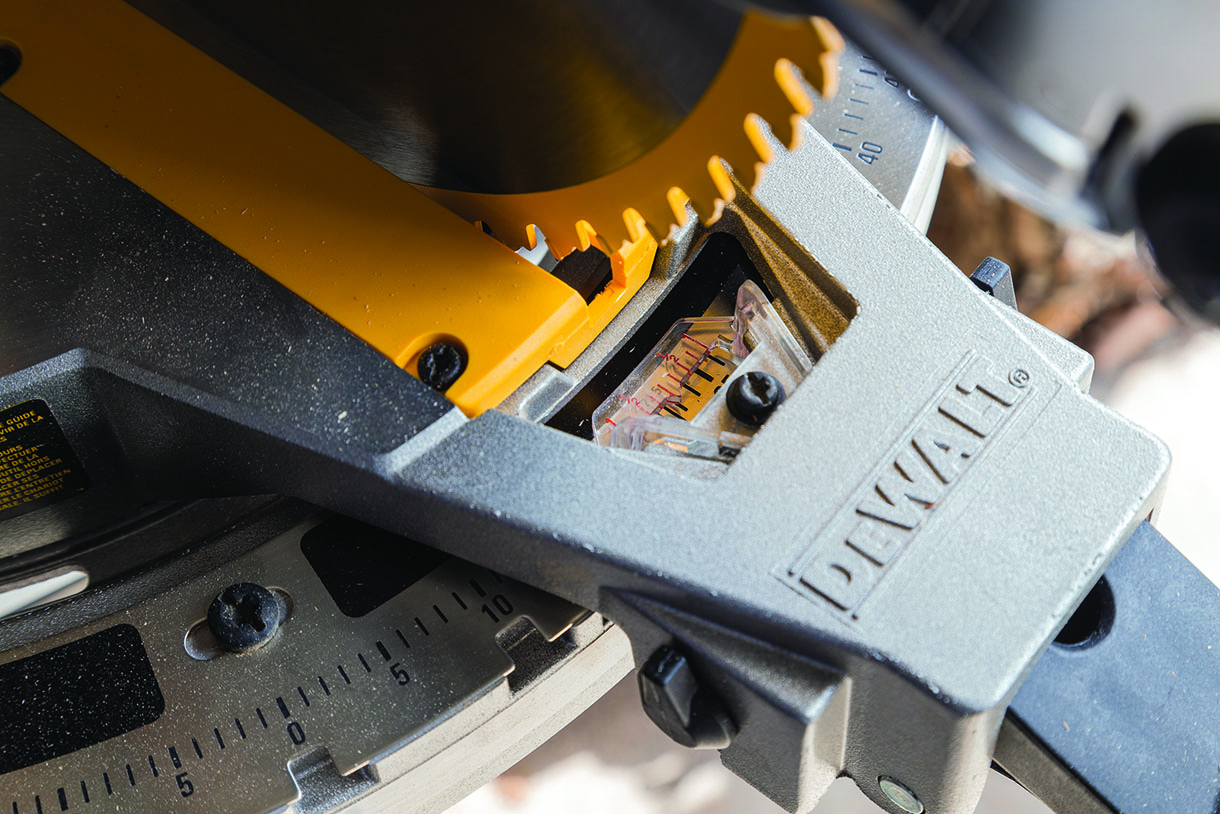
Sacrificial plywood stock is clamped on my mitre saw to create a zero clearance fence
Good practices
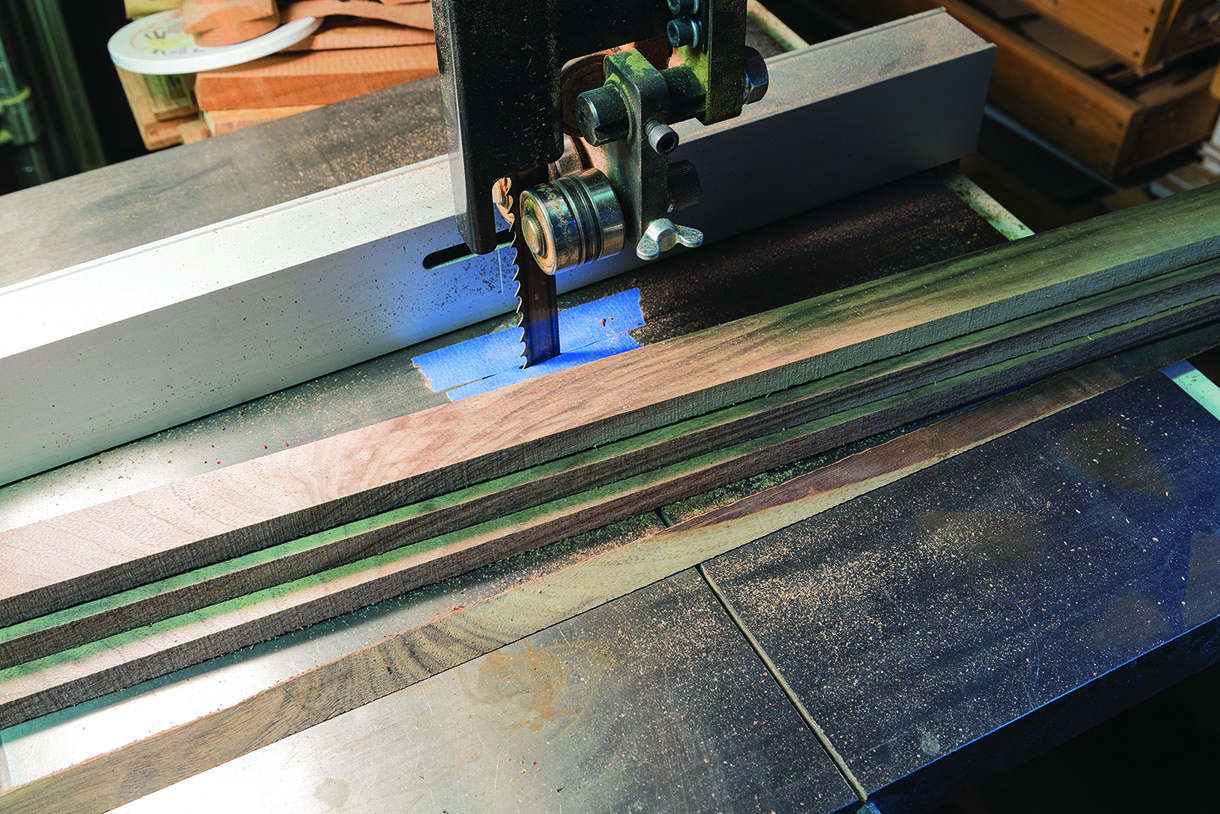
All adjustable angle equipment has a throat plate to accommodate the range of blade angles. This big gap doesn’t help the quality of the cut. Supporting the stock as close to both sides of the blade can improve the cut quality. When working with small pieces, a zero clearance throat plate prevents loss of small cut pieces. I find that a reasonable quality sharp blade suits my needs when used properly. Depending on the saw type you use, proper speeds and feeds are key to getting precise, repeatable cuts of good quality. A blade that is not sharp or running true can be as troublesome as forcing things rather than letting them be cut. Blade thickness will have an impact on your total kerf loss but usually not worth agonising about.
If you have a choice, a fine woodworking blade of good manufacture is likely to be superior to a contractor’s blade, but blade sharpness and your cutting technique will have a large impact. For those using a bandsaw, you’ll need to temper your blade choice based on the material and thickness. A three TPI skip tooth blade may not produce best cuts in 3mm snakewood much like a 32 TPI blade cutting 20mm cherry may burn. Use some scrap of the same stock to test the setup and quality of the cut. When cutting segments, you’ll almost always be making an angled crosscut to the grain. Without dwelling too much on blades, be aware
there are designs available for ripping, crosscut and combination cutting.
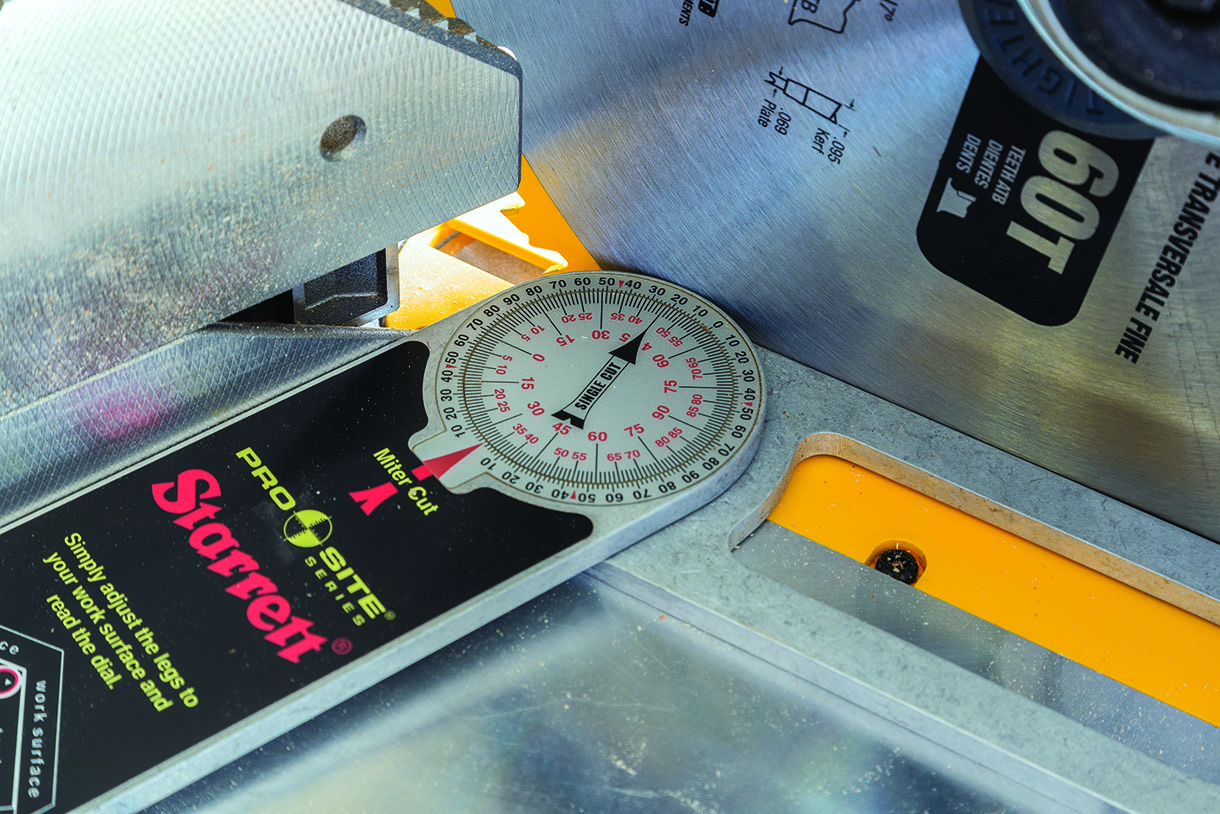
With good stock support, most saws can produce very good quality cuts
A sharp blade, proper speeds and feeds, and good stock support yields clean high quality cuts
A 3 TPI resawing blade rips wonderfully but isn’t always the best choice for cross cutting segments
Cutting segments
You’ve planned your design, selected and prepped your materials, checked and set your saw appropriately. Time to cut segments. In order to cut matching segments, you’ll need to set your outside length stop block and keep it clean. Regardless of how accurate you’ve set things, dust and debris not allowing for the stock to properly contact the table, fence and stop block will introduce errors. Once you’ve cut your first segment, you just keep flipping the stock to make the second cut with the stock against the stop block. The first cut was created when you separated the last segment free. It’s wise to start with your shortest length segment first. After you’ve cut enough to form a half circle, check again that the stackup gives you a workable situation. Gaps evident are only going to cause you more work later.
If there needs to be adjustment, now is the time to do it since you haven’t wasted too much stock. If all is good, complete cutting this lengths needs. Once done with this length, reset the stop block to the next dimension and cut those. When you run out of stock and need to start using the next piece, you obviously
will need to make that initial establishing angle cut. Needing only to be done once per length of stock, the loss is minimal.
Cut each group of segments until you’ve finished cutting everything. Some cut extra pieces of each length. I don’t, but do set aside the extra material should a replacement piece be needed. Depending on the quality of the cut, you may need to lightly sand any fuzzies off the segments if they will interfere with the gluing process. It isn’t often needed if you’ve used a sharp blade and good techniques. If you do need to de-fuzz, just a light scuff across the offending area will make gluing easier.
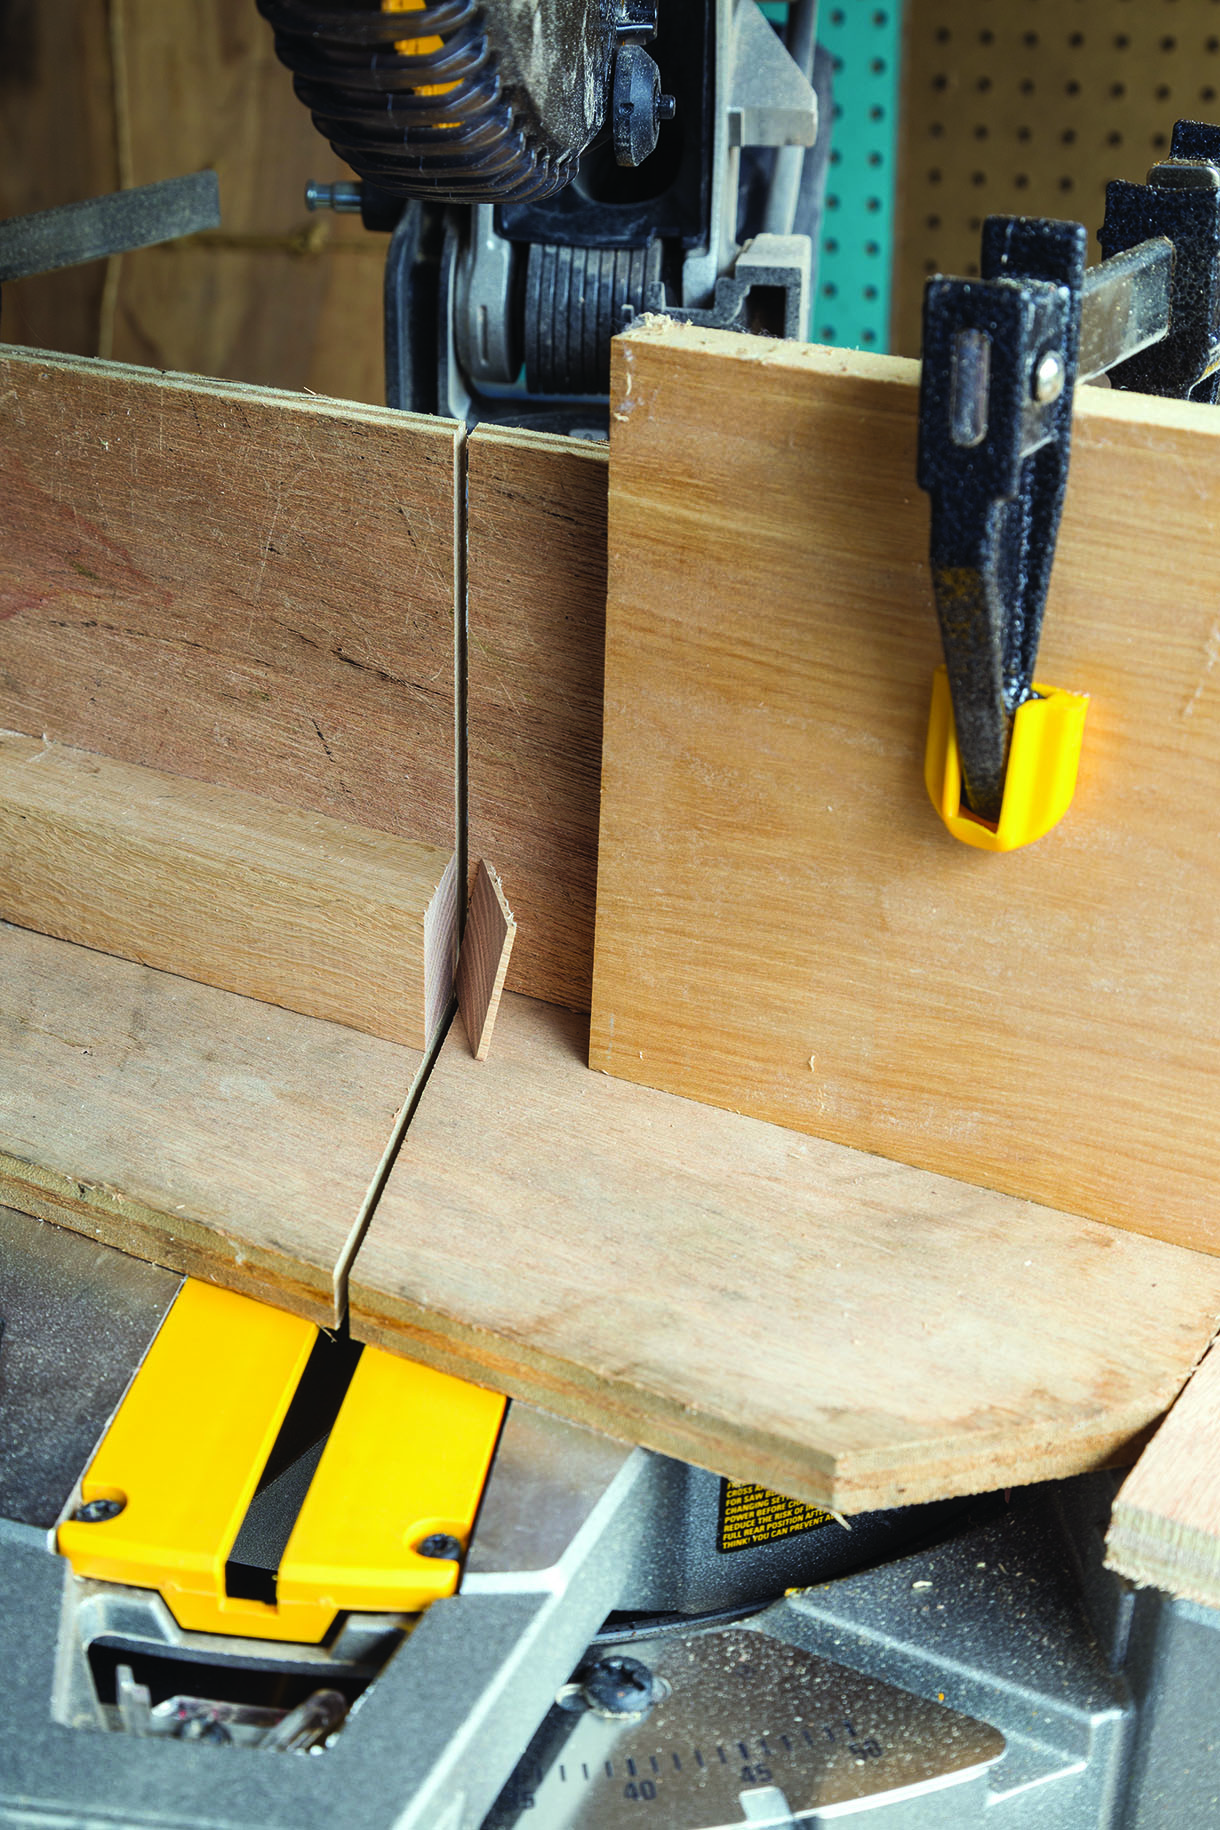
Setting the stop block accurately will help produce your planned results. Not the place for a tape measure
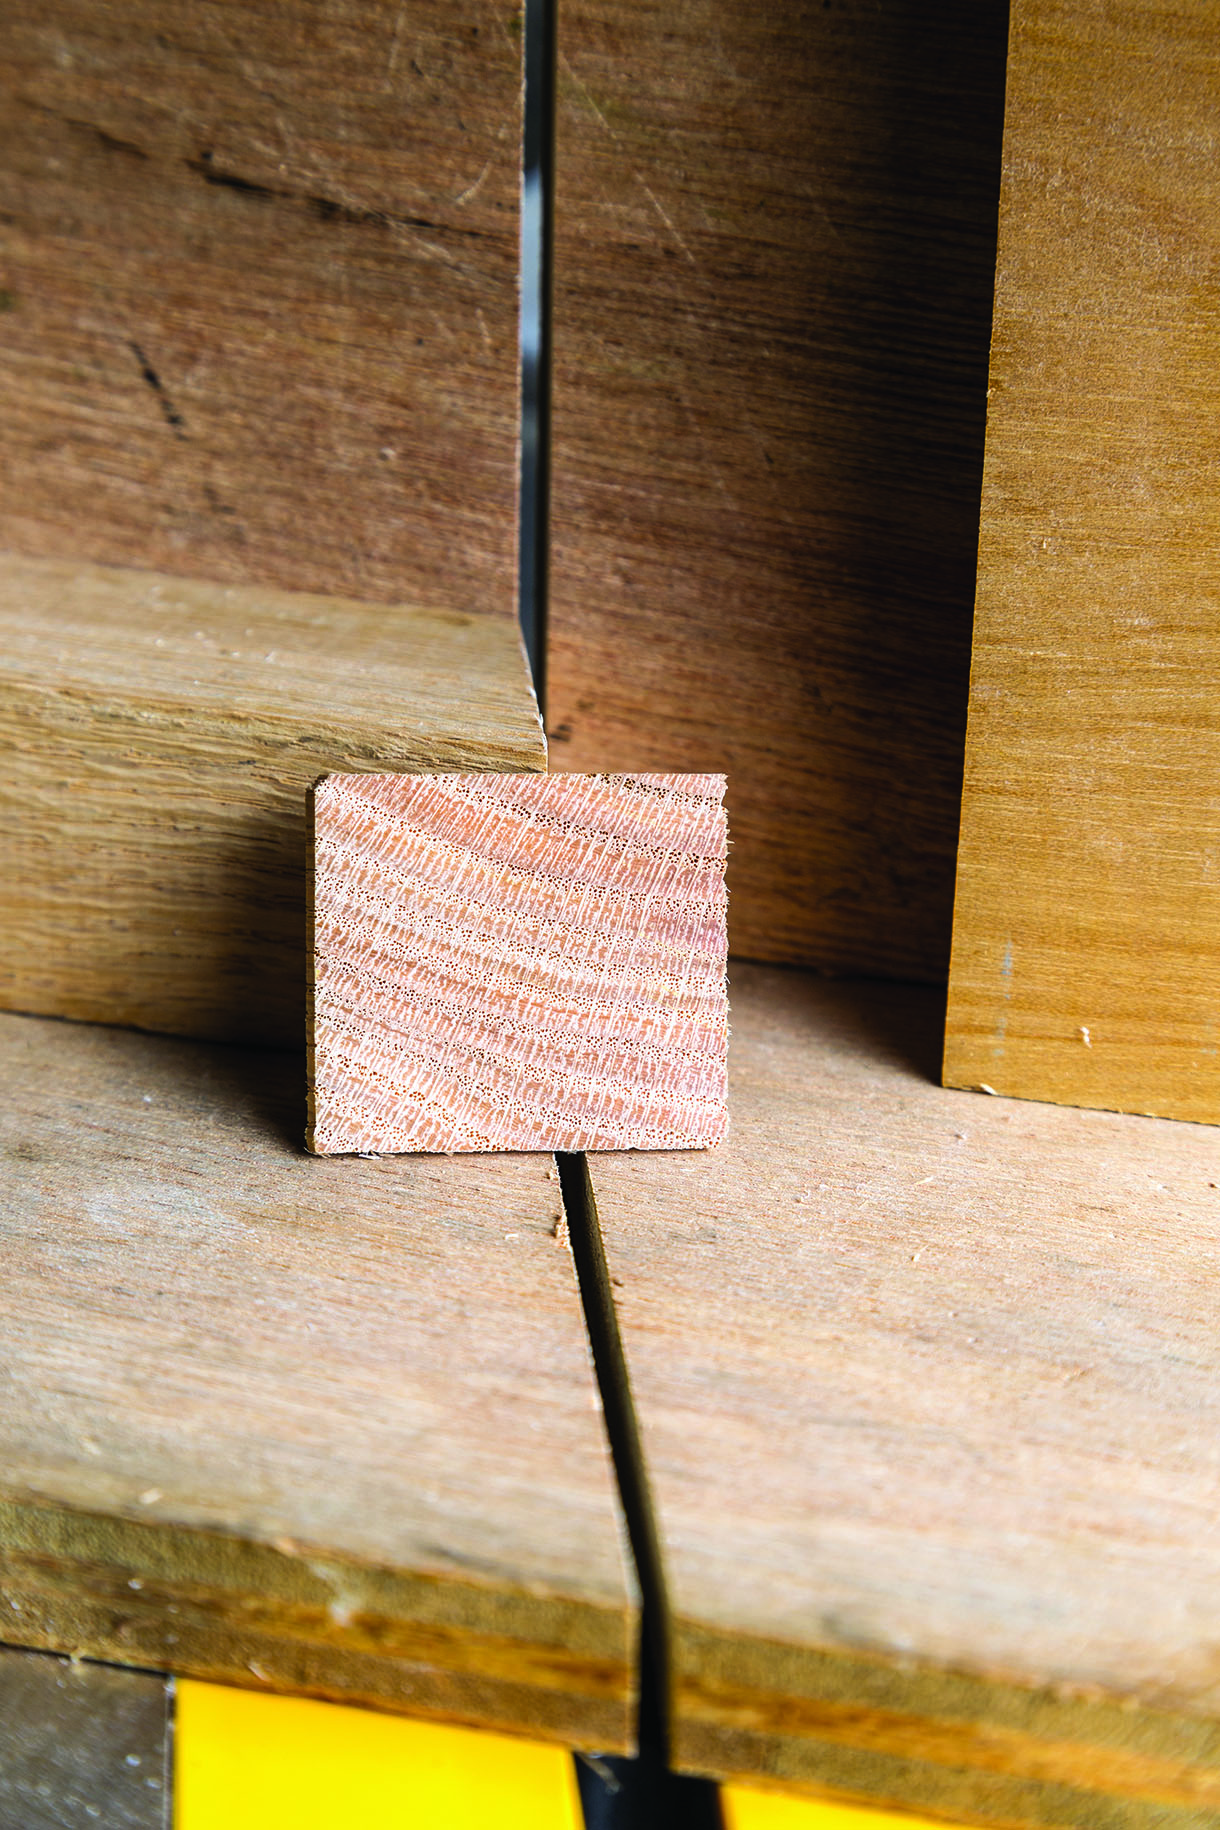
Make the initial angle cut to establish that. Flip the stock 180°, position at the stop and cut the segment
Making your shortest cut length first, take the first four and double check your angle stackup. Alter if needed
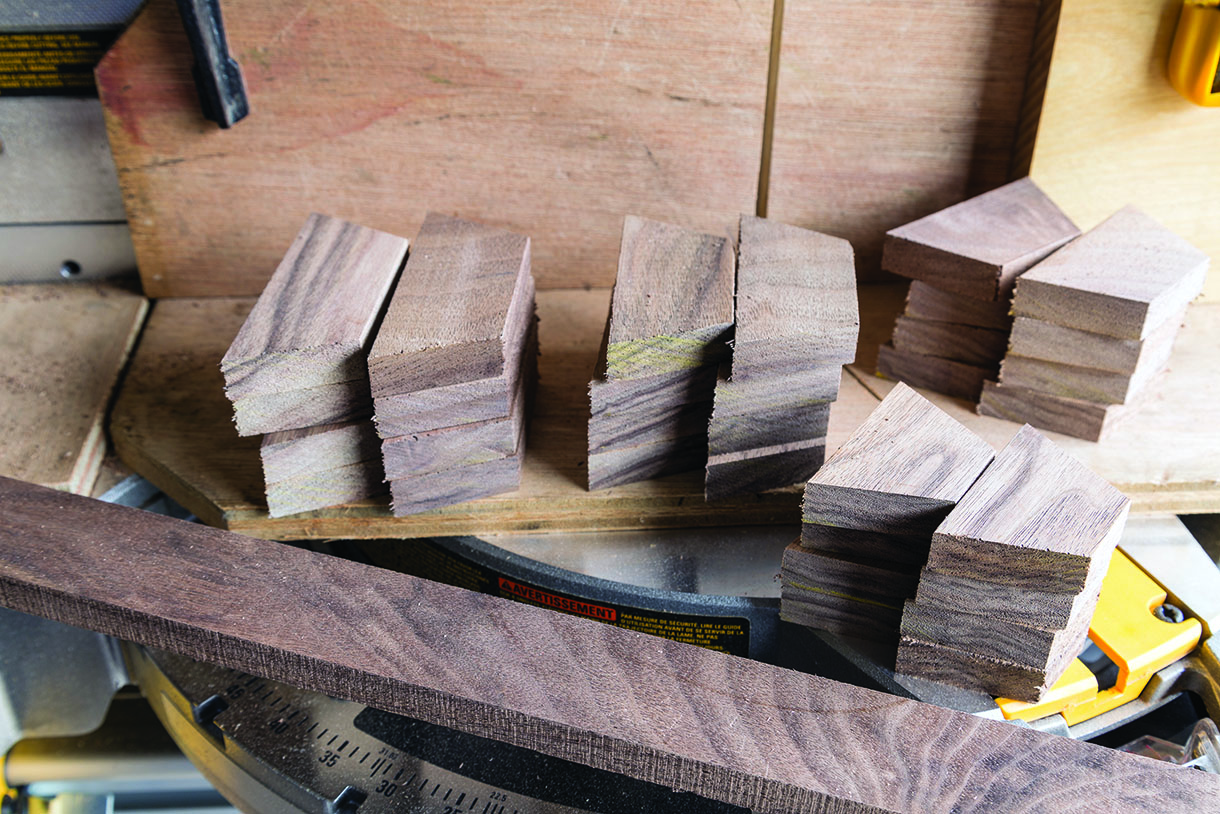
Once things are adjusted, cutting segments is quick work. Cut them all and save extra stock in case of errors later
Gluing the segments
With your favourite wood glue in hand and a flat surface work area properly covered, the glue up process can begin. I’ve never had a problem with any fresh wood adhesive. If it is out of date and stringy, get rid of it and buy a fresh replacement. Titebond is a favourite of many. Avoid using epoxies or Ca adhesives for gluing segments. Once you are an expert and know how and why to do it, you may on occasion select one of them depending on the circumstances. Not now. There are a variety of techniques for applying glue, spreading it, mating the pieces and clamping. For the clamping process use tape, rubber bands or hose clamps. The simplest and fastest method I know of is called the rub joint.
You dispense adhesive so you can coat both surfaces to be mated. Once evenly coated, place the two pieces flat on the work surface, put them together and rub them for a couple of moments. The glue will tack up and they will stick. The trick is to have them properly positioned with respect to each other when that moment occurs. At that point, continue holding pressure squeezing the two pieces together for a bit longer. Usually 10 seconds or so more is sufficient. Practise on scraps until you get it. Don’t waste your cut segments learning. Glue pairs of the proper ring segments together and let them cure.
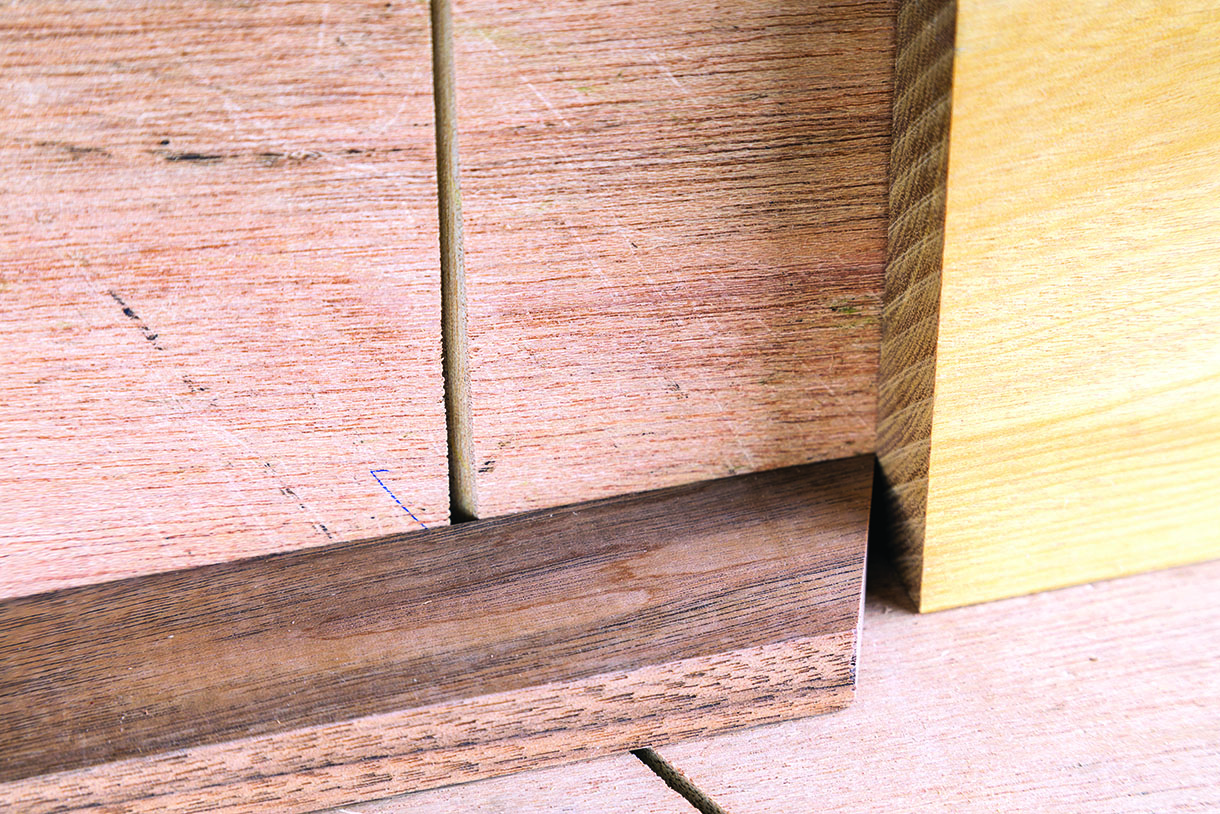
With care, you can continue to glue pairs of pairs together after a few minutes. I don’t rush things letting the sets of pairs to cure longer. Once you’ve gotten up to half rings, let them cure well. I wait overnight. Once the half rings are cured well, I mate them to be full rings visually. Now is when you’ll have to correct for angle error stackup. The two halves need to mate perfectly with no gaps in the to be glued surfaces. If they don’t, you’ll need to sand away the offending areas. Remove a bit from both halves until they meet perfectly. Minor errors can be done on a piece of sandpaper on a flat surface. More pronounced errors may need a trip to the disk or belt sander. Once corrected, you can glue the two halves together. The rub joint will work here. I put a rubber band or two around the perimeter to hold things in compression.
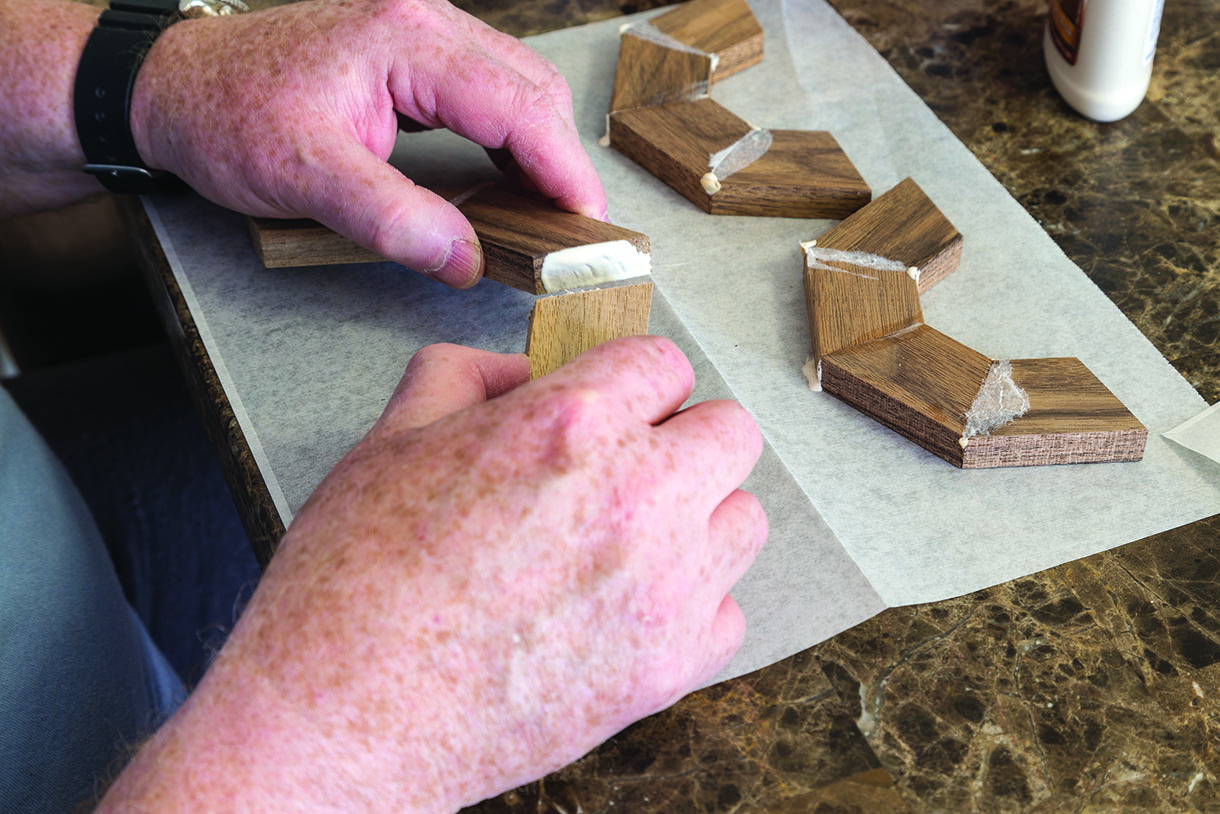
The ‘rub joint’ is a quick and easy gluing technique. It can be accomplished in moments, with no clamping
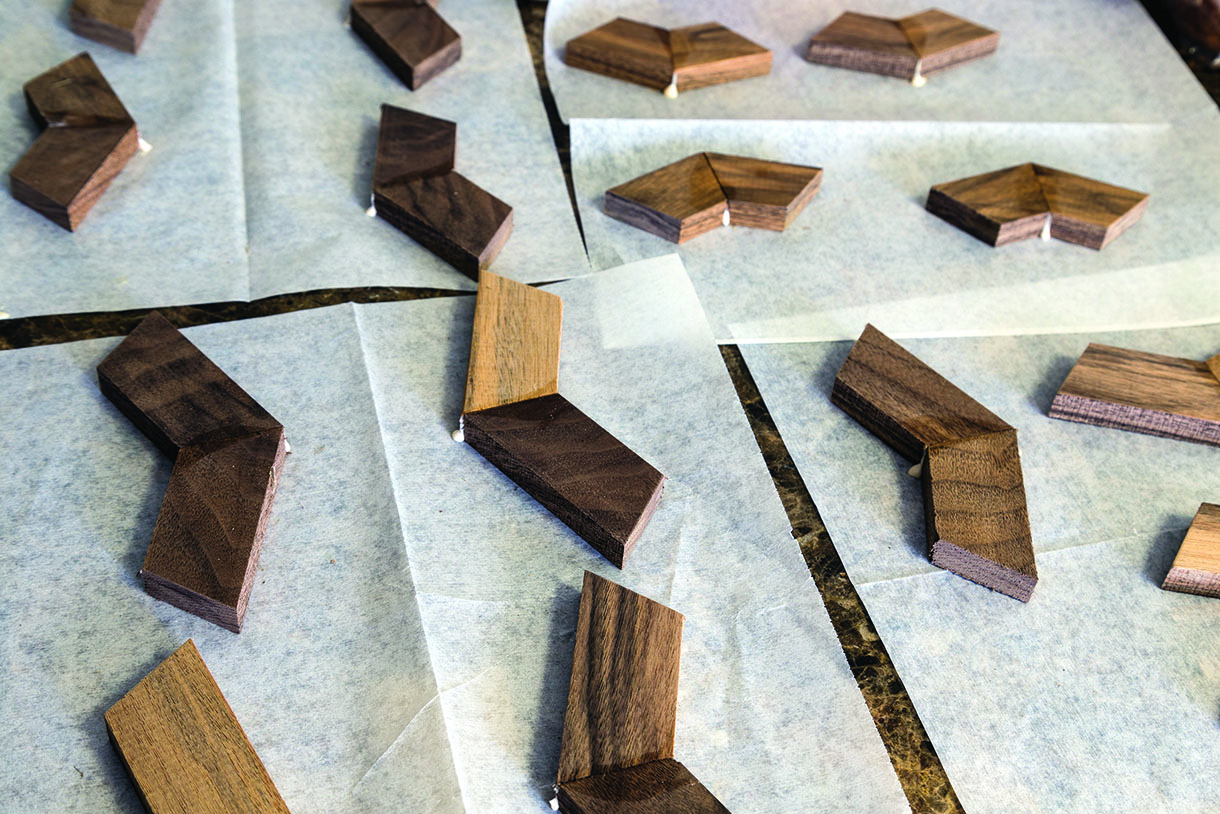
The segments are glued up in pairs and allowed to cure. Then pairs of pairs are glued up
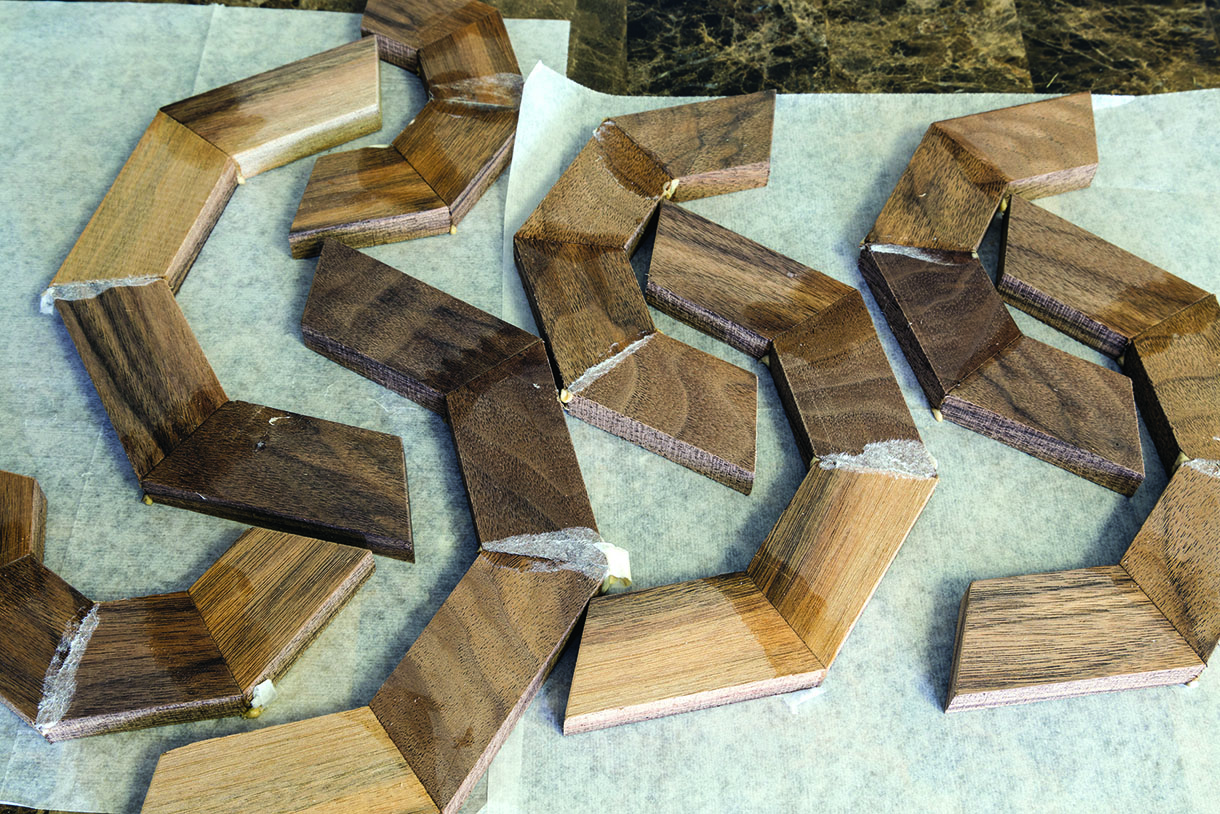
Once you’ve arrived at halves, any angle error needs to be corrected before full rings are created
When the two halves mated perfectly, they can be glued together. You may wish to use rubber bands for compression
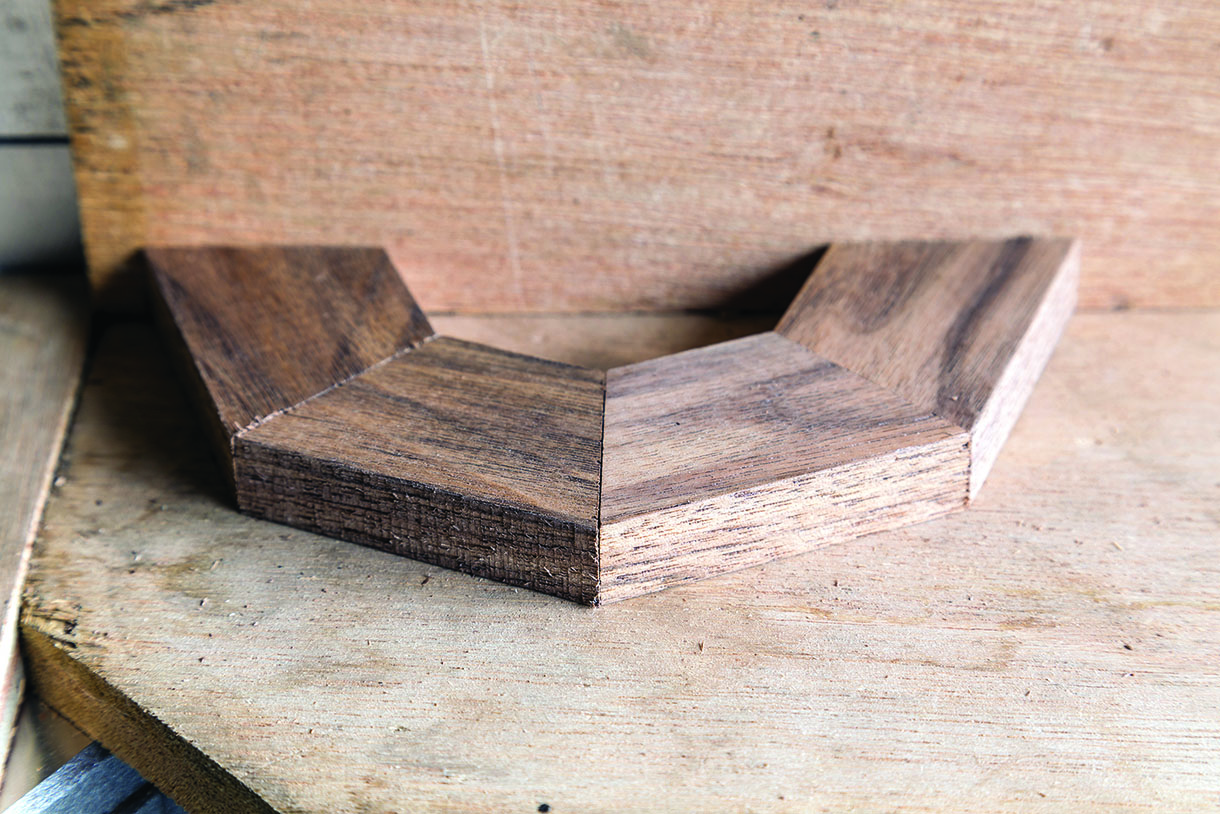
Gluing the rings into a blank
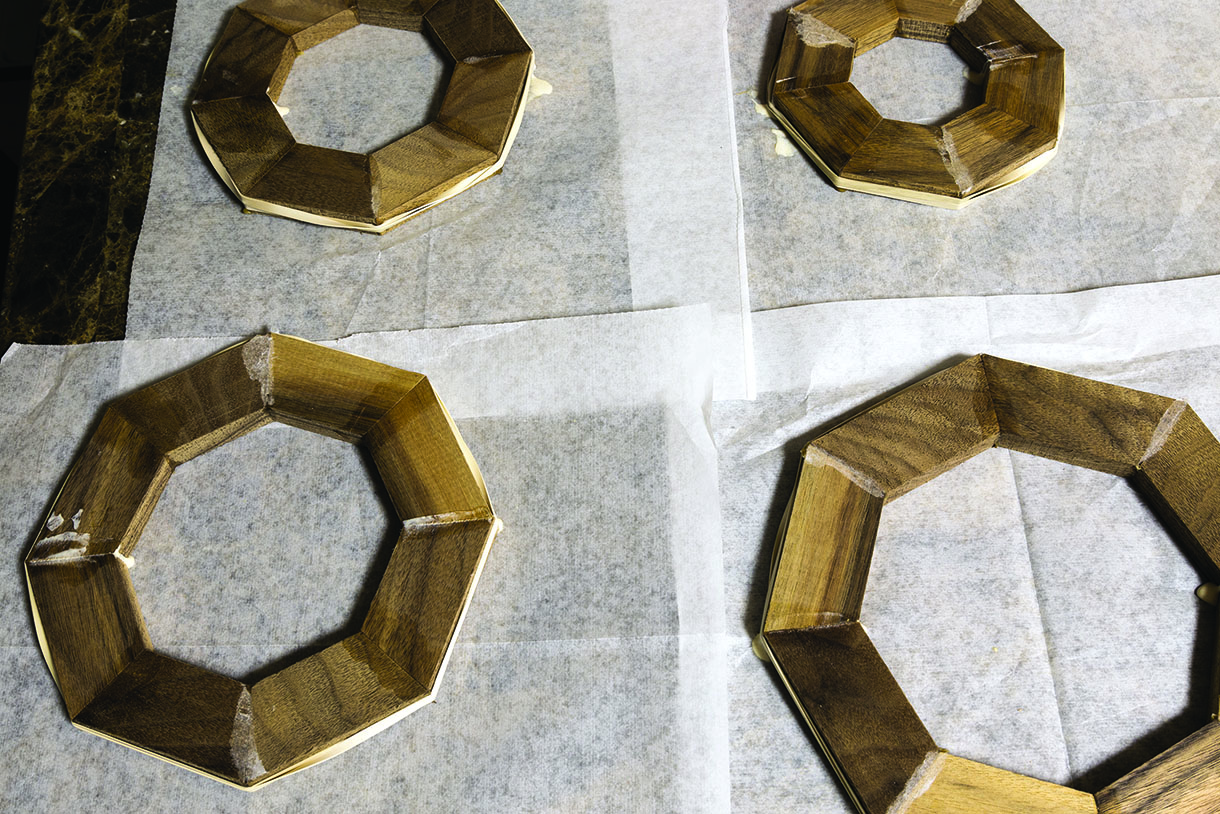
With the rings completed, they need to be flattened. The excess glue needs to be removed and any uneven joints need to be flattened. Carefully created rings can be prepped on a sheet of sandpaper on a flat surface. Attach your base to the waste block using adhesive and clamp. The glue will set well enough after a few minutes to continue with the next ring. I use my lathe as an assembly clamp but you can use a table and set weight on top of the ring for clamp load. Rotate each ring so the segment joints are staggered between rings. Putting them all in line begs for failure in the future. Staggered creates a much stronger assembly.
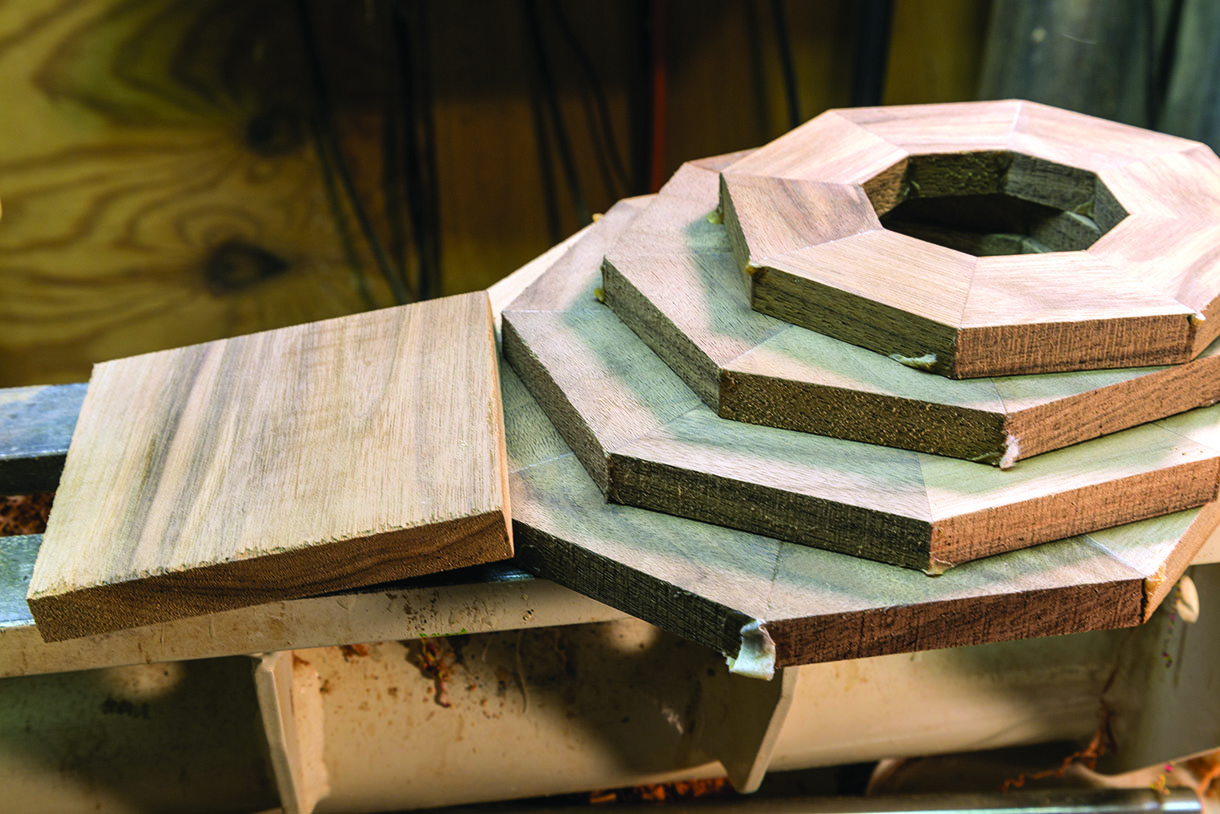
Glue squeeze out and uneven segments need to be sanded prior to blank glue up

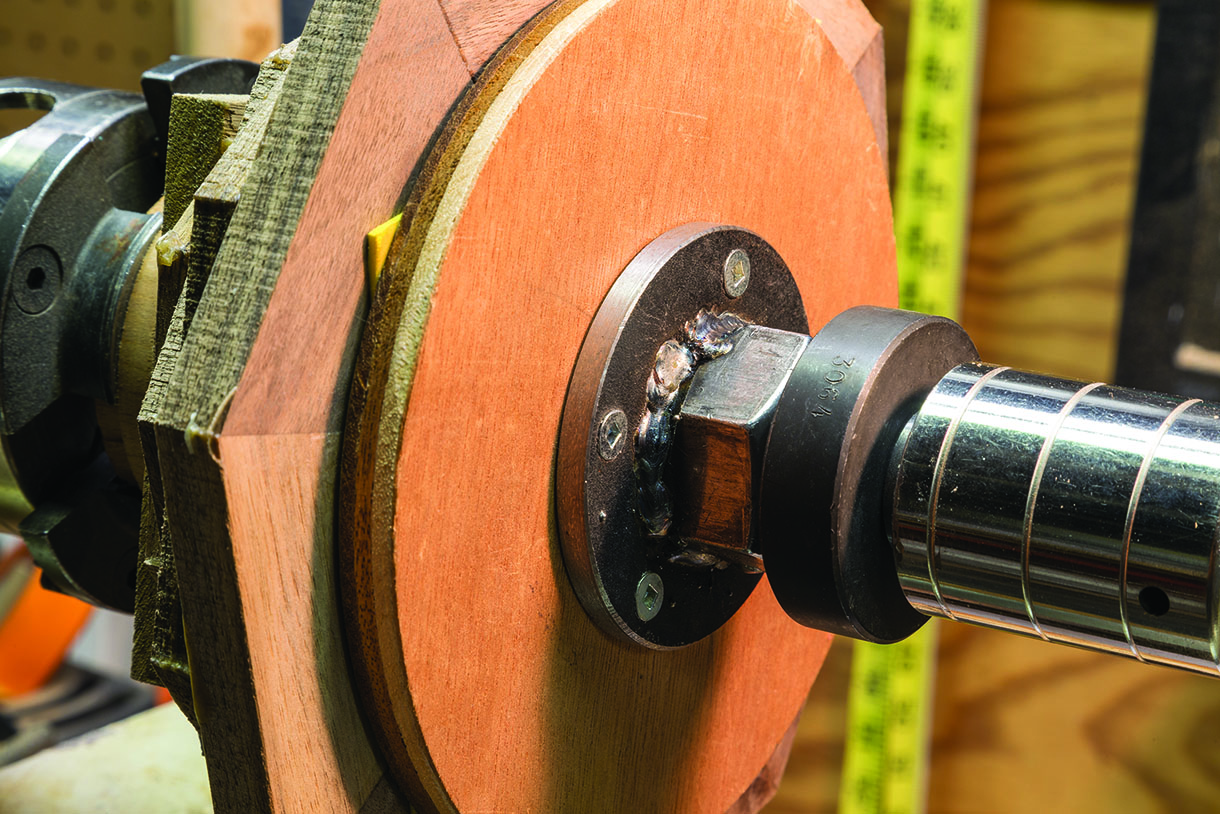
Waste block prepared, the base is glued and clamped in place using a home-made centring platten in the tail stock
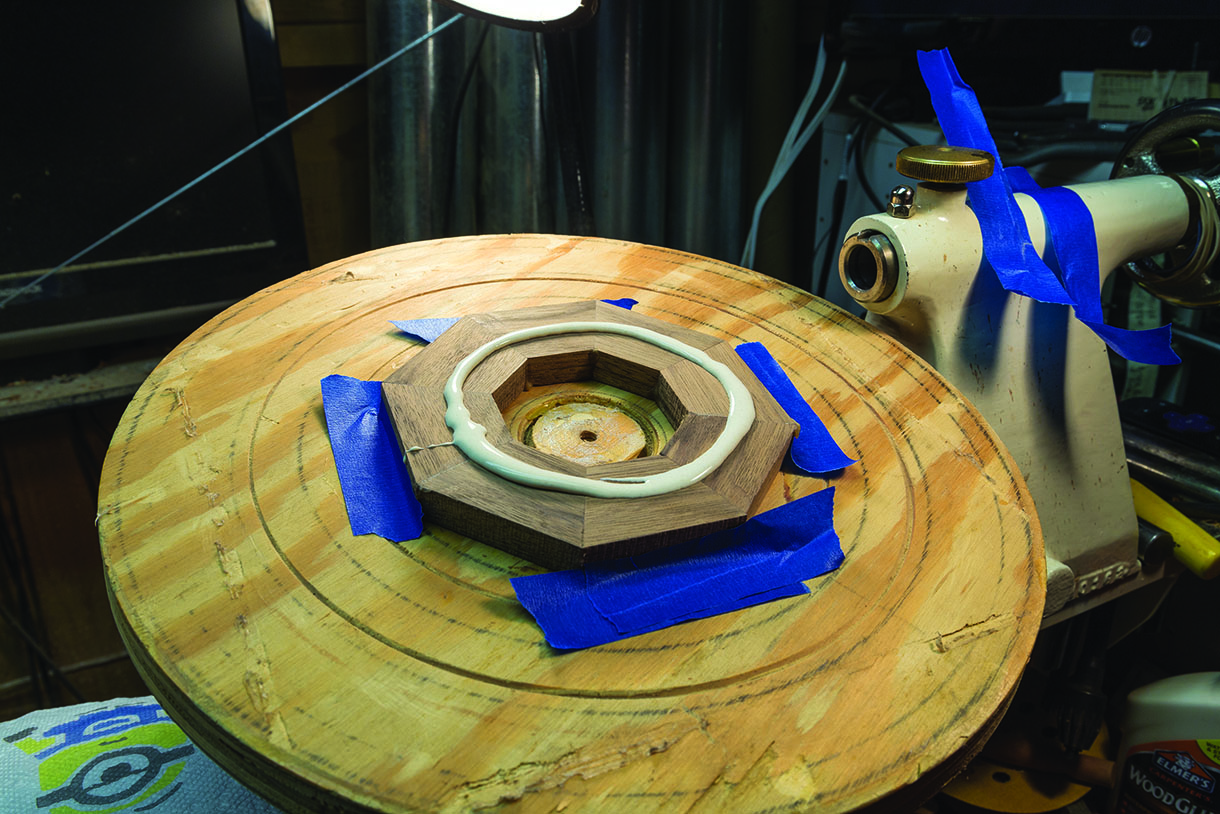
I can centre each ring, tape in place, apply and spread glue, put into tail centre, position and clamp
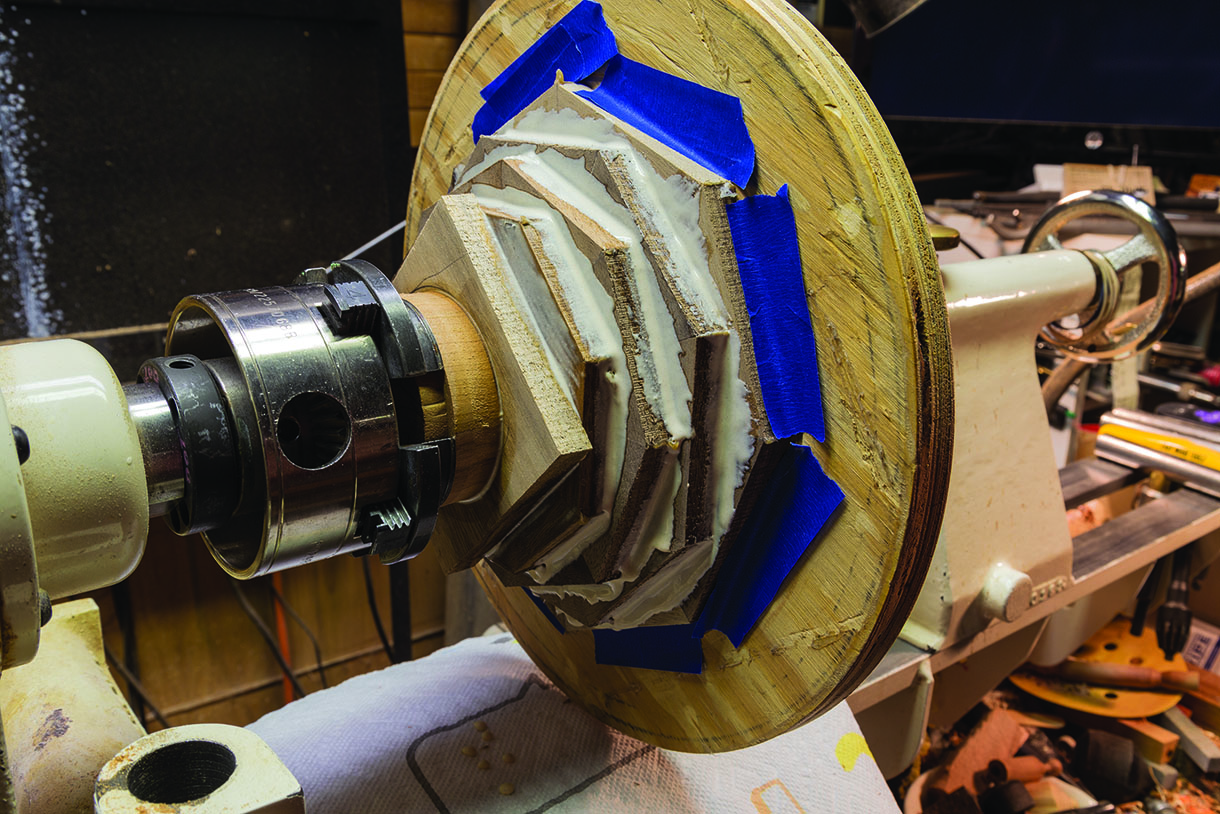
Regardless of your blank assembly method, glue up can be done in minutes and clamped overnight for curing
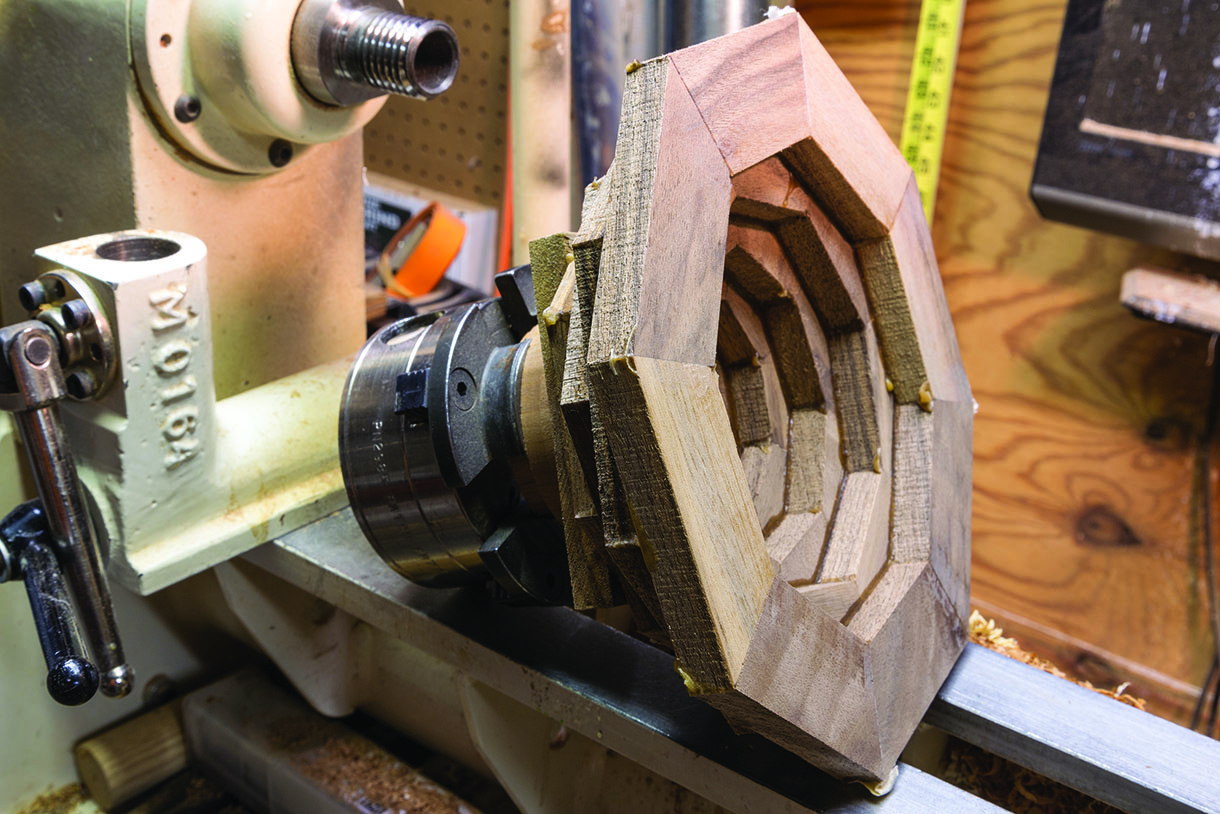
The completed segmented blank ready for turning
Turning, sanding and finishing
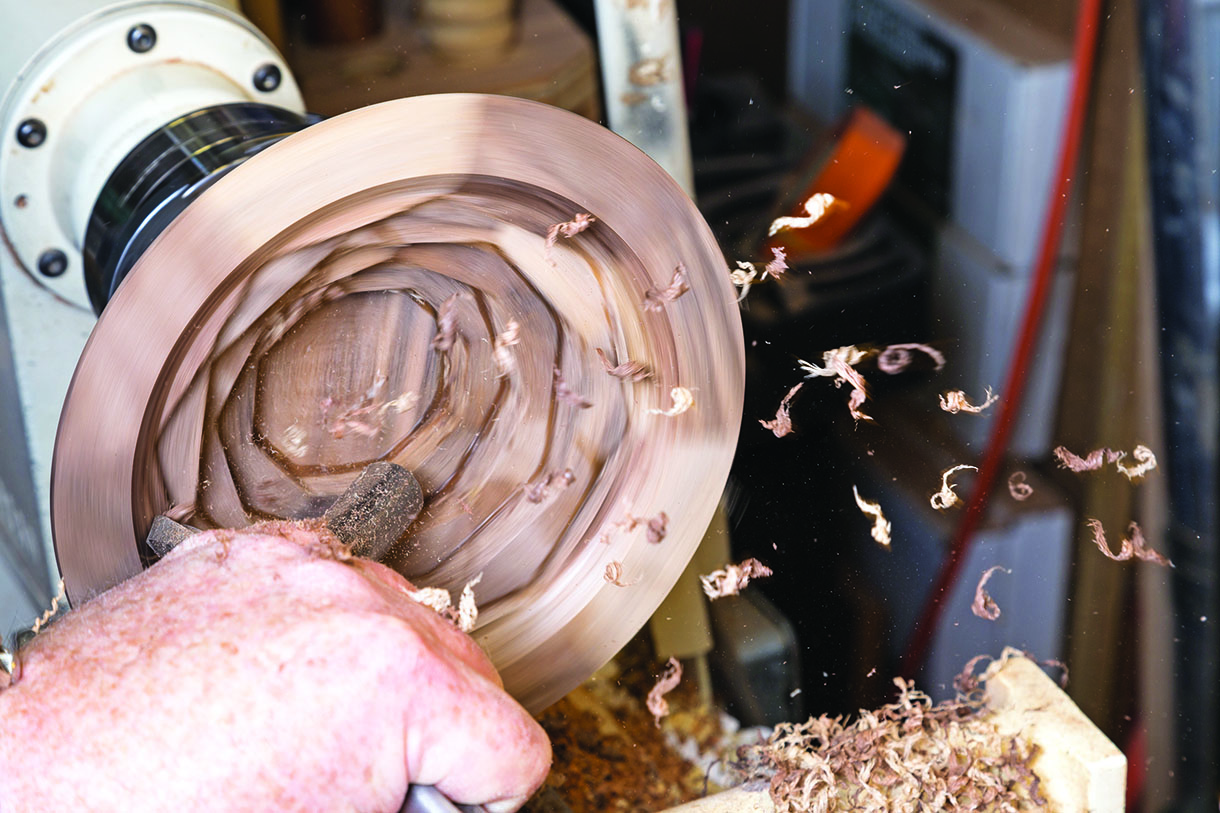
Not to be melodramatic, but there is no new news here. Once you’ve created your segmented bowl blank, or any other segmented blank, turn, sand and finish as you usually would. Good practices, such as tailstock support, sharp tools and light touch, and cutting downhill are always valuable. Sanding and finishing is likewise identical. The only huge difference is that you won’t run into end grain other than at our solid base. As such, you can use a scraper everywhere but there in our example. You won’t have the end grain coming around twice a rotation on the sidewalls as in the traditional bowl blank.
Like any bowl blank, there is value in using the tailstock for support until it needs to be removed
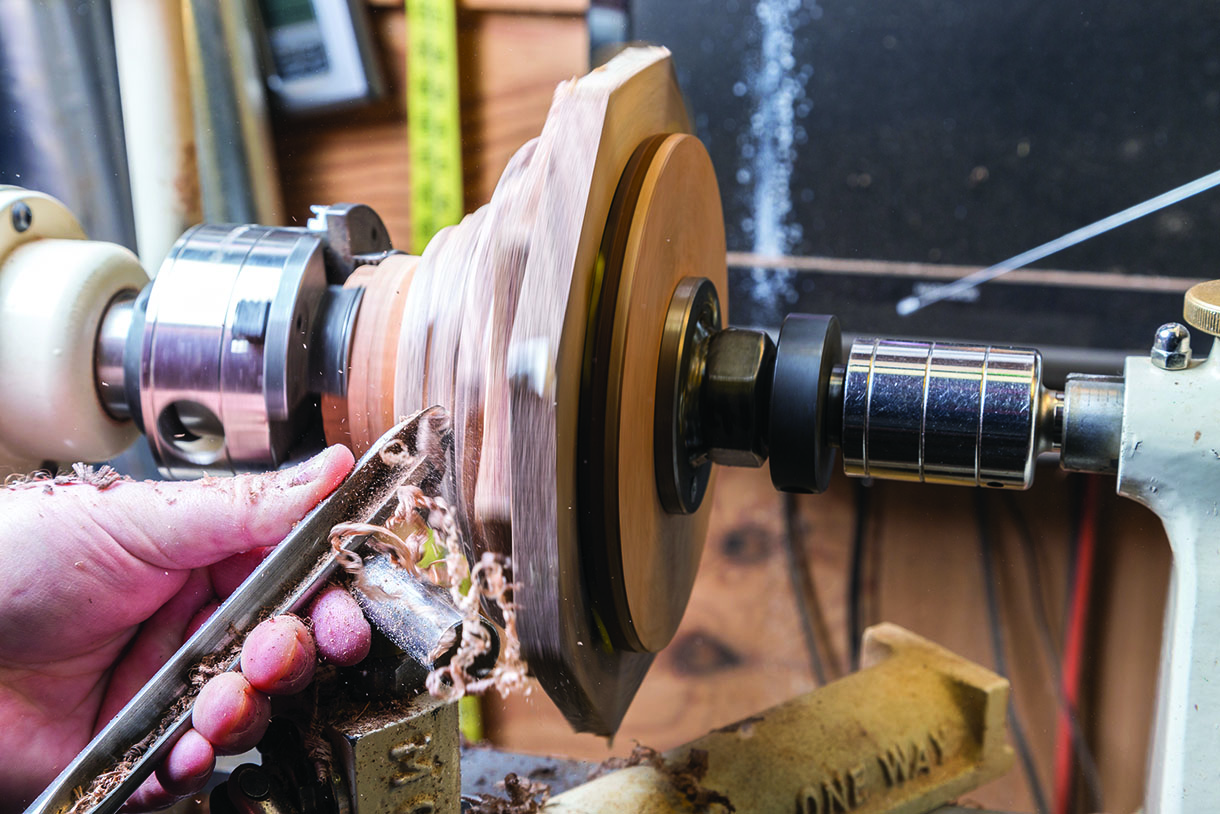
Turning a segmented blank is like other bowl blanks. Use the same tools, sharp tools, light touch, and cut downhill
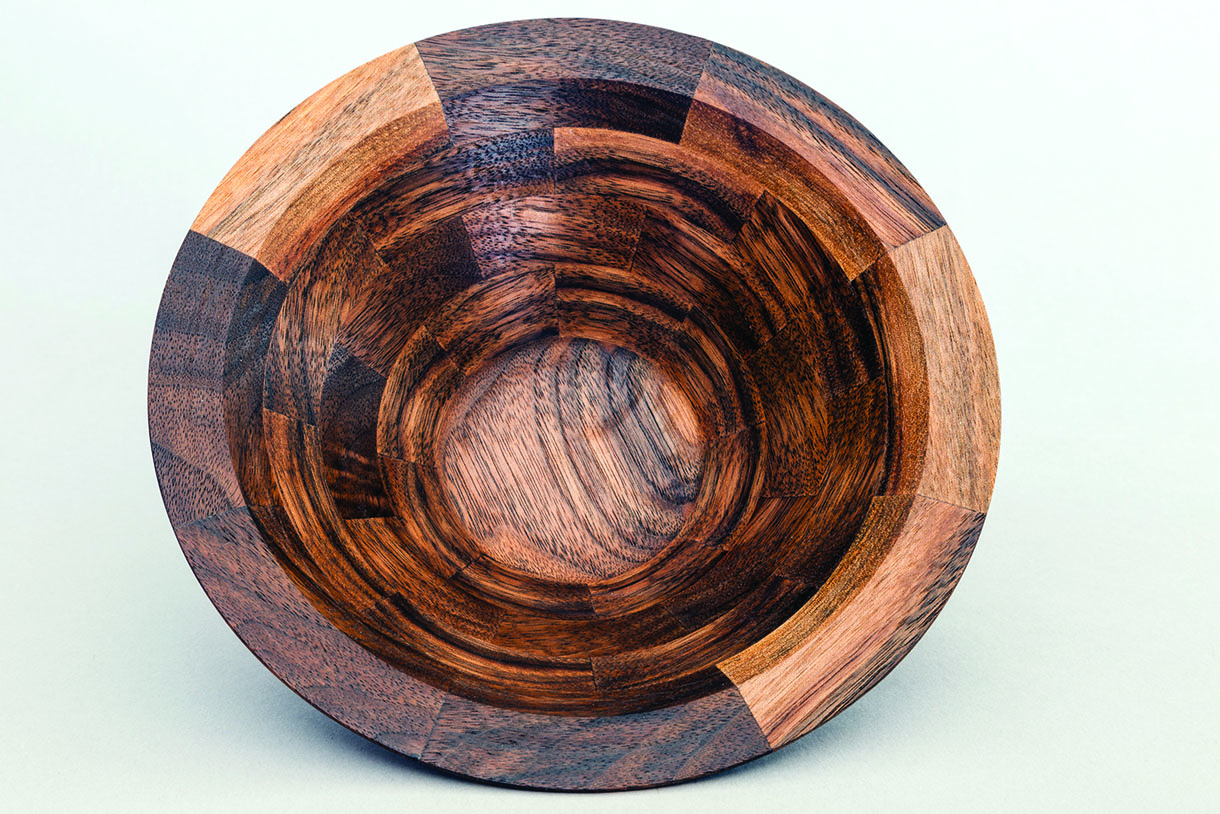
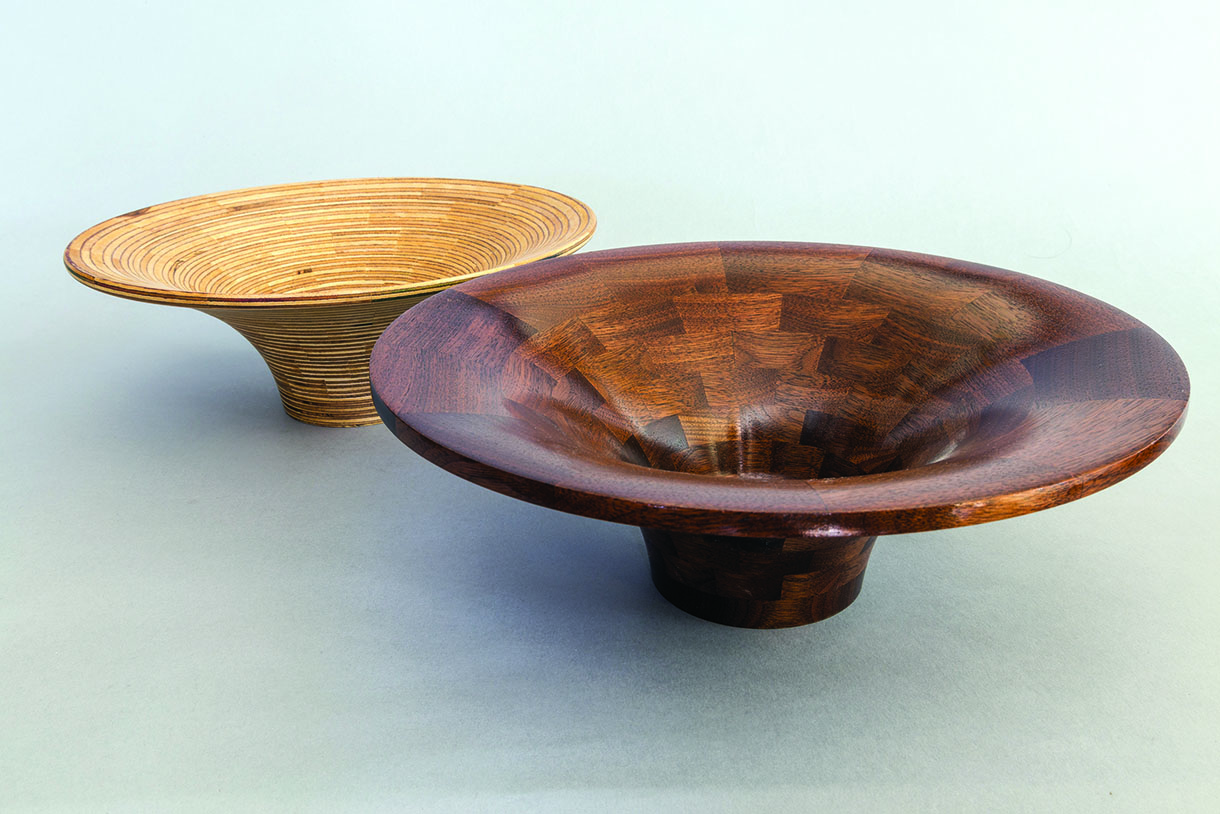
A simple segmented bowl made from some scrap walnut. A powerful technique that has tremendous potential
Conclusions
Perhaps this was simplistic for an entry into segmented turning. I hope not. The goal was to make as clear a picture on how to give it a try and why you should without big investment and lots of study. If you walk away with the understanding of the basics yet virtually no expense to adjusting your saw, you’ll have gained in all of your ’shop work. If you see how easy it is to create a turning blank of any size and proportion without the worry of cracking, checking or availability, I have succeeded. You now have the basic basics and can grow from here. Turning progressively as you build or combining pieces turned separately out of convenience or need await you. The creation of artistic feature rings from multiple species, intricate patterns and open segmenting hold future growth and exploration opportunities. You really have no excuses. The only thing above and beyond your standard turning resources is a saw. No table, band or mitresaw? You can always use a mitre box and hand saw to cut segments. Slower but once the segments are cut properly, nobody will know whether you used a mitre box or Felder table saw. You’ve got all you need to know to dip your toes into segmenting. Give it a try.
You’ll be surprised how much fun it is.
")

