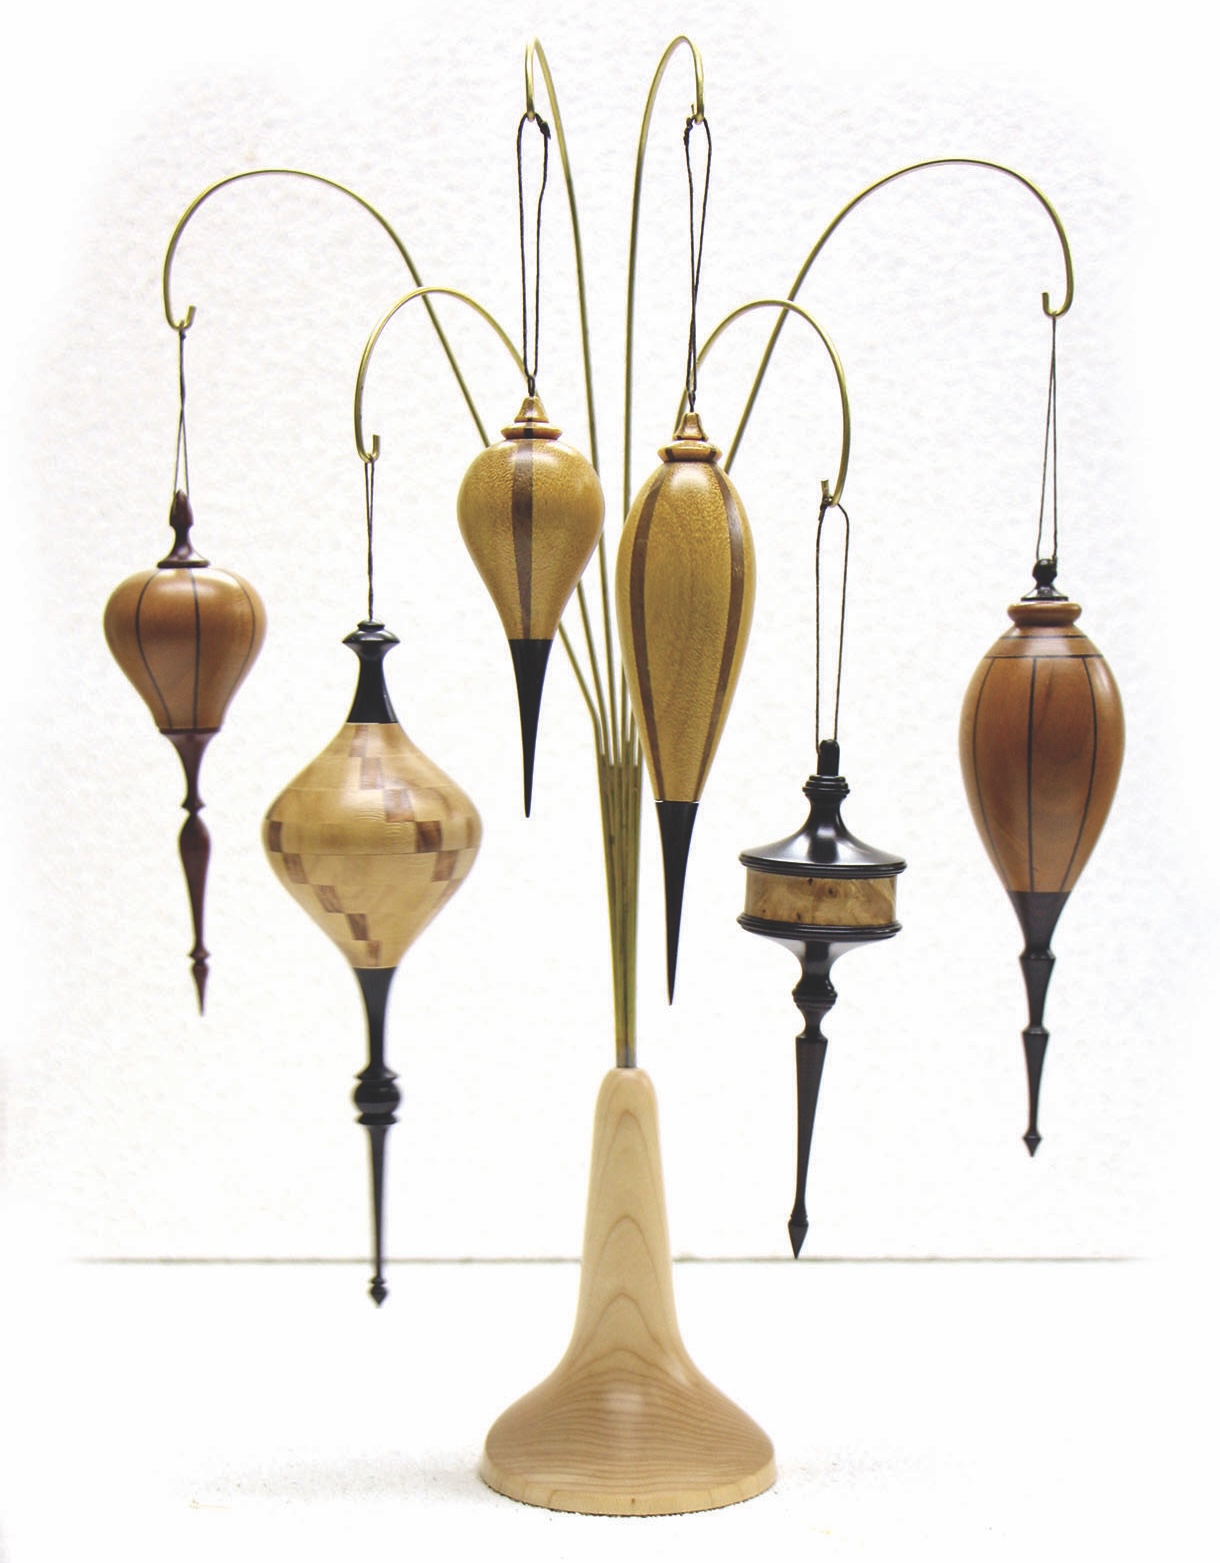
Christmas Ornaments:
Gary Miller provides some plans for Christmas tree decorations and explains his techniques for creating his stacked segmented ornaments.
Gary Miller provides some plans for Christmas tree decorations and explains his techniques for creating his stacked segmented ornaments
Christmas tree ornament plans
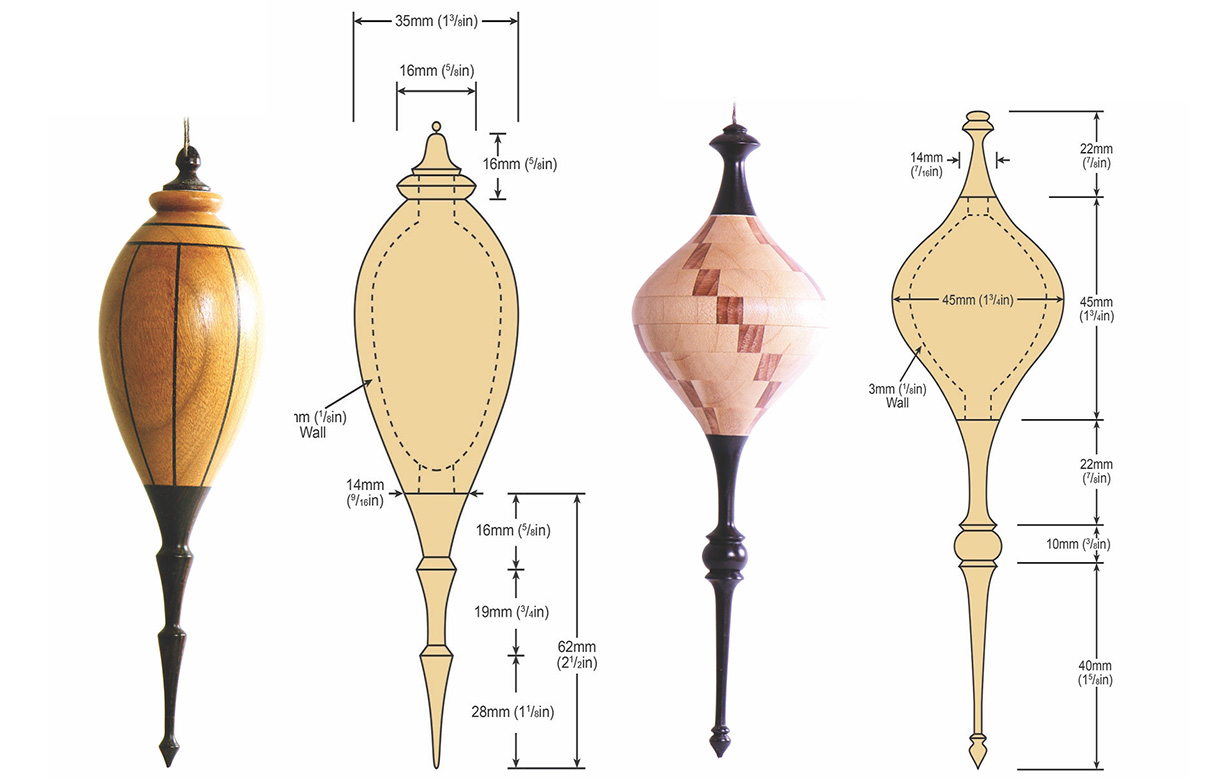
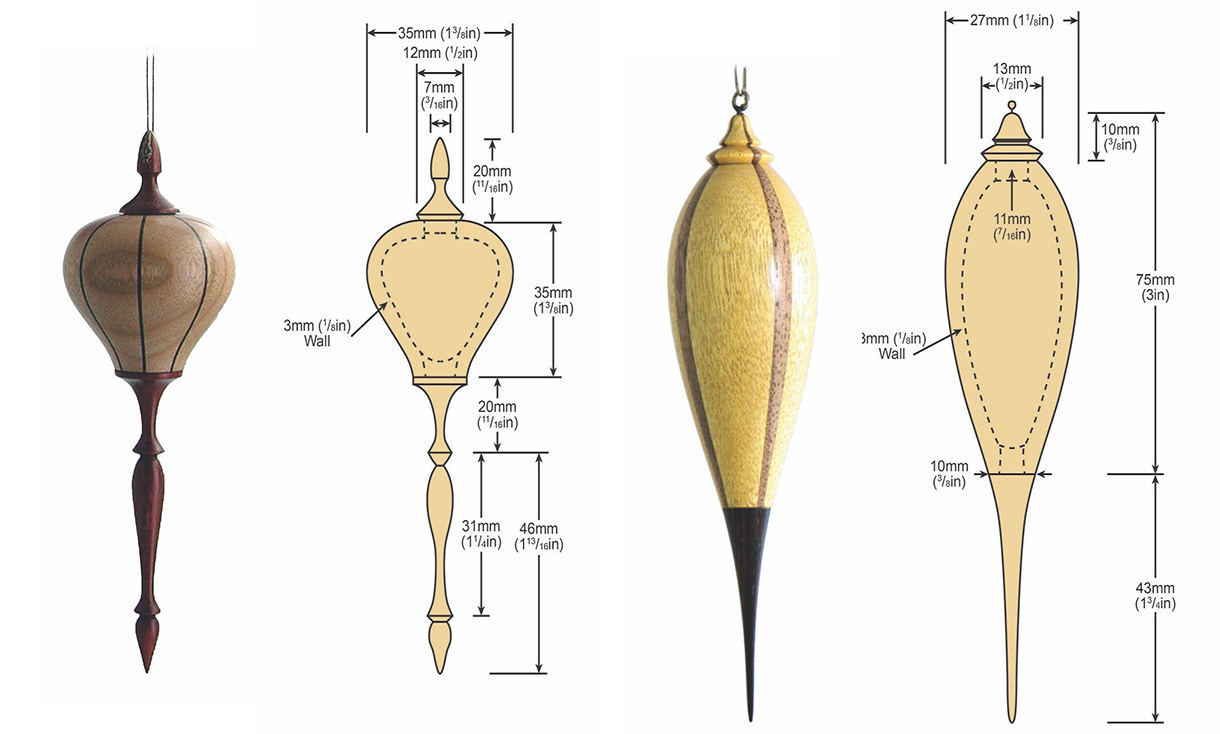
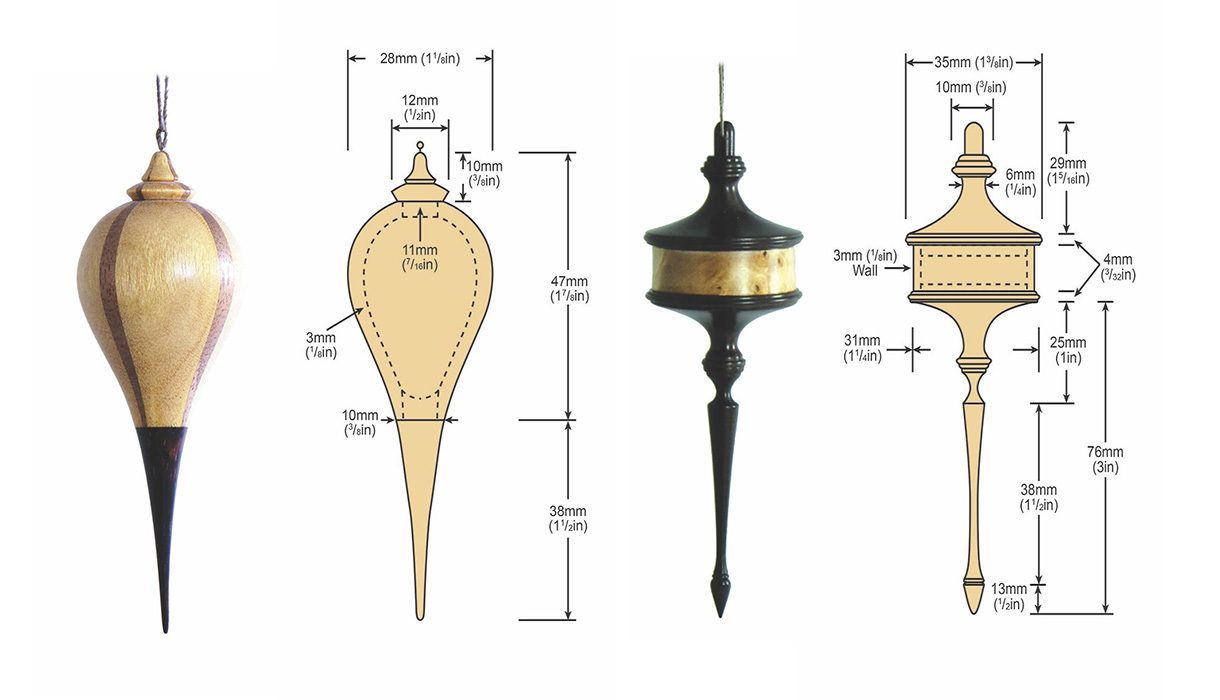 Drawings and how to resize them
To enlarge or reduce the size of drawings right click on the image to download it and then go HERE to watch a video on how to use paper with a grid to do exactly that.
Segmented ball ornament: constructing the blank
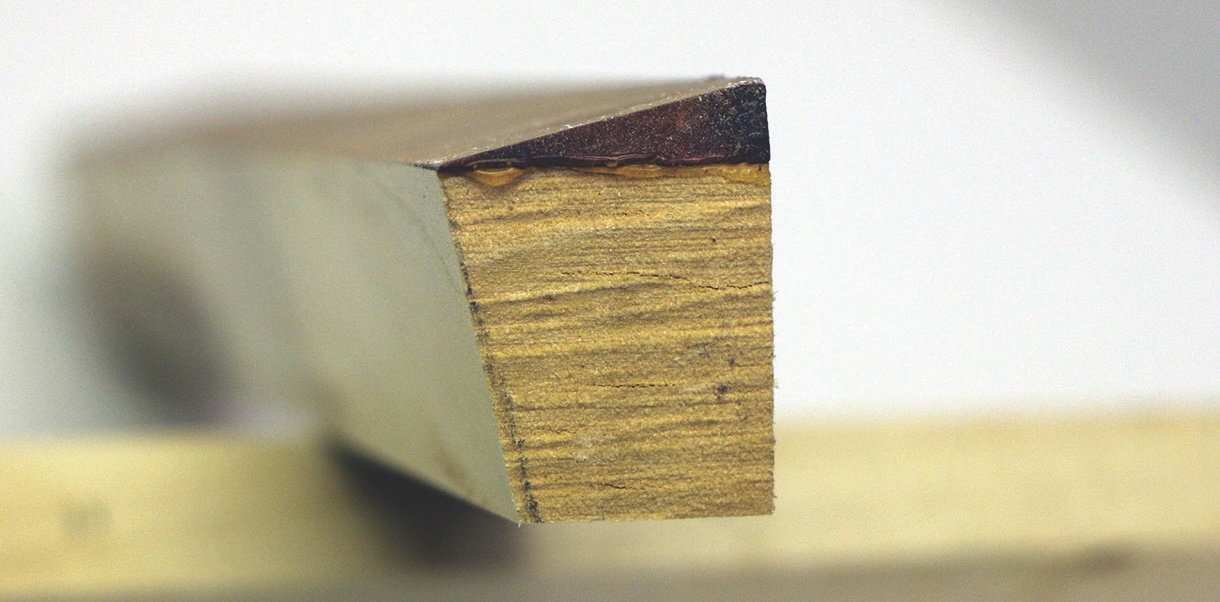
To create a segmented Christmas ornament requires accuracy and care, but the results can be stunning. To create the offset pattern shown on this ornament, glue and clamp a 6 x 25 x 305mm strip of dark material to each 25 x 25 x 305mm piece of light wood, making sure that the grain orientation is the same. Make three more. After the glue-ups are fully cured set your bandsaw at an angle that will intersect the outer edge and the opposite inner edge of the dark strip – approximately a 15° angle and cut the bevel on each of the glue-ups. Another options is to plane the angles. Use push sticks and take great care for your safety. Once cut, set the bandsaw table to 90° again. Place the thin edge of the ‘wedge’ on one of the glue-ups against the table with the wide edge touching the rip fence. Rip each of the glue-ups accordingly – again, with care for your safety. You have created a new 90° corner at the thin edge of the ‘wedge’ on each piece.
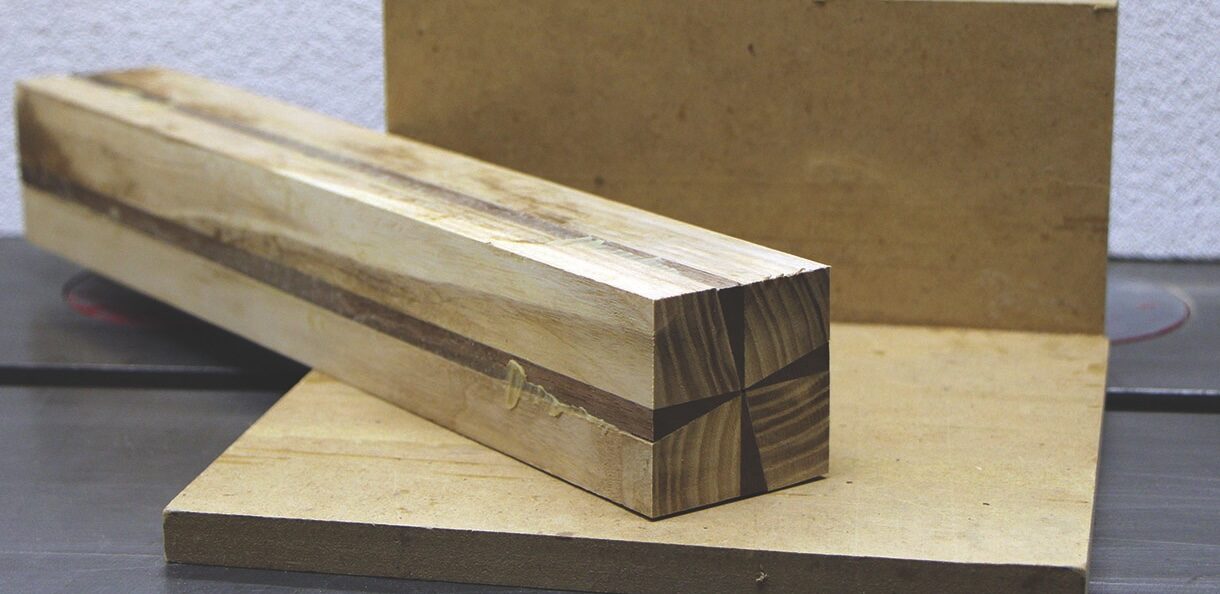
Next, place one of the glue-ups the-dark-‘wedge’-facing out and sloping down. Rotate the next glue-up so the tip of the ‘wedge’ touches the tip of the previously placed ‘wedge’ then glue them together (glue applied to both of the adjoining faces).
Glue the next two glue-ups to the first two, rotating each strip to ensure that the tips of the ‘wedges’ all touch (again, glue applied to both adjoining faces). Wrap wax paper around the bundle and take care with the clamping to keep the blank square and flush on all sides. The resulting blank will yield several 50mm spheres.
 Cutting the segmented sections
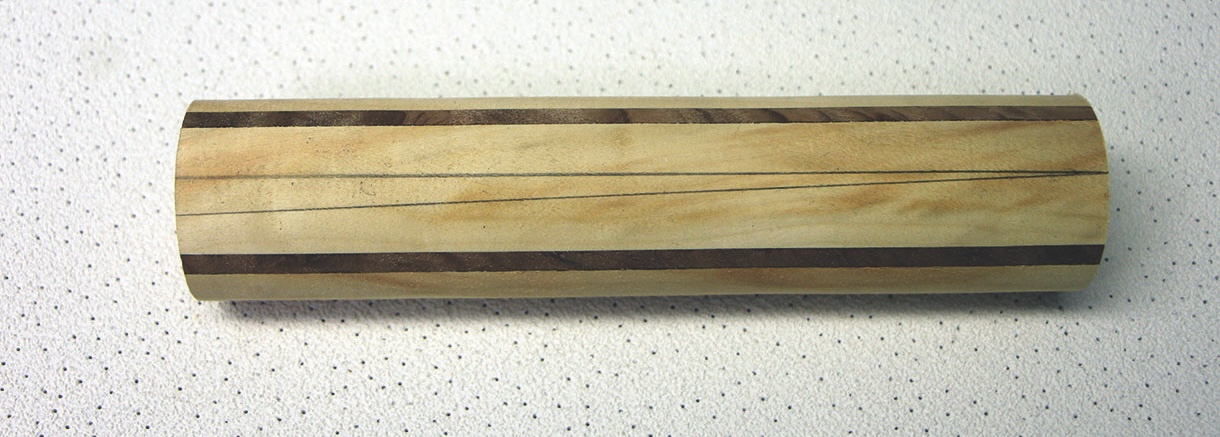
When cured, turn the blank to a 50mm cylinder. Square off one end of the cylinder. Use a mitre saw (or use a mitre gauge on a tablesaw). Note: Because you are cutting end grain and there will be no sanding, a fine, very sharp blade is best used for this and the following cuts to ensure clean, flat gluing surfaces. Mark the full length of the cylinder with two lines, wide apart at one end tapering to a point at the other end. Make one of the lines heavier than the other.
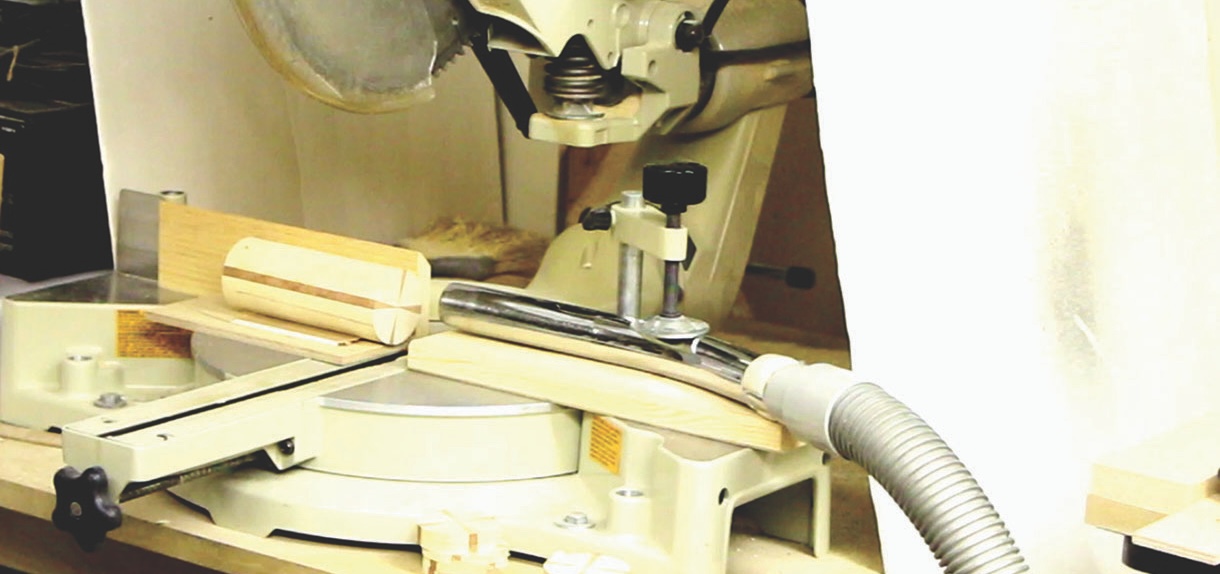
Make a simple cutting platform out of 12mm MDF and screw it to the mitre saw fence so that its edge is very close to the cutting path of the saw blade. Lightly clamp another piece of MDF (or scrap) 38mm away from the edge of the cutting platform (for a register location). Place a fine pencil mark on the cylinder 6mm from the end. Align the saw blade to where it will cut off the 6mm wafer. Insert a 25mm spacer between the edge of the cylinder and the registration piece. Bring the registration piece up tight to the spacer and clamp the registration piece in place. Remove the spacer. Clamp the vacuum nozzle to the registration piece and turn on the vac. Cut off the first wafer. It will immediately be sucked up against the nozzle, clear of the saw blade. Remove the wafer and place it face down on a table. Repeat until you have eight wafers, stacking them in order (watch the converging lines). Remove any fuzzy fibres with light sanding.
Gluing up the segmented discs
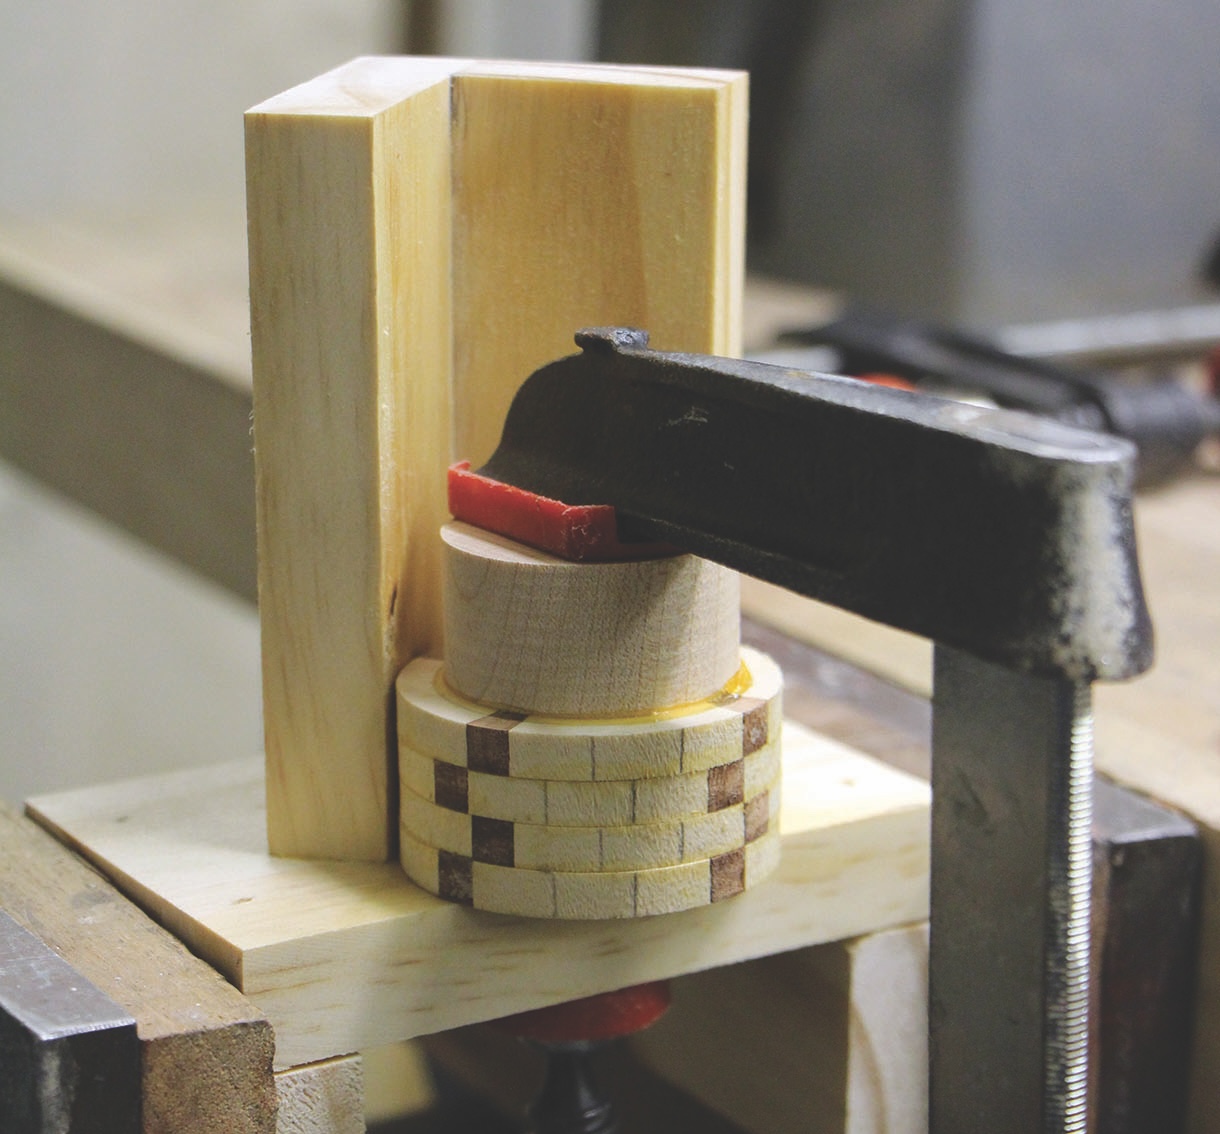
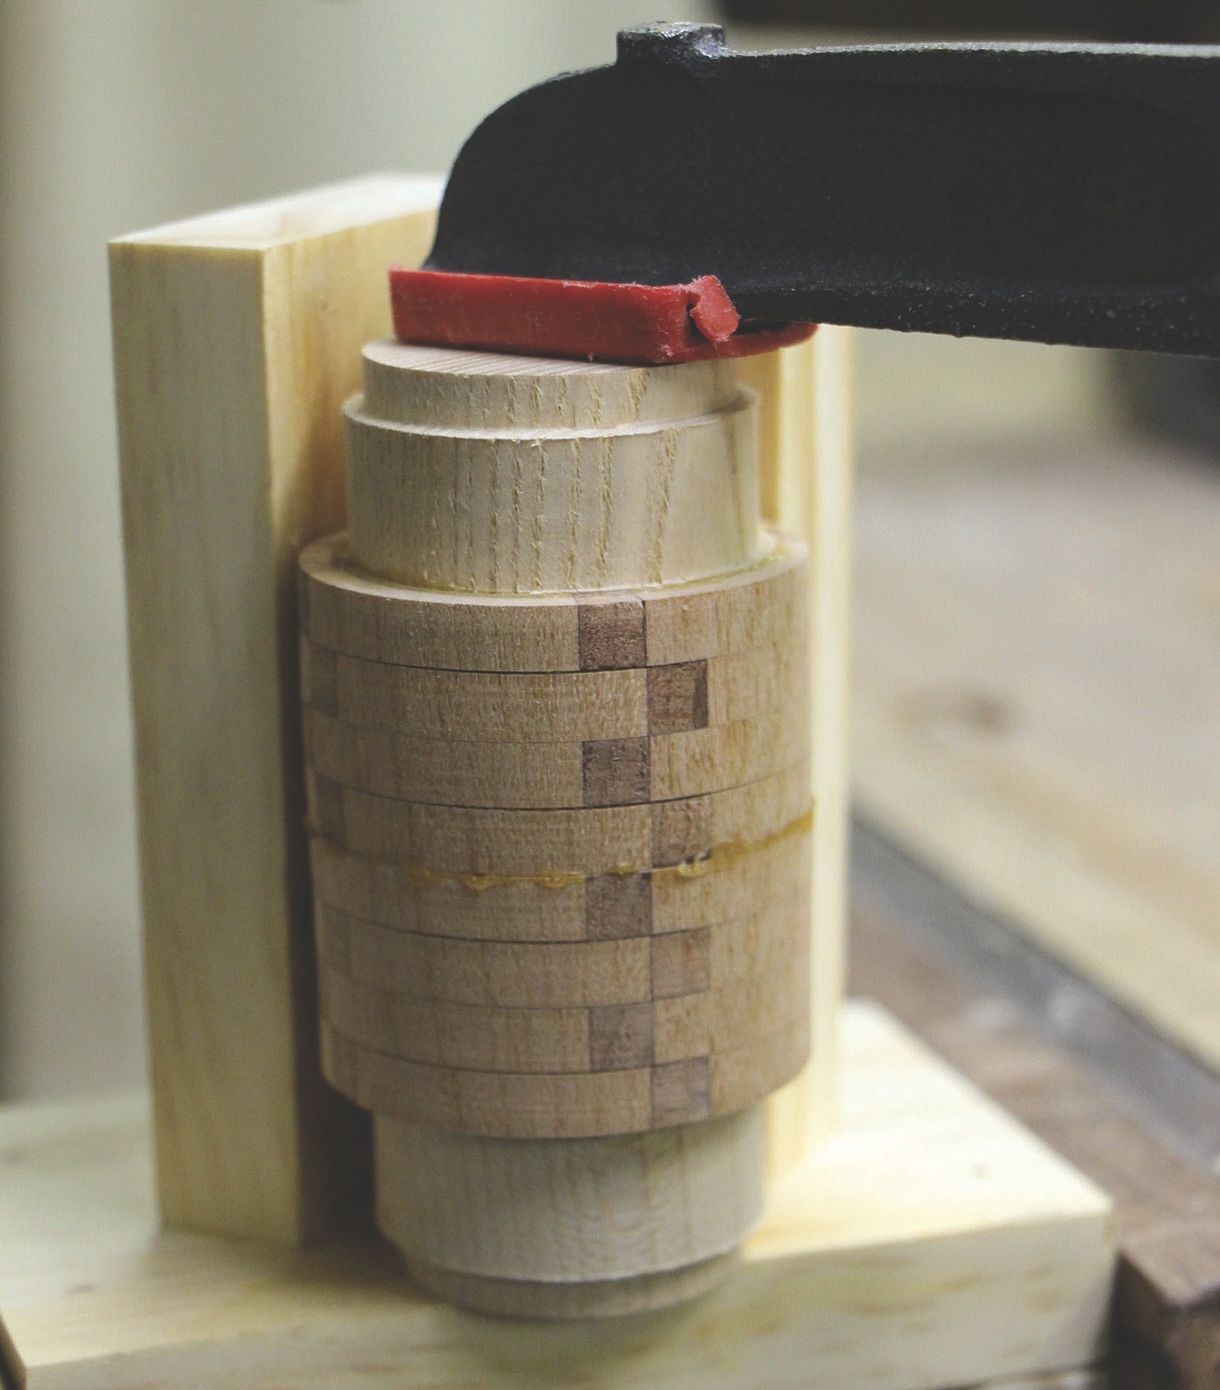
Make two simple gluing jigs – effectively a base and two upright pieces of wood at 90° to each other. Separate the stack of wafers into two piles. Take the first wafer on pile No.1 and draw a 38mm circle on centre with a compass. On the opposite side of No.1 apply a generous layer of glue. Take wafer No.2 and apply a generous layer of glue. Place No.2 wafer on top of wafer No.1 (glue to glue) aligning the converging lines to ensure correct orientation and apply hand pressure to force out excess glue, and wipe off. Continue as above with the remaining wafers. Keep them in order and right side up by using the converging lines as a guide. Before clamping, re-align the wafers to alternate the dark segments. Glue a 38mm dowel of waste wood onto the first wafer centred in the previously drawn circle. Place the stack onto the gluing jig, waste block up, force the wafers against the ‘V’ of the clamping jig. Clamp carefully to ensure proper alignment of the segments. The second pile of wafers are glued and clamped in exactly the same way except the circle is drawn on the back of the last wafer and the waste block glued there. The two stacks eventually form a single ornament blank with waste blocks at each end but before gluing them together it allows you to hollow each piece.
 Turning the ornament
Mount stack No.1 in a chuck with the waste block facing out. Turn the waste block concentric and make a chuck-mounting tenon. Reverse mount the stack in the chuck. Lightly turn the stack concentric with a spindle roughing gouge. Drill a pilot hole to 20mm depth. Using a spindle gouge, hollow from the centre out until it conforms to the hollowing template. Repeat the procedure with stack No.2. Return to the gluing jig and glue the two stacks together being careful to maintain the alternate pattern of the dark segments. At this point,the blank will have a waste block on each end.
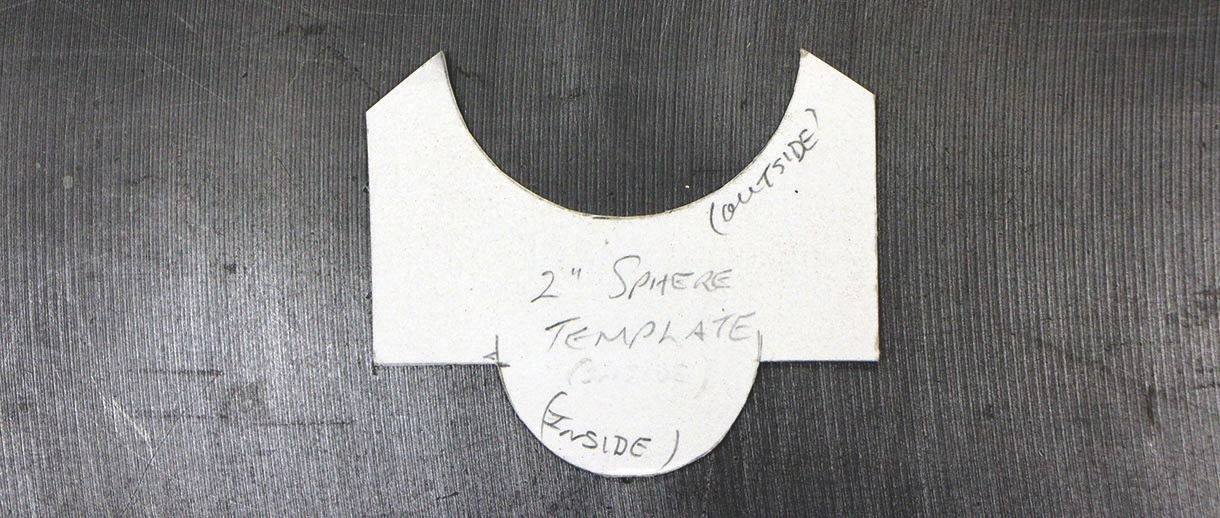
 After the glue has cured, mount the ornament blank in the lathe chuck – on either waste block – and bring up the tail stock. Part off the outer waste block. Measure the diameter of the cylinder with callipers. If necessary trim the length of the cylinder to the same measurement (a little off each end). Using a drill chuck in your tailstock, drill a 6mm hole into the outer end right through to the hollowed out area for the hanger knob. Move the tailstock up to stabilise the blank. Assuming you have a 50mm diamter cylinder, mark a line on the segmented cylinder 12mm from each end. Mark another line 12mm in from the perimeter on each end face (you will have to cut away a bit of the waste block at this location). Mark another line at mid-point on the cylinder. Now, using a spindle gouge, turn a 45° chamfer between the two lines at each end. This creates a rough, symmetrical semi-spherical shape. Gradually trim a little off each hard corner until the ball fits the outer template.
 NOTE: The cylinder is end grain for its full length. Turn from near the centre line down towards each end. As you turn closer to each end of the cylinder, the fibres at each joint are more prone to tear out (especially if the wafers were not perfectly glued). A light touch is necessary with a very sharp gouge. On the waste block end, you won’t be able to turn all the way to the centre. As you turn into the waste block, aim at the centre point but leave at least 10mm of the waste block attached to facilitate sanding/finishing.
When you’re happy with the fit to the outer template, sand the exterior of the ball to a fine grit eliminating any small areas of tear-out at the joints but maintaining the ball shape. Before you part it off, apply a finish. I use Ultrashine cut-n-polish to refine the surface before I do any final finishing.
The hanger knob
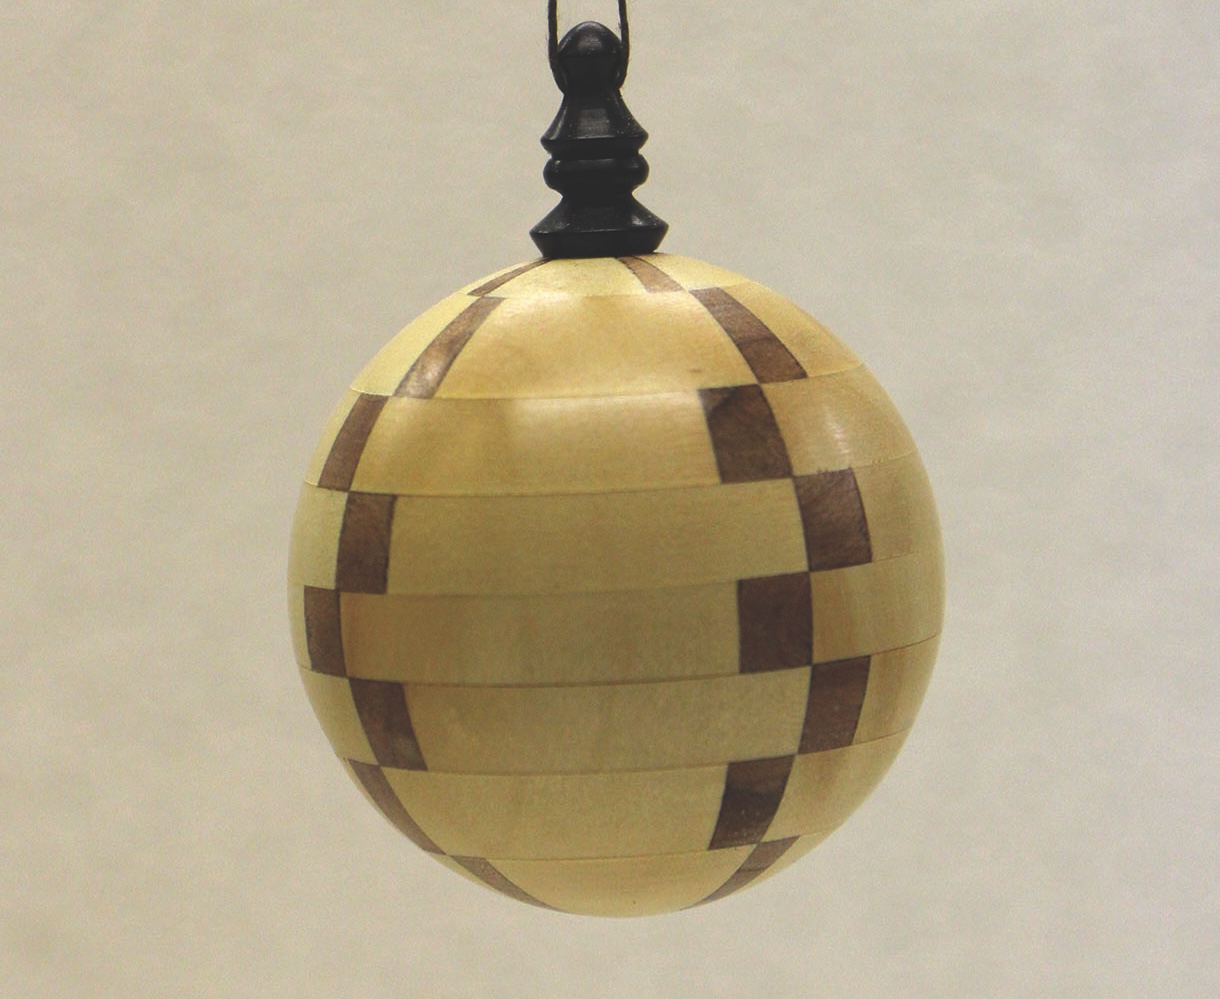
I used a small piece of African blackwood and mounted it in a chuck and turned about 38mm to 10mm diameter. I then turned a 6mm tenon to glue into the ball and shaped the next 20mm to a pleasing shape. After sanding and applying a finish it was glued into the ball. I drilled a small hole through the hanger knob and ran a length of black thread through it to form a loop for hanging. Put a drop of thin CA glue on the knot to keep it from unfurling. That’s it, you’re done! Now make a bunch more!


")